-
Products
-
SonicPlatform
SonicPlatform is the cybersecurity platform purpose-built for MSPs, making managing complex security environments among multiple tenants easy and streamlined.
Discover More
-
-
Solutions
-
Federal
Protect Federal Agencies and Networks with scalable, purpose-built cybersecurity solutions
Learn MoreFederalProtect Federal Agencies and Networks with scalable, purpose-built cybersecurity solutions
Learn More - Industries
- Use Cases
-
-
Partners
-
Partner Portal
Access to deal registration, MDF, sales and marketing tools, training and more
Learn MorePartner PortalAccess to deal registration, MDF, sales and marketing tools, training and more
Learn More - SonicWall Partners
- Partner Resources
-
-
Support
-
Support Portal
Find answers to your questions by searching across our knowledge base, community, technical documentation and video tutorials
Learn MoreSupport PortalFind answers to your questions by searching across our knowledge base, community, technical documentation and video tutorials
Learn More - Support
- Resources
- Capture Labs
-
- Company
- Contact Us
How to Configure Virtual Assist on UTM appliances


Description
Virtual Assist allows users to support their customers' technical issues without having to be on-site with the customer. This capability serves as an immense time-saver for support personnel, while adding flexibility in how they can respond to support needs. Users can allow or invite customers to join a “queue” to receive support, then virtually assist each customer by remotely taking control of a customer’s computer to diagnose and remedy technical issues.
 NOTE: Virtual Assist is license based.
Resolution
There are two methods to provide access for customers to gain support through Virtual Assist:
1) Enable customers to access the portal after receiving an email invitation.
2) Provide an “Assistance Code” for customers to enter when accessing the portal without the need for an invitation.
In this scenario we will configure Virtual Assist and provide access to customers using both methods above.
 NOTE: Enable SSLVPN Access should be checked on the WAN zone.
Configuring the Virtual Assist settings.
- Login to the SonicWall Management Interface.
- Click on the Virtual Assist tab.
- Navigate to the Settings page.
- Enter an assistance code of maximum eight (8) characters. This code will need to entered by the customer if not using support with email invitation.
- Check the option Enable Support without Invitation if an email invitation need not be sent to the customer.
- Under the Customer Access Link enter a URL for customer access to your SSL VPN appliance from outside your network. If no URL is entered, the support invitation to customers will use the same URL the technician uses to access the appliance.
- Check Display Virtual Assist link from Portal Login. This will display a link to Virtual Assist on the SSL-VPN login page.

To utilize the email invitation capabilities of Virtual Assist, you must configure the appropriate Mail Server settings on the Log | Automation screen within the SonicOS Management interface.
Once you have completed all necessary adjustments to the Virtual Assist | Settings screen,click the “Accept” button to save your settings.
In this article, not all fields in the Virtual Assist | Settings are described. For more information on the purpose of these fields please refer the Admin guide.
Login to Virtual Assist as a Technician
Creating a user (technician account):
To be able to support customers a technician needs to be member the of SSLVPN Services group.
- Go to Users | Local Users
- Click on Add User
- Enter a Username and Password for the user.
- Click on the Groups tab
- Add SSLVPN Services from Users Groups to the Member Of box

Configuring the Virtual Assist Stand Alone Client (VASAC)
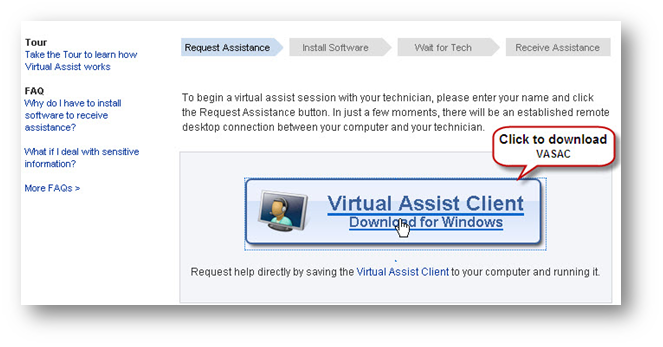
Download the Virtual Assist Stand Alone Client (VASAC) from the url link xx.xx.xx.xx/sslvpnsupportlogin.html. If the Technician is behind the SonicWall, the download link would be the LAN/DMZ interface ip followed by the port number and sslvpnsupportlogin.html (For eg. 192.168.168.168:4433/sslvpnsupportlogin.html). In order for this to work the option Enable SSLVPN Access in the LAN / DMZ zone needs to be checked.

- Run VASAC.
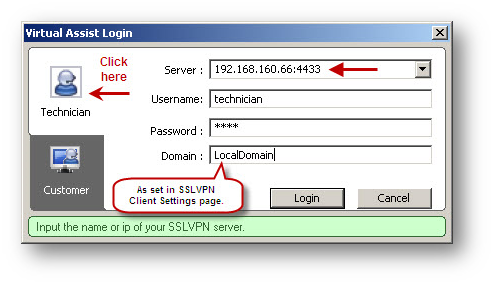
- Click on the Technician tab on the left side.
- Enter the IP of the Sonicwall followed by the port number (default: 4433). (For eg. 69.42.221.49:4433 if the technician is on the WAN; 192.168.168.168:4433 If on the LAN side of the SonicWall)
- Enter the username and password of the Technician.
- Enter the User Domain as set in the SSL-VPN | Client Settings page.
- Click on the Login button for the Virtual Assist window to open.

If Enable Support without Invitation is not checked:
- Enter customer's email address under Customer E-mail
- Enter technician's email address under Technician E-mail
- Click on Invite.

An invitation would be sent to the customer (see screenshot).
Virtual Assist Login for a Customer.
If Enable Support without Invitation is not checked an email would be sent to the customer's email address. 
- Click on the link Please click to begin your support process.
- Download the file VASAC file and run it. This file would contain all the necessary info to connect to Virtual Assist. No further information need to be added.
If Enable Support without Invitation is checked the Assistance Code as entered in the Virtual Assist | Settings page should be given to the customer to enable him to connect to the support process.
- Download the Virtual Assist Stand Alone Client (VASAC) from xx.xx.xx.xx:4433/sslvpnsupportlogin.html or click on the Virtual Assist link on the SSL-VPN portal page.
- Run VASAC.
- Click on the Customer tab on the left side.
- Enter the URL of your SSLVPN appliance or the WAN IP of the Sonicwall followed by the port number (default: 4433. For eg. 69.42.221.49:4433)
- Enter a Name to identify the customer in the Virtual Assist window.
- Click on Login.
- Enter the Assistance Code and click on OK.
The technician will see the customer's name in the Virtual Assist window and when the technician clicks on it the remote desktop of the customer will be displayed.
 NOTE: This feature has been deprecated with the latest GEN-7 devices.
Related Articles
- How to Block Google QUIC Protocol on SonicOSX 7.0?
- How to block certain Keywords on SonicOSX 7.0?
- How internal Interfaces can obtain Global IPv6 Addresses using DHCPv6 Prefix Delegation
Categories
- Firewalls > TZ Series
- Firewalls > SonicWall SuperMassive E10000 Series
- Firewalls > SonicWall SuperMassive 9000 Series
- Firewalls > SonicWall NSA Series


 YES
YES NO
NO