-
Products
-
SonicPlatform
SonicPlatform is the cybersecurity platform purpose-built for MSPs, making managing complex security environments among multiple tenants easy and streamlined.
Discover More
-
-
Solutions
-
Federal
Protect Federal Agencies and Networks with scalable, purpose-built cybersecurity solutions
Learn MoreFederalProtect Federal Agencies and Networks with scalable, purpose-built cybersecurity solutions
Learn More - Industries
- Use Cases
-
-
Partners
-
Partner Portal
Access to deal registration, MDF, sales and marketing tools, training and more
Learn MorePartner PortalAccess to deal registration, MDF, sales and marketing tools, training and more
Learn More - SonicWall Partners
- Partner Resources
-
-
Support
-
Support Portal
Find answers to your questions by searching across our knowledge base, community, technical documentation and video tutorials
Learn MoreSupport PortalFind answers to your questions by searching across our knowledge base, community, technical documentation and video tutorials
Learn More - Support
- Resources
- Capture Labs
-
- Company
- Contact Us
Configuring a CFS policy per IP address or range of IP addresses


Description
Appliances with SonicWall CFS Premium can now assign specific CFS policies to ranges of IP address ranges. This provides the ability to segment CFS policies within a single zone.
 NOTE: Custom CFS policies can only be created when the appliance has a valid subscription for SonicWall CFS Premium.
Resolution
Resolution for SonicOS 7.X
This release includes significant user interface changes and many new features that are different from the SonicOS 6.5 and earlier firmware. The below resolution is for customers using SonicOS 7.X firmware.
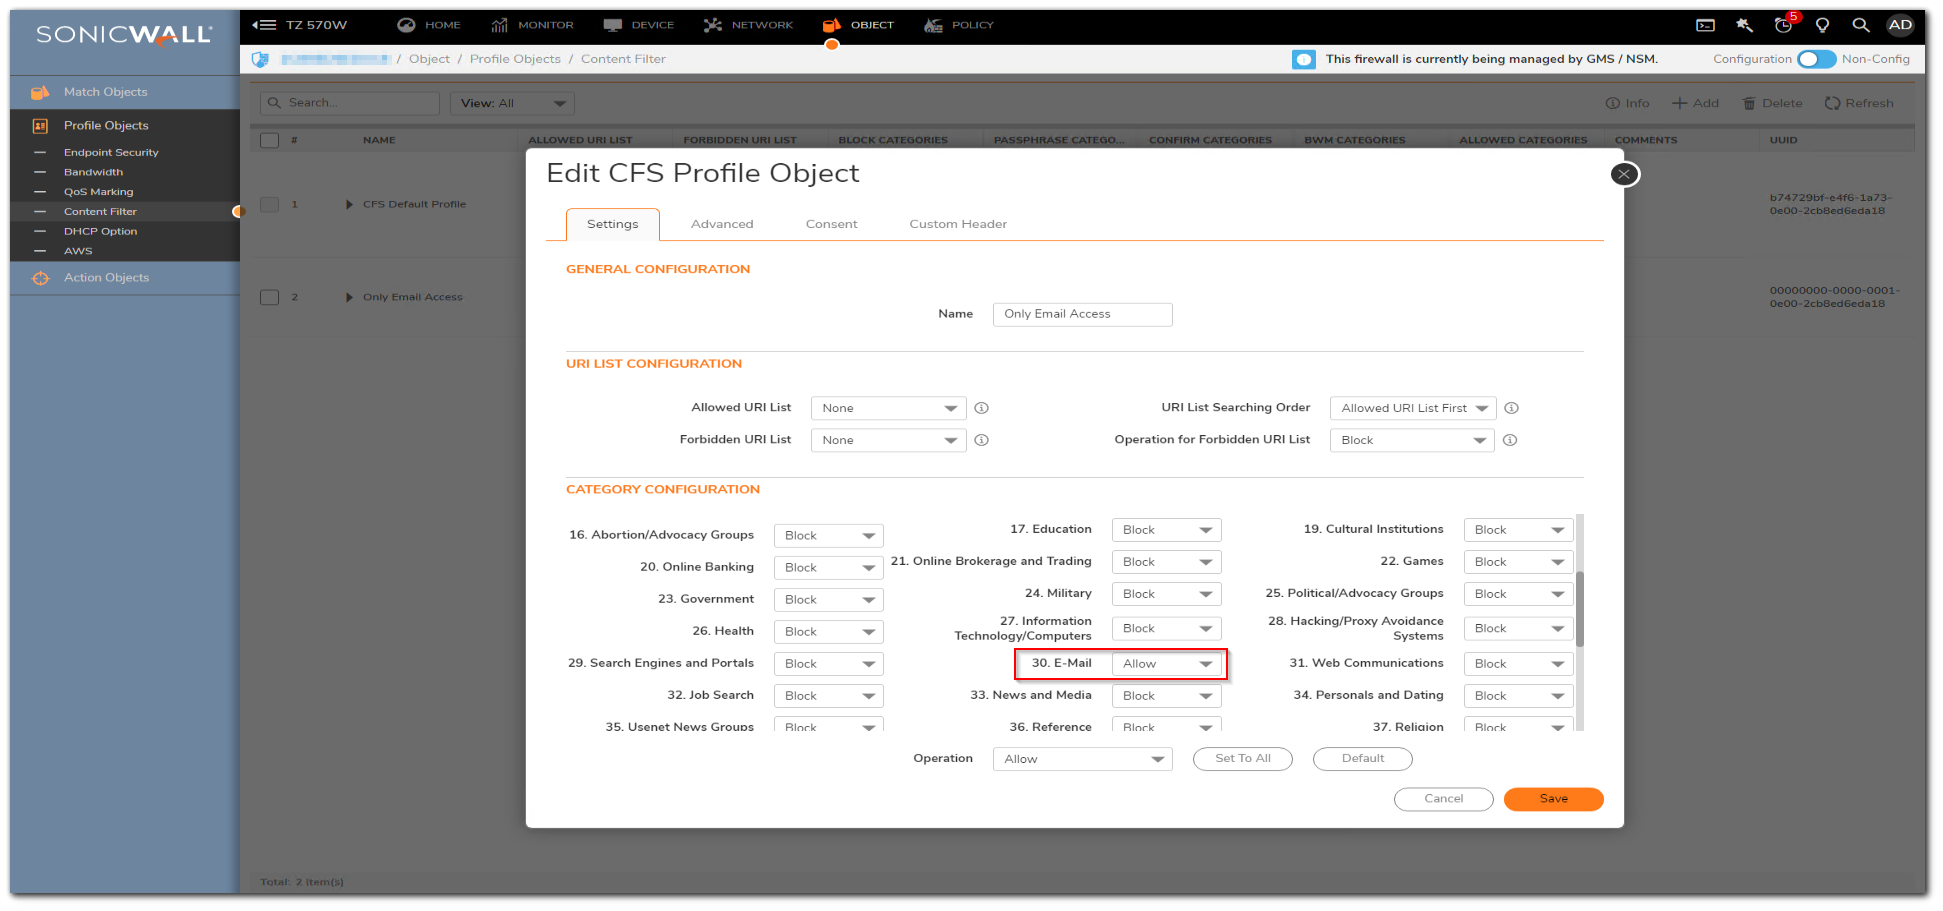
Creating a Custom CFS Policy.
- Click on Object | Profile Objects | Content Filter.
- Click on Add.
- Enter Name.
- Under Category Configuration , Block everything except Email.
- Click Save.

Creating an address object for the ip address we want to have a separate policy.
- Navigate to Object | Match Objects | Addresses.
- Click Add , create an address object for the range of IP you want the CFS policy to be applied.

Apply the CFS Policy
- Navigate to Policy | Rules and Policies | Content Filter Policies.
- Click Add.
- Make sure to select Source IP as the IP range which we created and Profile as the ONLY EMAIL ACCESS.
- Click OK.

Resolution for SonicOS 6.5
This release includes significant user interface changes and many new features that are different from the SonicOS 6.2 and earlier firmware. The below resolution is for customers using SonicOS 6.5 firmware.
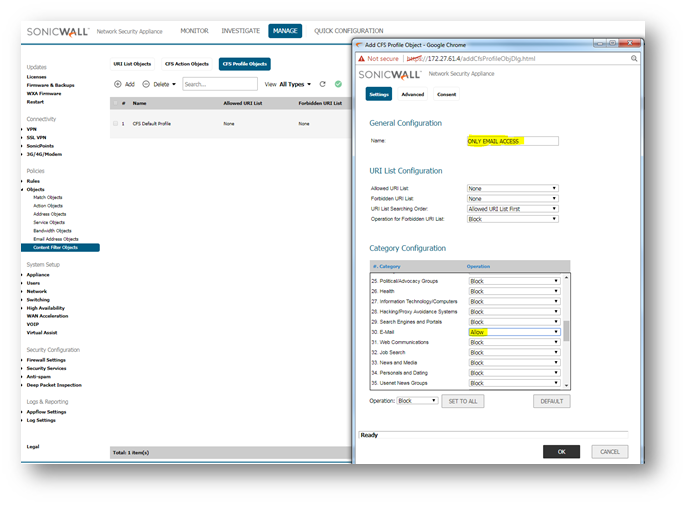
Creating a Custom CFS Policy.
- Click MANAGE , navigate to Objects | Content Filter Objects.
- Click CFS Profile Objects on the top.
- Click ADD.
- Enter Name.
- Under Category Configuration , Block everything except Email.
- Click OK

Creating an address object for the ip address we want to have a separate policy.
- Navigate to Objects | Address Objects.
- Click Add , create an address object for the range of IP you want the CFS policy to be applied .

Apply the CFS Policy
- Navigate to Security Services | Content Filter .
- Under CFS Policies , Click Configure.
- Make sure to select Source Ip as the IP range which we created in step 2 and Profile as the ONlY EMAIL ACCESS.
- Click ADD and then click ACCEPT at the bottom.

 NOTE: Make sure that the newly created Policy has top priority .
Resolution for SonicOS 6.2 and Below
The below resolution is for customers using SonicOS 6.2 and earlier firmware. For firewalls that are generation 6 and newer we suggest to upgrade to the latest general release of SonicOS 6.5 firmware.
Creating a Custom CFS Policy.
- Login to the SonicWall management Interface.
- Navigate to Security Services | Content Filter page.
- Click Configure button, and then Policy tab.
- Click Add to create a new policy. The Add CFS Policy window is displayed.
- Enter a name for the policy in the Name field.
- Click URL List tab.
- In the Select Forbidden Categories list, Uncheck any category to which you want to allow access. Move your mouse pointer over the Down or Up arrows to automatically scroll through the list of CFS categories. Select the Select all categories check box if you want to block all categories, or Uncheck the box to Uncheck all categories.

- Click OK.
Applying the Custom CFS Policy per IP address or range of IP addresses
- Scroll down to the CFS Policy per IP Address Range section and select the Enable Policy per IP Address Range checkbox.
- Click Add. The Add CFS Policy per IP Address Range window is displayed.
- Enter the first IP address in the range in the IP Address From: field and the last address in the IP Address To: field.
- Select the CFS policy to apply to this IP address range in the CFS Policy: pull down window.

- Optionally add a comment about this IP address range in the Comment: field.
- Click OK.
How to Test:
Login to the any computer within the IP range specified and try to access the website allowed by the new custom policy, and also try to go to restricted websites.
Related Articles
- How to Block Google QUIC Protocol on SonicOSX 7.0?
- How to block certain Keywords on SonicOSX 7.0?
- How internal Interfaces can obtain Global IPv6 Addresses using DHCPv6 Prefix Delegation
Categories
- Firewalls > NSa Series > Content Filtering Service
- Firewalls > NSv Series > Content Filtering Service
- Firewalls > TZ Series > Content Filtering Service


 YES
YES NO
NO