


TSA: configuring SonicWall Terminal Services Agent
 08/29/2022
  1,192 People found this article helpful
 405,979 Views

Description
TSA: configuring SonicWall Terminal Services Agent
Resolution
Prerequisites
The following requirements must be met in order to run the SonicWall TSA:
• UDP port 2259 (by default) must be open on all terminal servers on which TSA is installed; the firewall uses UDP port 2259 by default to communicate with SonicWall TSA; if a custom port is configured instead of 2259, then this requirement applies to the custom port
• Windows Server, with latest service pack.
• Windows Terminal Services or the following Citrix version installed on the Windows Server system(s):
– Citrix XenApp 7.0 - 2206
Installing and Configuring SonicWall TSA on Terminal Server
Install the SonicWall TSA on one or more terminal servers on your network within the Windows domain. The SonicWall TSA must have access to your SonicWall UTM security appliance, and the appliance must have access to the TSA. If you have a software firewall running on the terminal server, you may need to open up the UDP port number for incoming messages from the appliance. SonicWall TSA is available for download without charge from MySonicWall.
To install the SonicWall TSA, perform the following steps:
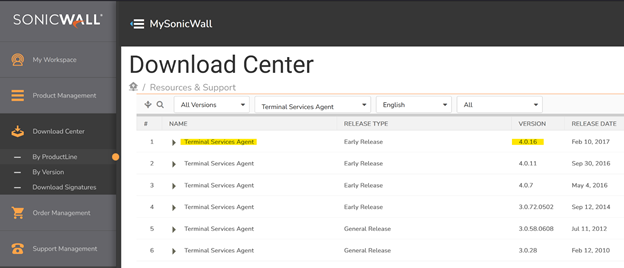
Step 1: On a Windows Terminal Server system, download one of the following installation programs, depending on your computer:
–SonicWall TSAInstaller.4.0.16.x86 (x86, version 4.0.16 or higher)
–SonicWall TSAInstaller.4.0.16.x64 (x64, version 4.0.16 or higher)
You can find these on http://www.mysonicwall.com.
Step 2: Double-click the installation program to begin installation.
Step 3: On the Welcome page, click Next to continue.
Step 4: The License Agreement displays. Select I agree and click Next to continue.
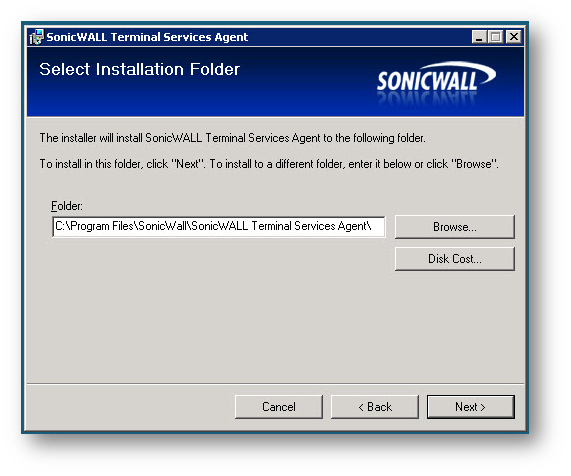
Step 5: On the Select Installation Folder window, select the destination folder. To use the default folder, C:Program FilesSonicWallSonicWall Terminal Services Agent, click Next. To specify a custom location, click Browse, select the folder, and click Next.
Step 6: On the Confirm Installation window, click Next to start the installation.
Step 7: Wait while the SonicWall Terminal Services Agent installs. The progress bar indicates the status.
Step 8: When installation is complete, click Close to exit the installer.
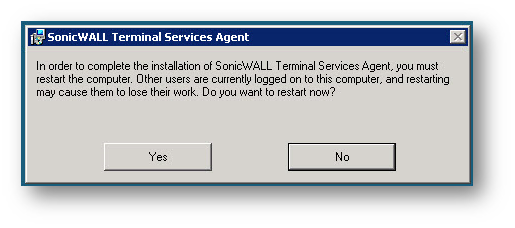
Step 9: You must restart your system before starting the SonicWall Terminal Services Agent. To restart immediately, click Yes in the dialog box. To restart later, click No.
Configuring the SonicWall Terminal Services Agent software
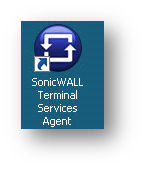
After installing the SonicWall TSA and restarting your Windows Server system, you can double-click the SonicWall TSA desktop icon created by the installer to launch it for configuration, to generate a trouble shooting report (TSR), or to see the status and version information. See the following sections:
• “Adding a SonicWall UTM Appliance to SonicWall TSA Settings”
Adding a SonicWall UTM Appliance to SonicWall TSA Settings
Perform the following steps to add a SonicWall UTM appliance to the SonicWall TSA:
Step 1 Double-click the SonicWall TSA desktop icon.
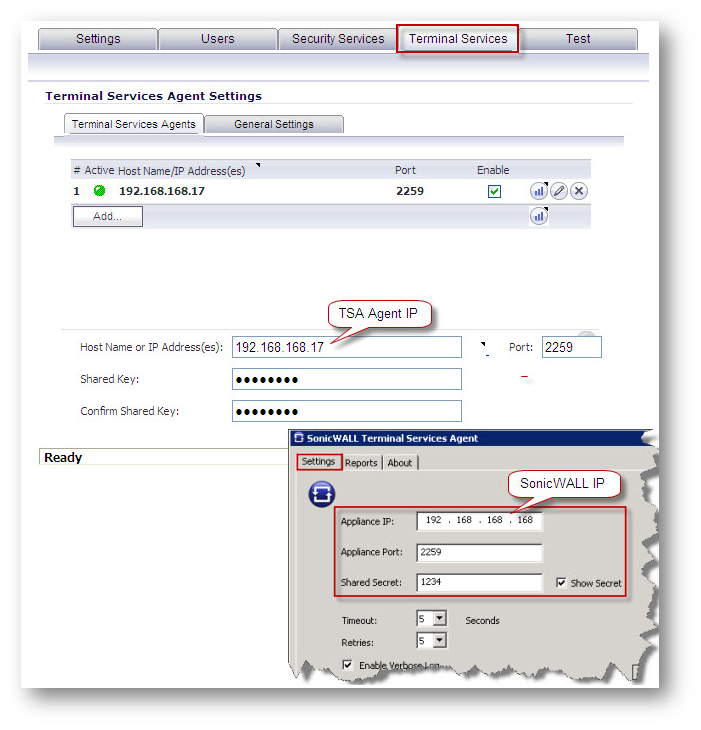
Step 2 The SonicWall Terminal Services Agent window displays. On the Settings tab, type the IP address of the SonicWall UTM appliance into the Appliance IP field.
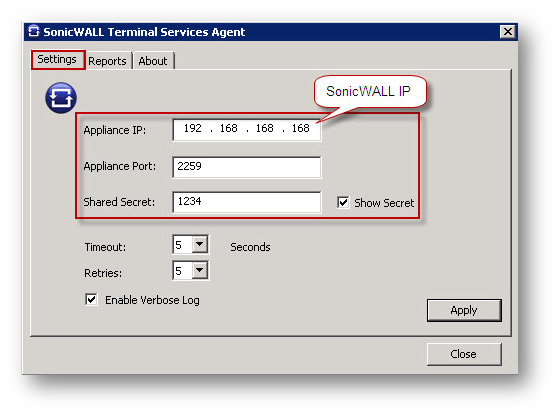
Step 3 Type the communication port into the Appliance Port field. The default port is 2259, but a custom port can be used instead. This port must be open on the Windows Server system.
Please Note: If you have a software firewall running on the terminal server, you may need to open up the UDP port 2259 number for incoming messages from the appliance.
Step 4 Type the encryption key into the Shared Secret field. Select the Show Secret checkbox to view the characters and verify correctness. Note: The same shared secret must be configured on the SonicWall UTM appliance.
Step 5 In the Timeout drop-down list, select the number of seconds that the agent will wait for a reply from the appliance before retrying the notification. The range is 5 to 10 seconds, and the default is 5 seconds.
Step 6 In the Retries drop-down list, select the number of times the agent will retry sending a notification to the appliance when it does not receive a reply. The range is 3 to 10 retries, and the default is 5.
Step 7 To enable full details in log messages, select the Enable Verbose Log checkbox. Do this only to provide extra, detailed information in a trouble shooting report. Avoid leaving this enabled at other times because it may impact performance.
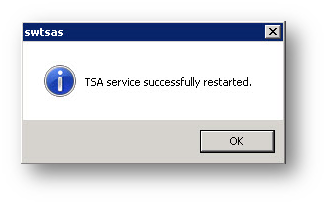
Step 8 Click Apply. A dialog box indicates that the SonicWall TSA service has restarted with the new settings.
You can create a trouble shooting report (TSR) containing all current log messages and information about the agent, driver, and system settings to examine or to send to SonicWall Technical Support for assistance.
Perform the following steps to create a TSR for the SonicWall TSA:
Step 1 Double-click the SonicWall TSA desktop icon.
Step 2 The SonicWall Terminal Services Agent window displays. Click the Reports tab.
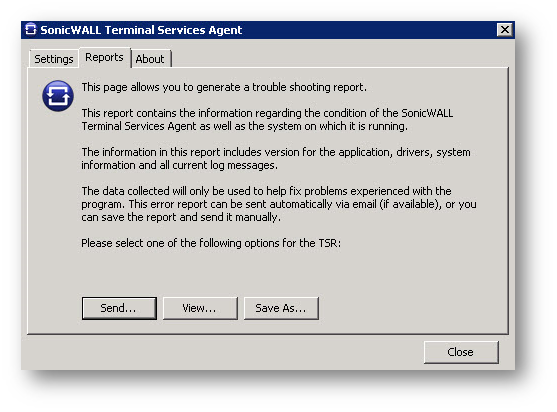
Step 3 To generate the TSR and automatically email it to SonicWall Technical Support, click Send.
Step 4 To generate the TSR and examine it in your default text editor, click View.
Step 5 To generate the TSR and save it as a text file, click Save As.
Step 6 When finished, click Close.
Viewing SonicWall TSA Status and Version
To display the current status of the SonicWall TSA service on your Windows Server system, or to view the version number of the SonicWall TSA, perform the following steps:
Step 1 Double-click the SonicWall TSA desktop icon.
Step 2 The SonicWall Terminal Services Agent window displays. Click the About tab.
Step 2 The SonicWall Terminal Services Agent window displays. Click the About tab.
Step 3 Click Close.
Configuring the TSA settings on the SonicWall UTM appliance
Resolution for SonicOS 7.X:
Step 1: Login to your SonicWall security appliance as an administrator.
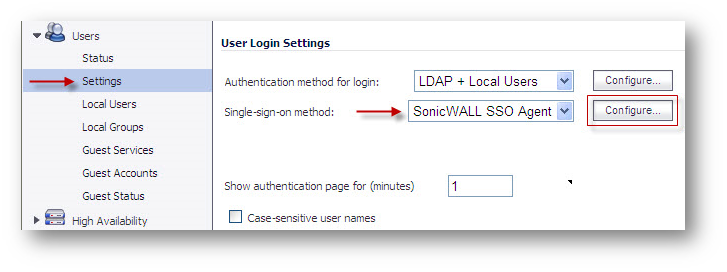
Step 2: Navigate to Users > Settings.
Step 3: In the Single sign on method drop-down menu, select SonicWall SSO Agent. Use this choice to add and configure a TSA as well as an SSO Agent for the SSO method.
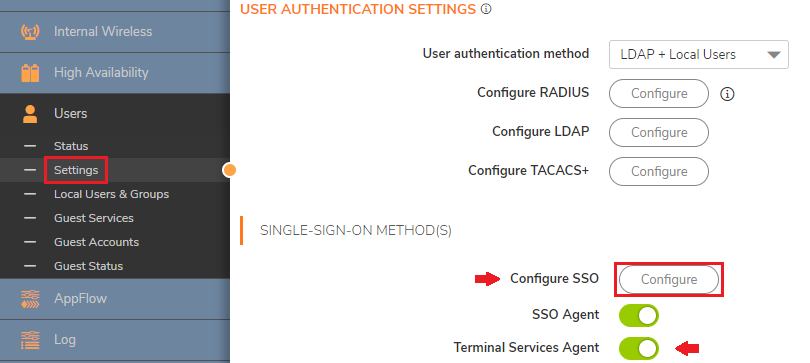
Step 4: Click the Terminal Services tab. The Terminal Services Agent Settings page displays.
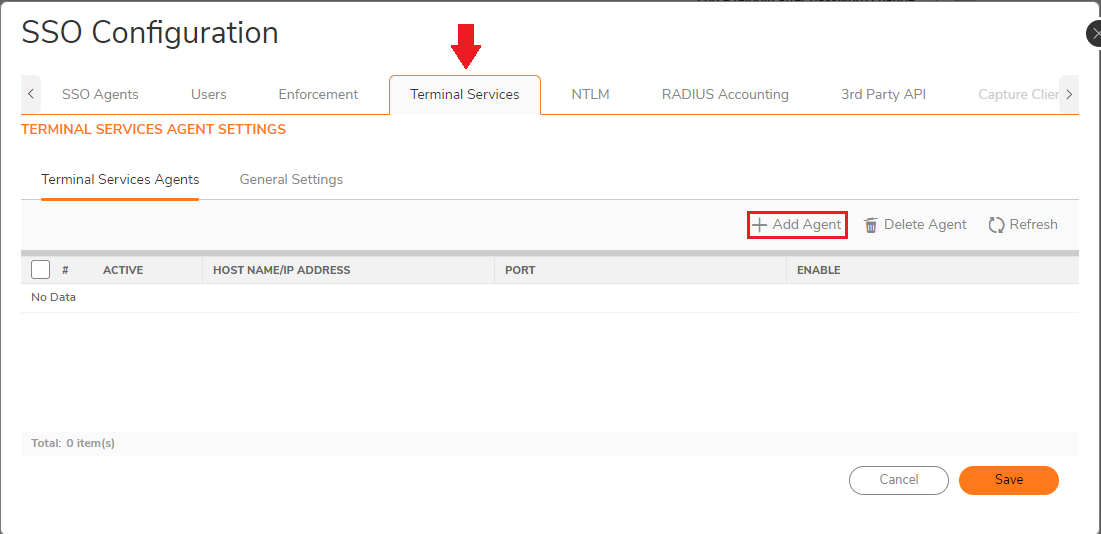
Step 5: Within this page, on the Terminal Services Agents tab, click the Add button.
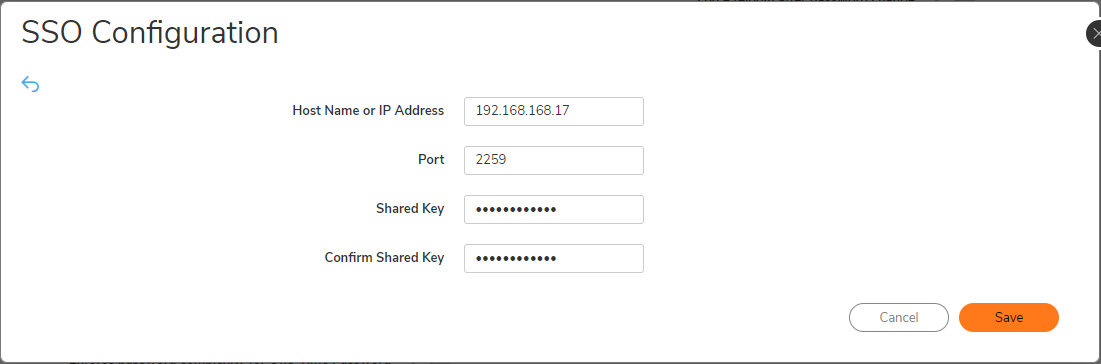
Step 6: In the Host Name or IP Address(es) field, enter the name or IP address of the terminal server on which SonicWall TSA is installed. If the terminal server is multi-homed (has multiple IP addresses) and you are identifying the host by IP address rather than DNS name, enter all the IP addresses as a comma-separated list. As you type in values for the fields, the row at the top is updated in red to highlight the new information.
Step 7: In the Port field, enter the port number of the workstation on which SonicWall TSA is installed. The default port is 2259. Note that agents at different IP addresses can have the same port number.
Step 8: In the Shared Key field, enter the shared key that you created or generated in the SonicWall TSA. The shared key must match exactly. Re-enter the shared key in the Confirm Shared Key field.
NOTE: Although it shows "SSO Configuration", it is actually configuring the Terminal Service Agent.
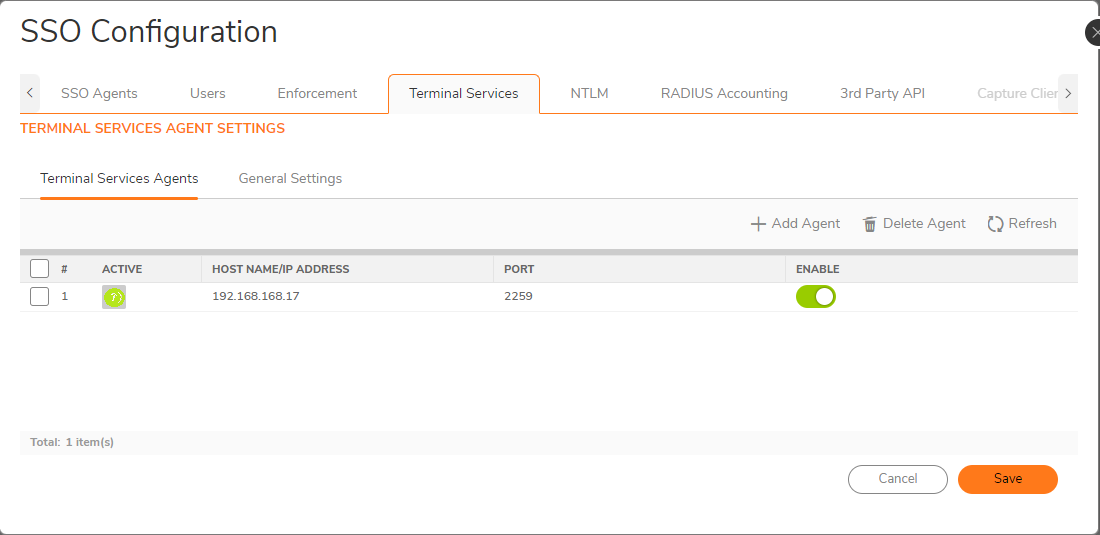
For existing agents, a green LED-style icon next to an agent indicates that the agent is up and running. A red LED icon indicates that the agent is down. A yellow LED icon means that the TSA is idle and the appliance has not heard anything from it for 5 minutes or more. Because TSA sends notifications to the appliance rather than the appliance sending requests to the agent, a lack of notifications could mean that there is a problem, but more likely means simply that no user on the terminal server is currently doing anything.
NOTE #1: Terminal Server should NOT bypass SSO. In other words, one cannot add the TS into the SSO Enforcement, under the bypass list.
NOTE #2: In case of user not been authenticated after accessing the TS server, reboot the server and try again repeating the process of authentication.
Step 9: Click the General Settings tab.
Step 10: The Allow traffic from services on the terminal server to bypass user authentication in access rules checkbox is selected by default. This allows traffic such as Windows updates or anti-virus updates, which is not associated with any user login session, to pass without authentication. If you clear this checkbox, traffic from services can be blocked if firewall access rules require user authentication. In this case, you can add rules to allow access for “All” to the services traffic destinations, or configure the destinations as HTTP URLs that can bypass user authentication in access rules.
Resolution for SonicOS 6.5:
Step 1: Login to your SonicWall security appliance as an administrator.
Step 2: Navigate to Users > Settings.
Step 3: In the Single sign on method drop-down menu, select SonicWall SSO Agent. Use this choice to add and configure a TSA as well as an SSO Agent for the SSO method.
Step 4: Click the Terminal Services tab. The Terminal Services Agent Settings page displays.
Step 5: Within this page, on the Terminal Services Agents tab, click the Add button. The page is updated to display a new row in the table at the top, and new input fields in the lower half of the page.
For existing agents, a green LED-style icon next to an agent indicates that the agent is up and running. A red LED icon indicates that the agent is down. A yellow LED icon means that the TSA is idle and the appliance has not heard anything from it for 5 minutes or more. Because TSA sends notifications to the appliance rather than the appliance sending requests to the agent, a lack of notifications could mean that there is a problem, but more likely means simply that no user on the terminal server is currently doing anything.
Step 6: In the Host Name or IP Address(es) field, enter the name or IP address of the terminal server on which SonicWall TSA is installed. If the terminal server is multi-homed (has multiple IP addresses) and you are identifying the host by IP address rather than DNS name, enter all the IP addresses as a comma-separated list. As you type in values for the fields, the row at the top is updated in red to highlight the new information.
Step 7: In the Port field, enter the port number of the workstation on which SonicWall TSA is installed. The default port is 2259. Note that agents at different IP addresses can have the same port number.
Step 8: In the Shared Key field, enter the shared key that you created or generated in the SonicWall TSA. The shared key must match exactly. Re-enter the shared key in the Confirm Shared Key field.
Step 9: Click the General Settings tab.
Step 10: The Allow traffic from services on the terminal server to bypass user authentication in access rules checkbox is selected by default. This allows traffic such as Windows updates or anti-virus updates, which is not associated with any user login session, to pass without authentication. If you clear this checkbox, traffic from services can be blocked if firewall access rules require user authentication. In this case, you can add rules to allow access for “All” to the services traffic destinations, or configure the destinations as HTTP URLs that can bypass user authentication in access rules.
NOTE #1: Terminal Server should NOT bypass SSO. In other words, one cannot add the TS into the SSO Enforcement, under the bypass list.
NOTE #2: In case of user not been authenticated after accessing the TS server, reboot the server and try again repeating the process of authentication.
Step 11: Click the Test tab. The Test Authentication Agent Settings page displays. You can test the connectivity between the appliance and an SSO agent or TSA. You can also test whether the SSO agent is properly configured to identify a user logged into a workstation.
Note: Performing tests on this page applies any changes that have been made.
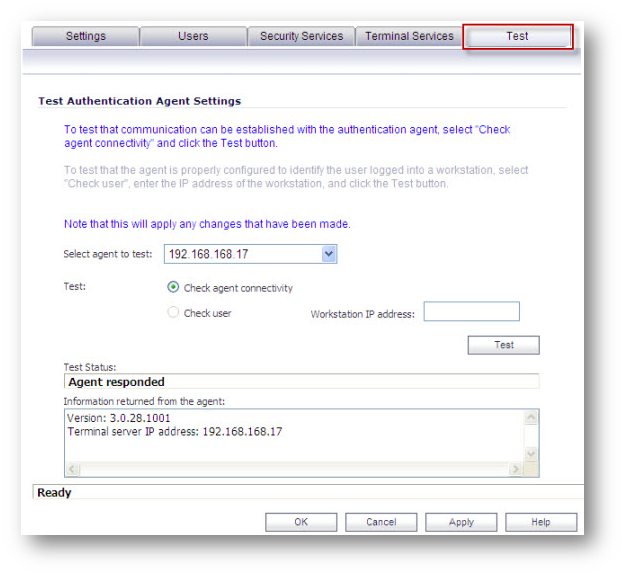
Step 12: If you have multiple agents configured, select the SSO agent or TSA to test from the Select agent to test drop-down list. The drop-down list includes SSO agents at the top, and TSA’s at the end under the heading --Terminal Server Agents--.
Step 13 Select the Check agent connectivity radio button and then click the Test button. This will test communication with the authentication agent. If testing a TSA, the Test Status field displays the message, and the version and server IP address are displayed in the Information returned from the agent field.
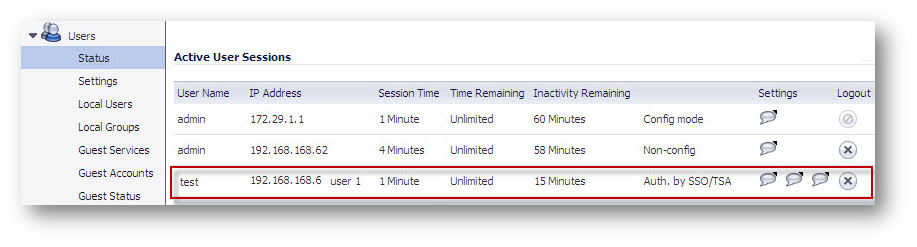
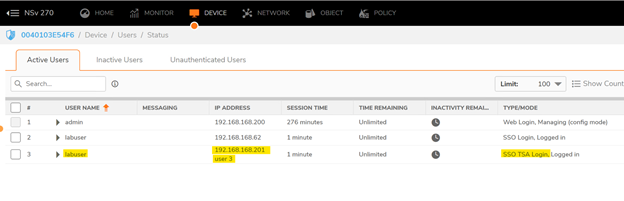
When users logon to Terminal server, each user will be listed separately in the SonicWall appliance on the Users > Status page.
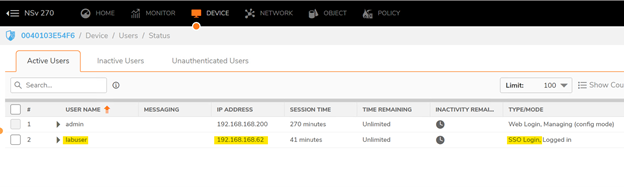
Test on Gen 7:
Windows Server 2016 - TSA
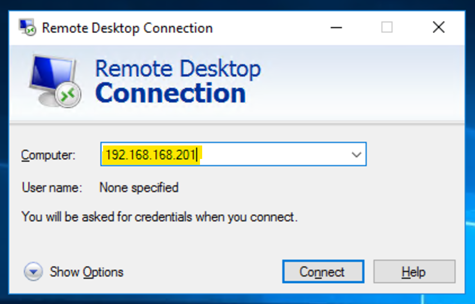
- IP 192.168.168.201
Windows 10 Workstation - Domain User
IP 192.168.168.62 (DHCP server of the firewall)
Step 1- login to the workstation with the allowed domain user, one should see SSO authentication:
Step 2- Now, open RDP in the domain user PC, and access the TS server as seen below:
Step 3- After connecting to the remote instance, try to browse the internet:

Step 4- If one is able to RDP the TS server, one should see the following status in the firewall:
Please Note: For all SonicWall UTM models, a maximum of 32 IP addresses is supported per terminal server.
Encryption of TSA Messages and Use of Session IDs:
SonicWall TSA uses a shared key for encryption of messages between the TSA and the SonicWall UTM appliance when the user name and domain are contained in the message. The first open notification for a user is always encrypted, because the TSA includes the user name and domain.
Note: The shared key is created in the TSA, and the key entered in the SonicWall UTM appliance during SSO configuration must match the TSA key exactly. The TSA includes a user session ID in all notifications rather than including the user name and domain every time. This is efficient, secure, and allows the TSA to re-synchronize with Terminal Services users after the agent restarts.
Connections to Local Subnets
The TSA dynamically learns network topology based on information returned from the appliance and, once learned, it will not send notifications to the appliance for subsequent user connections that do not go through the appliance. As there is no mechanism for the TSA to “unlearn” these local destinations, the TSA should be restarted if a subnet is moved between interfaces on the appliance.
Non-Domain User Traffic from the Terminal Server
The SonicWall UTM appliance has the Allow limited access for non-domain users setting for optionally giving limited access to non-domain users (users logged into their local machine and not into the domain), and this works for terminal services users as it does for other SSO users. If your network includes non-Windows devices or Windows computers with personal firewalls running, check the box next to Probe user for and select the radio button for either NetAPI or WMI depending on which is configured for the SSO Agent. This causes the SonicWall UTM appliance to probe for a response on the NetAPI/WMI port before requesting that the SSO Agent identify a user. If no response occurs, these devices will fail SSO immediately. Such devices do not respond to, or may block, the Windows networking messages used by the SSO Agent to identify a user.
Non-User Traffic from the Terminal Server
Non-user connections are opened from the Terminal Server for Windows updates and anti-virus updates. The TSA can identify a connection from a logged-in service as being a non-user connection , and indicates this in the notification to the appliance. To control handling of these non-user connections, an Allow Terminal Server non-user traffic to bypass user authentication in access rules checkbox is available in the TSA configuration on the appliance. When selected, these connections are allowed. If this checkbox is not selected, then the services are treated as local users and can be given access by selecting the Allow limited access for non-domain users setting and creating user accounts on the appliance with the corresponding service names.
Related Articles
- How can I configure a tunnel interface VPN (Static Route-Based VPN)?
- Pivot tables to view Event Logs
- HA - Active Firewall cannot reach the License Manager
Categories
- Firewalls > TZ Series
- Firewalls > SonicWall SuperMassive E10000 Series
- Firewalls > SonicWall SuperMassive 9000 Series
- Firewalls > SonicWall NSA Series
 YES
YES NO
NO