
SonicOS 8 Rules and Policies for Classic Mode
Table of Contents
Creating Access Rules
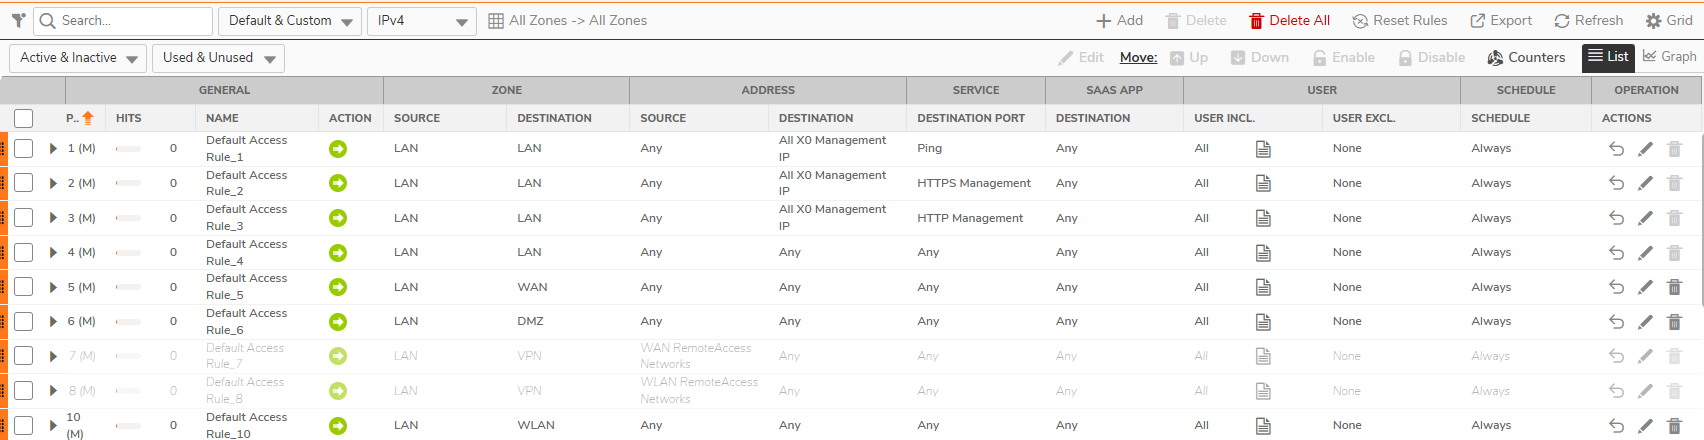
The Access Rules page lets you add, edit, and delete rules. You can also select the zones for the traffic flow with the Zone Matrix Selector.
To create an access rule
-
Navigate to POLICY | Rules and Policies > Access Rules.
-
Use the Zone Matrix Selector, or the From Zone and To Zone menus, to select the zone pair for the rule.

-
Click + Add. The Adding Rule dialog box appears.
-
Select the Action: Allow, Deny, or Discard. For more information, see About Stateful Packet Inspection Default Access Rules.
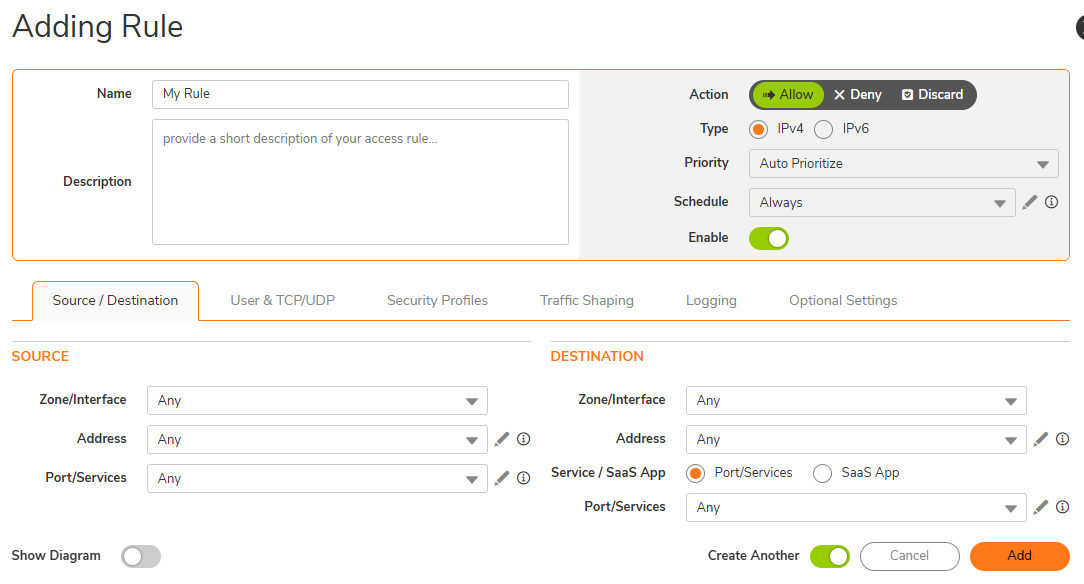
- Select the source and destination zone or interface from the Zone/Interface drop-down menus. Then select the source and destination address from the Address drop-down menus.
-
Select the source service object from the Port/Services drop-down menu.. The default is Any.
-
In the Destination section, select how to match the traffic:
- Port/Services: Select a destination service object from the Port/Services drop-down menu.
- SaaS App: Select an existing SaaS & AI Application Group from the SaaS App Group drop-down menu. If no group exists, click the Edit icon to create one. For more information, see the SonicOS 8 Objects Administration Guide.
The SaaS App option is supported in SonicOS 8.2.3 and later. The firewall must download the SaaS & AI Applications database (Cloud Sync turned on), and a SaaS & AI Application Group must exist. For more information, see Setting Firewall Access Rules.
- Click the User & TCP/UDP tab. Specify whether this rule applies to all users or to an individual user or group in the User Include and Exclude options.
-
Select the Authenticate via SAML checkbox, and then select a SAML Profile from the drop-down menu to log in with SAML authentication. For more information, see Configuring the SAML Profile in the SonicOS 8 SAML Feature Guide.
- In the TCP Inactivity Timeout field, enter the number of minutes a TCP connection can stay idle before the firewall closes it.
-
In the UDP Inactivity Timeout field, enter the number of seconds a UDP connection can stay idle before the firewall closes it.

-
Click the Security Profiles tab. Turn on or off deep packet inspection (DPI), Client DPI-SSL, Server DPI-SSL, the Botnet/C&C Filter, the Indicator of Compromise (IoC) Filter, and the Geo-IP Filter as needed.
Select the By IoC IP Addresses option and select one of the following:
- Global – Includes all IoC IP addresses from all configured IoC IP Address Files in the access rule.
- Custom – Allows you to select specific IoC IP Address Files to include in the access rule.

-
Click the Bandwidth tab to configure egress and ingress bandwidth management for specific sources, destinations, and services. Bandwidth management must be enabled on the interface first.

- To track bandwidth usage for this service, enable Track Bandwidth Usage.
- To configure logging, click the Logging tab and select the options you want.
-
Click the Optional Settings tab. In the Number of connections allowed (% of maximum connections) field, enter the percentage of the maximum connections that this rule allows.

-
Set a limit for the maximum number of connections allowed per source IP address by selecting Enable Connection Threshold for each Source IP and entering the value in the field.
Only available for Allow rules.
-
Set a limit for the maximum number of connections allowed per destination IP address by selecting Enable Connection Threshold for each Destination IP and entering the value in the field.
Only available for Allow rules.
-
If needed, select Allow Fragmented Packets and Allow Management Traffic. To see the flow diagram of the rule, select Show Diagram.

- Click Add.