-
Products
-
SonicPlatform
SonicPlatform is the cybersecurity platform purpose-built for MSPs, making managing complex security environments among multiple tenants easy and streamlined.
Discover More
-
-
Solutions
-
Federal
Protect Federal Agencies and Networks with scalable, purpose-built cybersecurity solutions
Learn MoreFederalProtect Federal Agencies and Networks with scalable, purpose-built cybersecurity solutions
Learn More - Industries
- Use Cases
-
-
Partners
-
Partner Portal
Access to deal registration, MDF, sales and marketing tools, training and more
Learn MorePartner PortalAccess to deal registration, MDF, sales and marketing tools, training and more
Learn More - SonicWall Partners
- Partner Resources
-
-
Support
-
Support Portal
Find answers to your questions by searching across our knowledge base, community, technical documentation and video tutorials
Learn MoreSupport PortalFind answers to your questions by searching across our knowledge base, community, technical documentation and video tutorials
Learn More - Support
- Resources
- Capture Labs
-
- Company
- Contact Us
VLAN assignment via RADIUS using 802.1X authentication on SonicWall Switch


Description
The IEEE-802.1X authentication provides a security standard for network access control with RADIUS servers and holds a network port disconnected until authentication is completed. With 802.1X authentication, the supplicant provides credentials, such as user name, password, or digital certificate to the authenticator, and the authenticator forwards the credentials to the authentication server for verification. If the authentication server determines the credentials are valid, the supplicant (client device) is allowed to access resources located on the protected side of the network. The Switch uses 802.1X to enable or disable port access control, to enable or disable the Guest VLAN, and to enable or disable the forwarding EAPOL (Extensible Authentication Protocol over LANs) frames.
Additionally, we can also have the VLAN assignment done through the RADIUS server itself.
Resolution
Please refer to Setting Up 802.1x Authentication On SonicWall Switch for 802.1X authentication related settings on the firewall and RADIUS server.
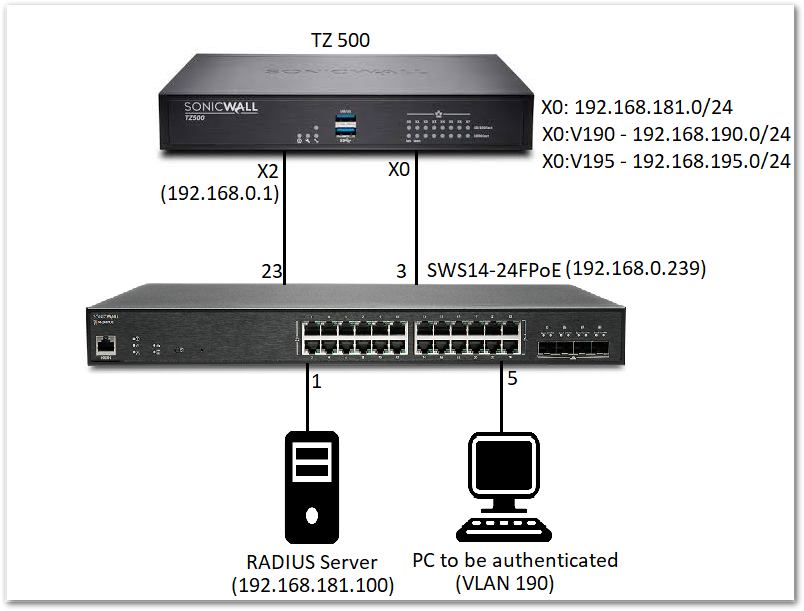
 EXAMPLE: Let us consider that the RADIUS server is connected to port 1 of the switch and has static IP: 192.168.181.100. The PC that needs be authenticated is connected to port 5 on the switch which is portshielded to interface X0. Once it is successfully authenticated we need to get an IP from X0:V190 subnet.
The X0 interface is on 192.168.181.0/24 network and has two VLAN sub-interfaces X0:V190 - 192.168.190.0/24 and X0:V195 - 192.168.195.0/24.
Navigate to MANAGE | Network | Interfaces to make sure that the VLAN sub-interfaces are set up correctly.
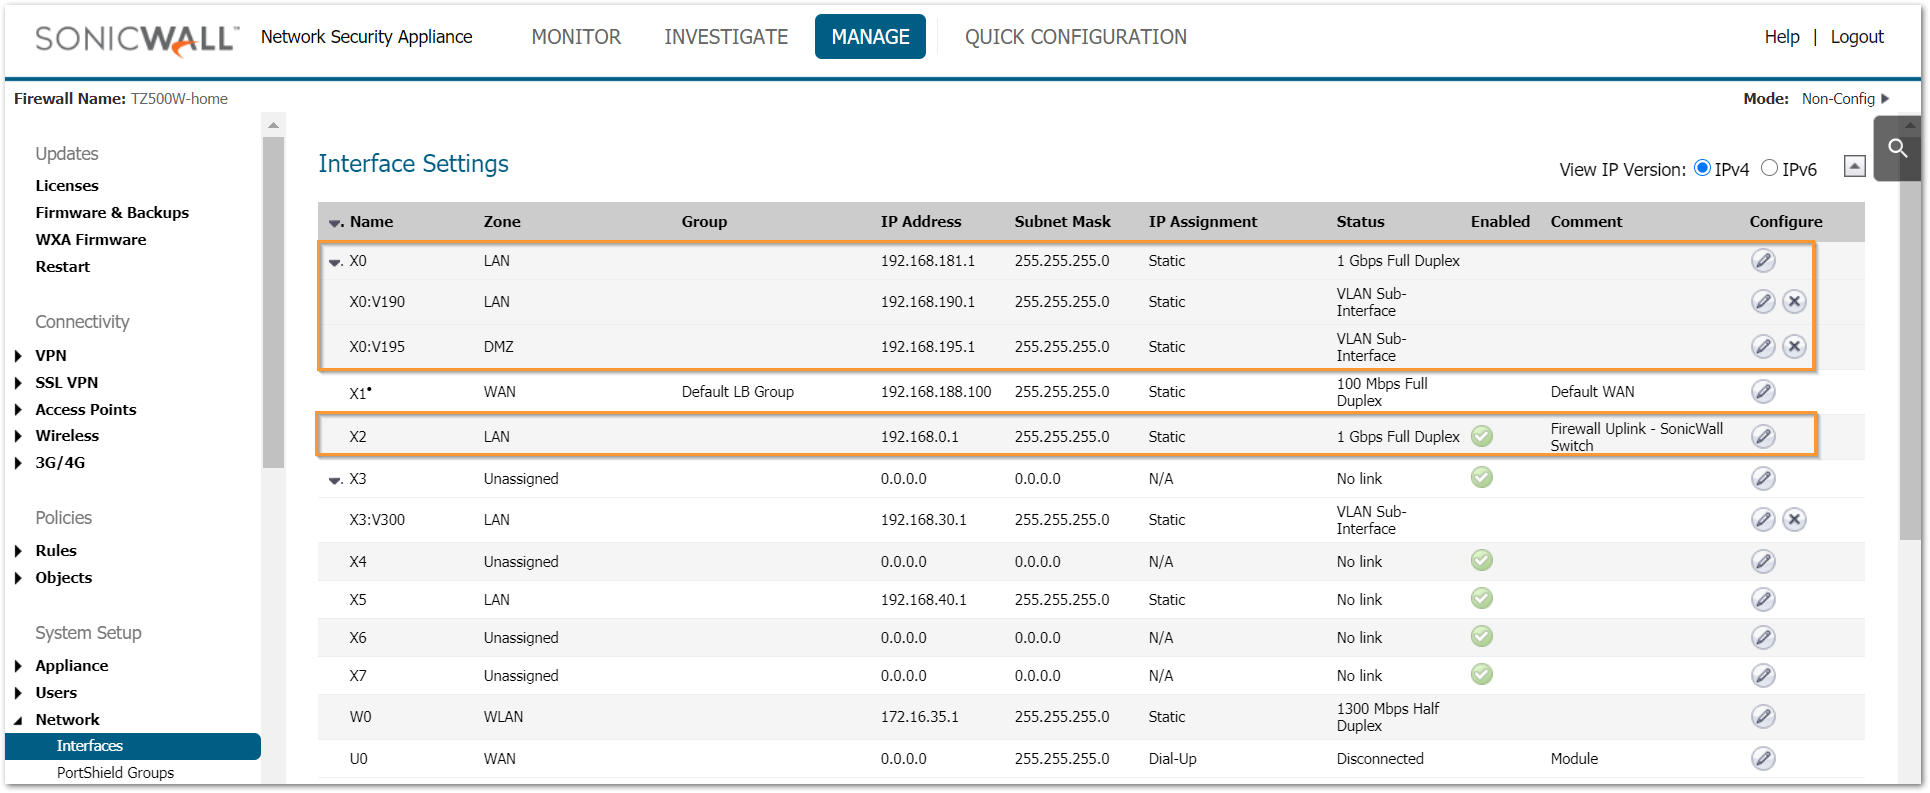
Please refer to How Can I Configure Sub-Interfaces? to add sub-interfaces on the firewall.
Enable 802.1X Authentication on Port 5
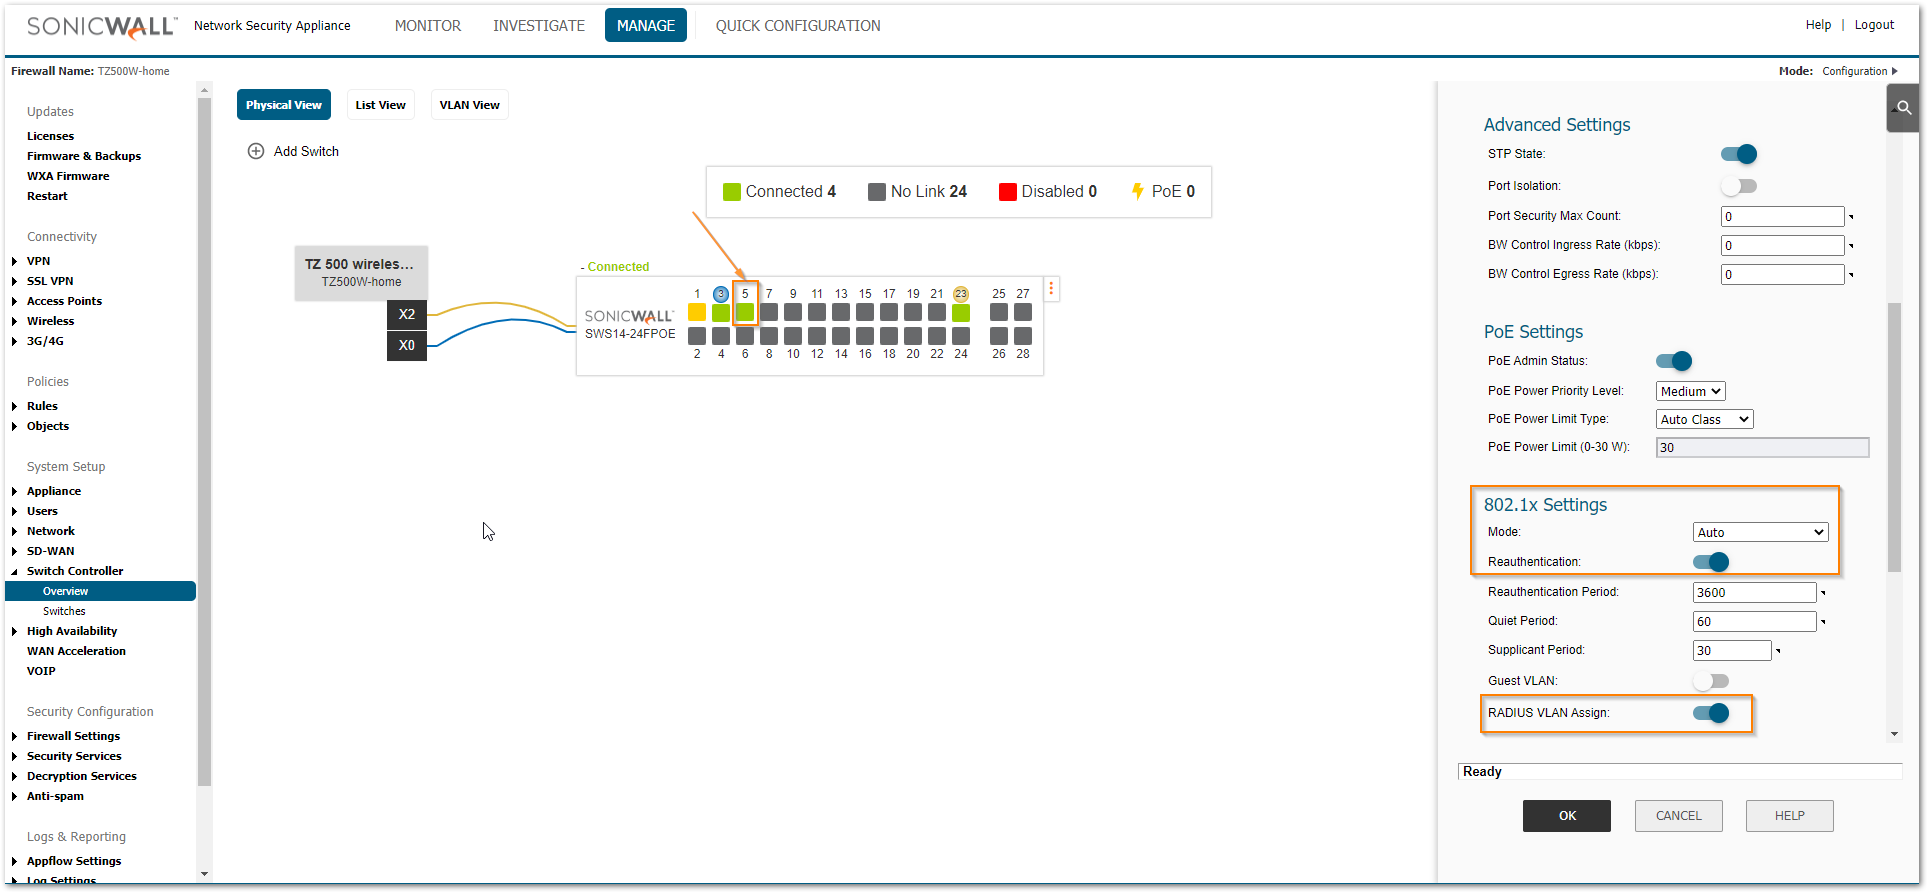
- Navigate to MANAGE | Switch Controller | Overview tab. Click on Port 5 from physical, link or VLAN view.
- Scroll down to the 802.1x Settings.
- Select the mode as 'Auto' and Enable the toggle switch for 'RADIUS VLAN assign'. Leave other options on default.
- Click OK.
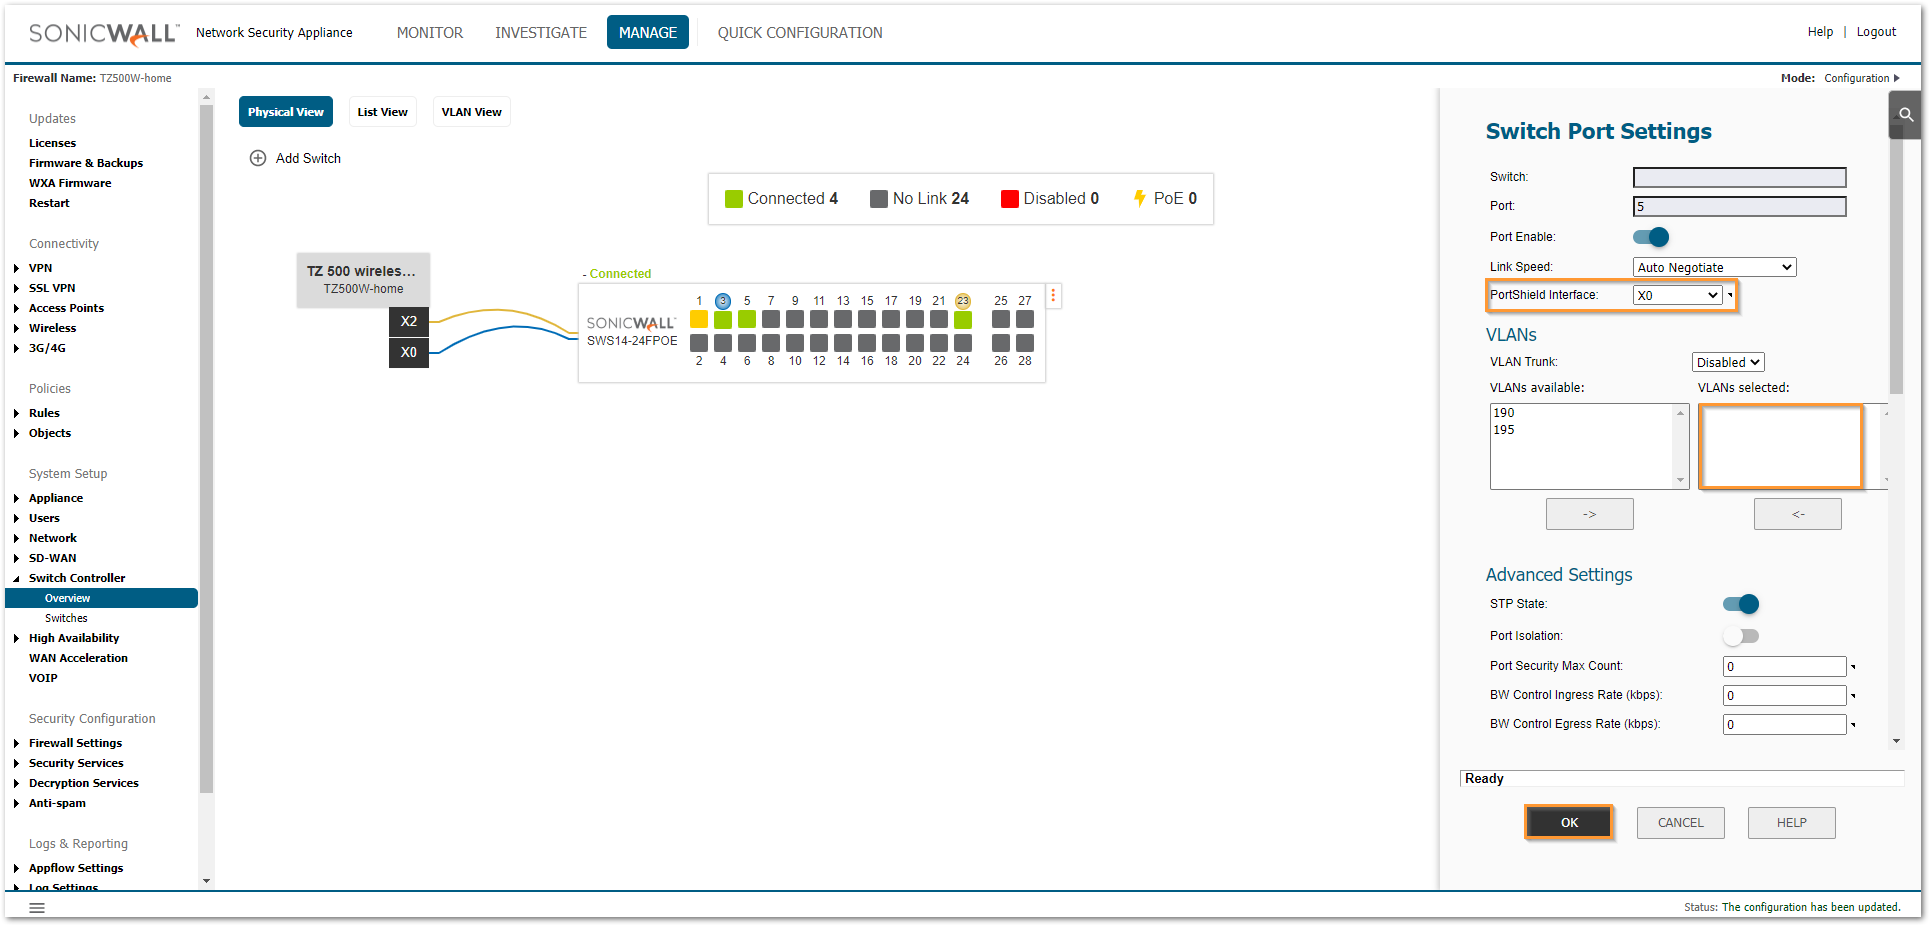
- Portshield port 5 to interface X0 but do not assign any VLANs to this port.
The following additional changes will be required on the NPS policy for VLAN assignment.
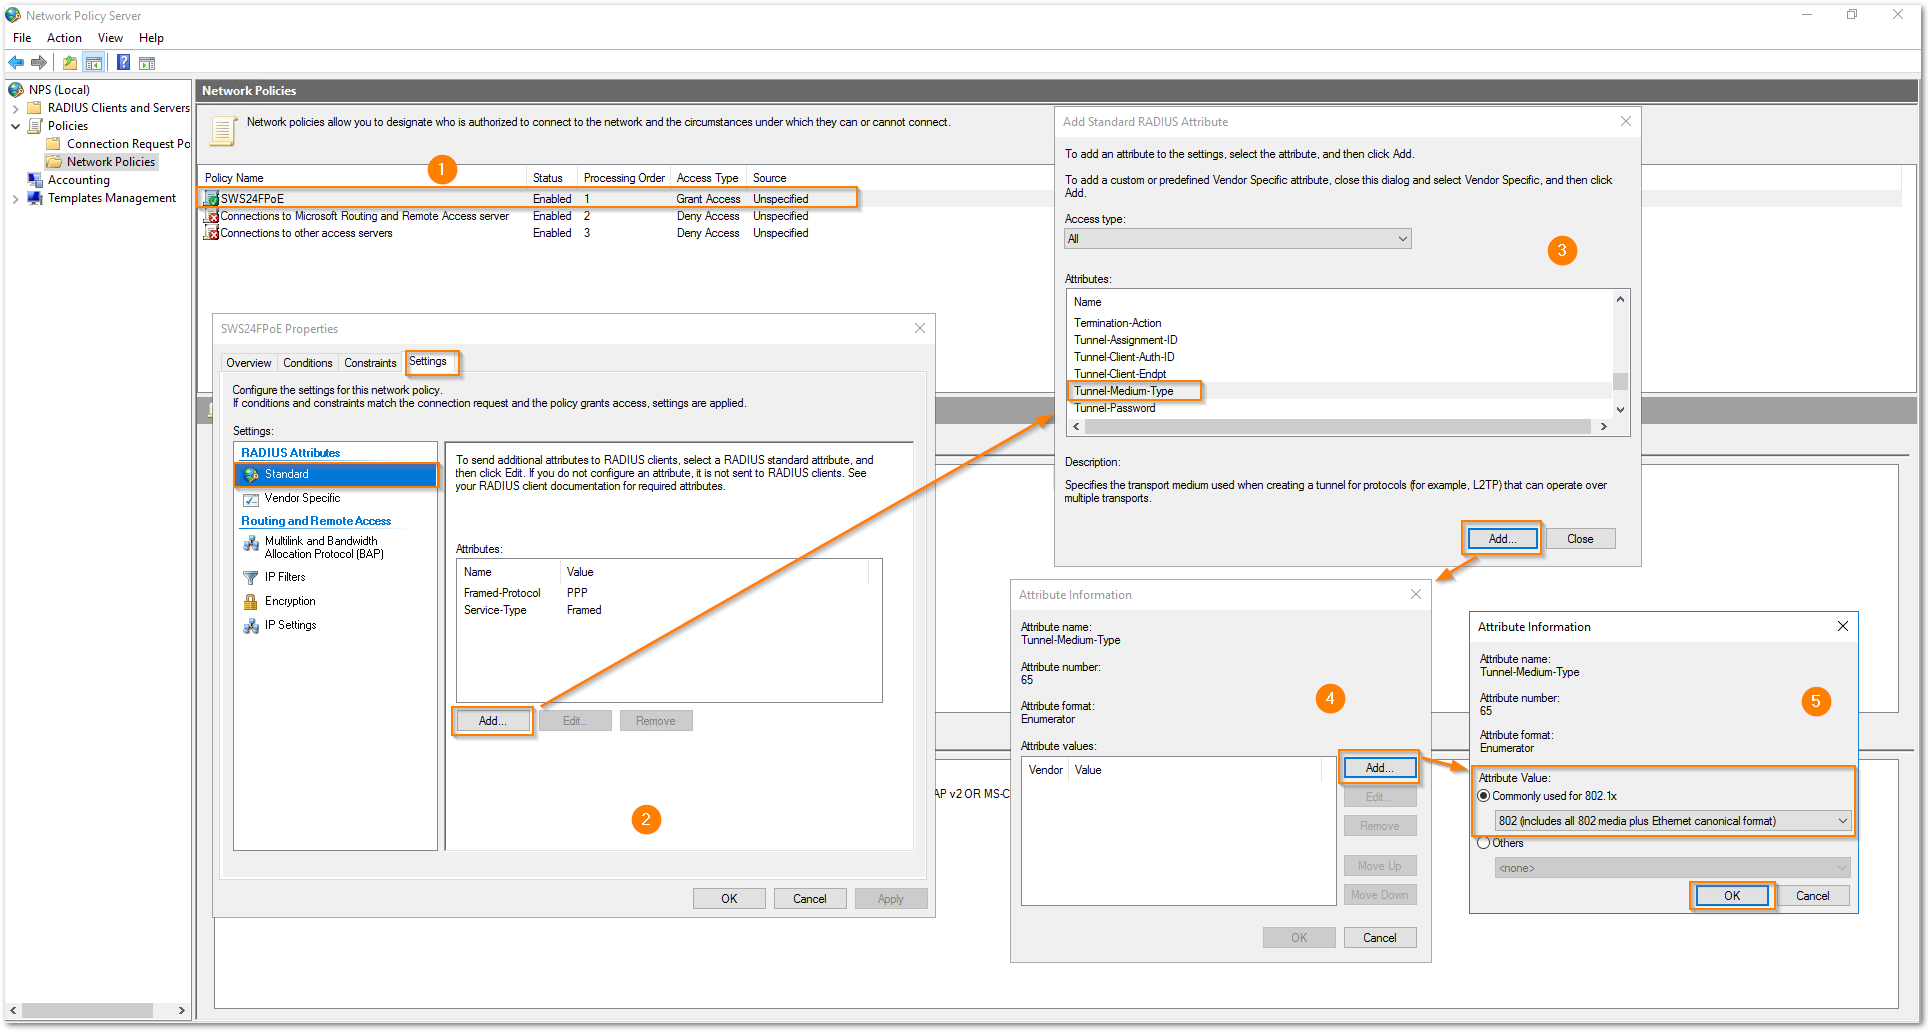
- Right click on the NPS policy and click on 'Properties'. Navigate to the Settings tab and click Add under Attributes. Select 'Tunnel-Medium-Type' from the attribute list and click on 'Add'. Click on 'Add' for the Attribute values and select the radio button for 'Commonly used for 802.1x' with the dropdown selected as '802 (includes all 802 media plus Ethernet canonical format)'. Click OK.
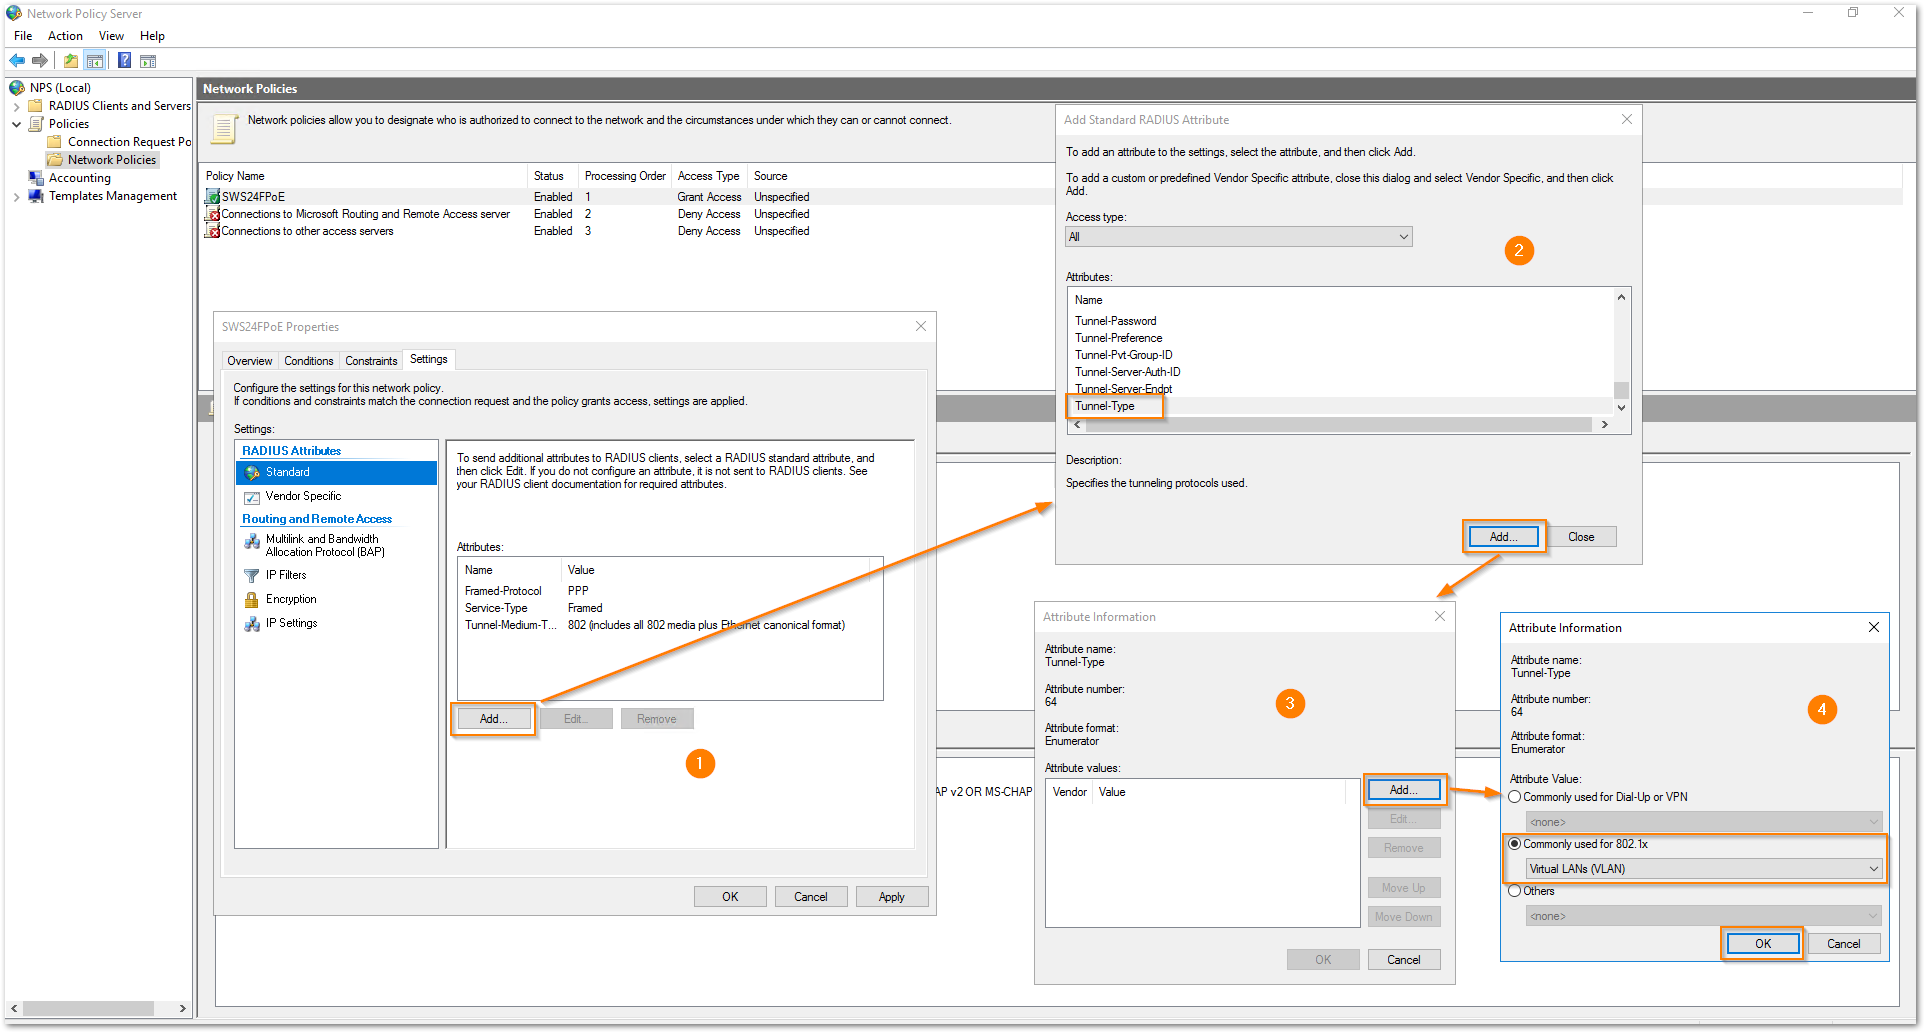
- Click Add under Attributes. Select Tunnel-Type from the attribute list and click on 'Add'. Click Add for the Attribute values and select the radio button for 'Commonly used for 802.1x' with the dropdown selected as 'Virtual LANs (VLAN)'. Click OK.
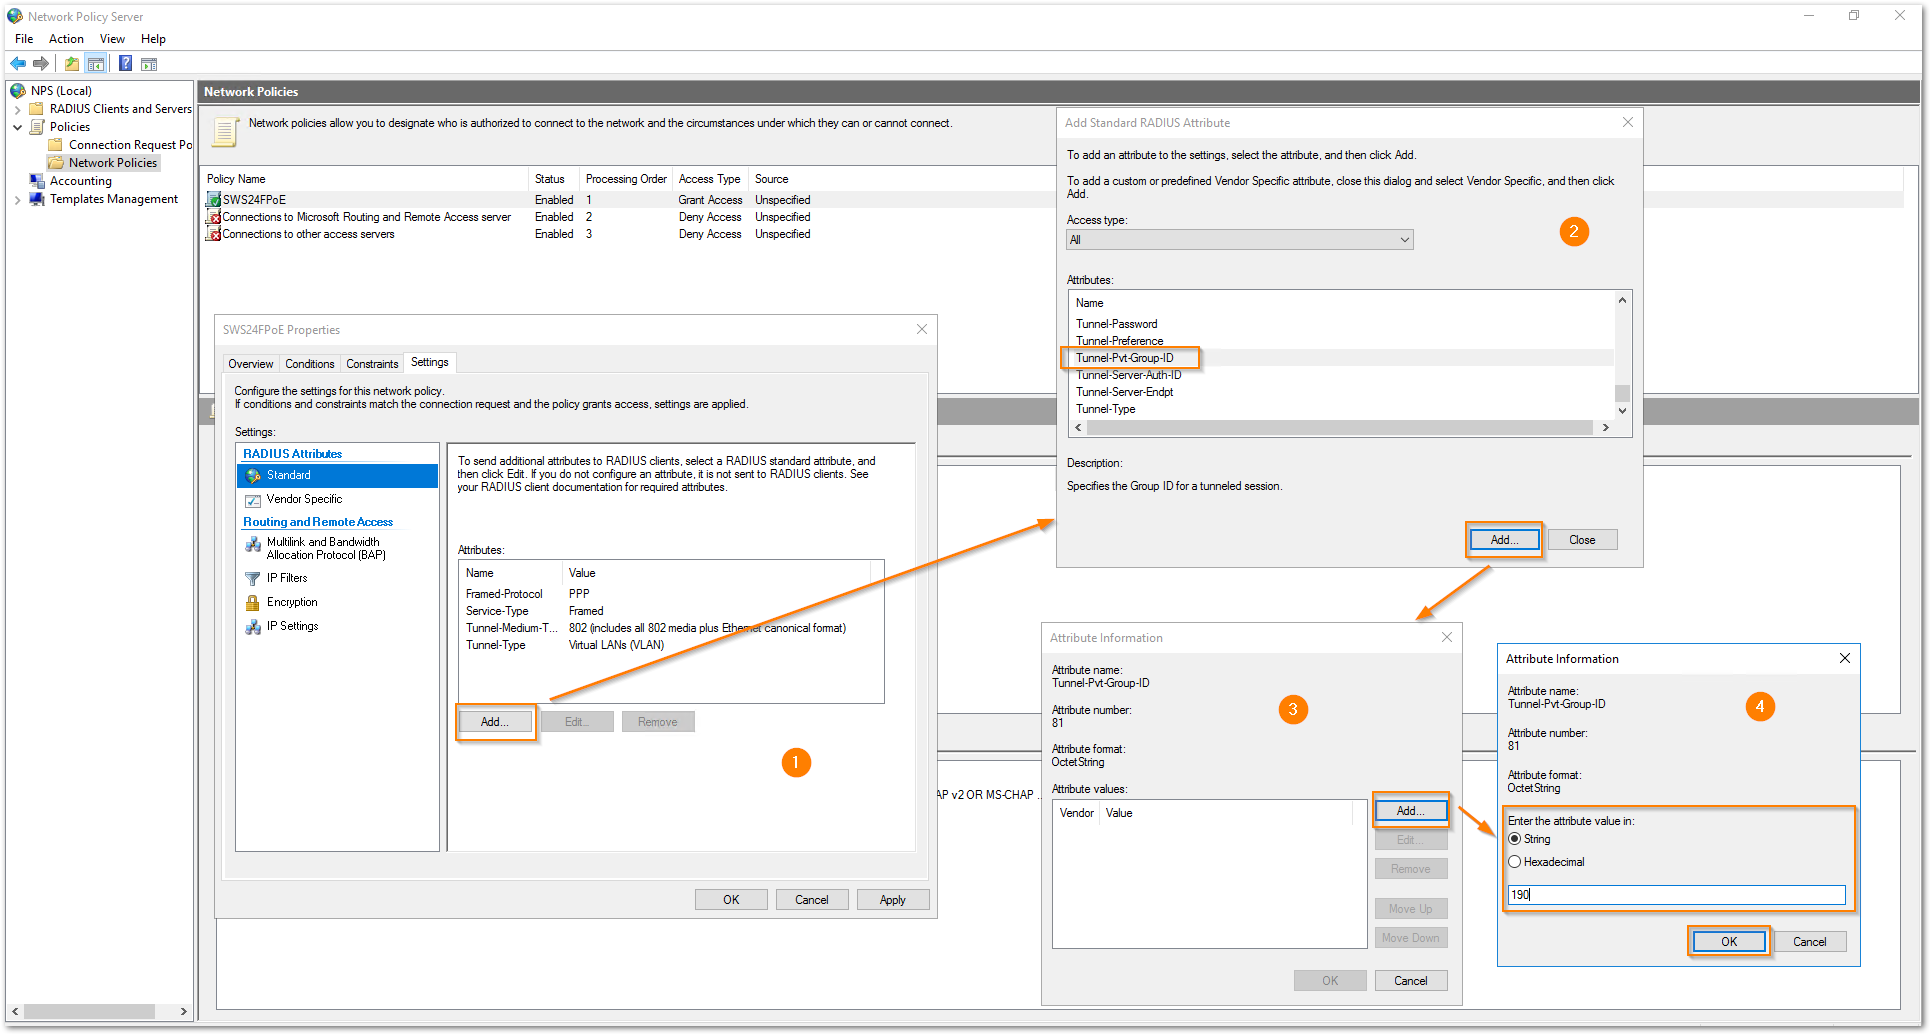
- Click on 'Add' under Attributes. Select 'Tunnel-Pvt-Group-ID' from the attribute list and click on 'Add'. Click on 'Add' for the Attribute values and select the radio button 'String' for 'Enter the attribute value in:' and mention the VLAN ID, which is 190 in this example. Click OK.
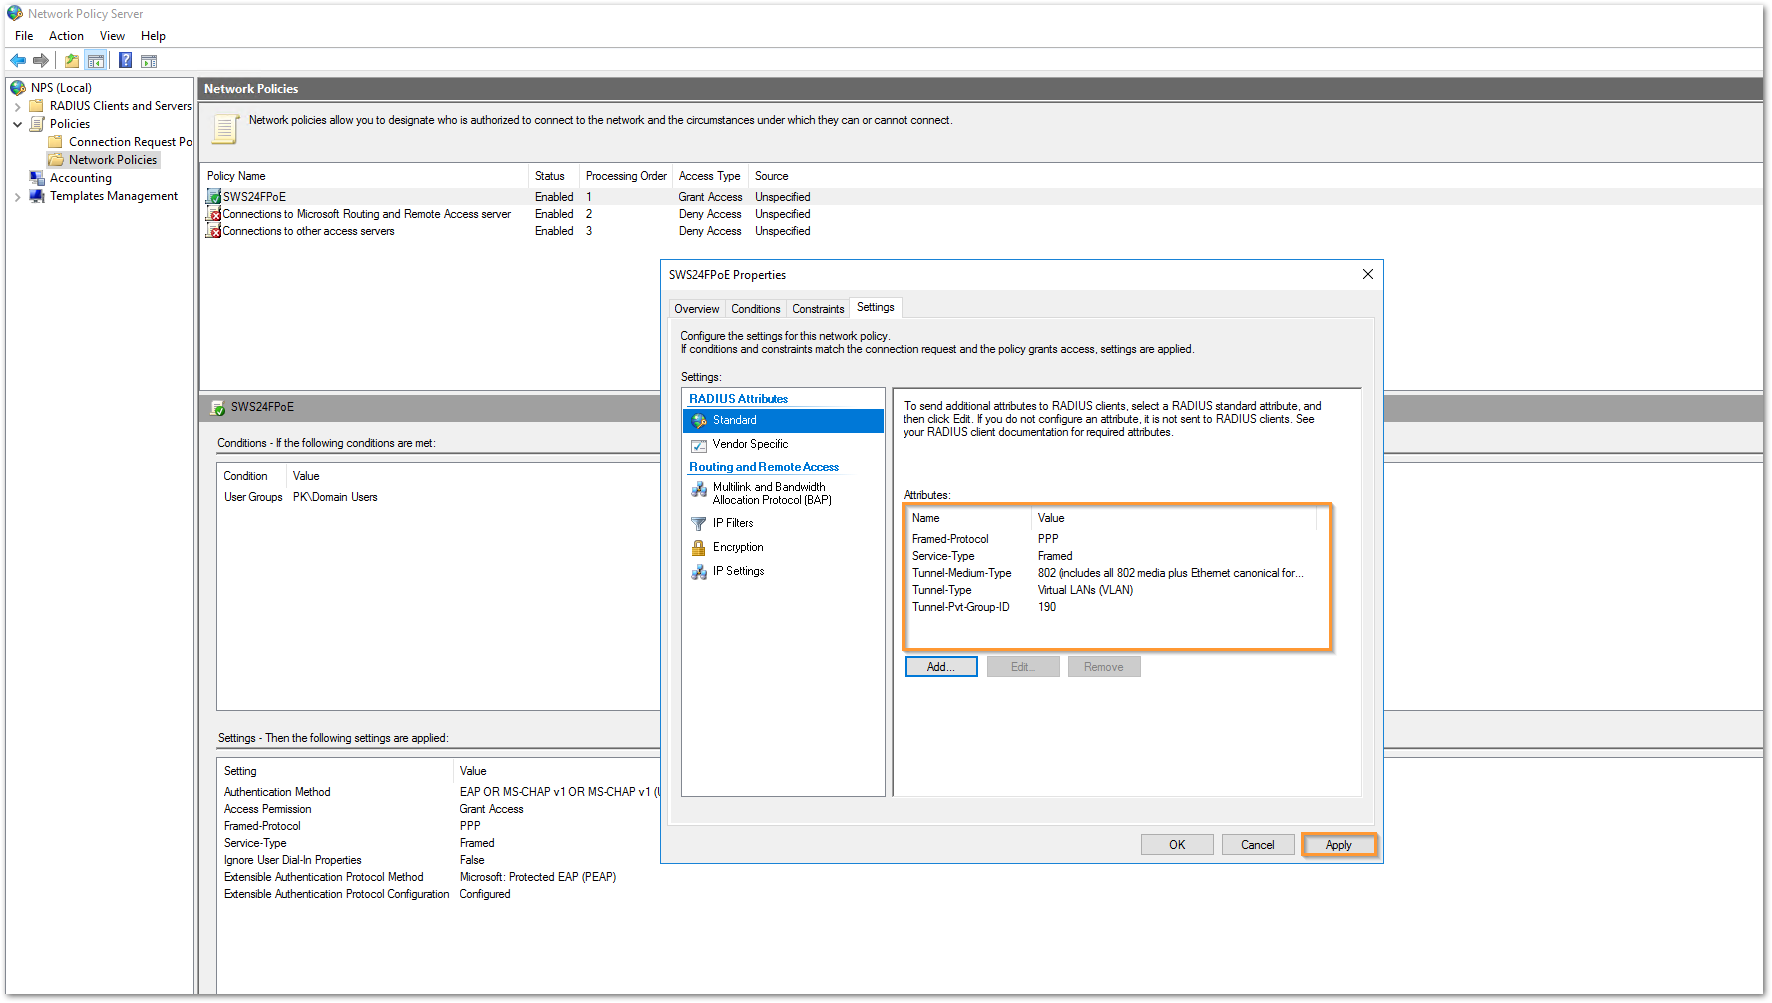
- You can now see all the attributed added to this NPS policy. Click OK.
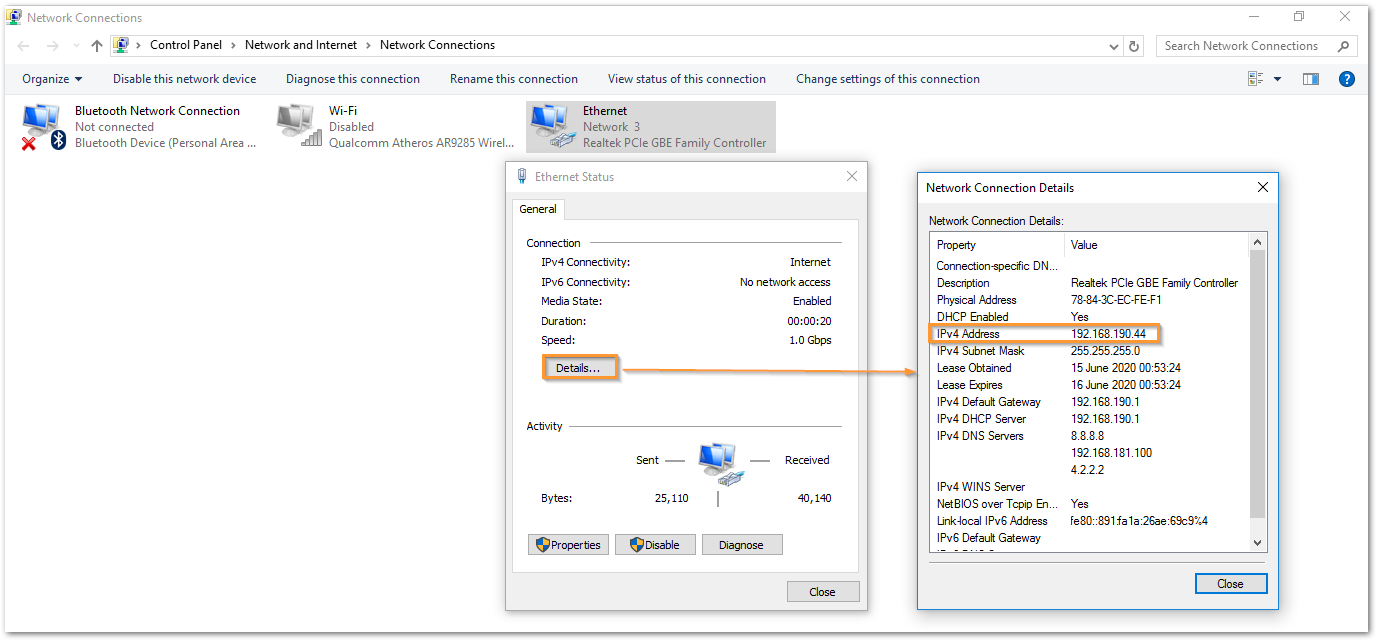
On the end machine that is connected to port 5, once the successful authentication is done, it gets an IP address from X0:V190 subnet.
You can see the following states on the Ethernet adapter of the end machine:
- Press Ctrl+R and type 'ncpa.cpl' to show up all the network adapters on the end machine. You can see that the end machine is attempting to authenticate against the RADIUS server using 802.1X authentication.
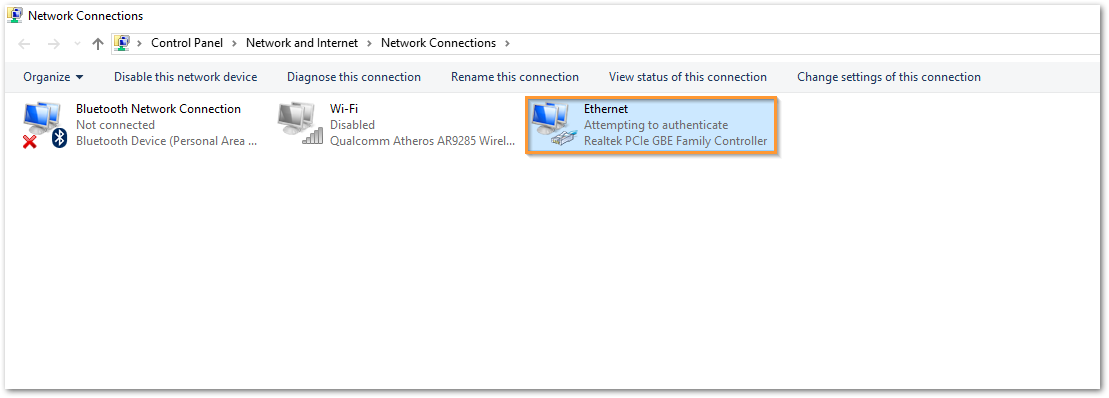
- Right click the Ethernet adapter and select Status. Click on details to check the IP address that it received. The IPv4 address section shows that it got an IP from X0:V190 subnet.
Related Articles
- Supported SonicWall and 3rd party SFP and SFP+ Modules that can be used with SonicWall Switches
- How to enable Port Mirror on Sonicwall Switch.
- Create a new VLAN on Sonicwall Switch managed by WCM.


 YES
YES NO
NO