-
Products
-
SonicPlatform
SonicPlatform is the cybersecurity platform purpose-built for MSPs, making managing complex security environments among multiple tenants easy and streamlined.
Discover More
-
-
Solutions
-
Federal
Protect Federal Agencies and Networks with scalable, purpose-built cybersecurity solutions
Learn MoreFederalProtect Federal Agencies and Networks with scalable, purpose-built cybersecurity solutions
Learn More - Industries
- Use Cases
-
-
Partners
-
Partner Portal
Access to deal registration, MDF, sales and marketing tools, training and more
Learn MorePartner PortalAccess to deal registration, MDF, sales and marketing tools, training and more
Learn More - SonicWall Partners
- Partner Resources
-
-
Support
-
Support Portal
Find answers to your questions by searching across our knowledge base, community, technical documentation and video tutorials
Learn MoreSupport PortalFind answers to your questions by searching across our knowledge base, community, technical documentation and video tutorials
Learn More - Support
- Resources
- Capture Labs
-
- Company
- Contact Us
Setting Up 802.1x Authentication on SonicWall Switch


Description
The IEEE-802.1X authentication provides a security standard for network access control with RADIUS servers and holds a network port disconnected until authentication is completed. With 802.1X authentication, the supplicant provides credentials, such as user name, password, or digital certificate to the authenticator, and the authenticator forwards the credentials to the authentication server for verification. If the authentication server determines the credentials are valid, the supplicant (client device) is allowed to access resources located on the protected side of the network. The Switch uses 802.1X to enable or disable port access control, to enable or disable the Guest VLAN, and to enable or disable the forwarding EAPOL (Extensible Authentication Protocol over LANs) frames.
Resolution
Enable 802.1X Authentication:
- Navigate to MANAGE | Switch Controller | Switches and click on 802.1x tab.
- Set the State slider to the right to enable authentication.
Other settings are:
• Guest VLAN — Select whether Guest VLAN is enabled or disabled on the Switch. The Default is disabled.
• Guest VLAN ID — Select the Guest VLAN from the list for currently defined VLANs.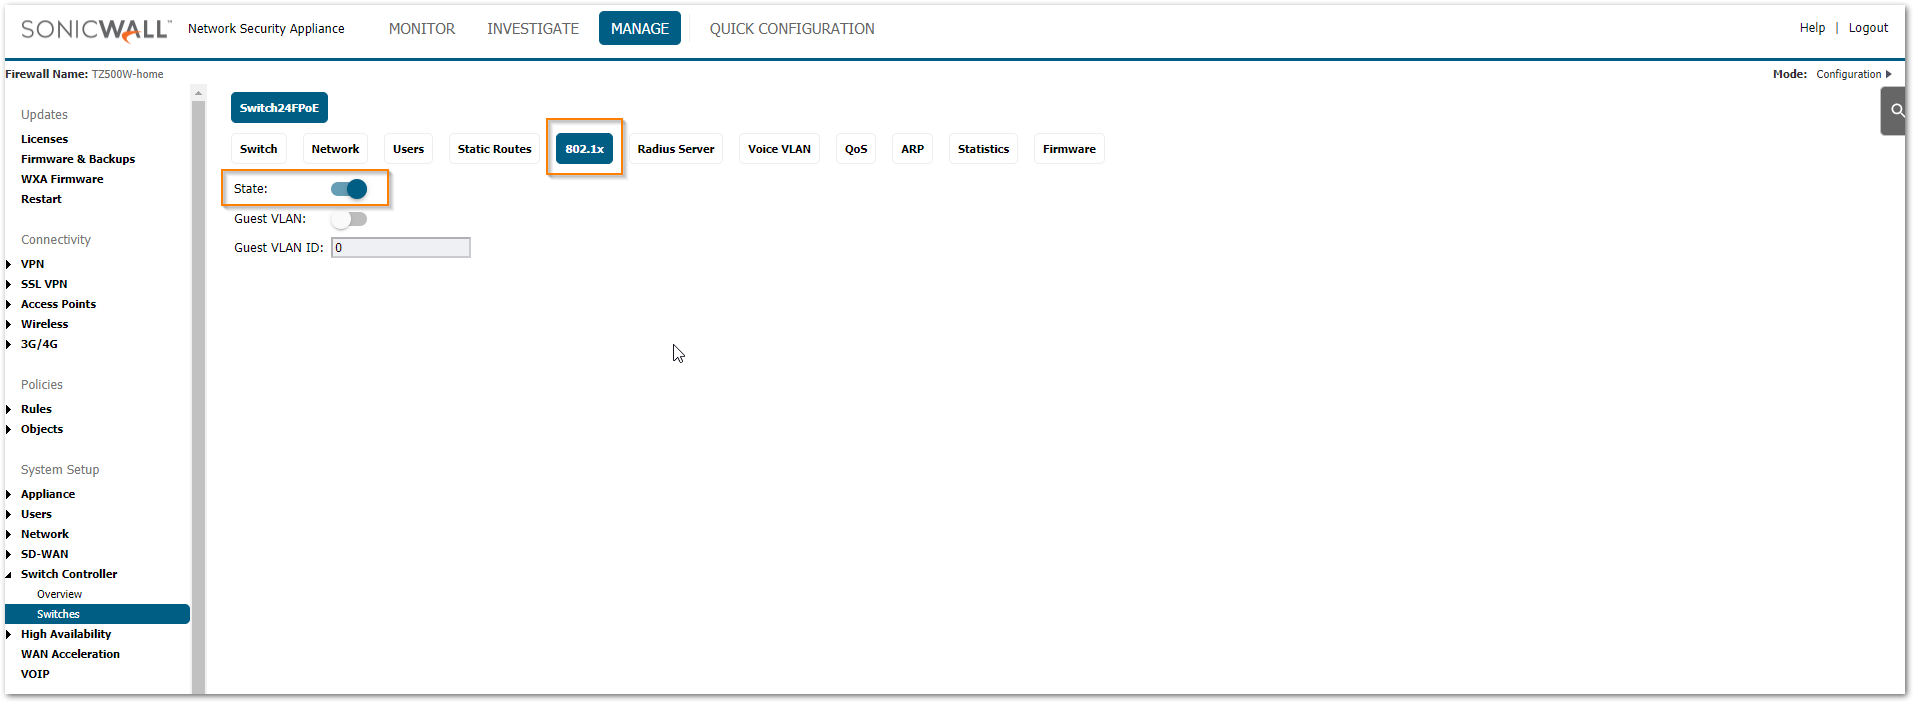
Enable RADIUS server
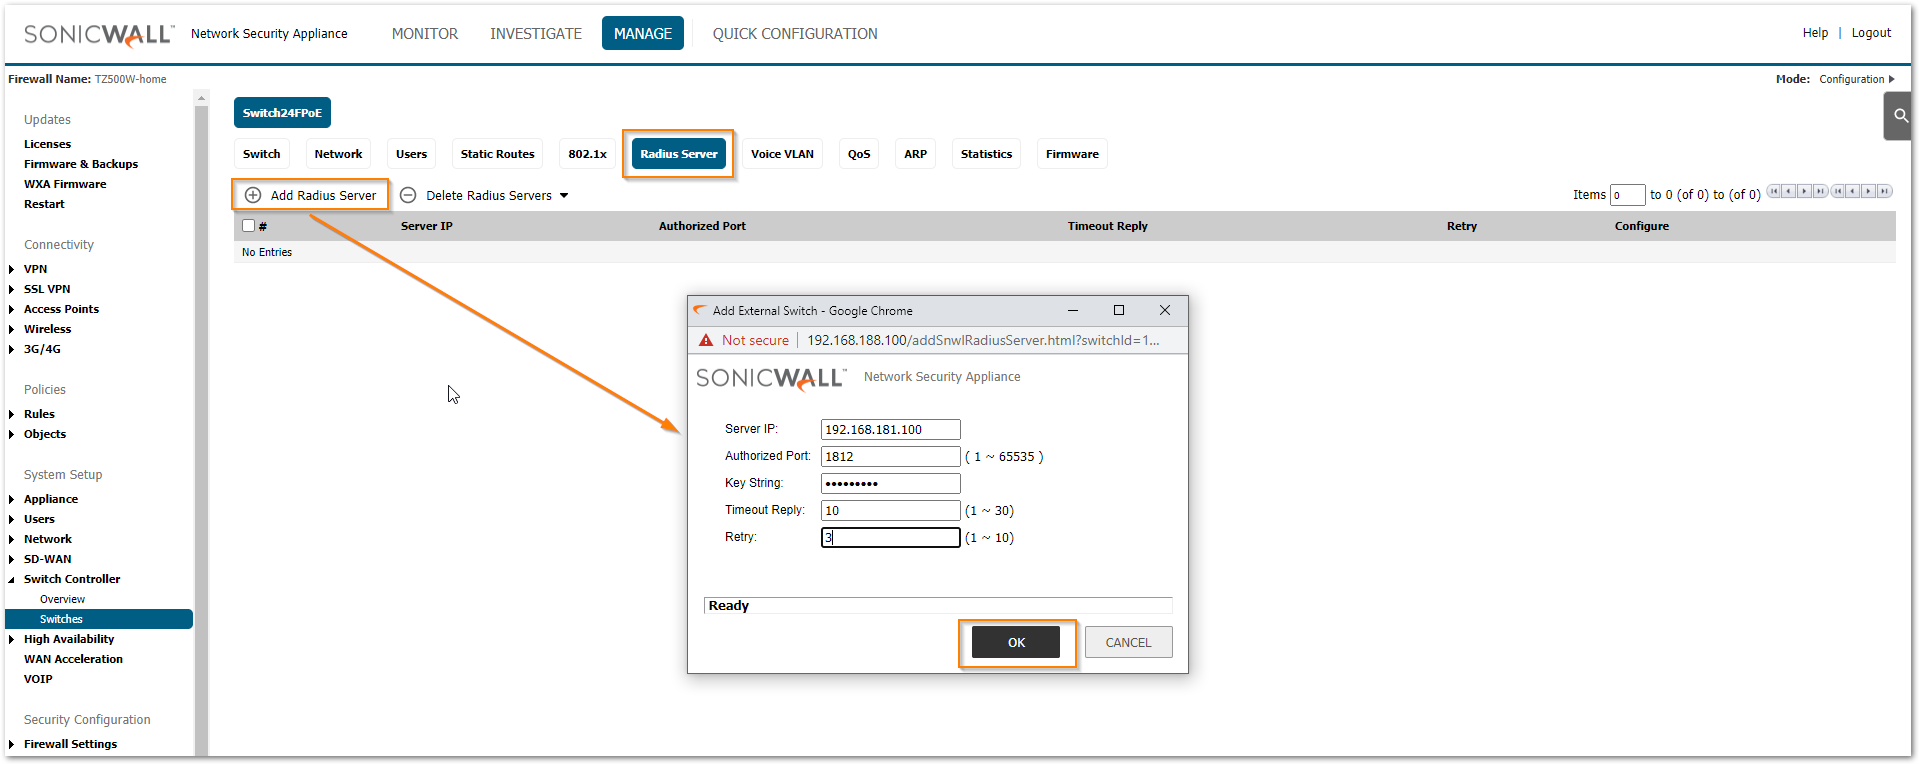
- Navigate to MANAGE | Switch Controller | Switches and click on Radius Server tab. When the server list appears click Add Radius Server.
- Mention the RADIUS Server IP address, port number (authorized port: default is 1812), and shared secret (key string) with other details like timeout reply and retry.
- Click OK.
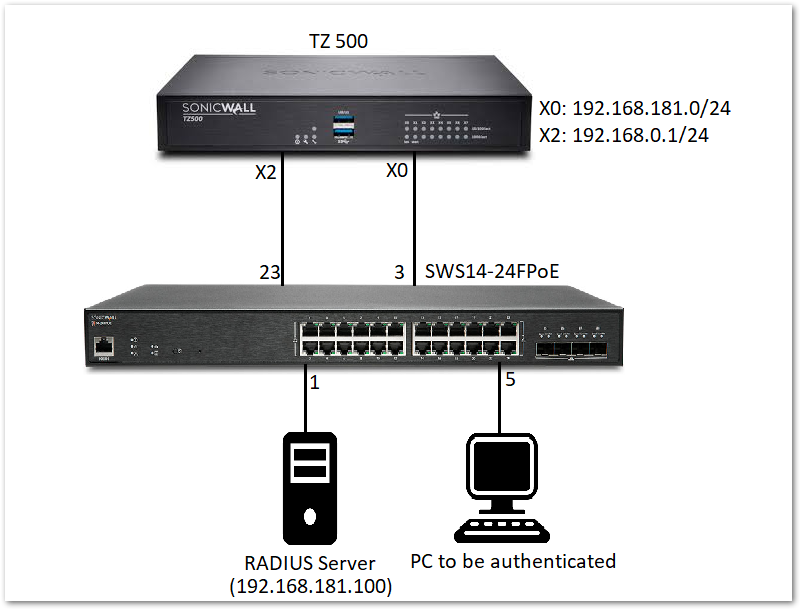
 EXAMPLE: Let us consider that the RADIUS server is connected to port 1 of the switch and has static IP: 192.168.181.100. The PC that needs be authenticated is connected to port 5 on the switch which is portshielded to interface X0. Once it is successfully authenticated it should get an IP on the X0 subnet.
Topology:
The following changes are required on the RADIUS server to achieve connectivity and perform authentication:
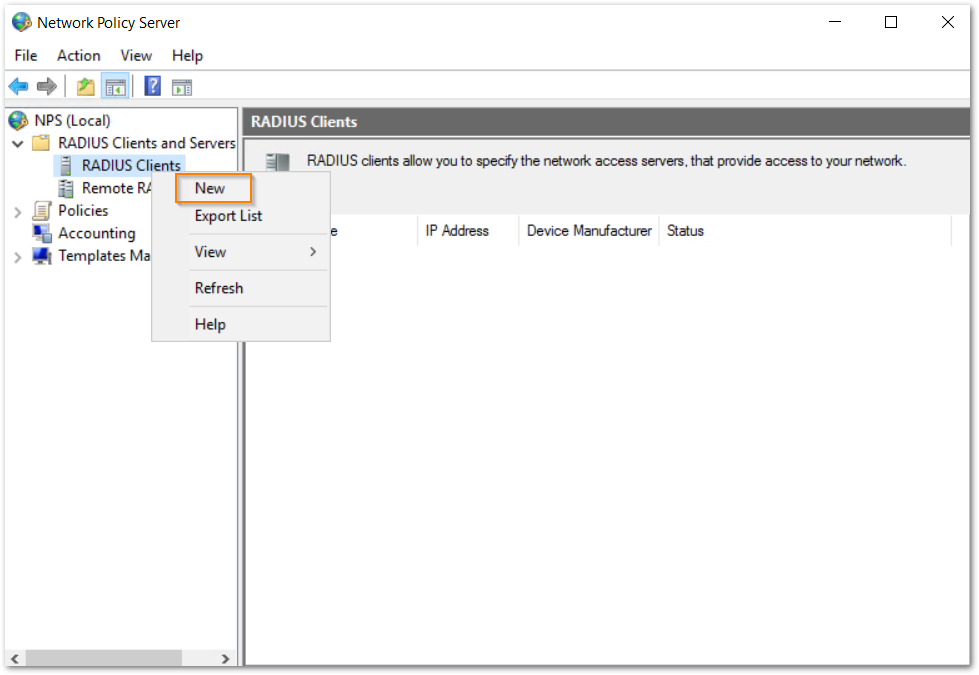
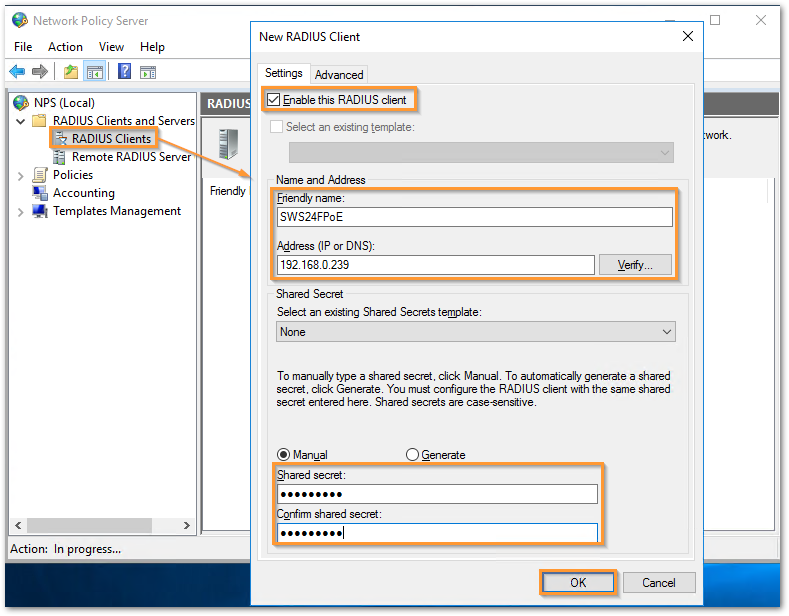
- Add a new RADIUS client under NPS. The IP address of the switch should be used along with the key string used while adding the RADIUS server on the switch.
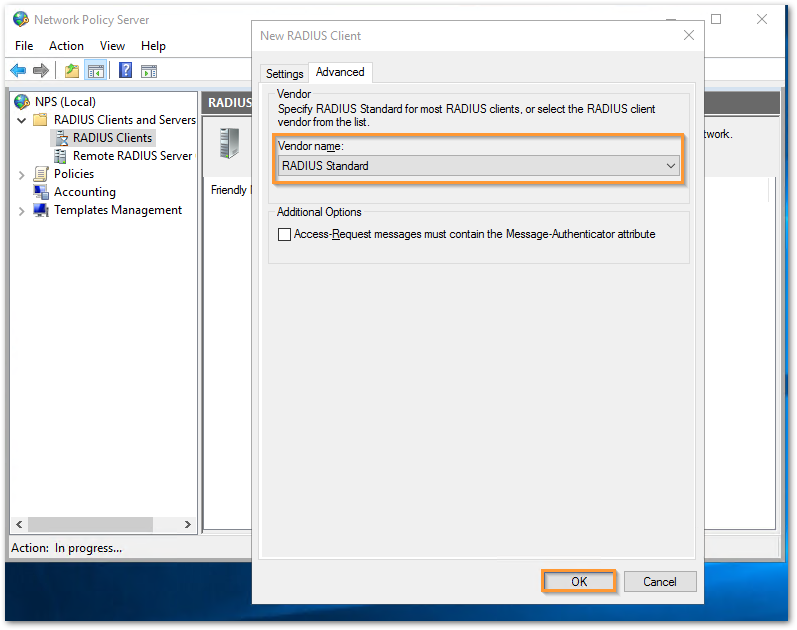
- Make sure that the vendor name is 'RADIUS Standard' on the Advanced tab. Click OK.
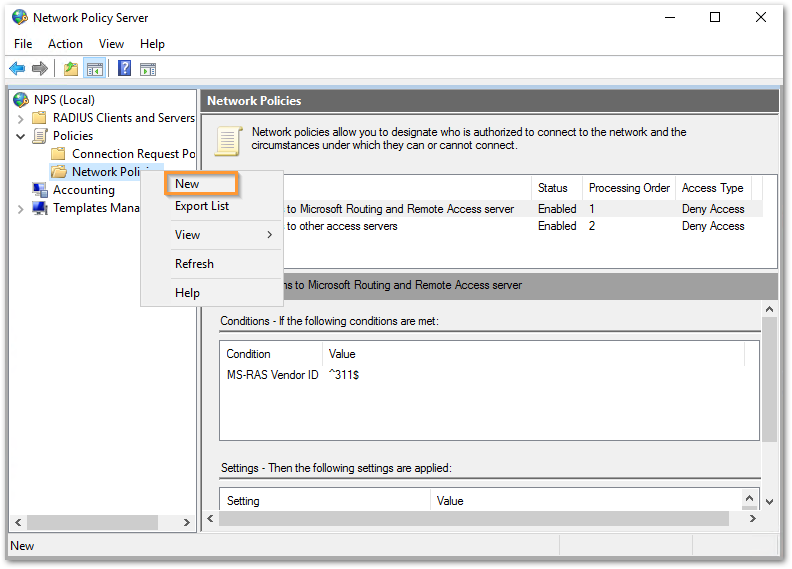
- We need to create a NPS policy to grant access to the right account with valid credentials to have a successful connection. Add the following NPS policy for the same. Right click on Network Policies under NPS and select New.
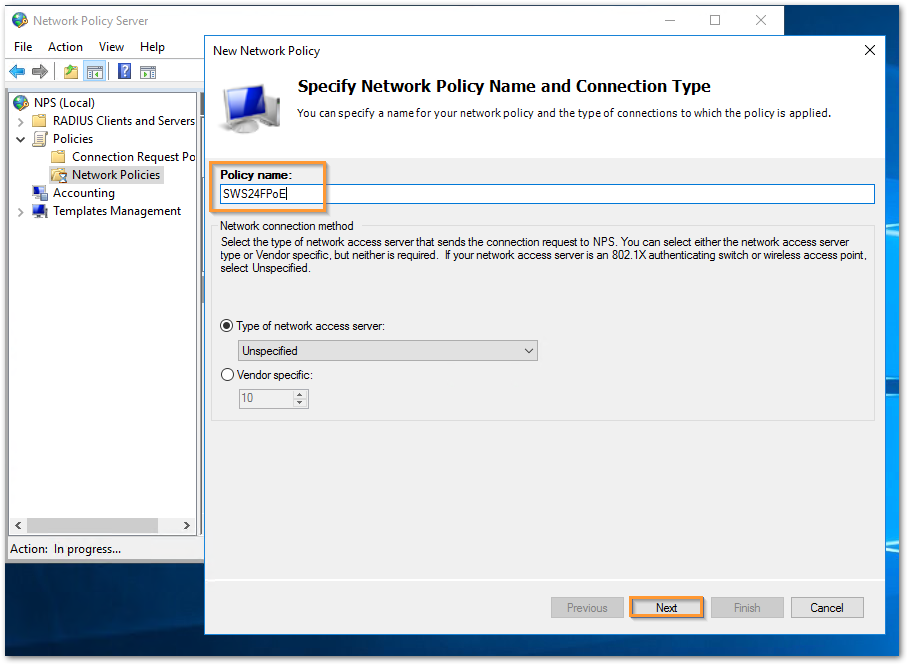
- Give a name to this new policy and click Next.
- We would like to provide access to the users belonging to Domain Users. So, under Conditions, click Add.
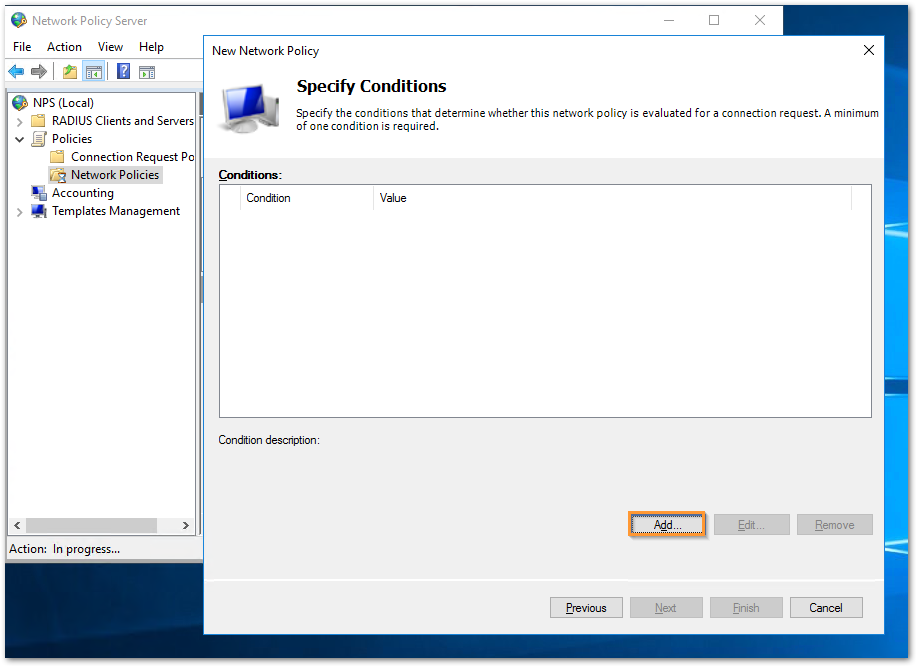
- Select 'User Groups' and click Add.
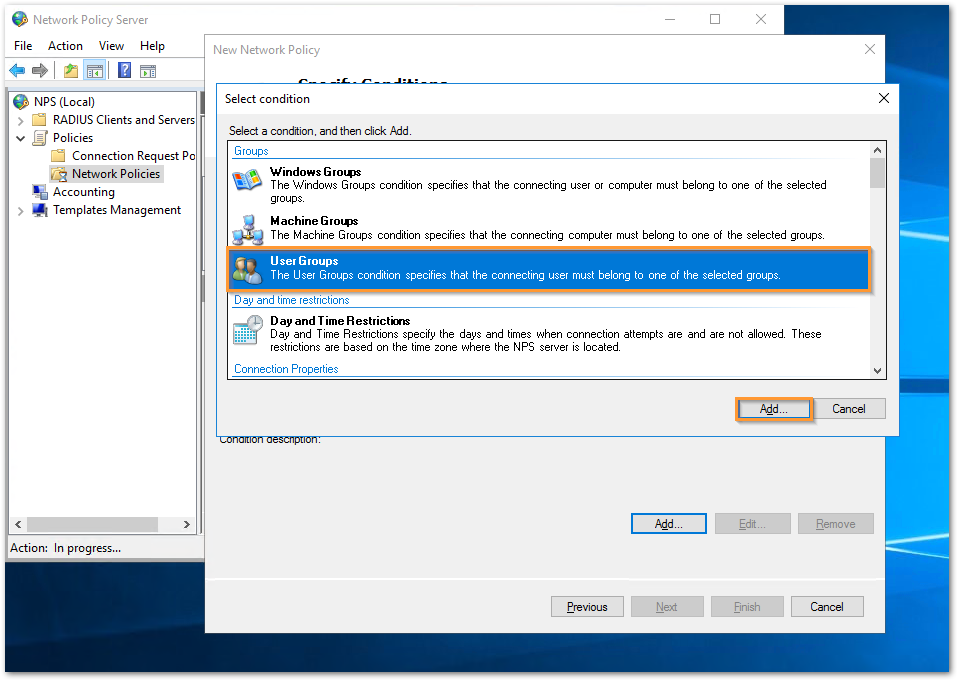
- Under 'Add Groups' select the User group to be matched. For this example, we are selecting 'Domain Users'. Click on OK.
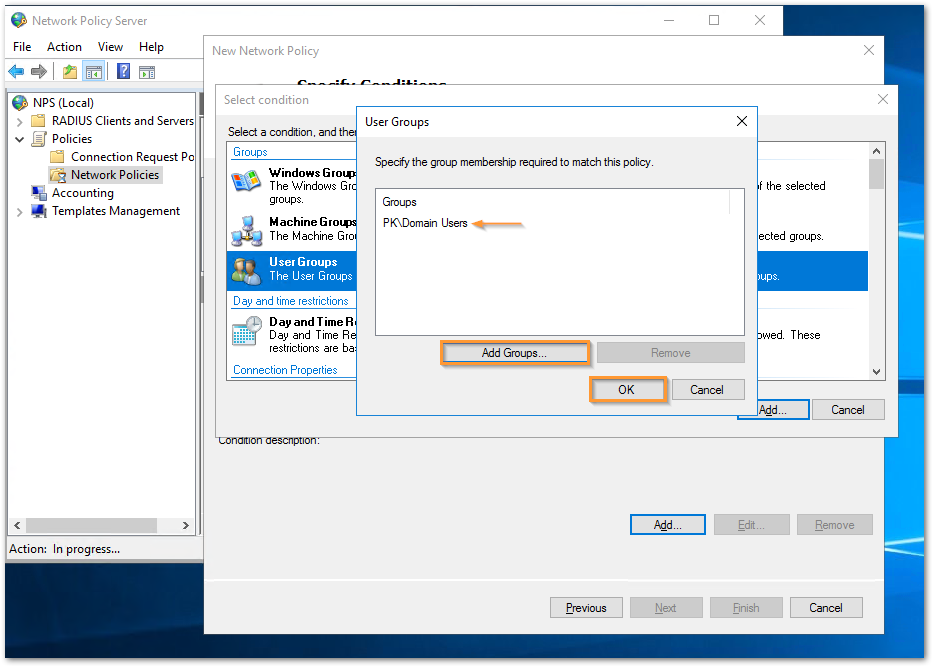
- Select the Radio button for Access granted and click Next.
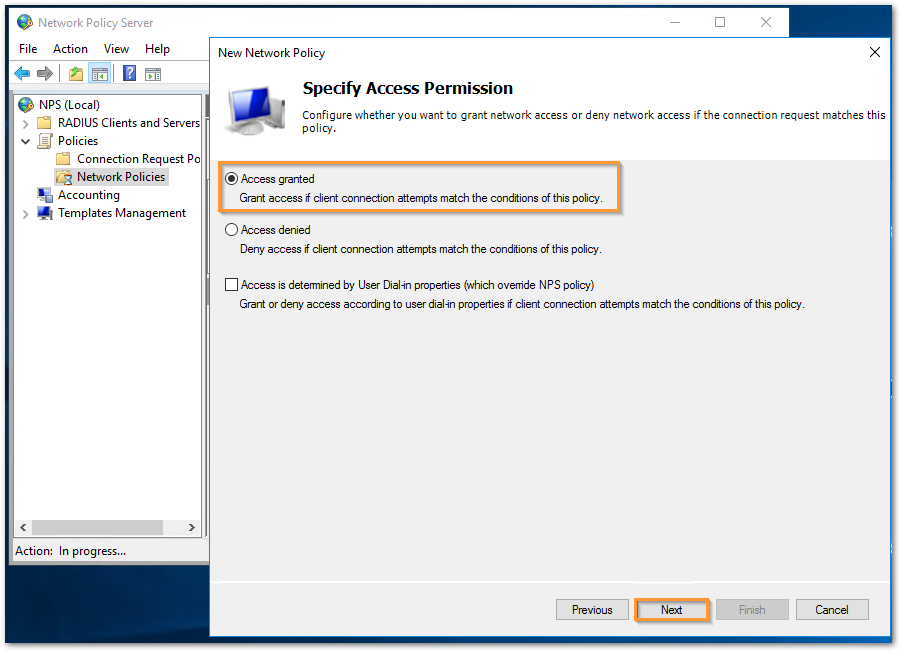
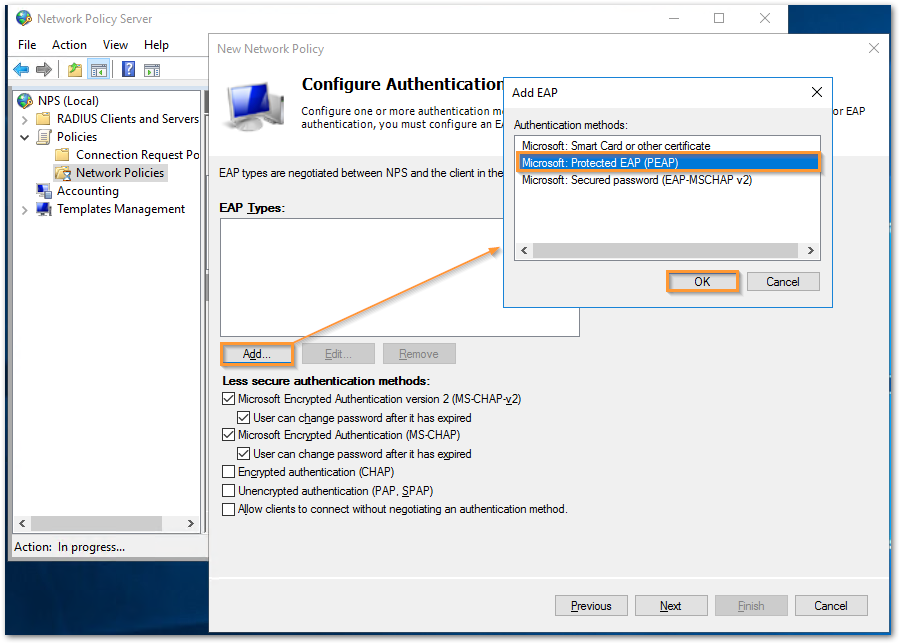
- Under EAP Types, select 'Microsoft: Protected EAP (PEAP)' and then click OK.
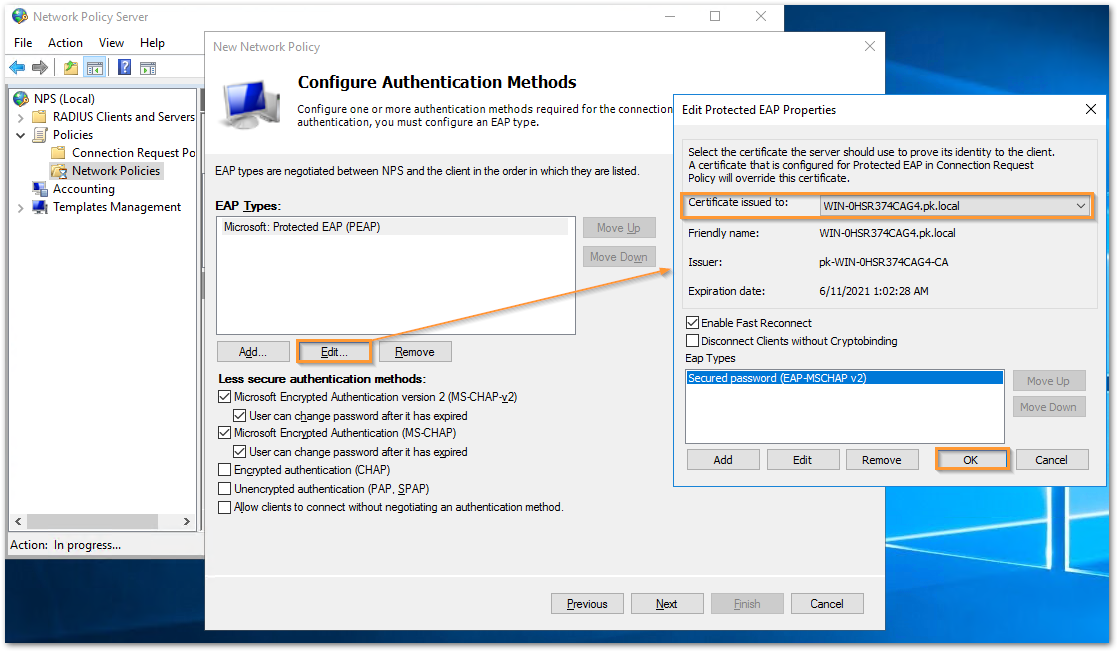
- Select the EAP Type just added and click on Edit. Under Certificate issues to, select the local certificate. This should be a local certificate issued to the server and not a CA certificate. Click on OK. Finally click Finish.
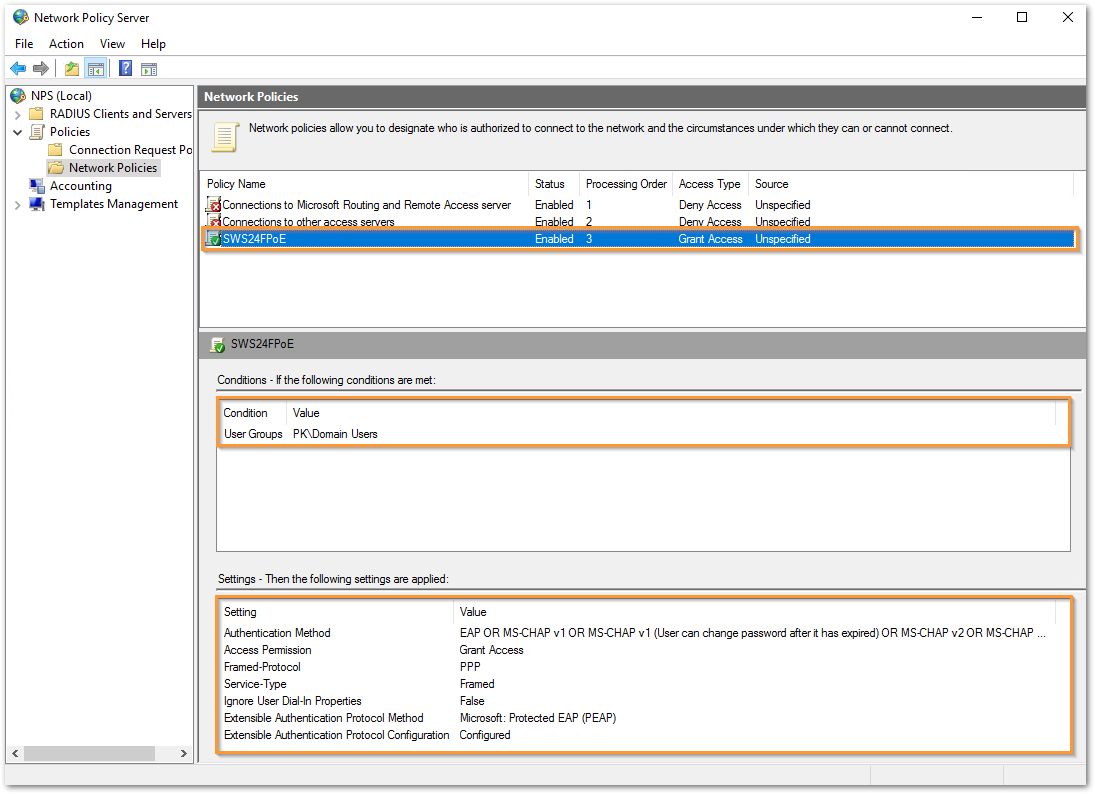
- You can now see the latest new policy added and the condition and settings related to this policy.
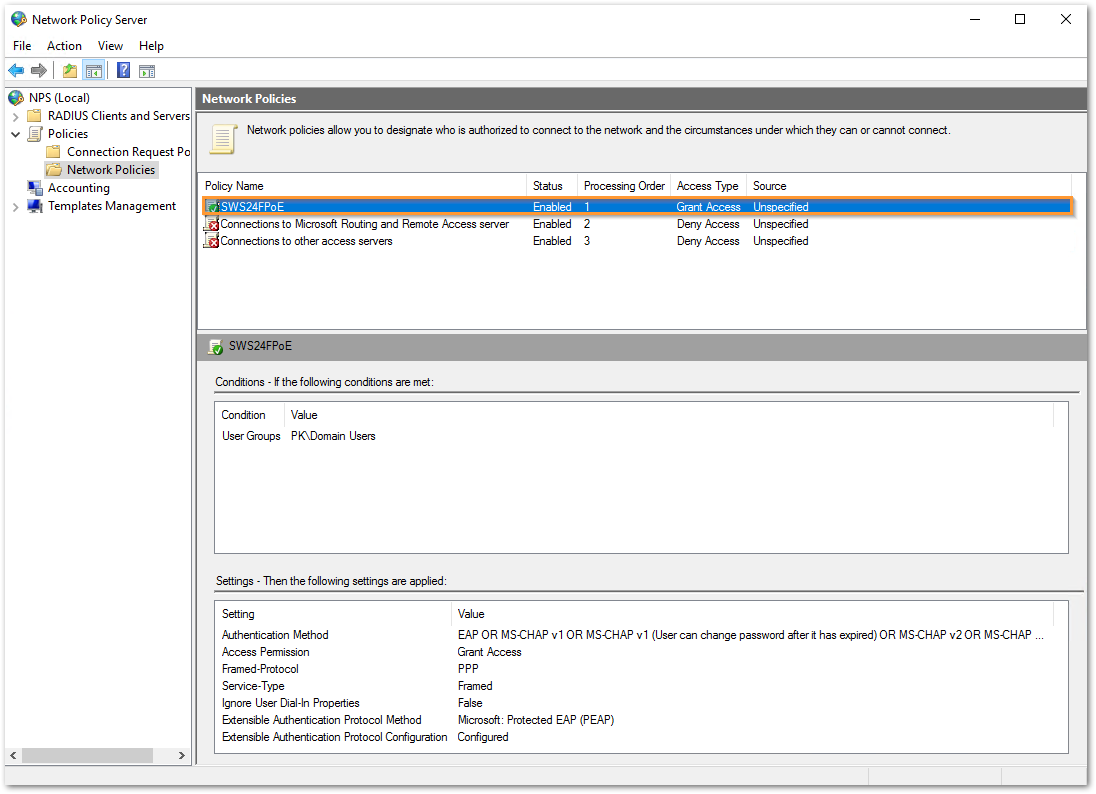
- Move up this policy if you see other NPS policies already added on the list. To move the policy up, right click on the policy and select 'Move up'. This is essential as we would like to match this policy first and allow the connection.
The following changes are required on the end machine connected to port 5 to be able to successfully authenticate using 802.1X authentication against the RADIUS server:
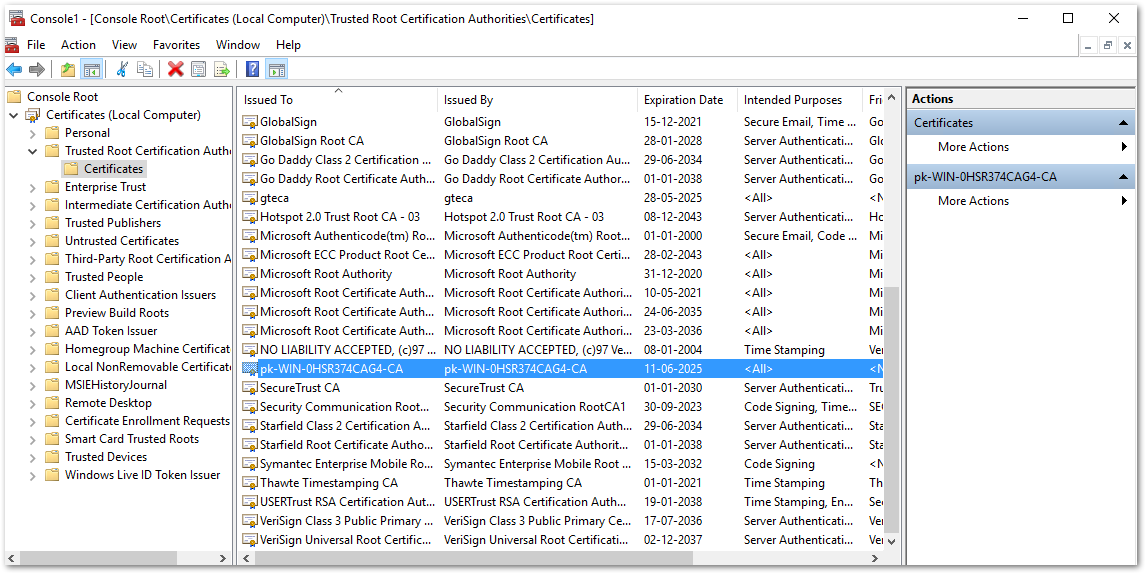
- We selected a local certificate in Step 10 of adding a NPS policy. The CA certificate that signed that local certificate should be present on the 'Trusted Root Certification Authorities' on the local computer. You can use a Group Policy to push this certificate to all machines that belong to the domain.
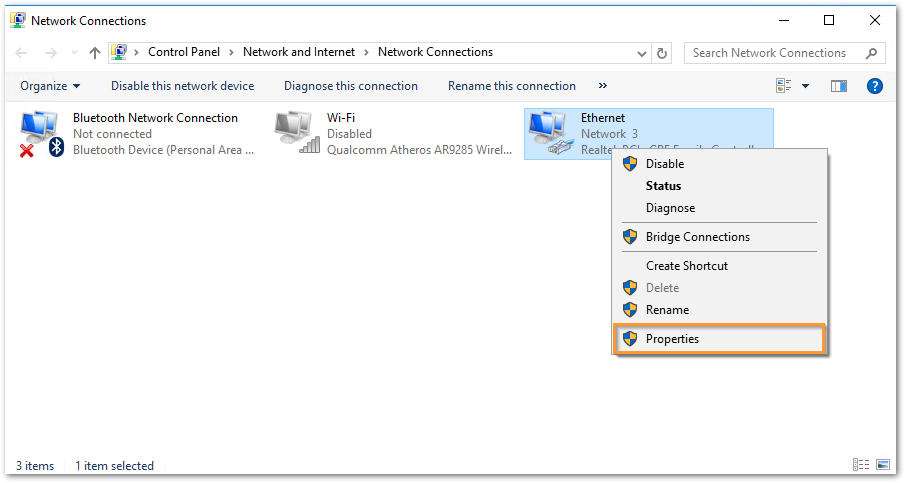
- Press Ctrl+R and type 'ncpa.cpl' to show up all the network adapters on the end machine. Right click the Ethernet adapter and select Properties.
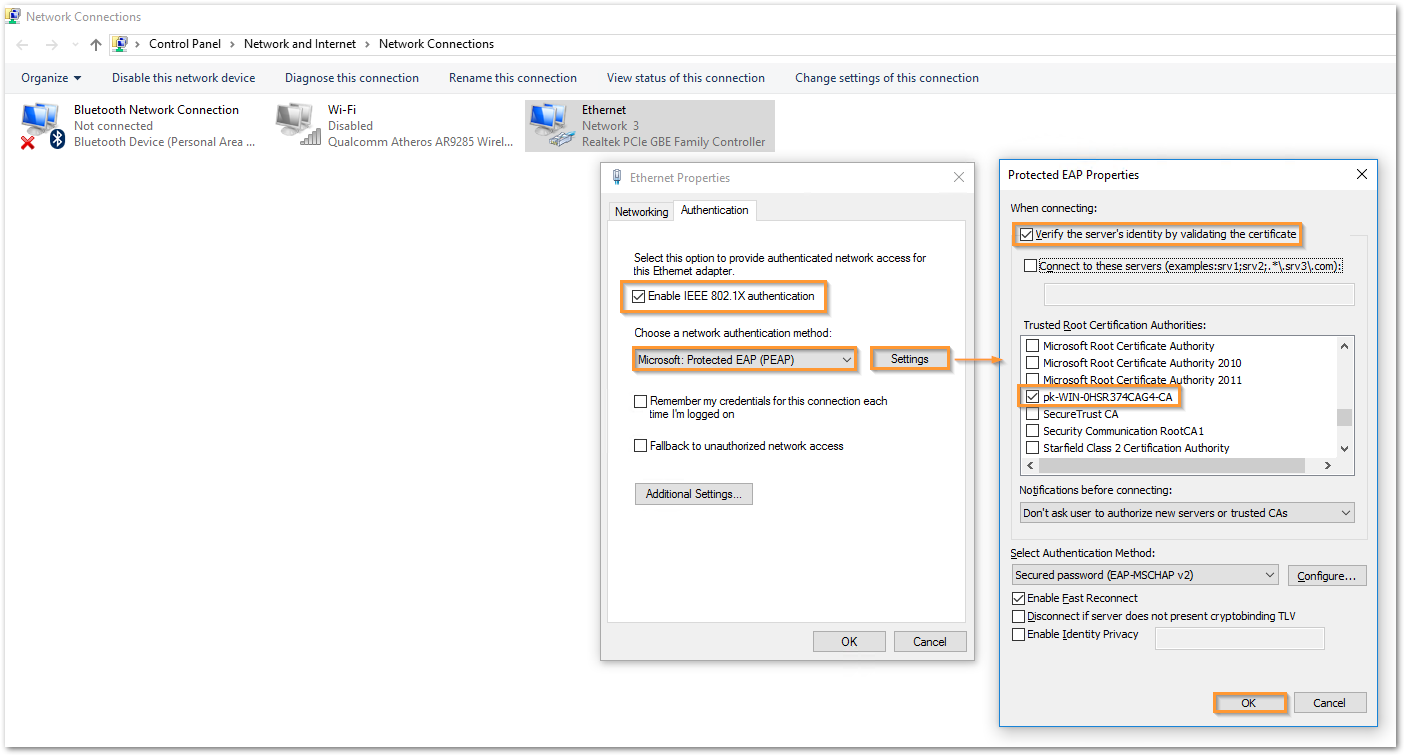
- Select the 'Authentication' tab and enable the option 'Enable IEEE 802.1X authentication'. Use the method as PEAP as used in the NPS policy and click on the 'Settings' button. A new pop-up window will show up, enable the option 'Verify the server's identity by validating the certificate' and select the CA certificate imported on Step 1 and click OK.
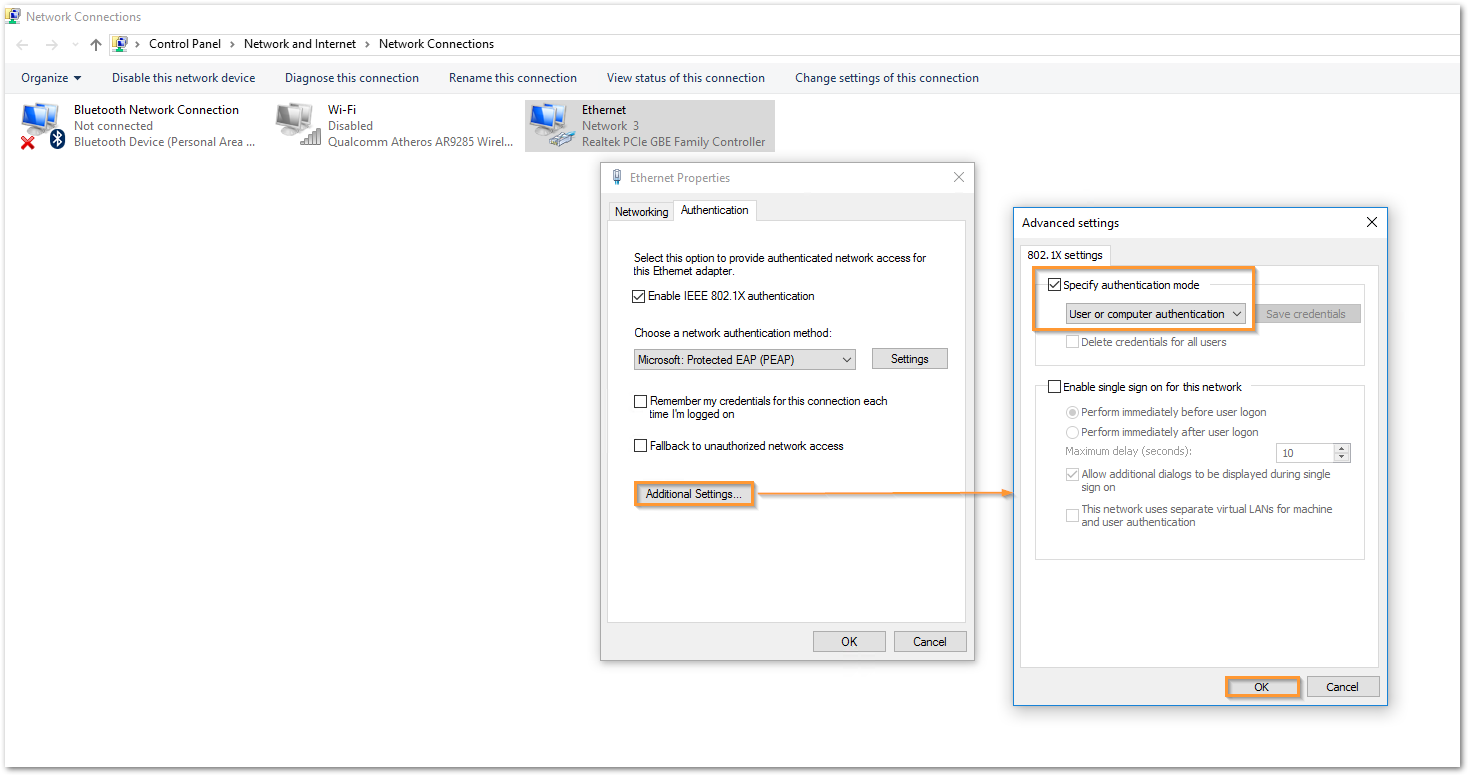
- Click on 'Additional Settings' button and under 802.1X settings, enable 'Specify authentication mode' and use 'User or computer authentication'. Click OK.
We also need to enable authentication using 802.1X on the required port on the switch. In this example, it is port 5 on the switch.
- Navigate to MANAGE | Switch Controller | Overview tab and click on port 5 from either physical, link or VLAN view.
- Under the '802.1X settings', select the mode as Auto. Keep the other options on default.
- Click OK.
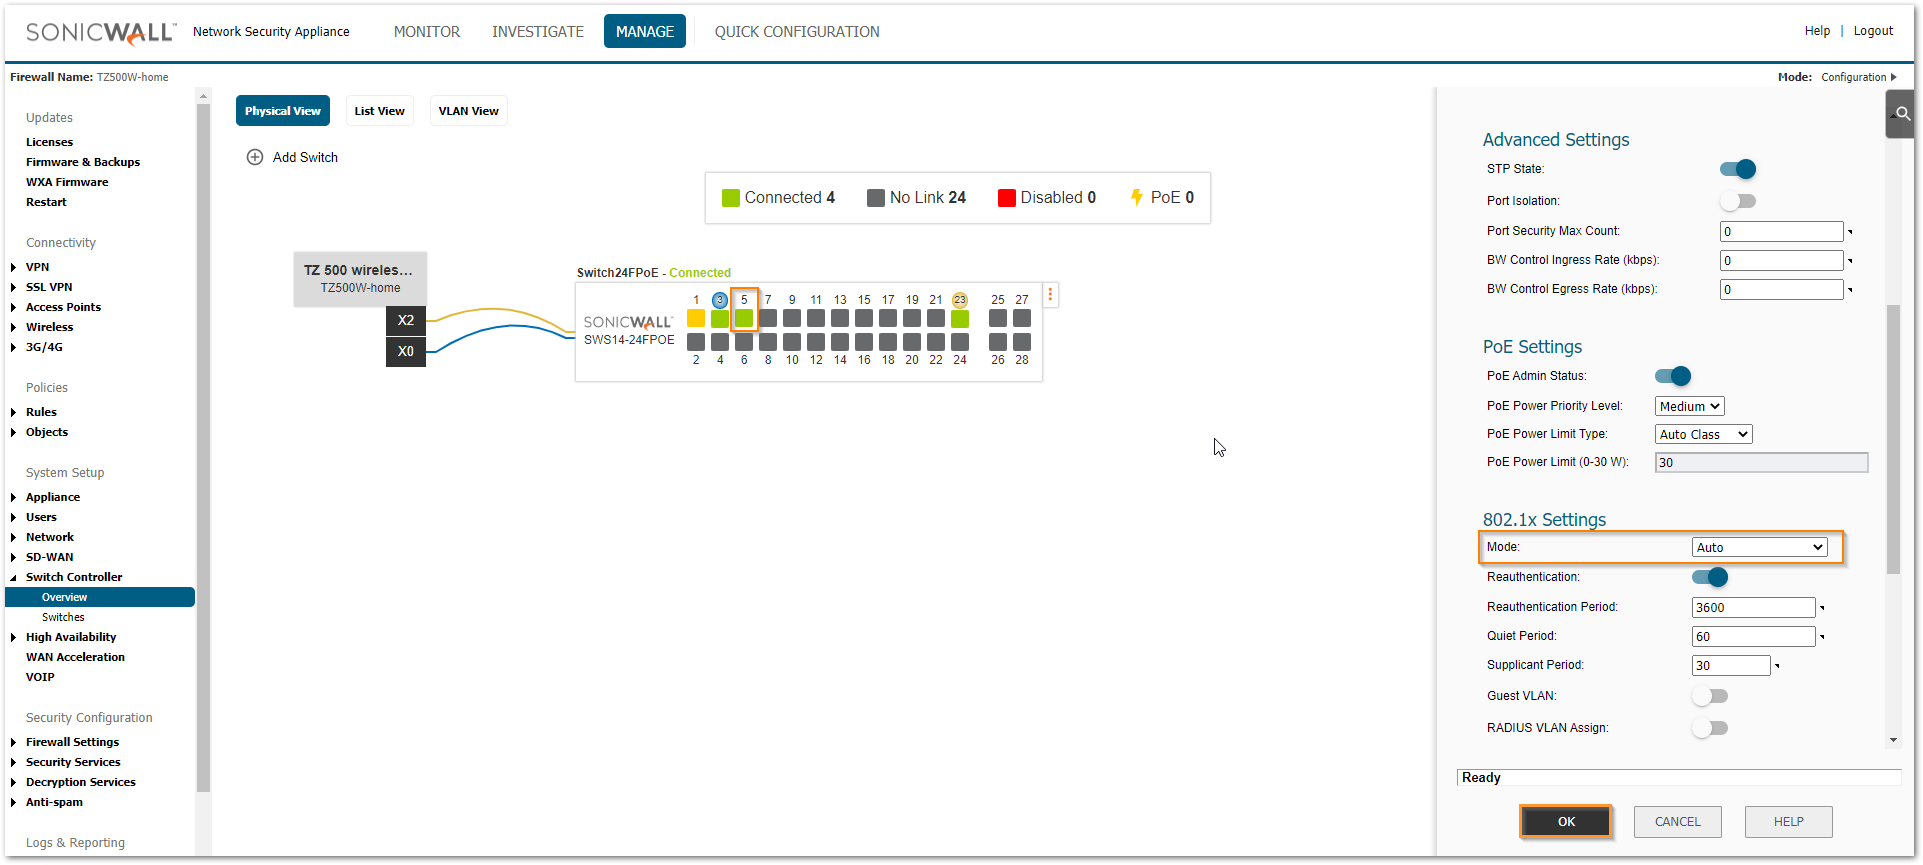
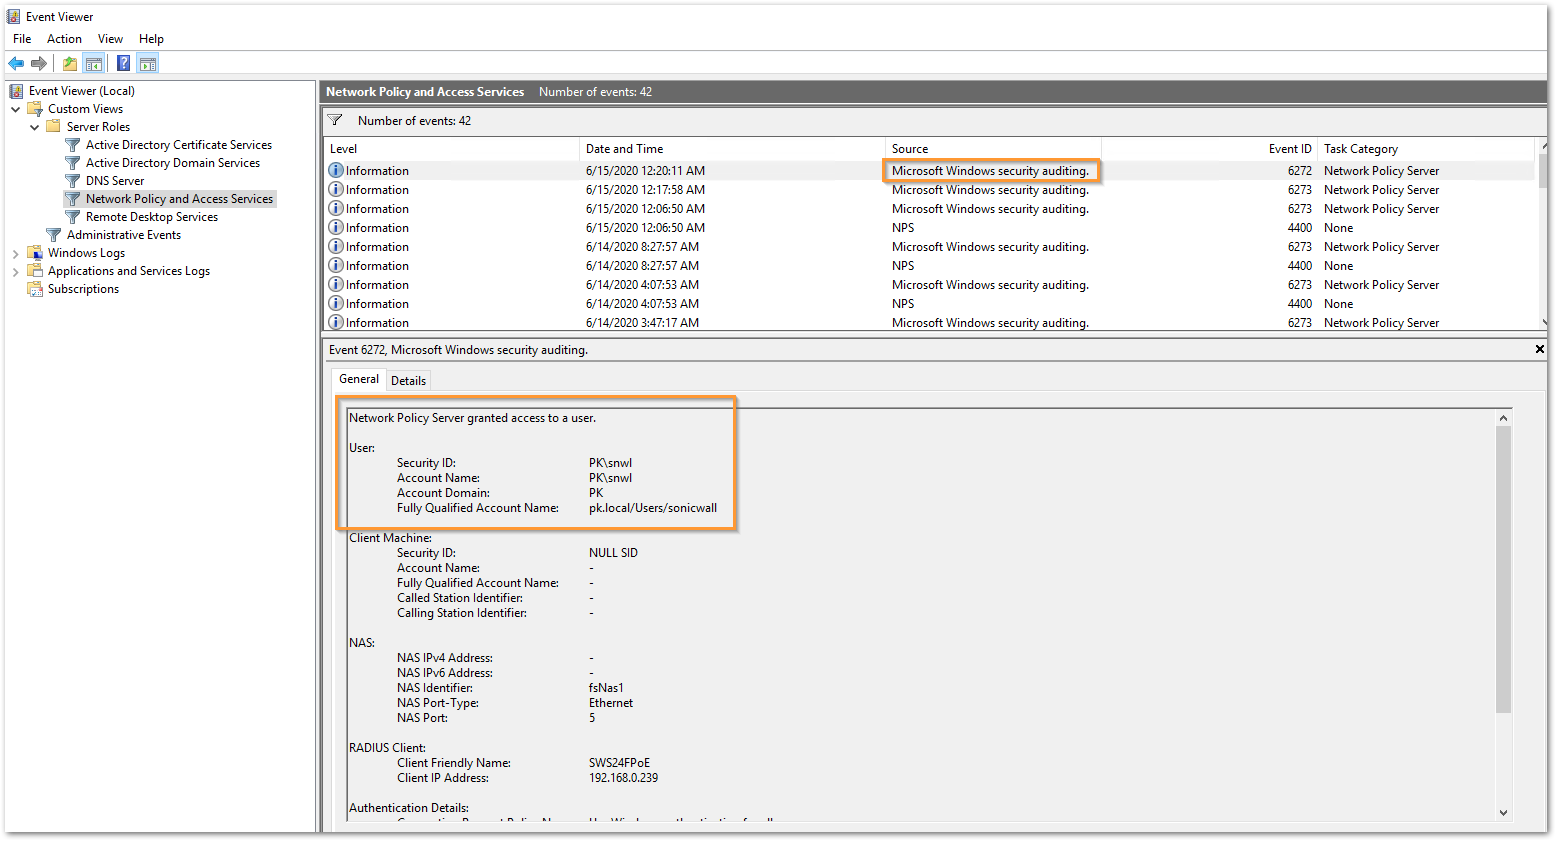
Now when the user logs in with a Domain User credentials on the end machine connected to port 5, it is authenticated against the RADIUS server and receives an IP from X0 subnet.
The following log message show up during successful authentication:
Related Articles
- Supported SonicWall and 3rd party SFP and SFP+ Modules that can be used with SonicWall Switches
- How to enable Port Mirror on Sonicwall Switch.
- Create a new VLAN on Sonicwall Switch managed by WCM.


 YES
YES NO
NO