-
Products
-
SonicPlatform
SonicPlatform is the cybersecurity platform purpose-built for MSPs, making managing complex security environments among multiple tenants easy and streamlined.
Discover More
-
-
Solutions
-
Federal
Protect Federal Agencies and Networks with scalable, purpose-built cybersecurity solutions
Learn MoreFederalProtect Federal Agencies and Networks with scalable, purpose-built cybersecurity solutions
Learn More - Industries
- Use Cases
-
-
Partners
-
Partner Portal
Access to deal registration, MDF, sales and marketing tools, training and more
Learn MorePartner PortalAccess to deal registration, MDF, sales and marketing tools, training and more
Learn More - SonicWall Partners
- Partner Resources
-
-
Support
-
Support Portal
Find answers to your questions by searching across our knowledge base, community, technical documentation and video tutorials
Learn MoreSupport PortalFind answers to your questions by searching across our knowledge base, community, technical documentation and video tutorials
Learn More - Support
- Resources
- Capture Labs
-
- Company
- Contact Us
How to provision SonicPoint/SonicWave through SonicWall Switch ?


Description
Connecting access points to a Switch involves three steps beyond making the physical connection.
- Configure the network interface to the Switch supporting the access point to support the WLAN.
- Configure the WLAN zone for trust and security services.
- Configure the SonicWave access point entry for the desired radio frequency, mode, and authentication type.
Resolution
The Articles explain how to integrate the SonicWall Access Points using the SonicWall Switch SWS14-48FPOE.
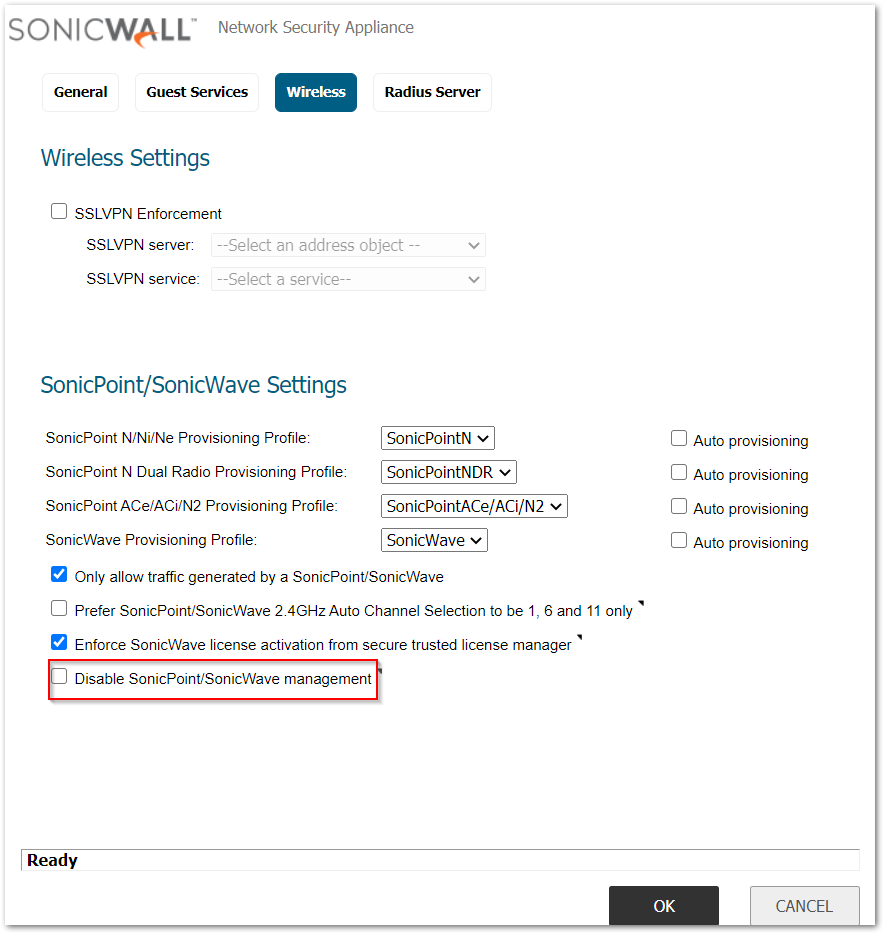
 NOTE: Please make sure to have "Disable SonicPoint/SonicWave management" setting unchecked for WLAN zone. To change this setting navigate to Manage|Network|Zones and click configure button for WLAN zone.
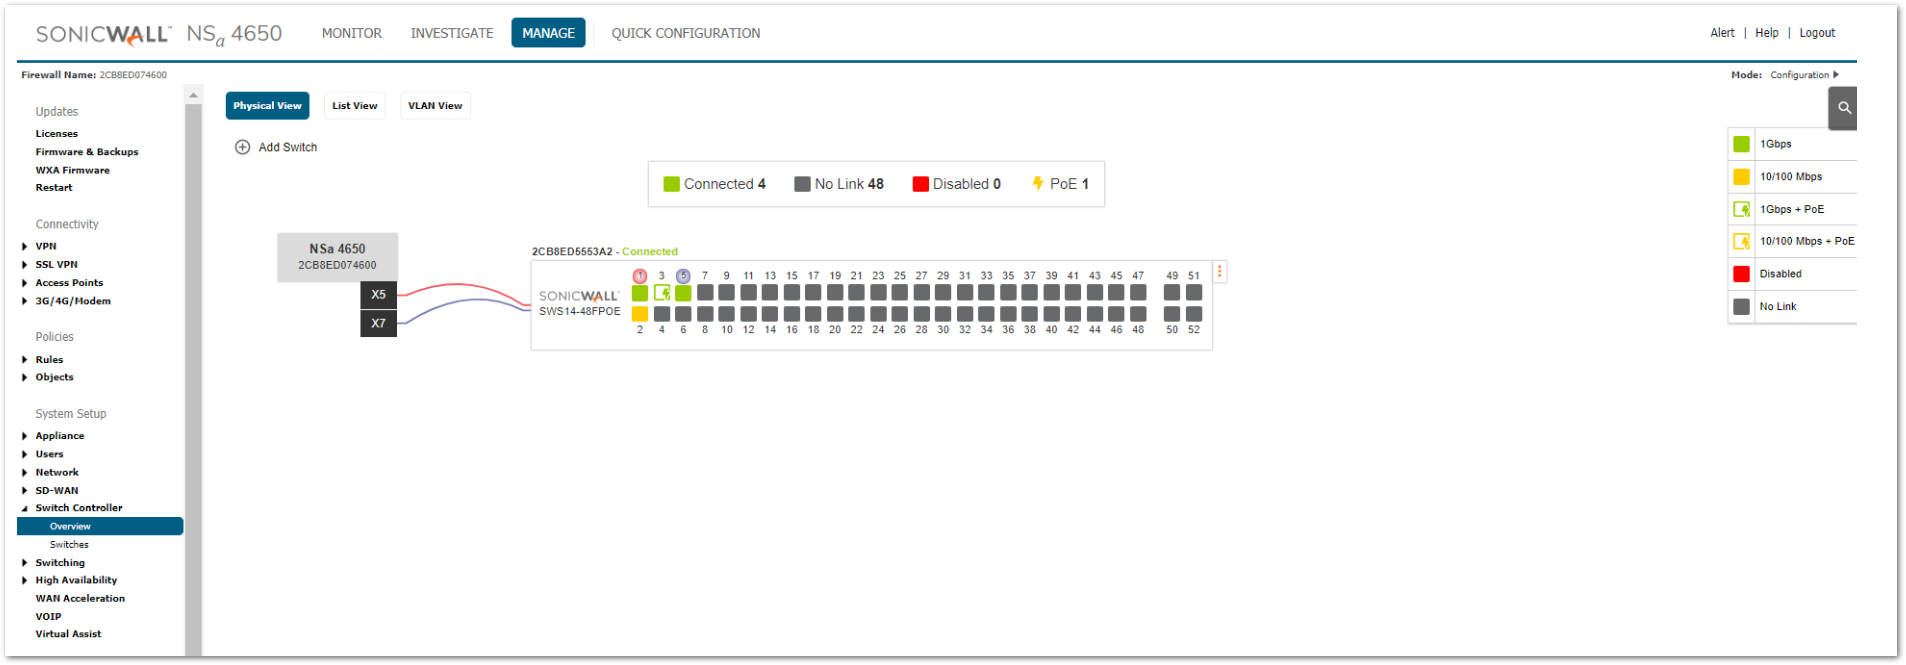
Adding the Switch and configuring Dedicated Link:
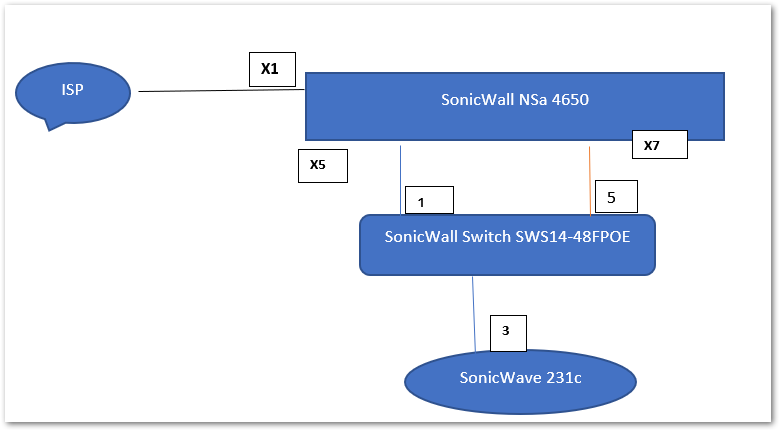
- Connect the X5 interface of SonicWall NSa 4650 to Port 1 of the SonicWall Switch SWS14-48FPOE.
- To add the Switch to the SonicWall, Navigate to Manage | Network | Interfaces and then click on Configure for X5 interface and select the Advanced tab. Select Enable AutoDiscovery of SonicWall Switches and click OK. Please follow the KB to understand more about How To Integrate A SonicWall Switch With SonicWall UTM Using Auto-Discovery?
- Connect Port 5 of the Switch to the X7 Interface of the SonicWall as a Dedicated Uplink.
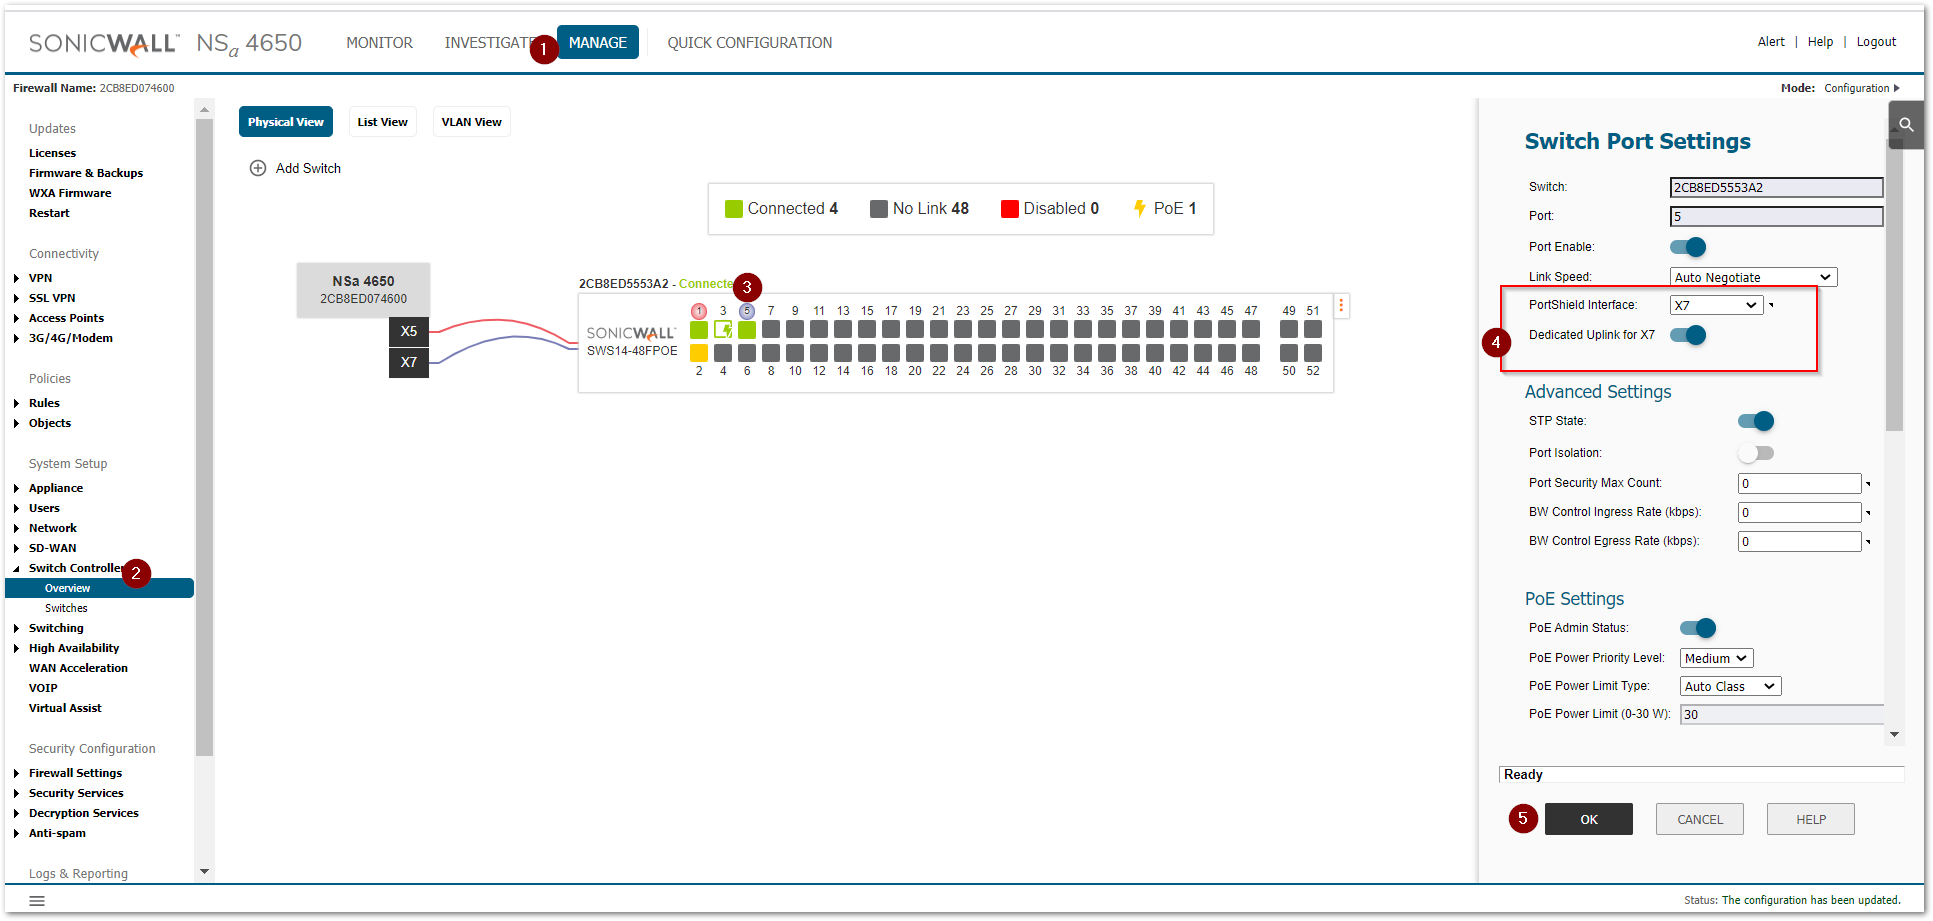
- This dedicated uplink configuration allows a given link between the firewall and the Switch to be designated as the dedicated uplink set up to carry PortShield traffic corresponding to the connected firewall interface. The firewall and Switch ports are configured in trunk mode for the VLAN corresponding to the PortShield VLAN of the firewall interface.
- To configure Port 5 of the Switch, Navigate to Manage|Switch Controller |Overview, select the port 5, and set the PortShield Interface to X7, Enable the Dedicated Uplink for X7 and click OK.
Configuring the WLAN Interfaces on SonicWall
- Configure the network interface in the WLAN zone, connected to the Switch to support the access point.
- Navigate to Manage|Network|Interfaces, Click on configure to edit the X7 Interface.
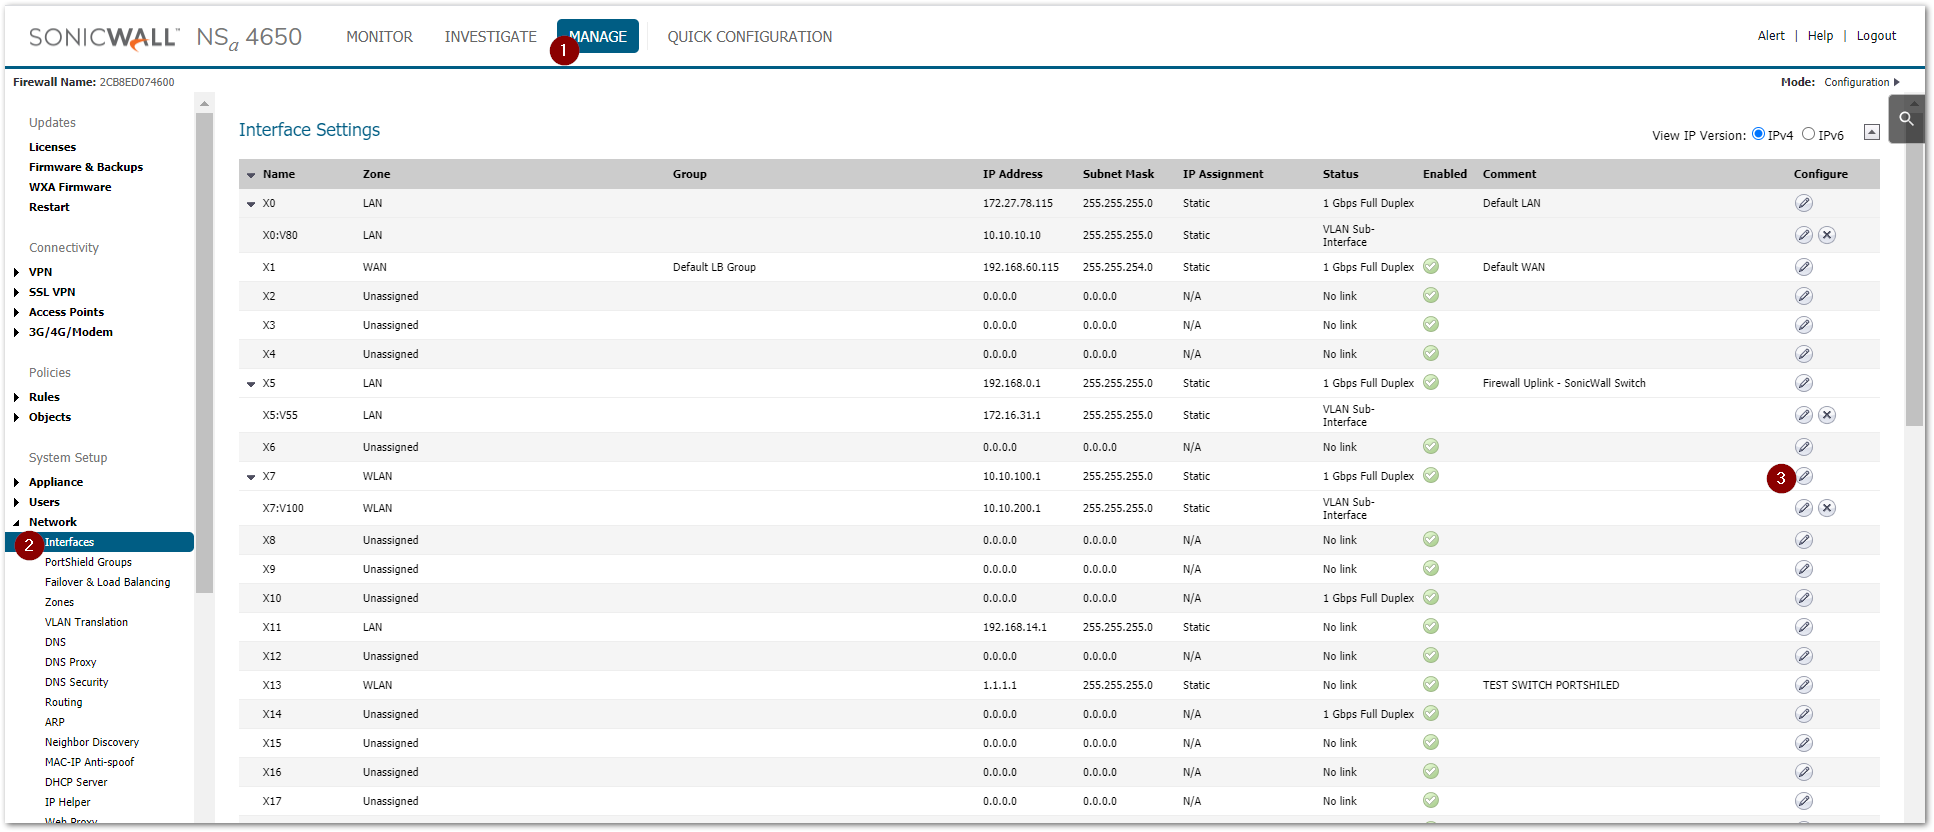
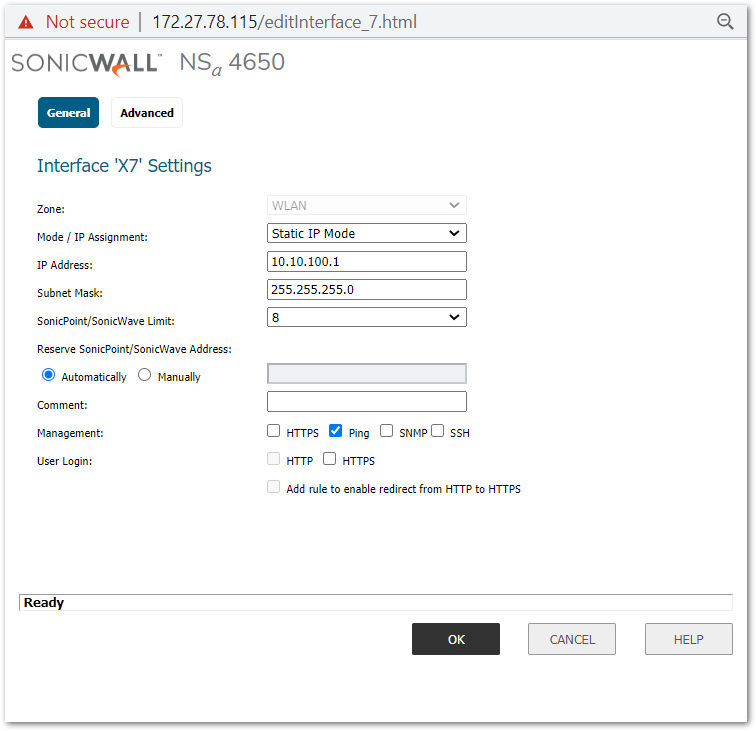
- Select WLAN for the Zone type with Static IP Mode for the Mode/IP Assignment. Configure IP Address field, type in any private IP address that does not interfere with the IP address range of any other interfaces on the appliance followed by Subnet Mask.
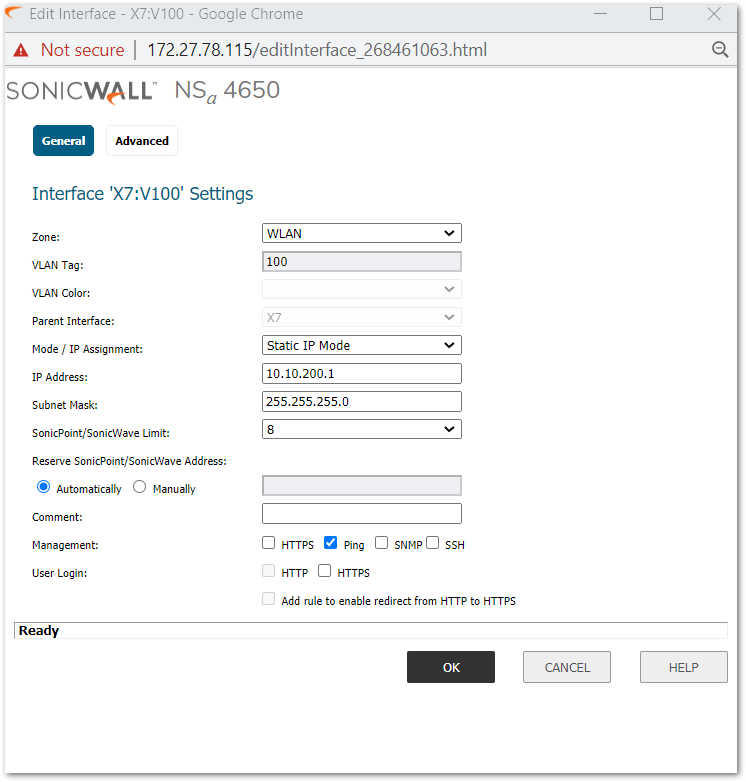
- Create a VLAN for X7 Interface with a VLAN ID 100 and Zone set to WLAN for as shown below:
Connect SonicWave to Switch
- Connect the SonicWave 231c access point to port 3 on the Switch.
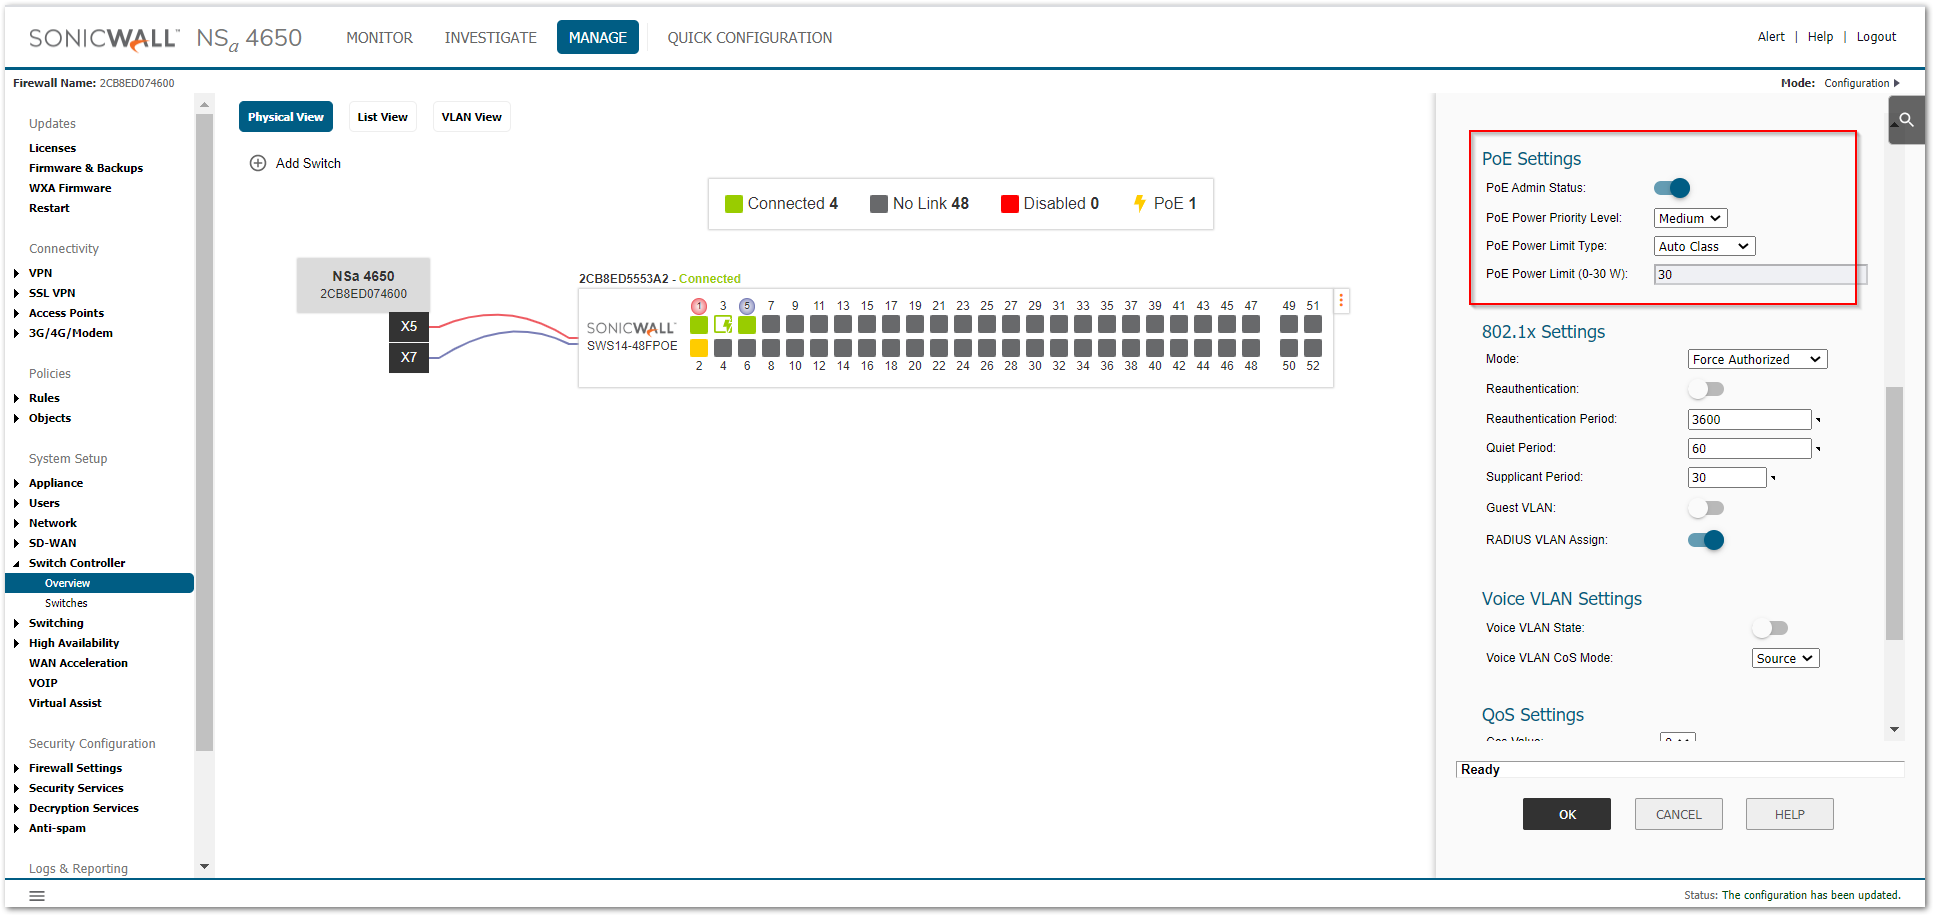
- Navigate to Manage|Switch Controller|Overview, Select the Port 3 and then Set the PortShield Interface to X7 and Select the VLAN's accordingly.
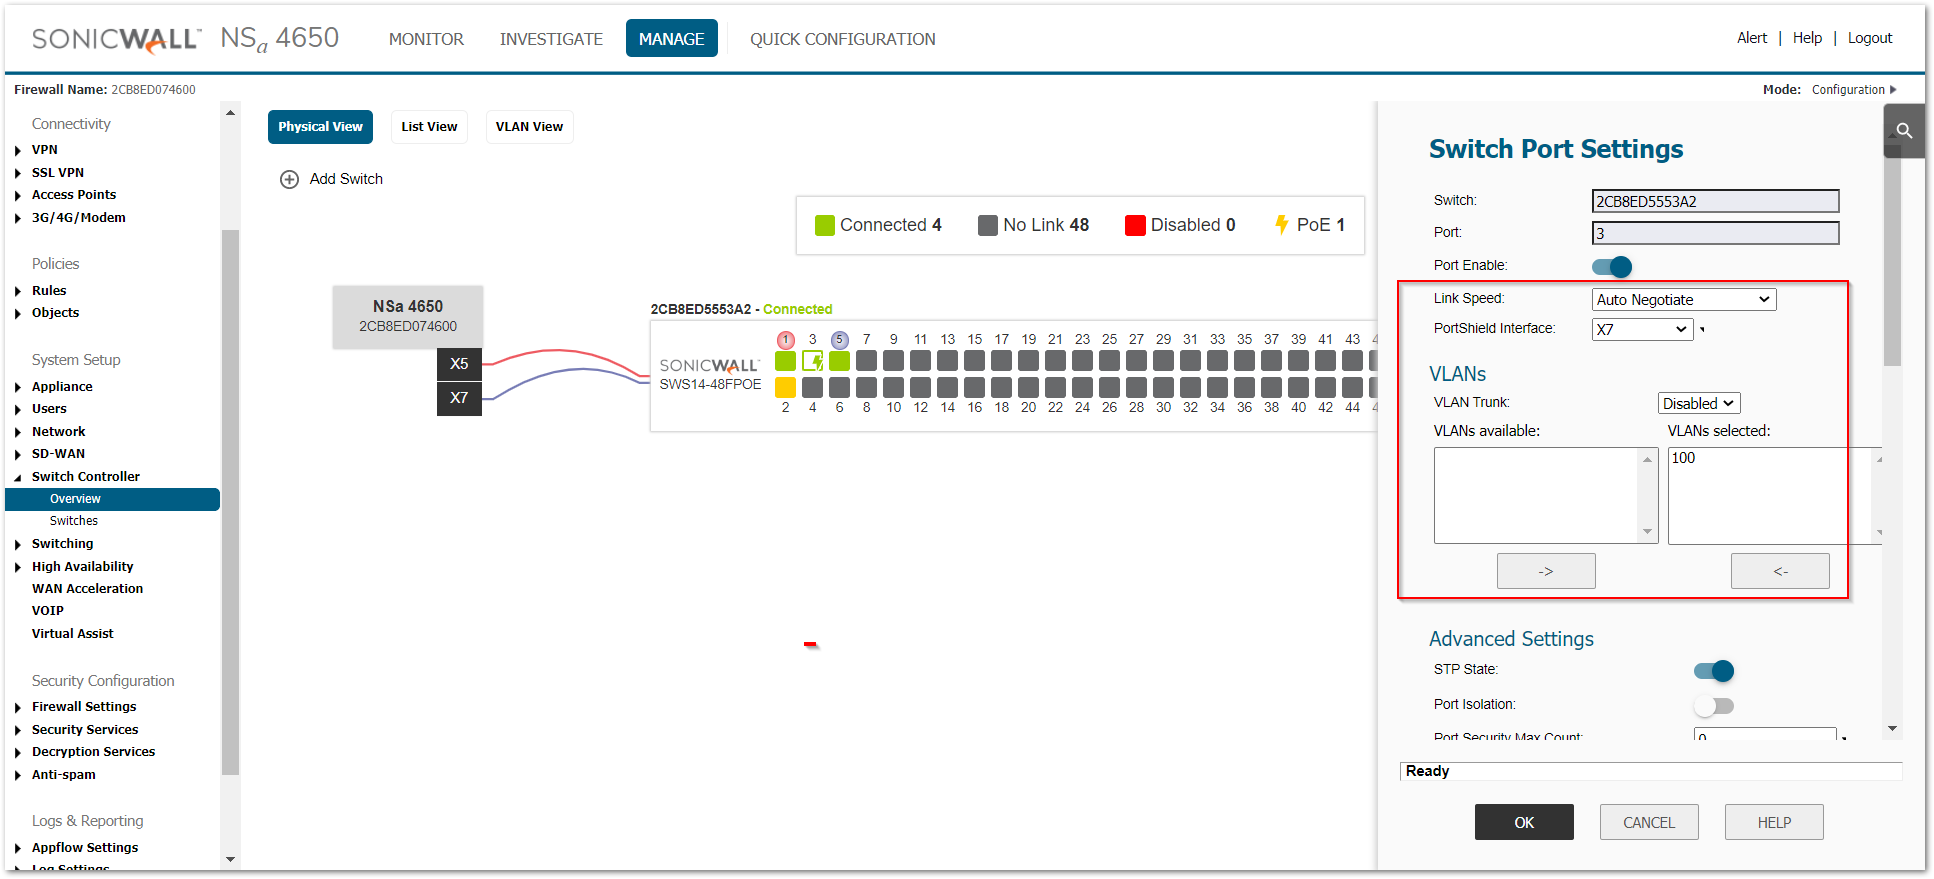
- Enable the PoE Admin status on Port 3 of the Switch. To know more about the PoE click here Power Over Ethernet (PoE) On SonicWall Secure Switch.
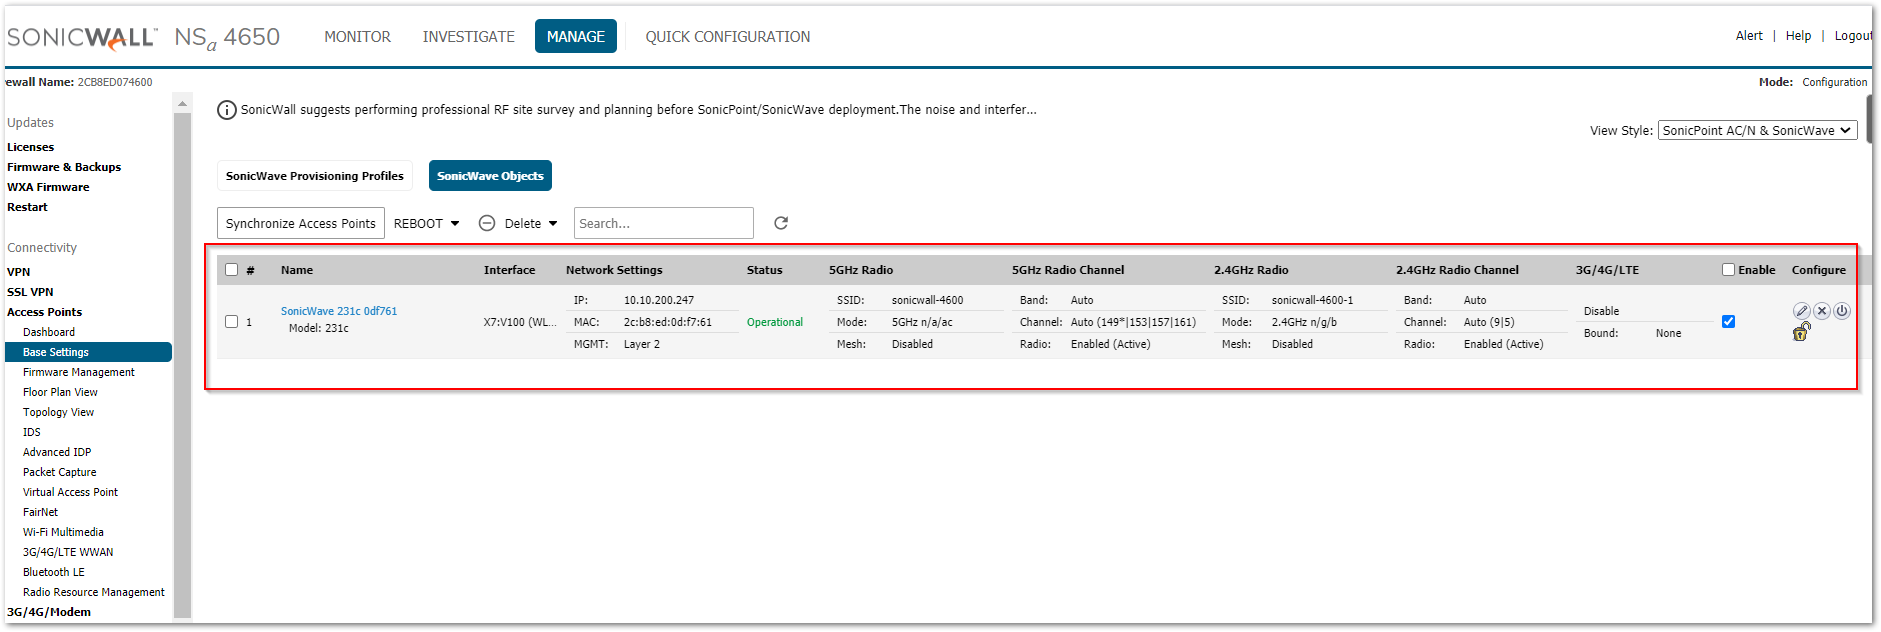
- Navigate to Access Points|Base Settings|SonicWave Object to verify that the SonicWave 231c gets an IP address from the configured network , after it is connected and Port-Shielded.
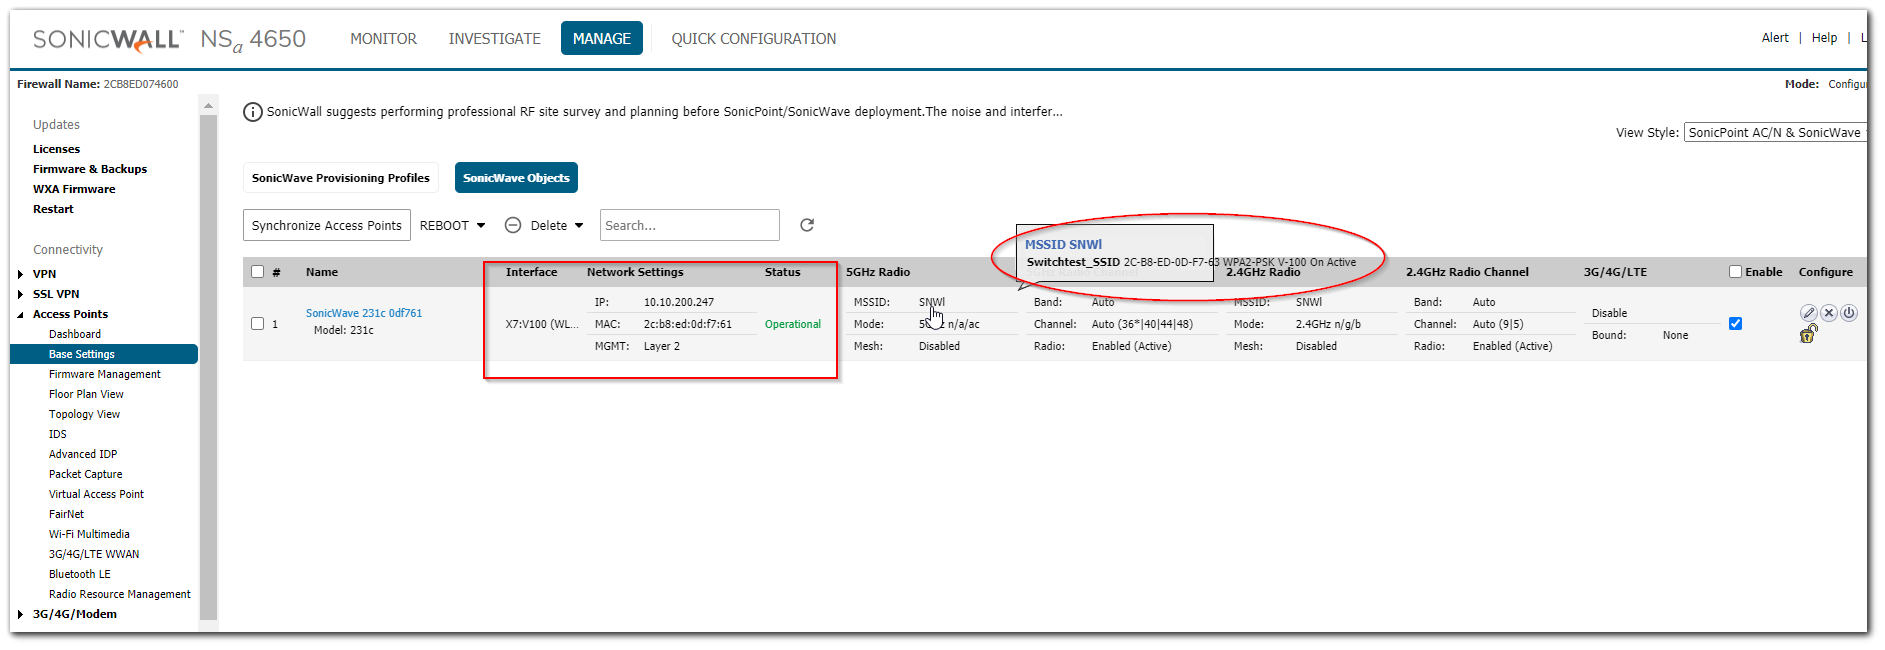
- Click on Configure Icon for the SonicWave to modify the SSID based on the desired radio channel. In this scenario, Switchtest_SSID is configured for both 5GHz radio and 2.4GHz radio.
 TIP:
TIP:
- To configure the SSID for both radio channels check the link Configure SonicWall Access Point With The Same SSID For Different Radios Using VAPs.
- For different SSID on each SonicPoint/SonicWave check the link SonicWall To Broadcast Different SSID on Different Access Point
Related Articles
- Create a new VLAN on Sonicwall Switch managed by WCM.
- How to add SonicWall Switch manually to SonicWall UTM?
- How to configure Trunk and Access ports on SonicWall Switches using WNM


 YES
YES NO
NO