-
Products
-
SonicPlatform
SonicPlatform is the cybersecurity platform purpose-built for MSPs, making managing complex security environments among multiple tenants easy and streamlined.
Discover More
-
-
Solutions
-
Federal
Protect Federal Agencies and Networks with scalable, purpose-built cybersecurity solutions
Learn MoreFederalProtect Federal Agencies and Networks with scalable, purpose-built cybersecurity solutions
Learn More - Industries
- Use Cases
-
-
Partners
-
Partner Portal
Access to deal registration, MDF, sales and marketing tools, training and more
Learn MorePartner PortalAccess to deal registration, MDF, sales and marketing tools, training and more
Learn More - SonicWall Partners
- Partner Resources
-
-
Support
-
Support Portal
Find answers to your questions by searching across our knowledge base, community, technical documentation and video tutorials
Learn MoreSupport PortalFind answers to your questions by searching across our knowledge base, community, technical documentation and video tutorials
Learn More - Support
- Resources
- Capture Labs
-
- Company
- Contact Us
How can I configure SonicWall access point with the same SSID for different radios using VAPs?


Description
This article shows you how to setup the same SSID on different radios (both the 5 GHz and the 2.4GHz radio) using VAPs for SonicOS version 5.9 and above.
 CAUTION: Using the same SSID for each radio is often discouraged. There are two reasons: stability (broadcasting the same SSID in both frequency bands may cause stability issue) and throughput (some clients will choose to stick to the 2.4 GHz signal rather than use the faster 5 GHz signal).
Resolution
Resolution for SonicOS 7.X
This release includes significant user interface changes and many new features that are different from the SonicOS 6.5 and earlier firmware. The below resolution is for customers using SonicOS 7.X firmware.
Create one VLAN interface
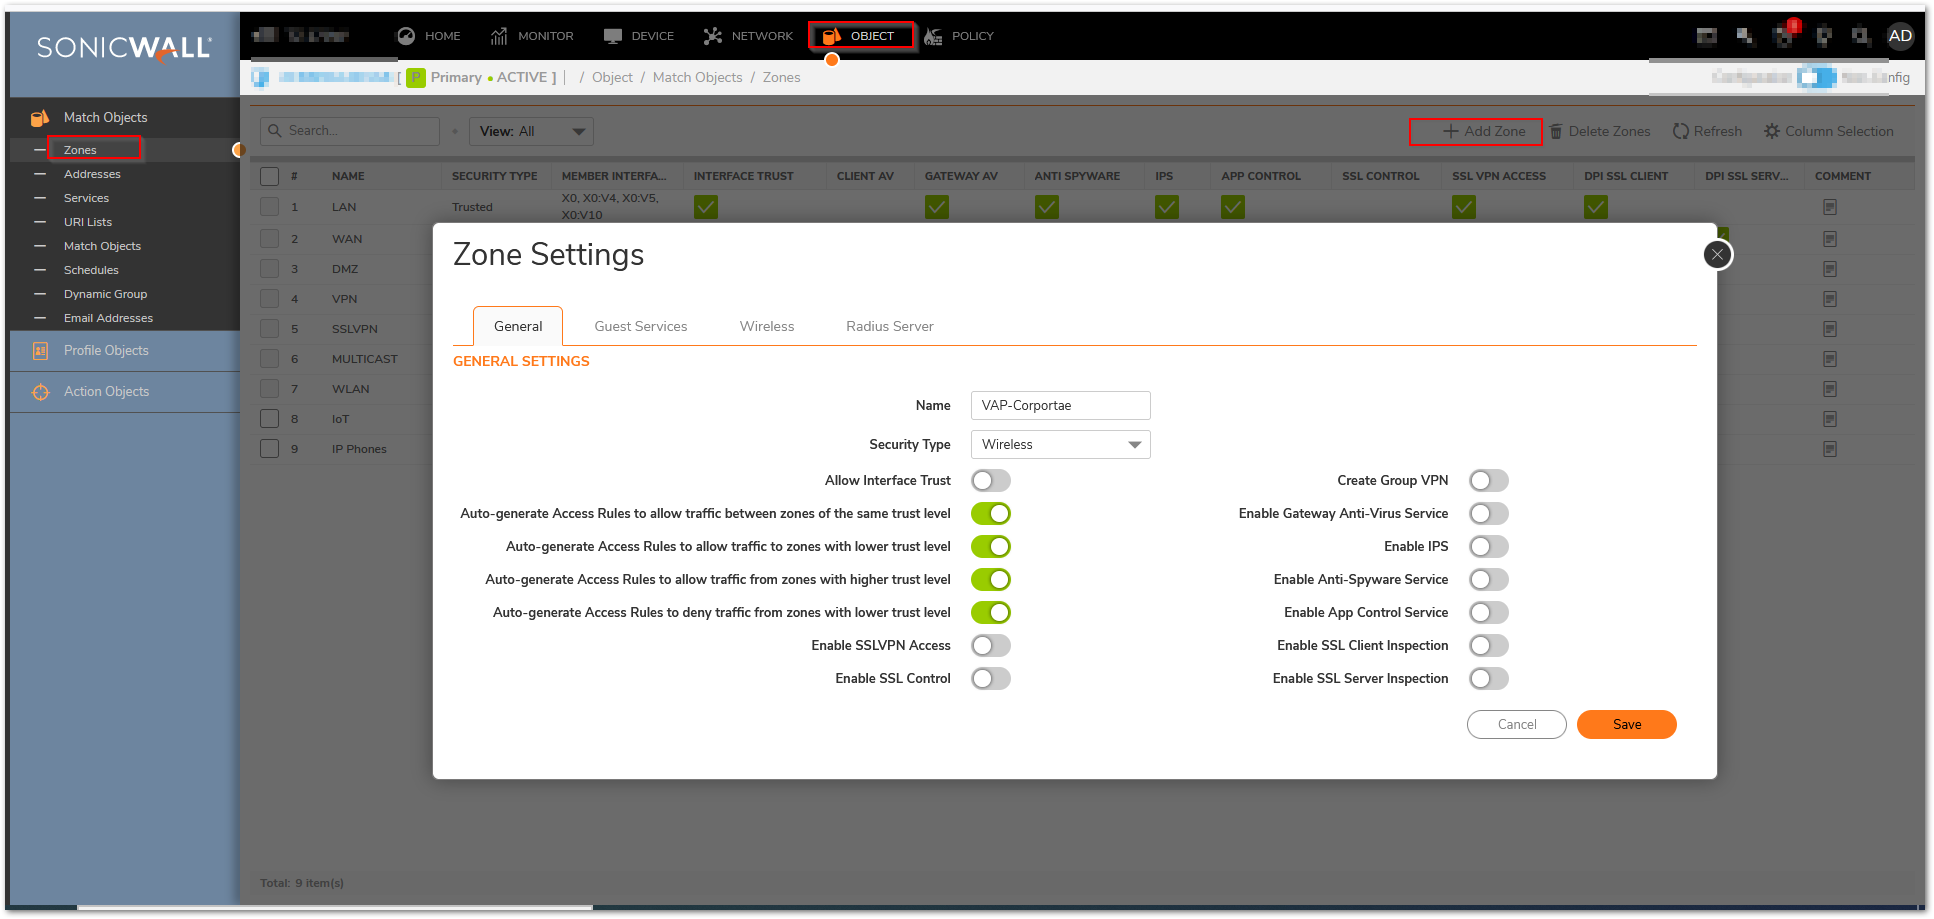
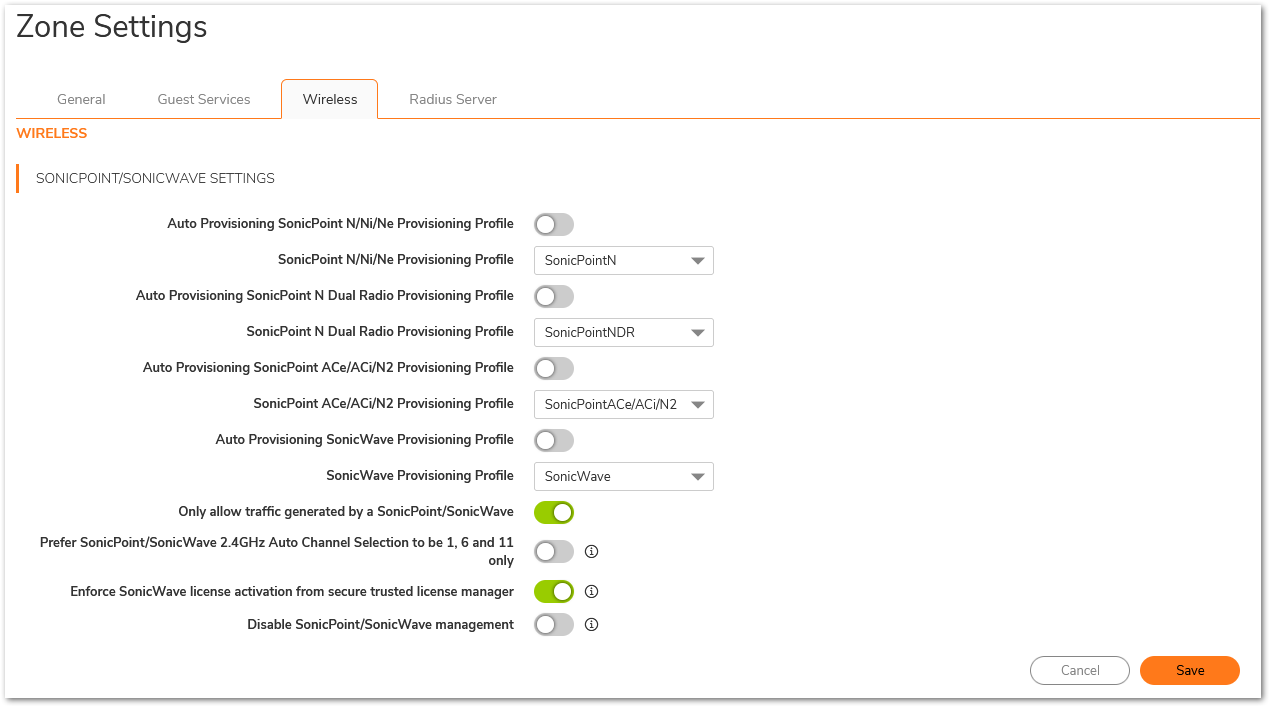
Before creating the VLAN interface, you can create a wireless zone or use the default wireless zone WLAN. In this article, a wireless zone VAP-Corporate has been created as following.
- Click Object in the top navigation menu.
- Click Match Objects | Zones, click Add.
- Configure Zone as below and click OK.
- Navigate to Network|System |Interfaces.
- Select Virtual Interface in Add Interface drop down menu.
- In the pop-up window click General tab and configure as per your environment. Click Ok.
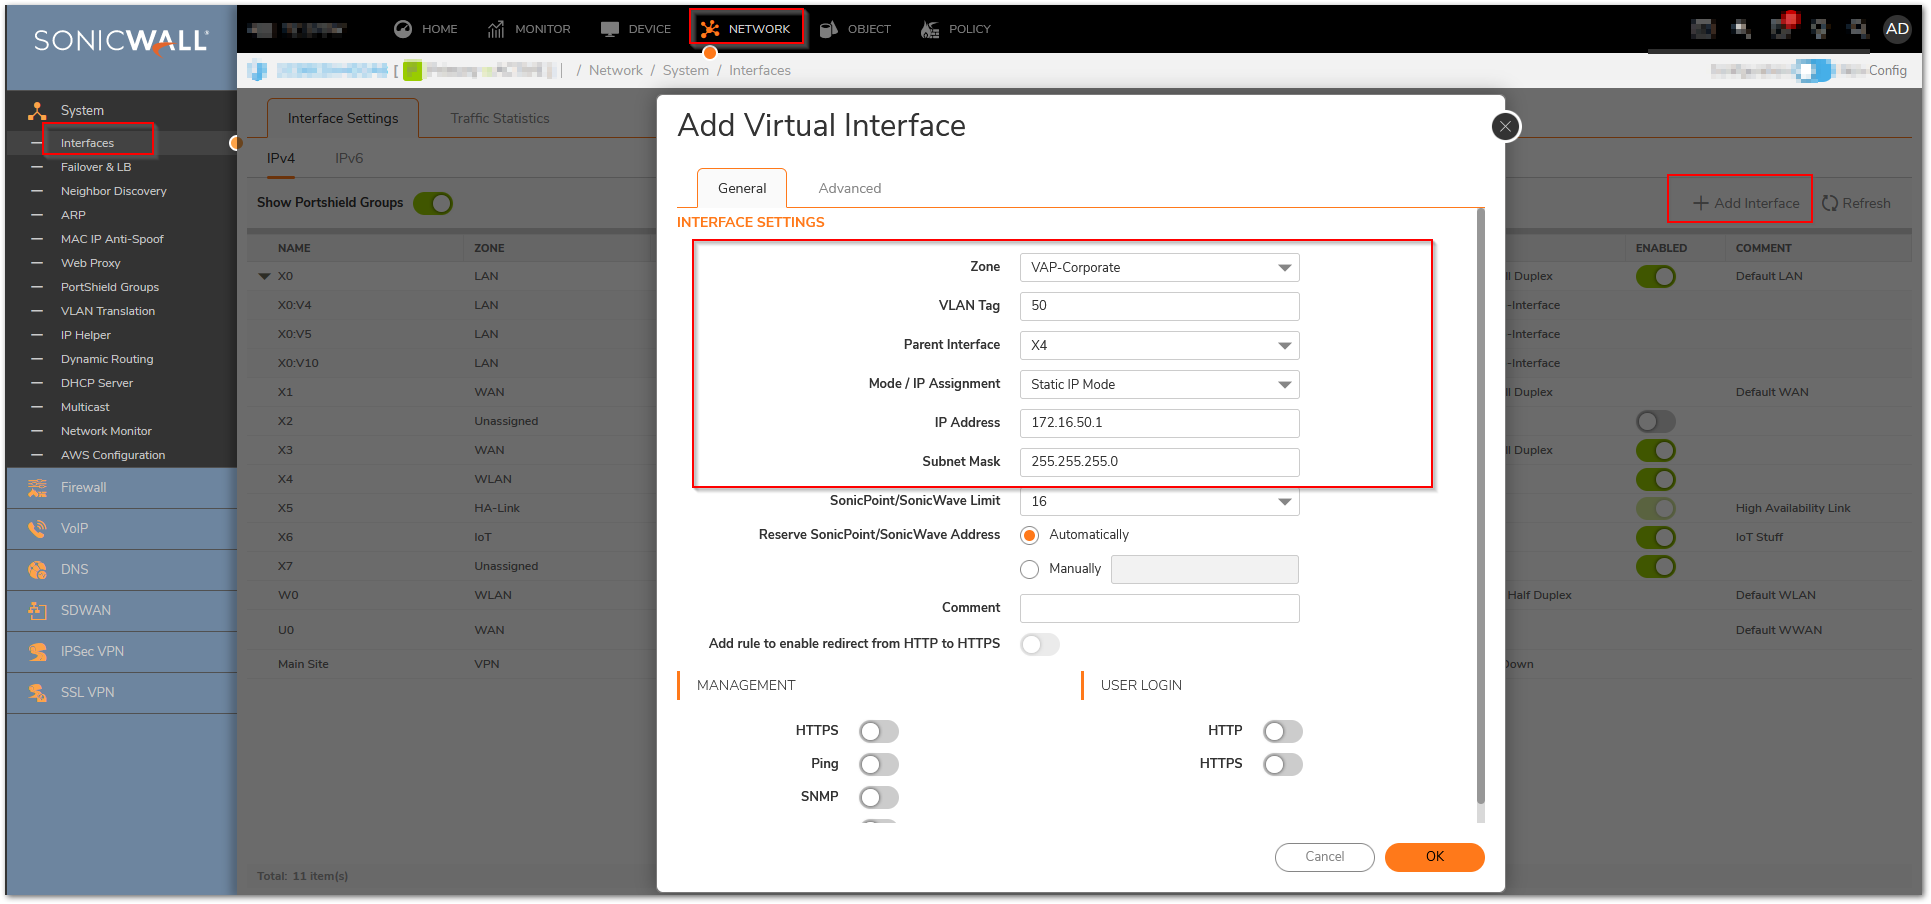
- VLAN Sub-Interface now appears in the Interface Settings list.
Note: VLAN tagging has to be done from the switch side and then use the same ID for the virtual interface
Create one VAP object, assign it to the VLAN and add the VAP object to a group
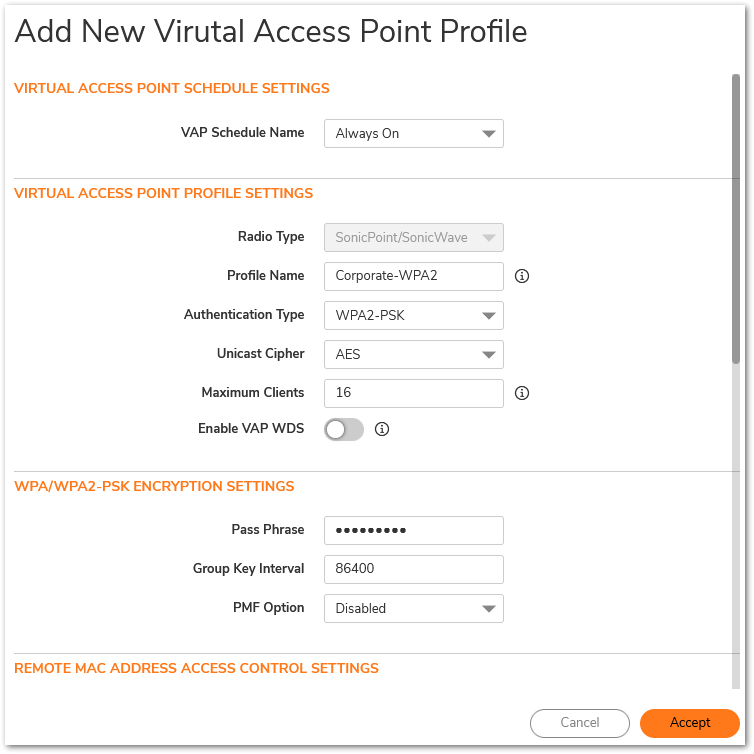
- Create a SonicPoint/SonicWave VAP Profile. Navigate to Device |Access Points | Virtual Access Points Click Add button at Virtual Access Point Profile page, configure the Profile as below picture. Click Ok.
Create a SonicPoint/SonicWave VAP
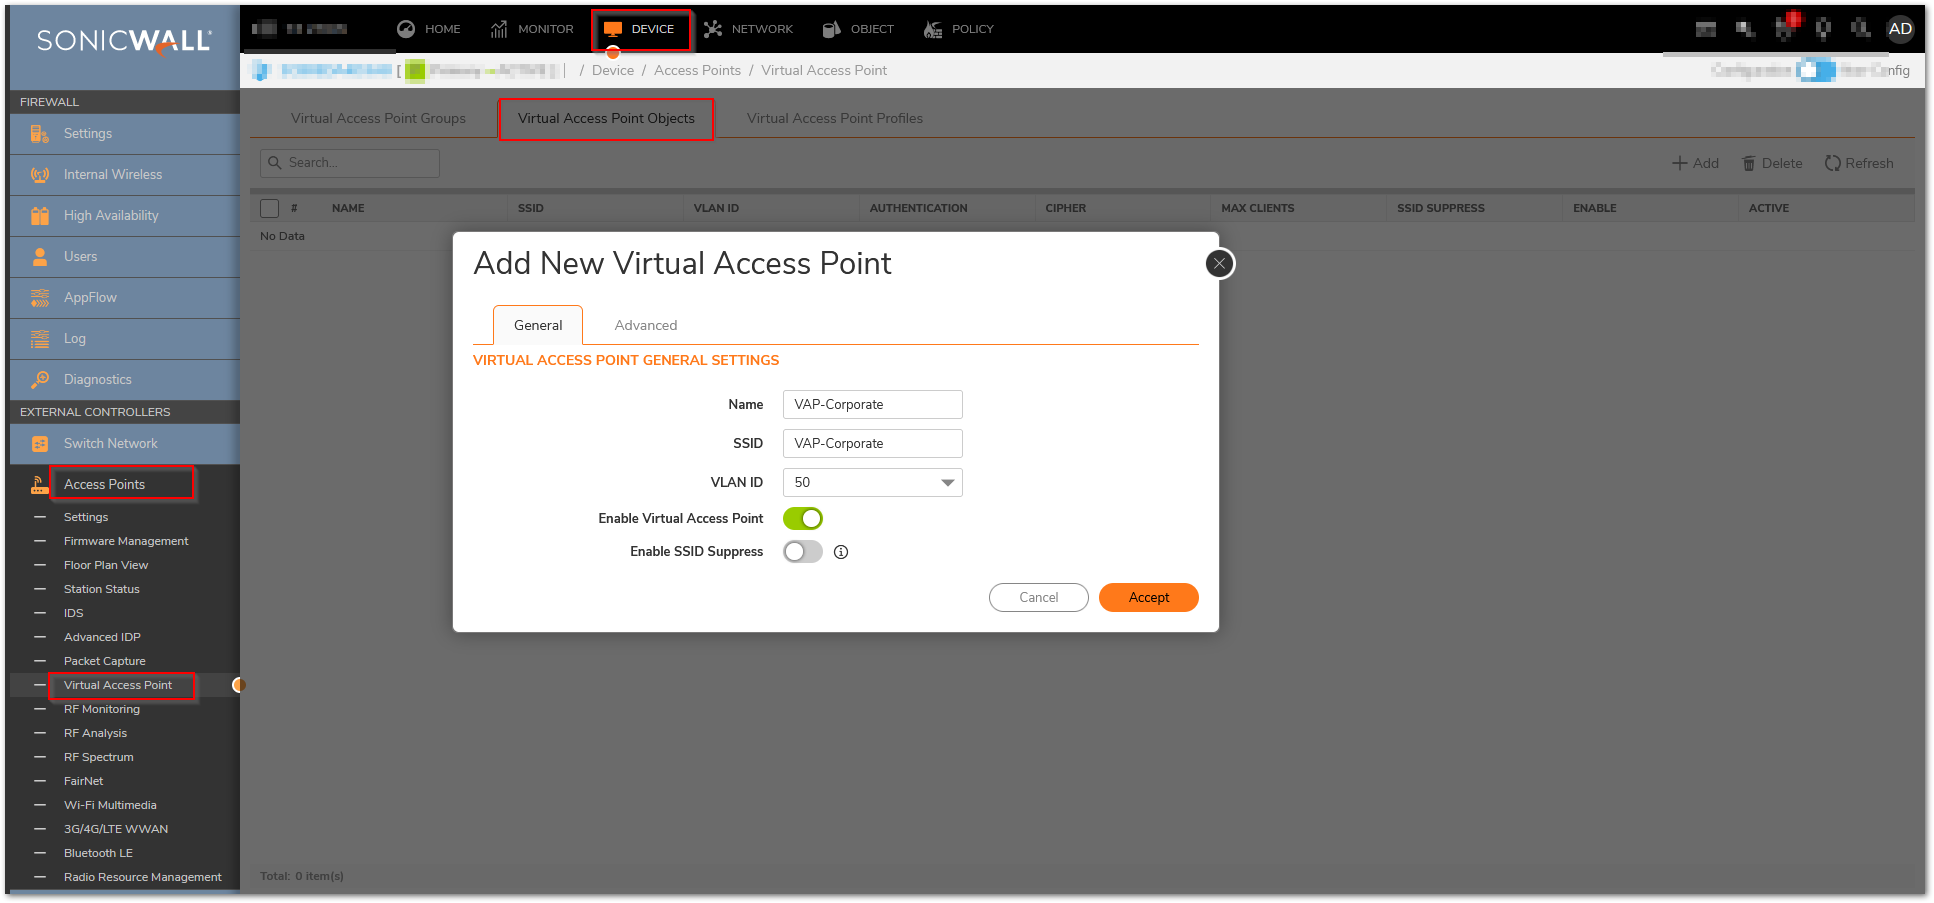
- Click Device in the top navigation menu, navigate to Access Points.
- At page Virtual Access Point.
- Click Add button at Virtual Access Points area .
- Click General, configure options as below.
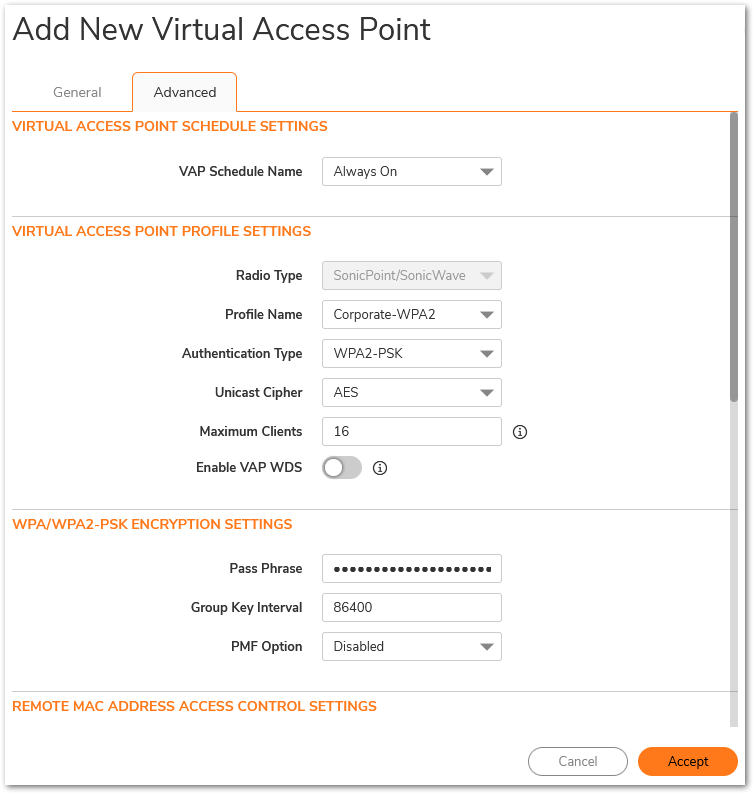
- Click Advanced tab, select Corporate-WPA2 at option Profile Name. Click OK .
- Grouping VAPs. At Virtual Access Point page.
- Click Add Group.
- Add VAP Object VAP-Corporate to VAP Group (Test).
- Click OK.
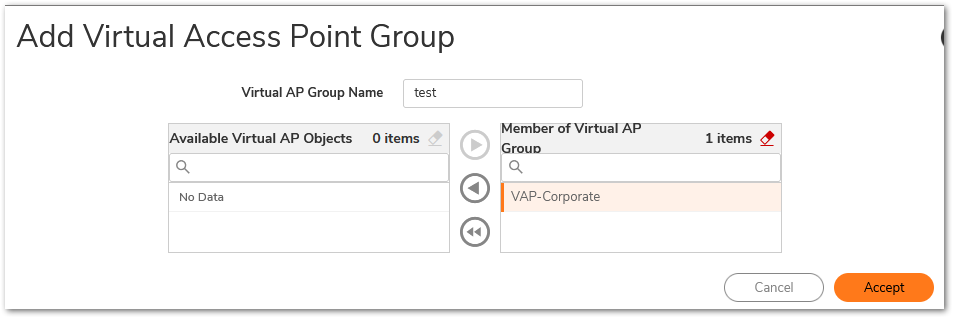
- Now you have successfully set up a VAP Profile, VAP Object and VAP group.
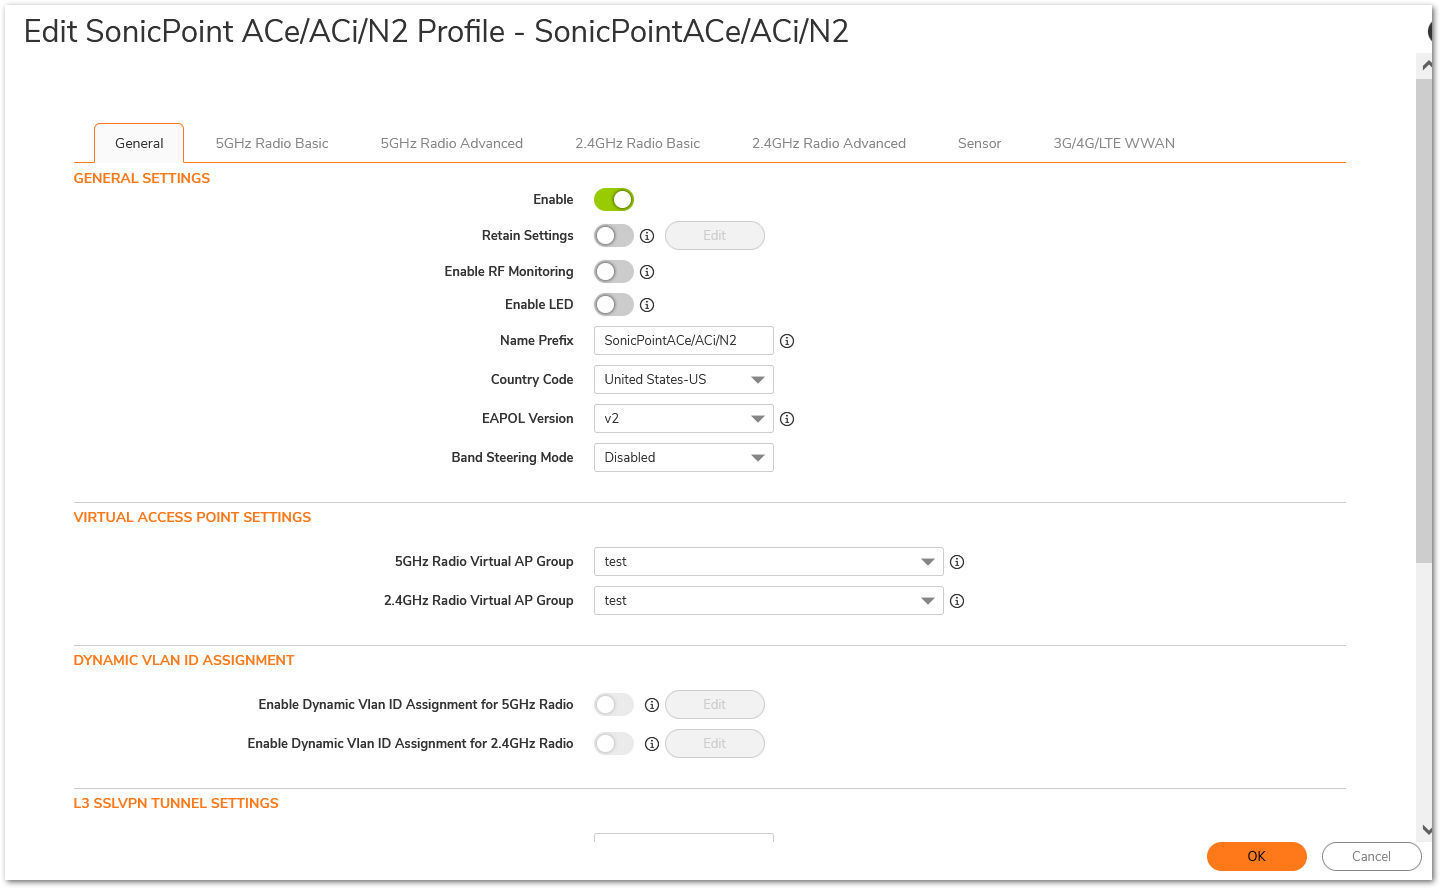
Assign the group to their respective radio in the SonicPoint/SonicWave object of the SonicPoint/SonicWave provisioning profile.
- Click Device in the top navigation menu.
- Navigate to Access points | Settings page.
- Click Edit button of SonicPoint/SonicWaveACe/ACi/N2 profile in the SonicPoint/SonicWave Provisioning Profiles section.
- Select the group VAP you created from the Virtual Access Point Settings drop-down list for each Radio.
- Click OK.
How to test
- Connecting to VAP-Corporate network from mobile clients with different frequency band (5GHz and 2.4GHz) should be successful.
- Connected clients will be listed in page Home | Dashboard | Access Points.
Resolution for SonicOS 6.5
This release includes significant user interface changes and many new features that are different from the SonicOS 6.2 and earlier firmware. The below resolution is for customers using SonicOS 6.5 firmware.
Create one VLAN interface
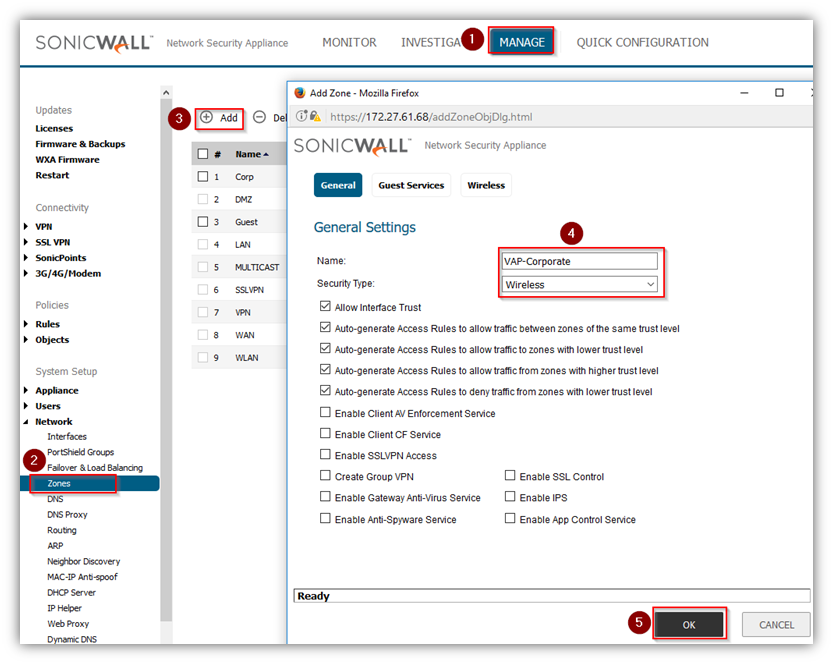
Before creating the VLAN interface, you can create a wireless zone or use the default wireless zone WLAN. In this article, a wireless zone VAP-Corporate has been created as following.
- Click Manage in the top navigation menu.
- Click Zones.
- Click Add.
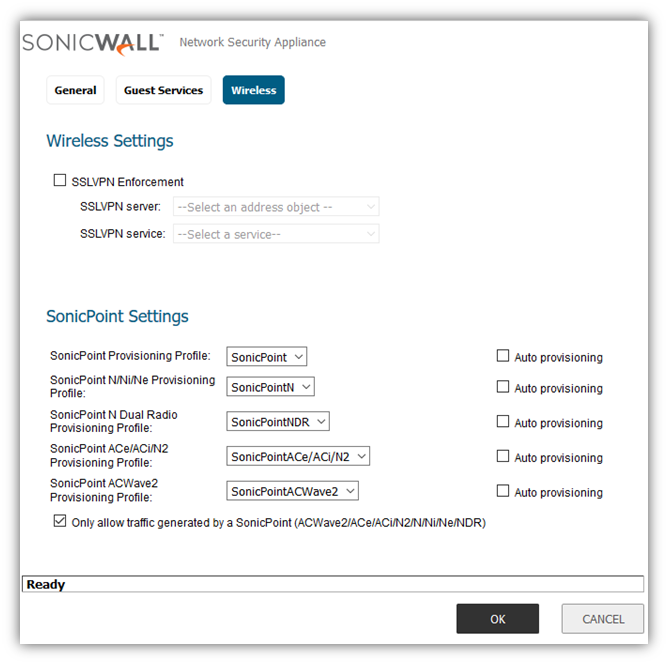
- Configure Zone as below.
- Click OK.
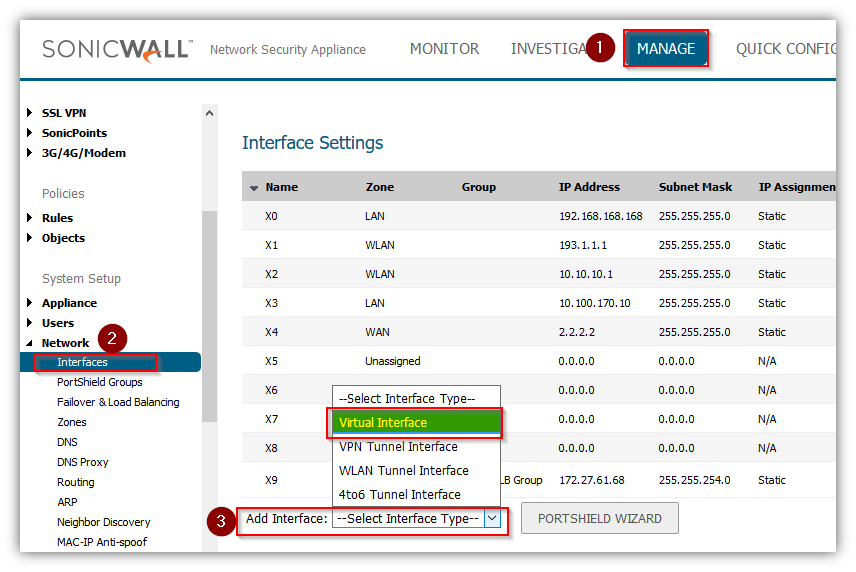
- Navigate to Manage | Network | Interfaces.
- Select Virtual Interface in Add Interface drop down menu.
- In the pop-up window click General tab and configure as per your environment. Click OK.
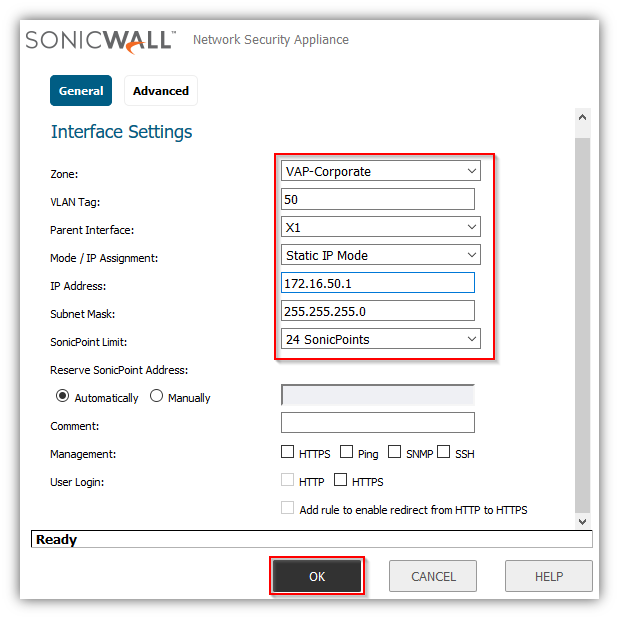
- VLAN Sub-Interface now appears in the Interface Settings list.

Create one VAP object, assign it to the VLAN and add the VAP object to a group
- Create a SonicPoint/SonicWave VAP Profile. Navigate to SonicPoint/SonicWave | Virtual Access Point | Click Add button at Virtual Access Point Profiles page, configure the Profile as below picture. Click OK.
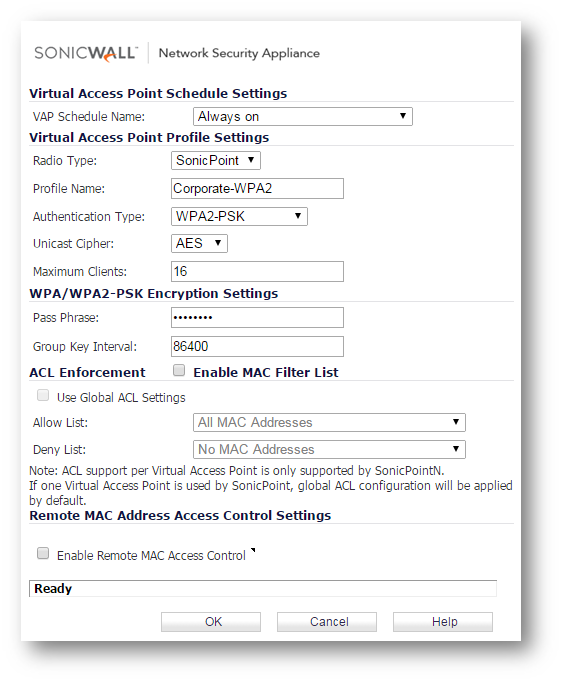
Create a SonicPoint/SonicWave VAP
- Click Manage in the top navigation menu.
- At page Virtual Access Point.
- Click Add button at Virtual Access Points area .
- Click General, configure options as below.
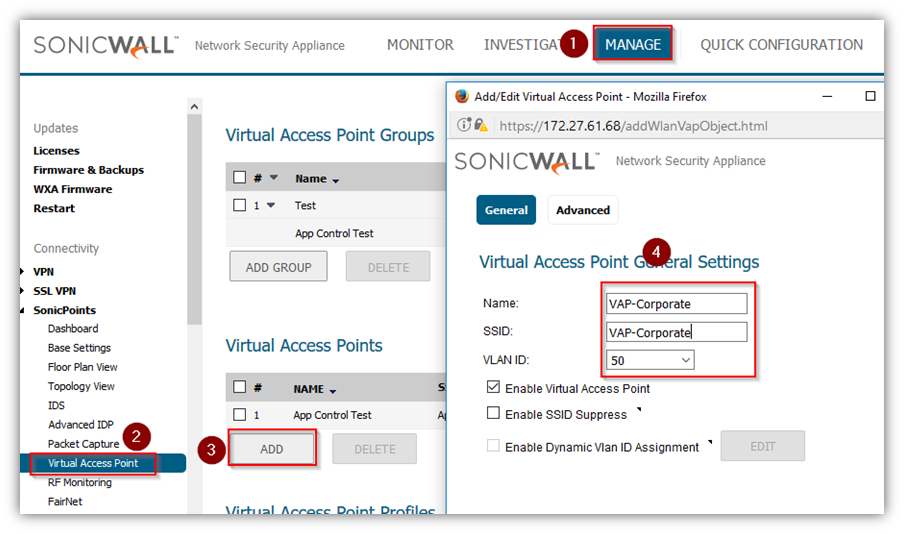
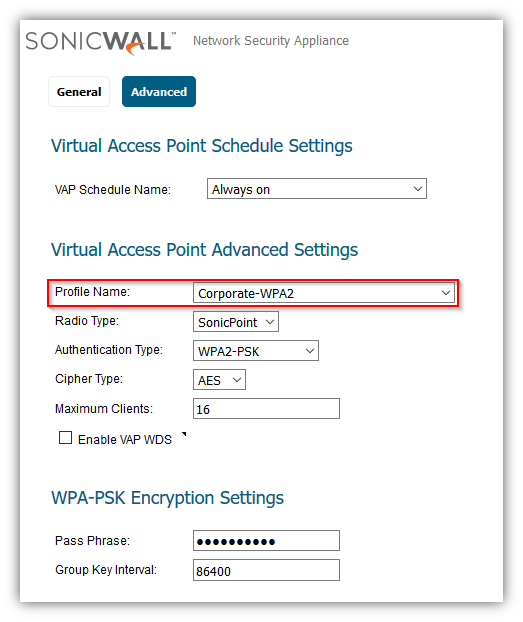
- Click Advanced tab, select Corporate-WPA2 at option Profile Name. Click OK .
- Grouping VAPs. At Virtual Access Point page.
- Click Add Group.
- Add VAP Object VAP-Corporate to VAP Group (Test).
- Click OK.
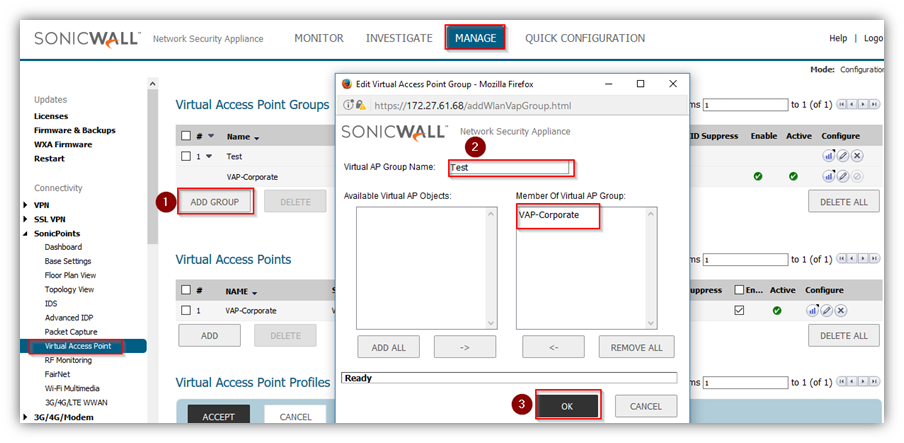
- Now you have successfully set up a VAP Profile, VAP Object and VAP group. They appears in page Virtual Access Point.
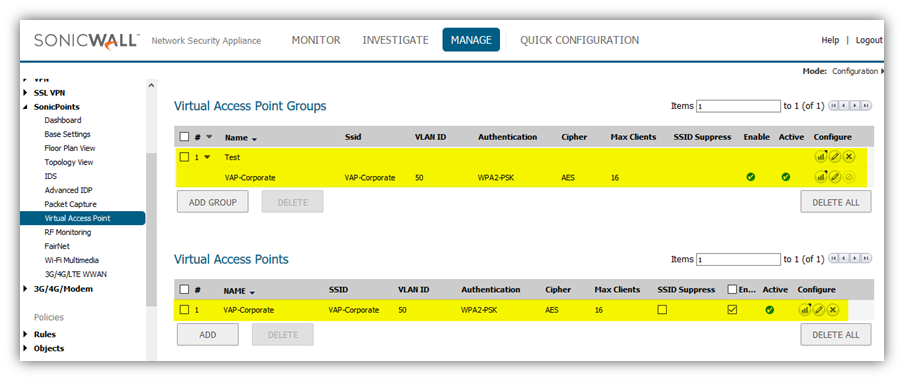
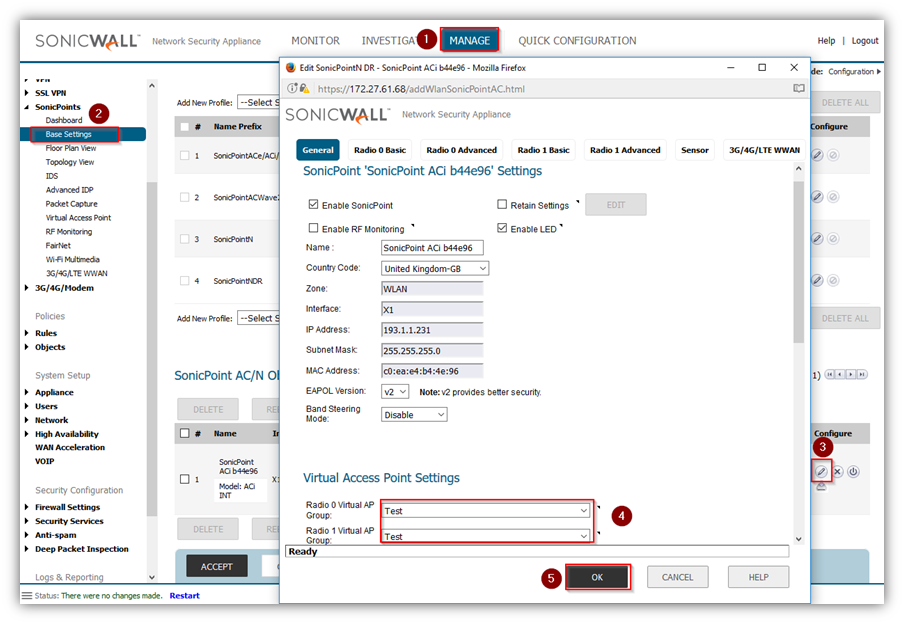
Assign the group to their respective radio in the SonicPoint/SonicWave object of the SonicPoint/SonicWave provisioning profile.
- Click Manage in the top navigation menu.
- Navigate to SonicPoint/SonicWave | Base Settings page.
- Click Edit button of SonicPoint/SonicWaveACe/ACi/N2 profile in the SonicPoint/SonicWave Provisioning Profiles section.
- Select the group VAP you created from the Virtual Access Point Settings drop-down list for each Radio.
- Click OK.
How to test
- Connecting to VAP-Corporate network from mobile clients with different frequency band (5GHz and 2.4GHz) should be successful.
- Connected clients will be listed in page SonicPoint/SonicWave | Dashboard.

Resolution for SonicOS 6.2 and Below
The below resolution is for customers using SonicOS 6.2 and earlier firmware. For firewalls that are generation 6 and newer we suggest to upgrade to the latest general release of SonicOS 6.5 firmware.
Create one VLAN interface
- Before creating the VLAN interface, you can create a wireless zone or use the default wireless zone WLAN. In this article, a wireless zone "VAP-Corporate" has been created as following.

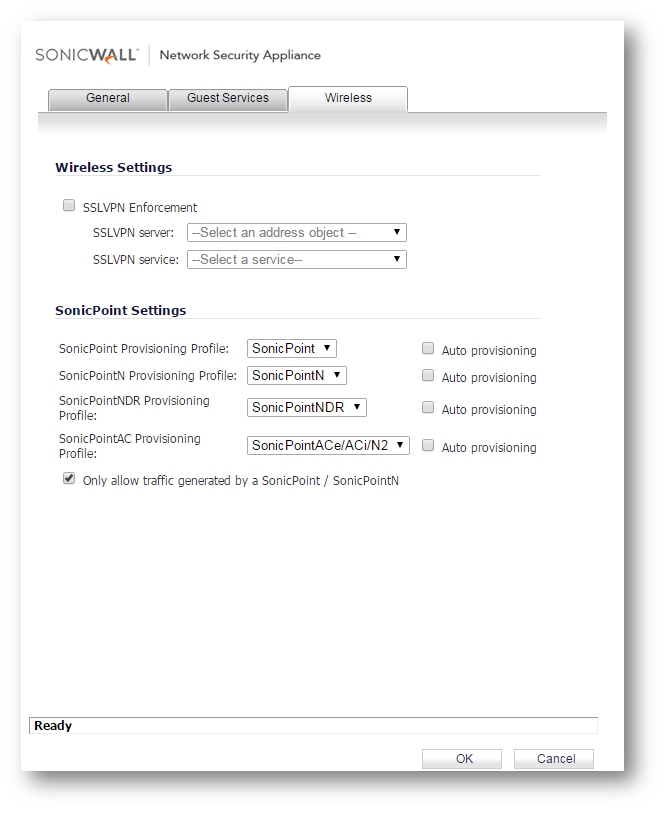
- Navigate to Network | Interfaces , select Virtual Interface in Add Interface drop down menu.
- In the pop-up window, click General tab and configure as per your environment. Click OK.
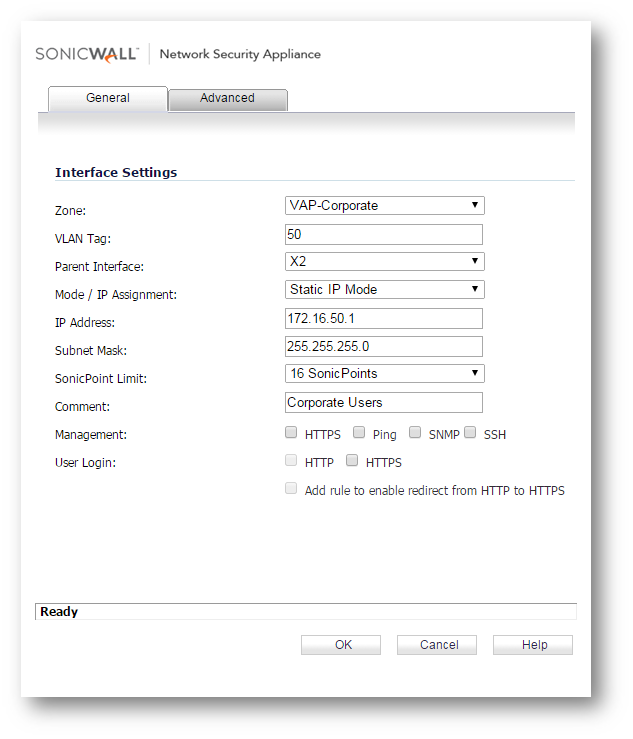
- VLAN Sub-Interface now appears in the Network | Interface Settings list.
Create one VAP object, assign it to the VLAN and add the VAP object to a group
- Create a SonicPoint/SonicWave VAP Profile. Navigate to SonicPoint/SonicWave | Virtual Access Point | Click Add button at Virtual Access Point Profiles page. Configure the Profile. Click OK.

- Create a SonicPoint/SonicWave VAP. At page Virtual Access Point, click Add button at Virtual Access Points area. Click tab General. Configure options per your environment .
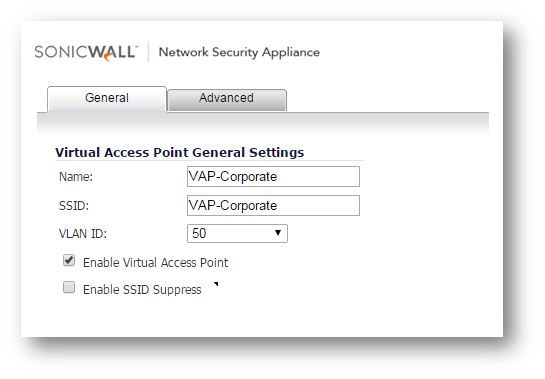
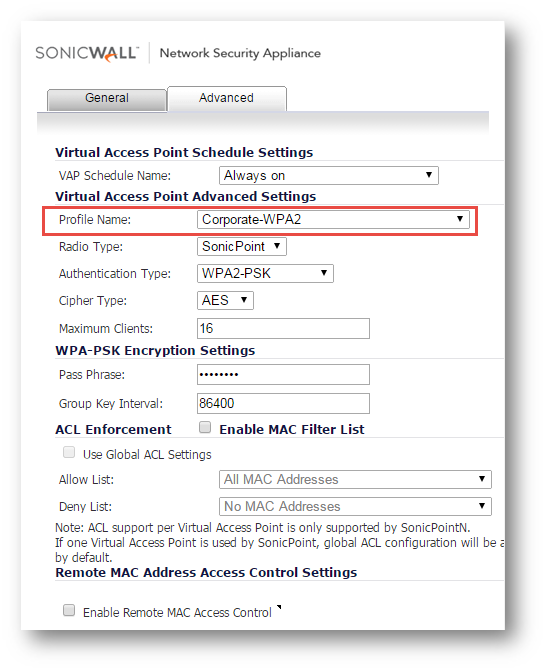
- Click Advanced. Select Corporate-WPA2 at option Profile Name. Click OK.
- Grouping VAPs. At Virtual Access Point page, click Add Group . Add VAP Object VAP-Corporate to VAP Group. Click OK.
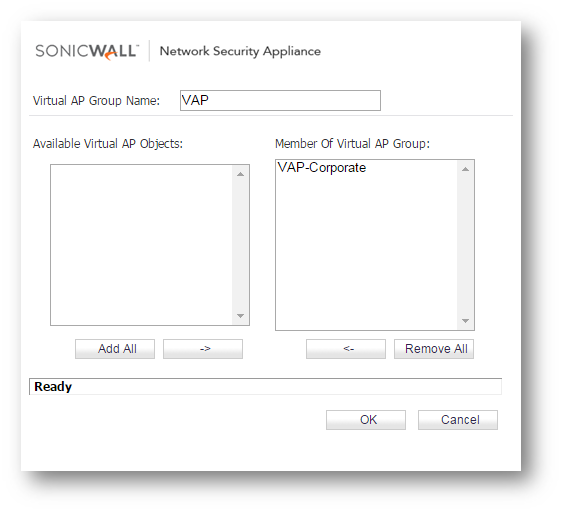
- Now you have successfully set up a VAP Profile, VAP Object and VAP group. They appears in the Virtual Access Point page.
Assign the group to their respective radio in the SonicPoint/SonicWave object of the SonicPoint/SonicWave provisioning profile.
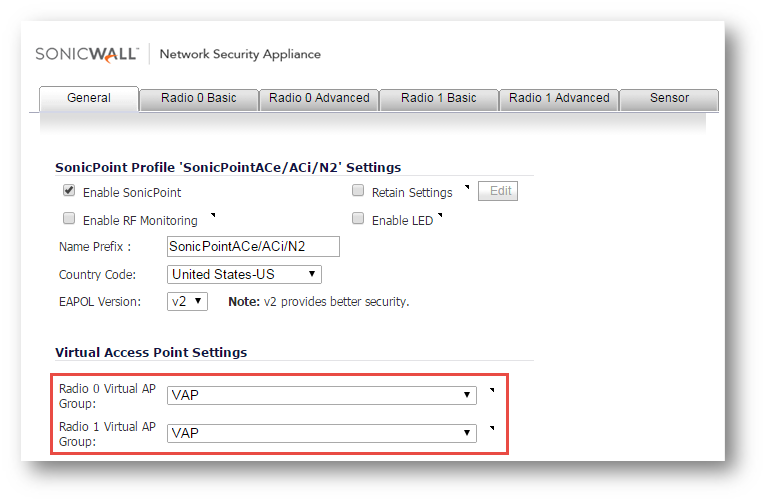
- Navigate to SonicPoint/SonicWave | SonicPoint/SonicWaves page, Click Edit button of SonicPoint/SonicWaveACe/ACi/N2 profile in the SonicPoint/SonicWave Provisioning Profiles section. Select the VAP group from the Virtual Access Point Settings drop-down list for each radio.
How to test
- Connecting to VAP-Corporate network from mobile clients with different frequency band (5GHz and 2.4GHz) should be successful.
- Connected clients will be listed in page SonicPoint/SonicWave | Station Status.
Related Articles
- Wireless: SNR, RSSI and Noise basics of wireless troubleshooting
- What happens when a SonicWave's license expires?
- SonicWall deprecates support for WEP and TKIP encryption on SonicOS 8.0.0


 YES
YES NO
NO