-
Products
-
SonicPlatform
SonicPlatform is the cybersecurity platform purpose-built for MSPs, making managing complex security environments among multiple tenants easy and streamlined.
Discover More
-
-
Solutions
-
Federal
Protect Federal Agencies and Networks with scalable, purpose-built cybersecurity solutions
Learn MoreFederalProtect Federal Agencies and Networks with scalable, purpose-built cybersecurity solutions
Learn More - Industries
- Use Cases
-
-
Partners
-
Partner Portal
Access to deal registration, MDF, sales and marketing tools, training and more
Learn MorePartner PortalAccess to deal registration, MDF, sales and marketing tools, training and more
Learn More - SonicWall Partners
- Partner Resources
-
-
Support
-
Support Portal
Find answers to your questions by searching across our knowledge base, community, technical documentation and video tutorials
Learn MoreSupport PortalFind answers to your questions by searching across our knowledge base, community, technical documentation and video tutorials
Learn More - Support
- Resources
- Capture Labs
-
- Company
- Contact Us
How to manually migrate unit from CSC to new NSM 2.0 Tenant?


Description
In this article we explained about the procedure to manually migrate Firewalls from CSC (Capture Security Center) to new NSM 2.0 (Network Security Manager 2.0) tenant.
 NOTE: Manual migration will result in historical data loss of flow report for previous dates. If you wish to migrate flow data then please wait for auto migration process and don't follow this article.
1) Remove association of Firewall from old CSC
2) Create a new NSM tenant & transfer product to NSM tenant.
3) Select Data center for the 1st Firewall in NSM tenant.
Resolution
This article describes the procedure to manually migrate Firewalls from CSC (Capture Security Center) to the new NSM 2.0 (Network Security Manager 2.0) tenant.
In this article, we use "MSK_CSC" as the CSC tenant name & "MSK_NSM" as the NSM tenant name.
1) Remove association of Firewall from old CSC tenant.
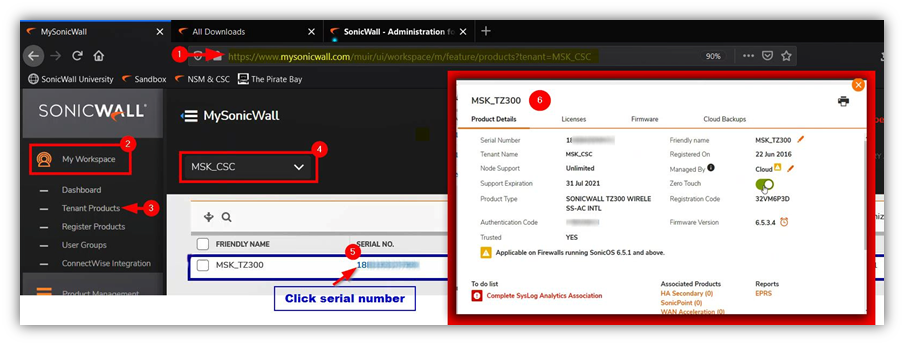
Login to MySonicWall using your MySonicWall Credentials. Navigate to My Workspace | Tenant Products.
- Select MSK_CSC from a dropdown list (Select the CSC tenant under which your unit is already registered).
- Click on the product serial number which you would like to transfer from CSC to NSM to get product details as below.
- Disable Zero Touch click clicking on the tile to OFF state as shown below.
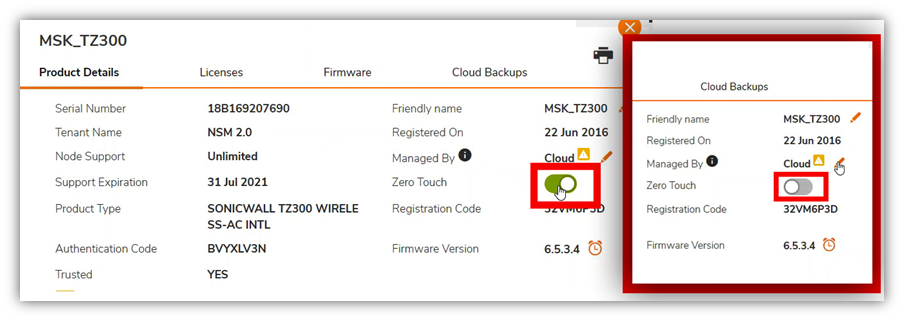
 NOTE: This option will remove the unit automatically from CSC management. If the unit added to CSC using the Manual method then we need to login to CSC and remove it Manually.
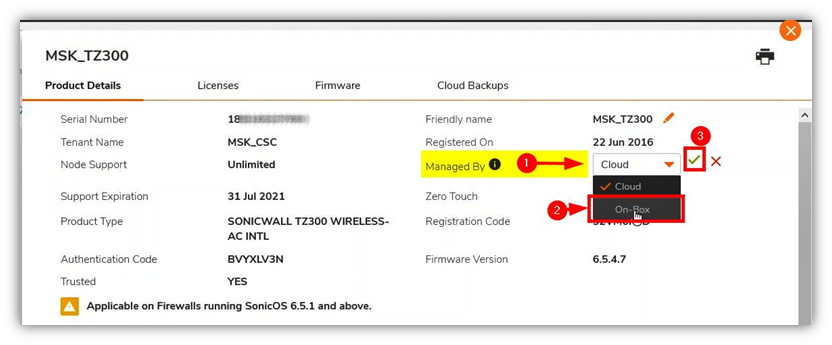
- Change it from Cloud to On-BOX near Managed By and click Green tick to accept the change as shown in the below image.
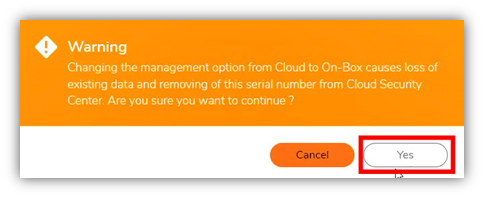
 Warning: Changing the management option from Cloud to On-Boc causes loss of existing data and removing of this serial number from Cloud Security Center. Are you sure you want to continue? Click Yes to remove the association.
- This changed will remove the association of the device from the CSC Colo.
2) Create a new NSM tenant & transfer the product to the NSM tenant.
There are 2 steps involved in this phase. They are New NSM tenant creation & Transfer Product from CSC to NSM tenant.
Step1: New NSM tenant creation
Login to MySonicWall using your MySonicWall Credentials. Navigate to My Workspace | Dashboard.
- Click on Create Tenant button on the left side of the page.

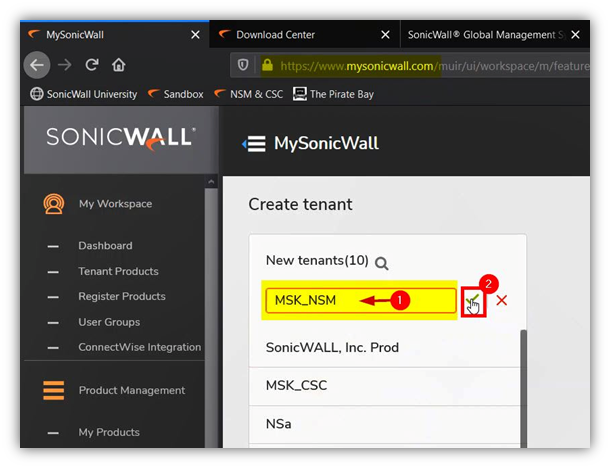
- Type tenant name on Create tenant page. In this case, we typed MSK_NSM & click the Green tick mark to accept it.
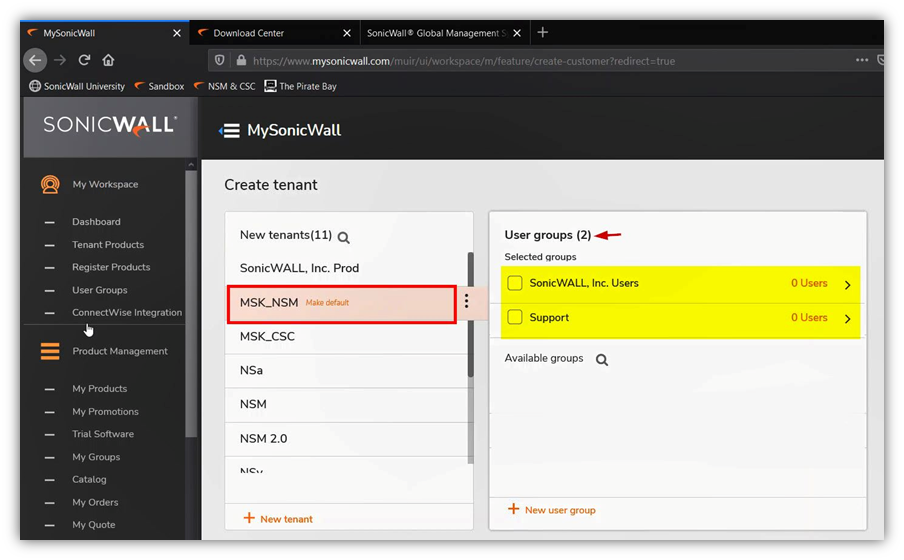
A new tenant will be created as below and we need to assign required User groups for the NSM access as shown below
Step2: Transfer Product from CSC to NSM tenant.
Login to MySonicWall using your MySonicWall Credentials. Navigate to My Workspace | Tenant Products.
- Select MSK_CSC from the dropdown list (Select the CSC tenant under which your unit is already registered).
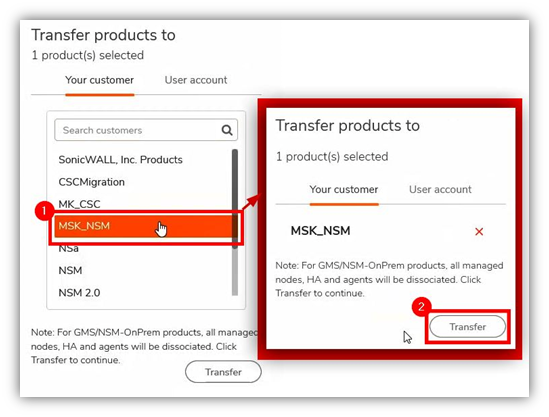
- Click 3 dots at the right corner of your device from the list and Select Transfer Products from the list as shown below.

- Select the newly created tenant from the previous step for NSM 2.0, in this case, select tenant MSK_NSM.
- Click the Transfer button to move to NSM tenant as shown below.
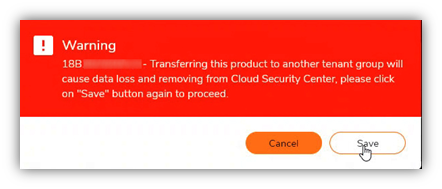
 Warning: Transferring this product to another tenant group will cause data loss and removing from Cloud Security Center, please click on "Save" button again to Proceed. Click on the Save button to proceed with the transfer.
- Now the transfer is successful and you will get a Success message as below
- Navigate to the new NSM 2.0 tenant (MSK_NSM) from the drop-down box
- The transferred devices will be on the list. Click the serial number of the unit to get Product Details.
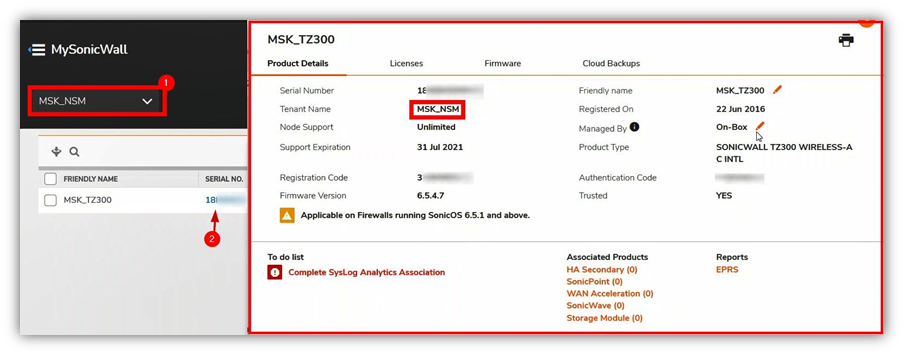
3) Select Datacenter for the 1st Firewall in NSM tenant.
Login to MySonicWall using your MySonicWall Credentials. Navigate to My Workspace | Tenant Products.
- Select MSK_NSM from a dropdown list (Select the NSM tenant under which your unit is transferred).
- Click the serial number of the unit to get Product Details. Change Manage to from On-Box to Cloud & click on the Green tick mark.
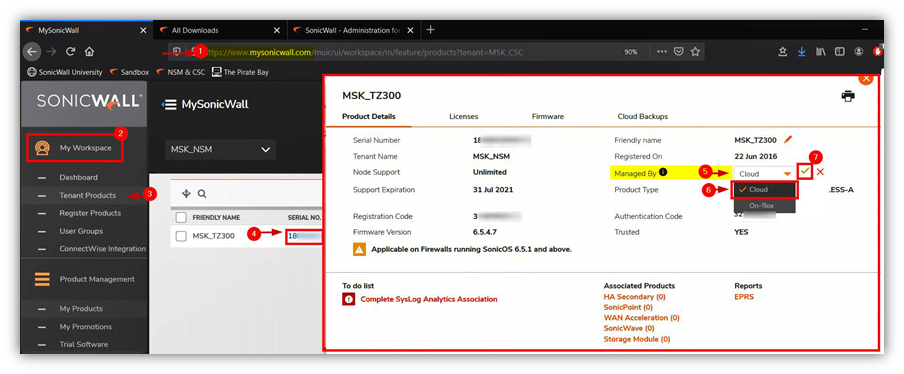
- Only for the First Product which we added in this Tenant we get a pop up windows as below with available datacenters.
- For NSM we have 2 datacenters, they are North America (NSM) & Europe (NSM)
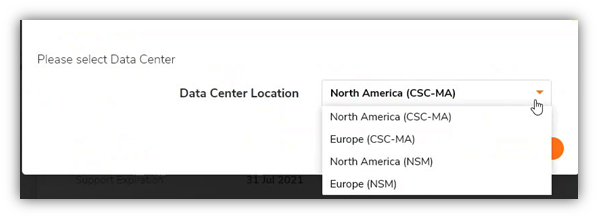
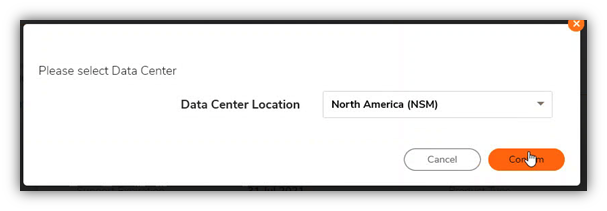
- You can select any datacenter close to your location. In this article for example we are selecting North America (NSM) as shown below and click on Confirm button.
- After 3 minutes, you will see new field in the Product Details tab as Cloud Management. This will show the new NSM Tenant information along with it's Serial Number & Datacenter Region as shown in below image.
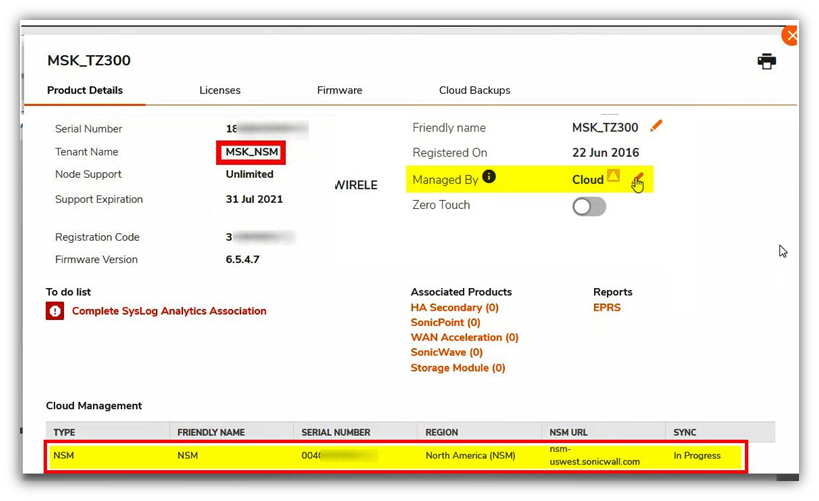
New NSM is ready with unit added to it and assigned with datacenter.
If you wish to add your unit to NSM and manage then refer below KB article
How To Add Units To NSM 2.0 Using Zero Touch?
Related Articles
- How to Expand the HDD of a GMS Virtual Appliance
- How to create a template in NSM
- How to edit Device Groups in NSM


 YES
YES NO
NO