-
Products
-
SonicPlatform
SonicPlatform is the cybersecurity platform purpose-built for MSPs, making managing complex security environments among multiple tenants easy and streamlined.
Discover More
-
-
Solutions
-
Federal
Protect Federal Agencies and Networks with scalable, purpose-built cybersecurity solutions
Learn MoreFederalProtect Federal Agencies and Networks with scalable, purpose-built cybersecurity solutions
Learn More - Industries
- Use Cases
-
-
Partners
-
Partner Portal
Access to deal registration, MDF, sales and marketing tools, training and more
Learn MorePartner PortalAccess to deal registration, MDF, sales and marketing tools, training and more
Learn More - SonicWall Partners
- Partner Resources
-
-
Support
-
Support Portal
Find answers to your questions by searching across our knowledge base, community, technical documentation and video tutorials
Learn MoreSupport PortalFind answers to your questions by searching across our knowledge base, community, technical documentation and video tutorials
Learn More - Support
- Resources
- Capture Labs
-
- Company
- Contact Us
How can I troubleshoot Core 0 spikes or high utilization?


Description
While all SonicWalls have multiple CPU Cores, Core 0 is responsible for handling specific traffic flows which cannot be handed off to other Cores. This is referred to as the Control Plane while all other Cores are referred to as the Data Planes. High usage on the Control Plane can be indicative of many things but can also cause sluggishness on the GUI, inability to Manage the SonicWall, Reboots, and other issues.
To monitor the Control Plane, and all CPU Cores, navigate to Dashboard | Multi-Core Monitor or System | Diagnostics and select Multi-Core Monitor from the Diagnostic Tool menu. If you notice consistently high Core 0 activity then it's recommended to follow the steps below. Even on devices with normal CPU usage it can be valuable to follow this article as it presents Best Practices that can prevent future issues.
 TIP:Short, infrequent spikes of Core 0 to high percentages are normal, especially when logged into the SonicWall for Management purposes. This article is intended to resolve consistent, high CPU utilization.
Resolution
Resolution for SonicOS 7.X
This release includes significant user interface changes and many new features that are different from the SonicOS 6.5 and earlier firmware. The below resolution is for customers using SonicOS 7.X firmware.
Disable AppFlow
- Click Device in the top navigation menu. Click AppFlow | Flow Reporting , and Uncheck the following, then click Accept.
- Enable Real-Time Data Collection.
- Enable Aggregate AppFlow Report Data Collection.
- Enable AppFlow To Local Collector.
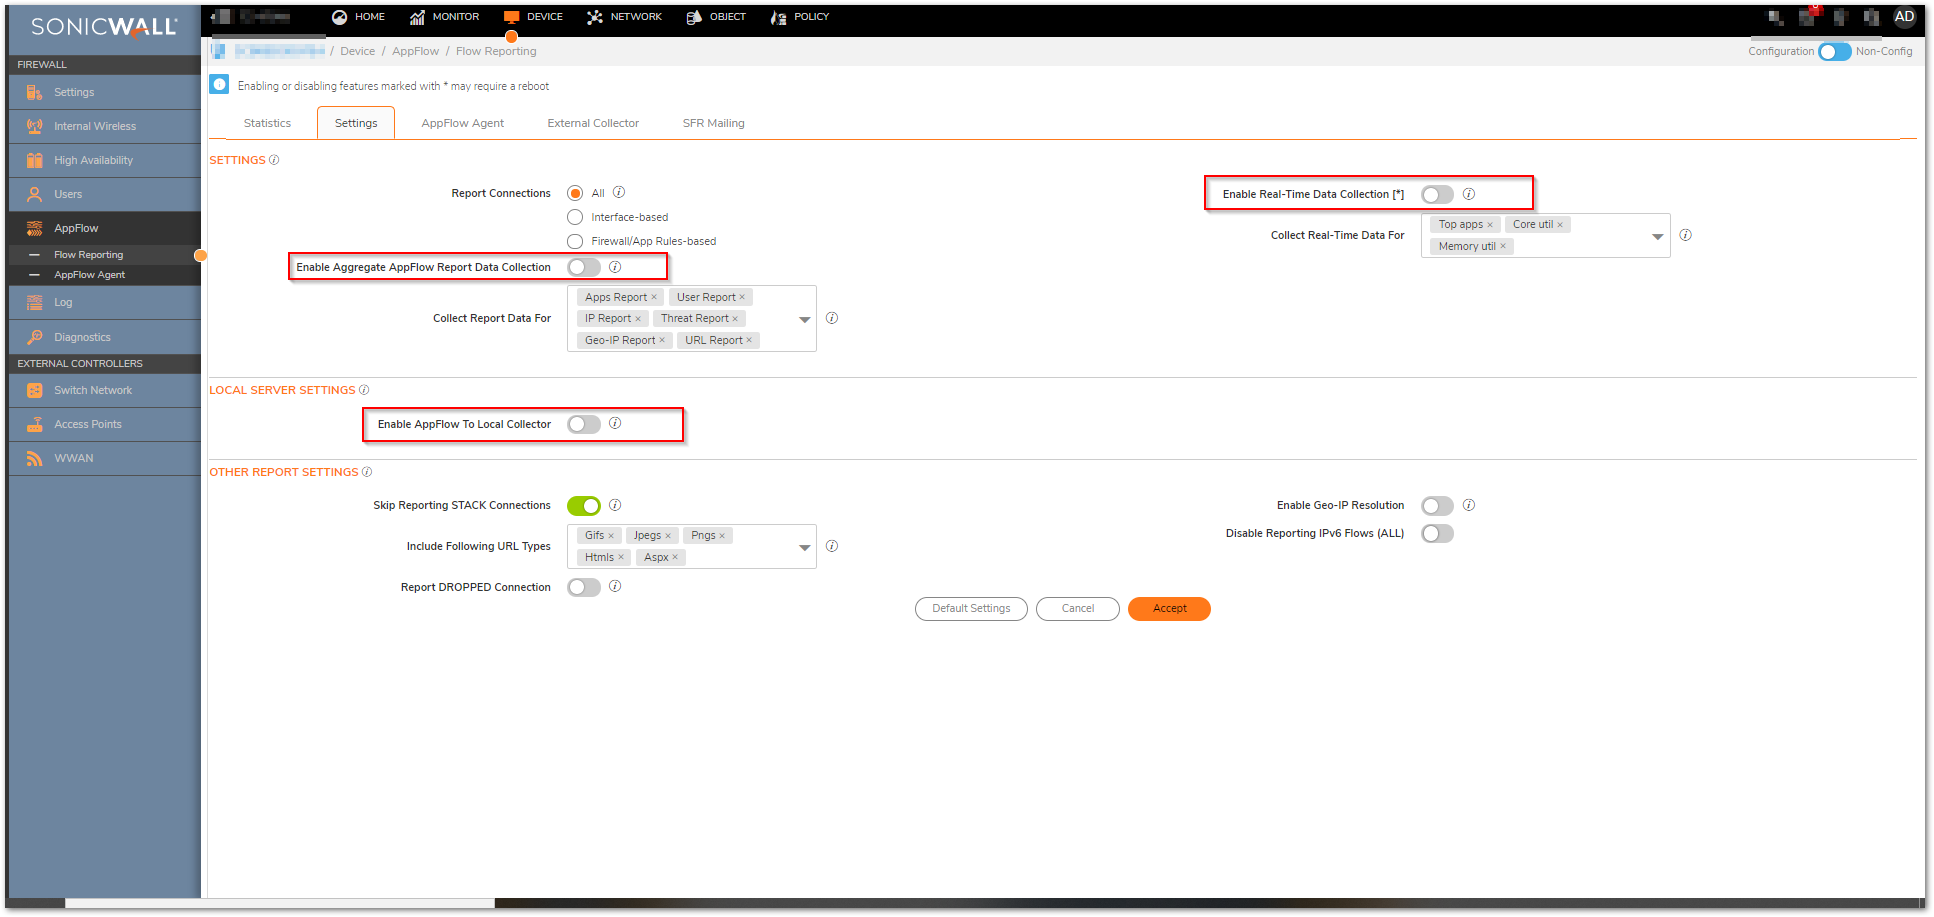
 NOTE: AppFlow is an advanced monitoring tool which is available under Dashboard. If you make use of this tool, it's recommended to skip the above step.
Disable, Remove, or Connect all Inactive IPSec VPN Policies
- Click Network in the top navigation menu.
- Navigate to IPSec VPN | Rules and Settings.
- Look for any Policies which are Enabled but not currently up. Disable these tunnels via the checkbox on the right hand side of the page, or reconfigure them to be up.

 TIP: If a VPN Policy doesn't show a Green Bubble between the Destinations and Crypto Suite Fields, it isn't up.
Lower the Logging Amount and Set Redundancies
- Click Device in the top navigation menu.
- Click Log | Settings and select Import Logging Template.
- Select Analyzer / Viewpoint / GMS from the drop-down menu, click Apply.
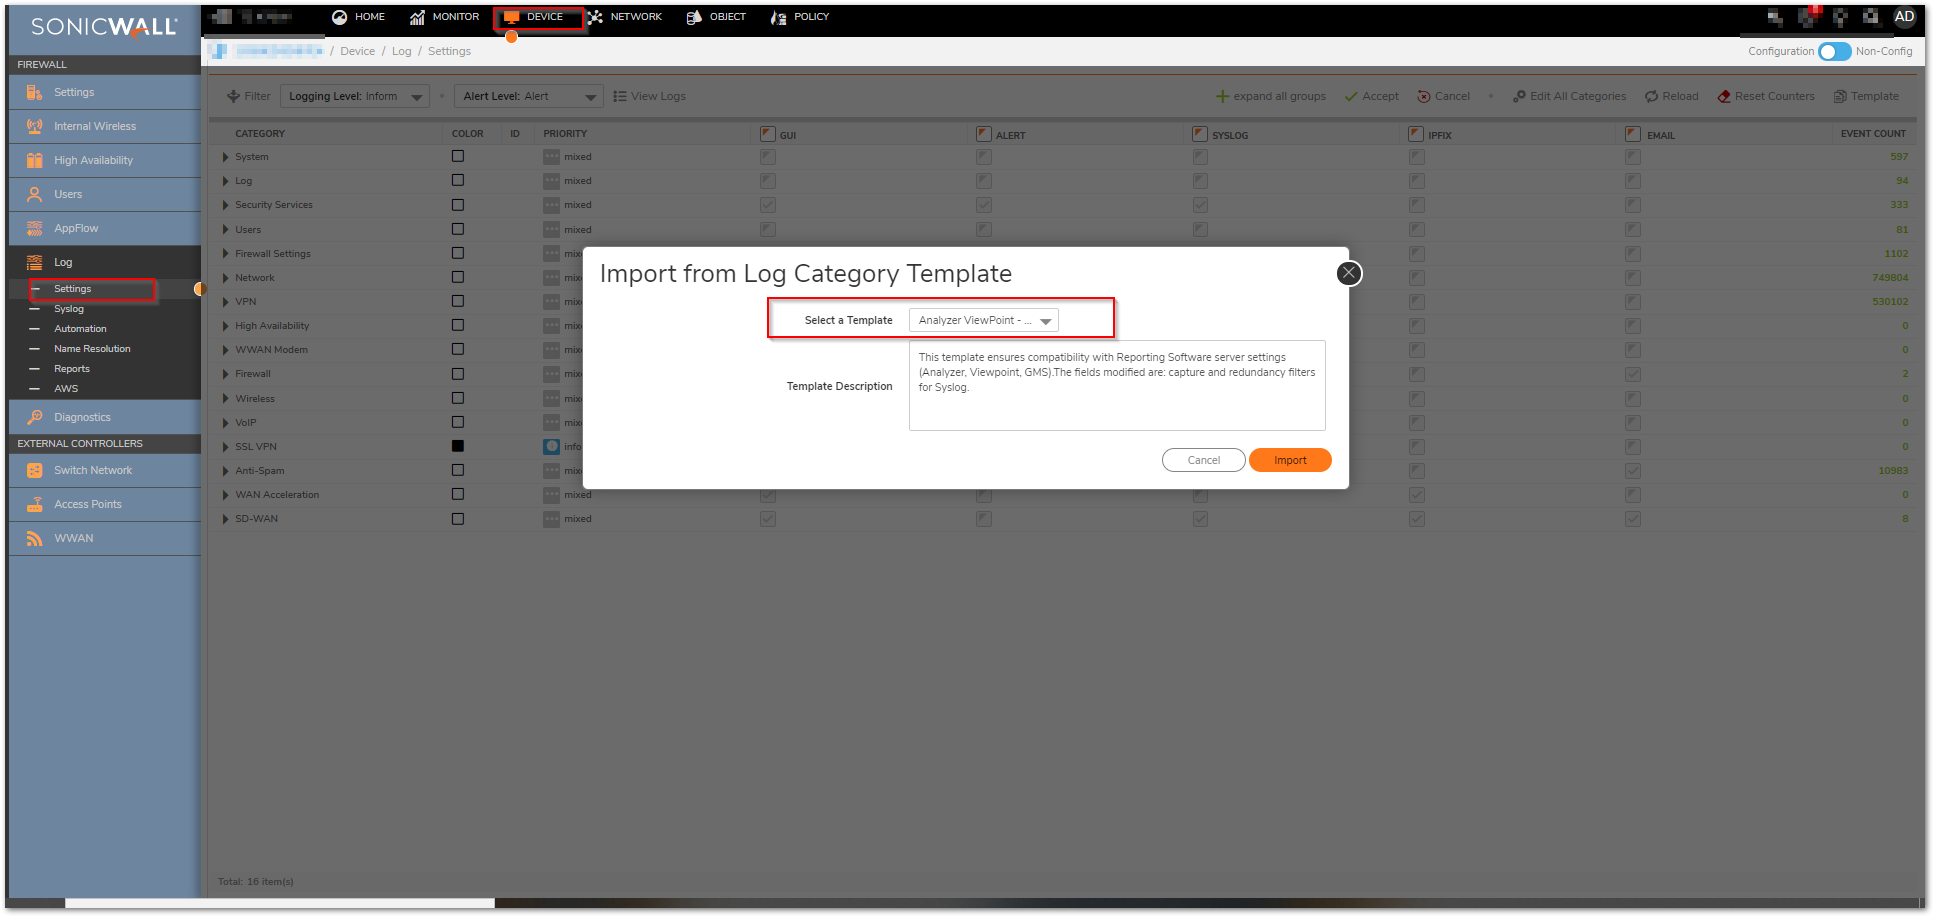
 CAUTION: This will lower the amount of information logged on the SonicWall compared to default values. It may be necessary to revert this change when troubleshooting in the future.
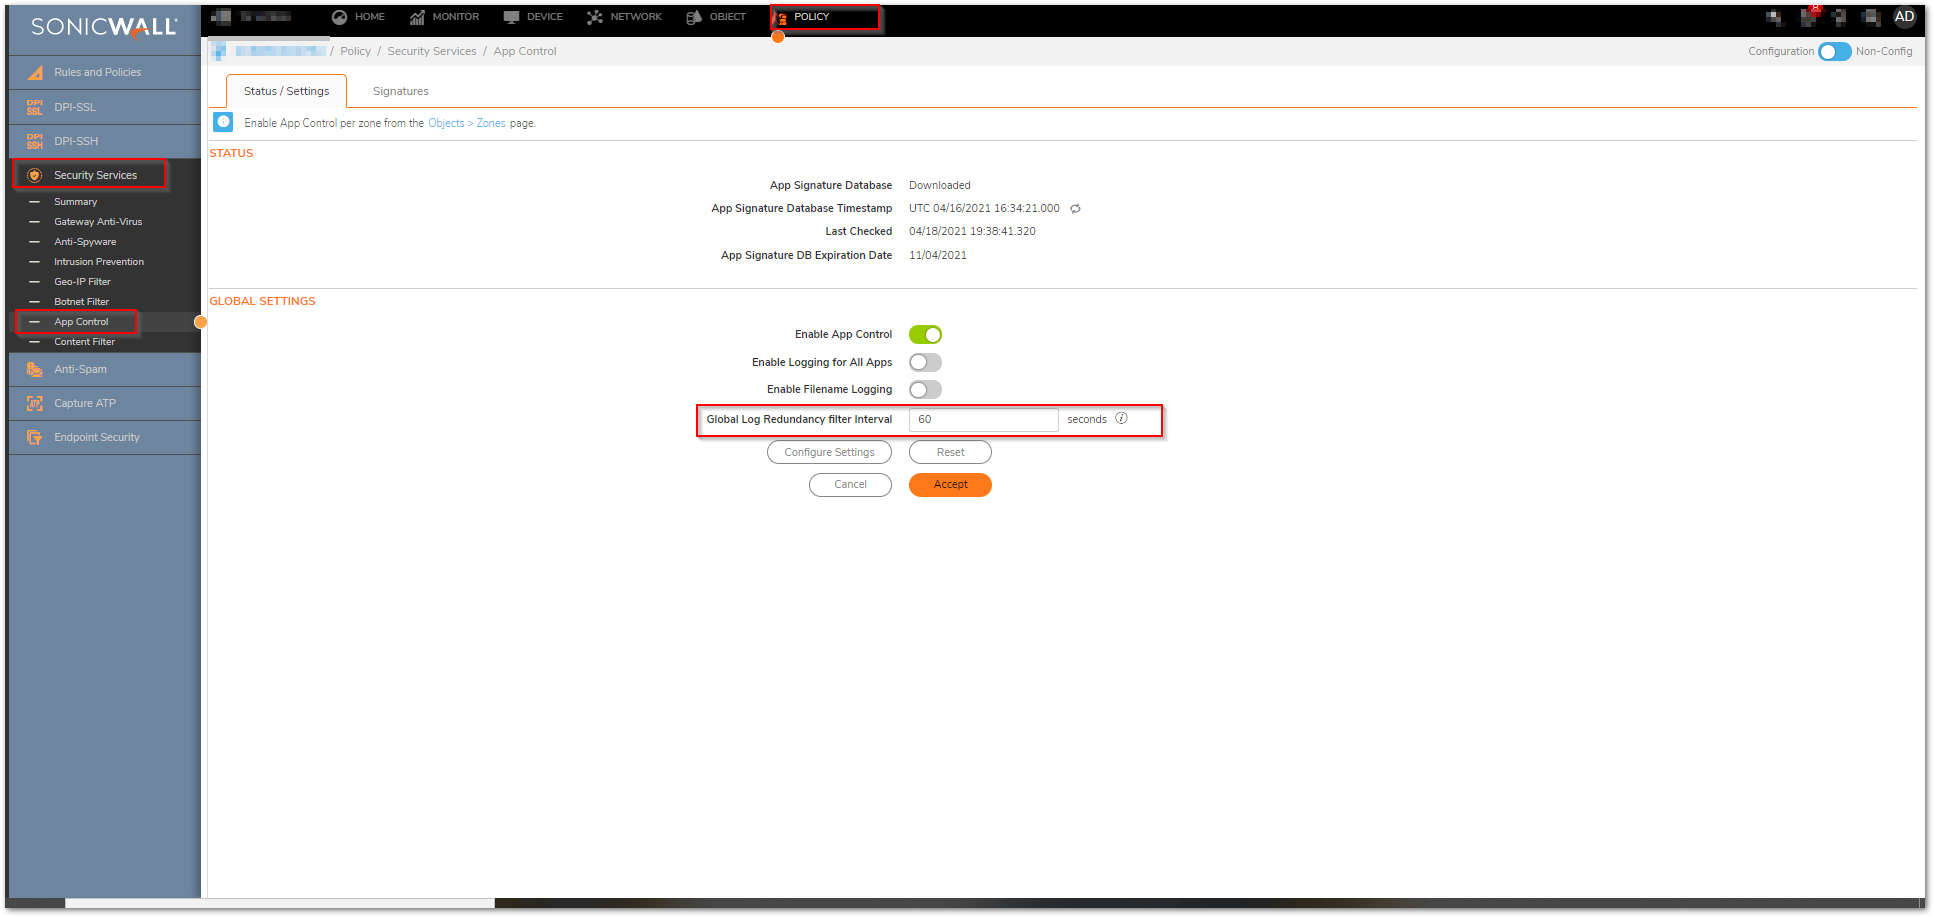
 - Click Policy in the top navigation menu.
- Click Security Services | Application Control and set the Global Log Redundancy Filter (Seconds) to 60. Click Accept.
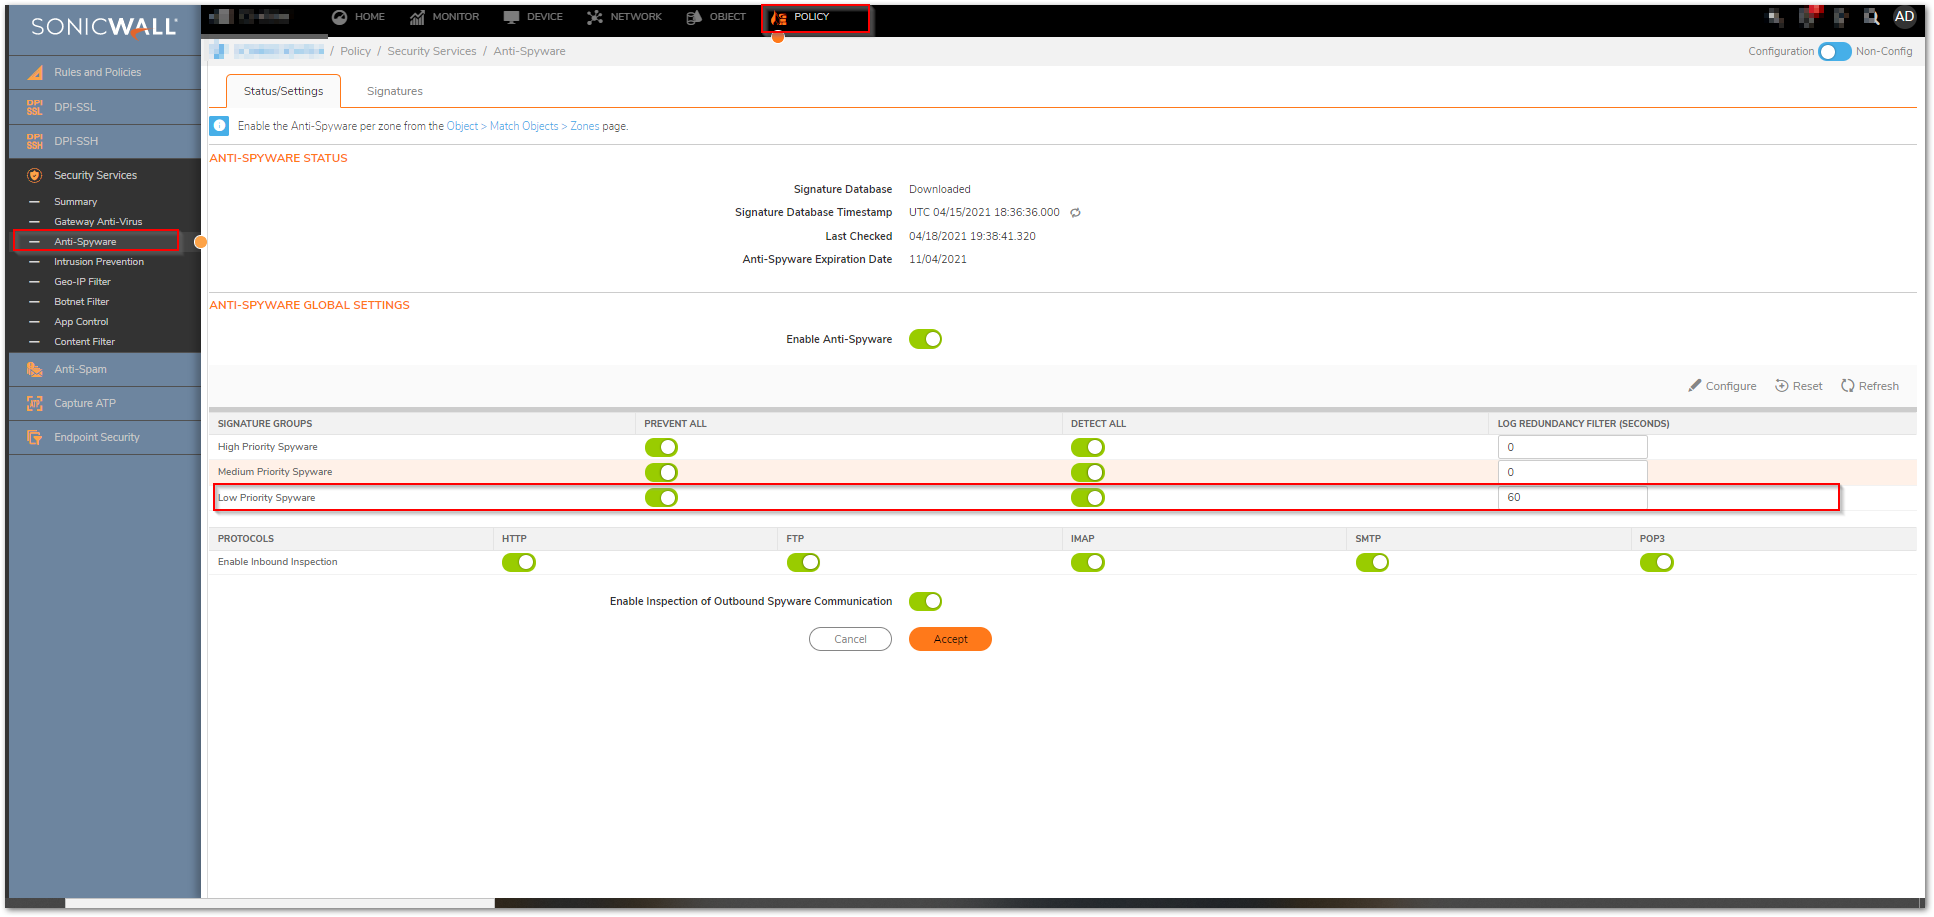
- Navigate to Security Services | Anti-Spyware and set the Low Danger Level Spyware field for Log Redundancy Filter (seconds) to 60. Click Accept.
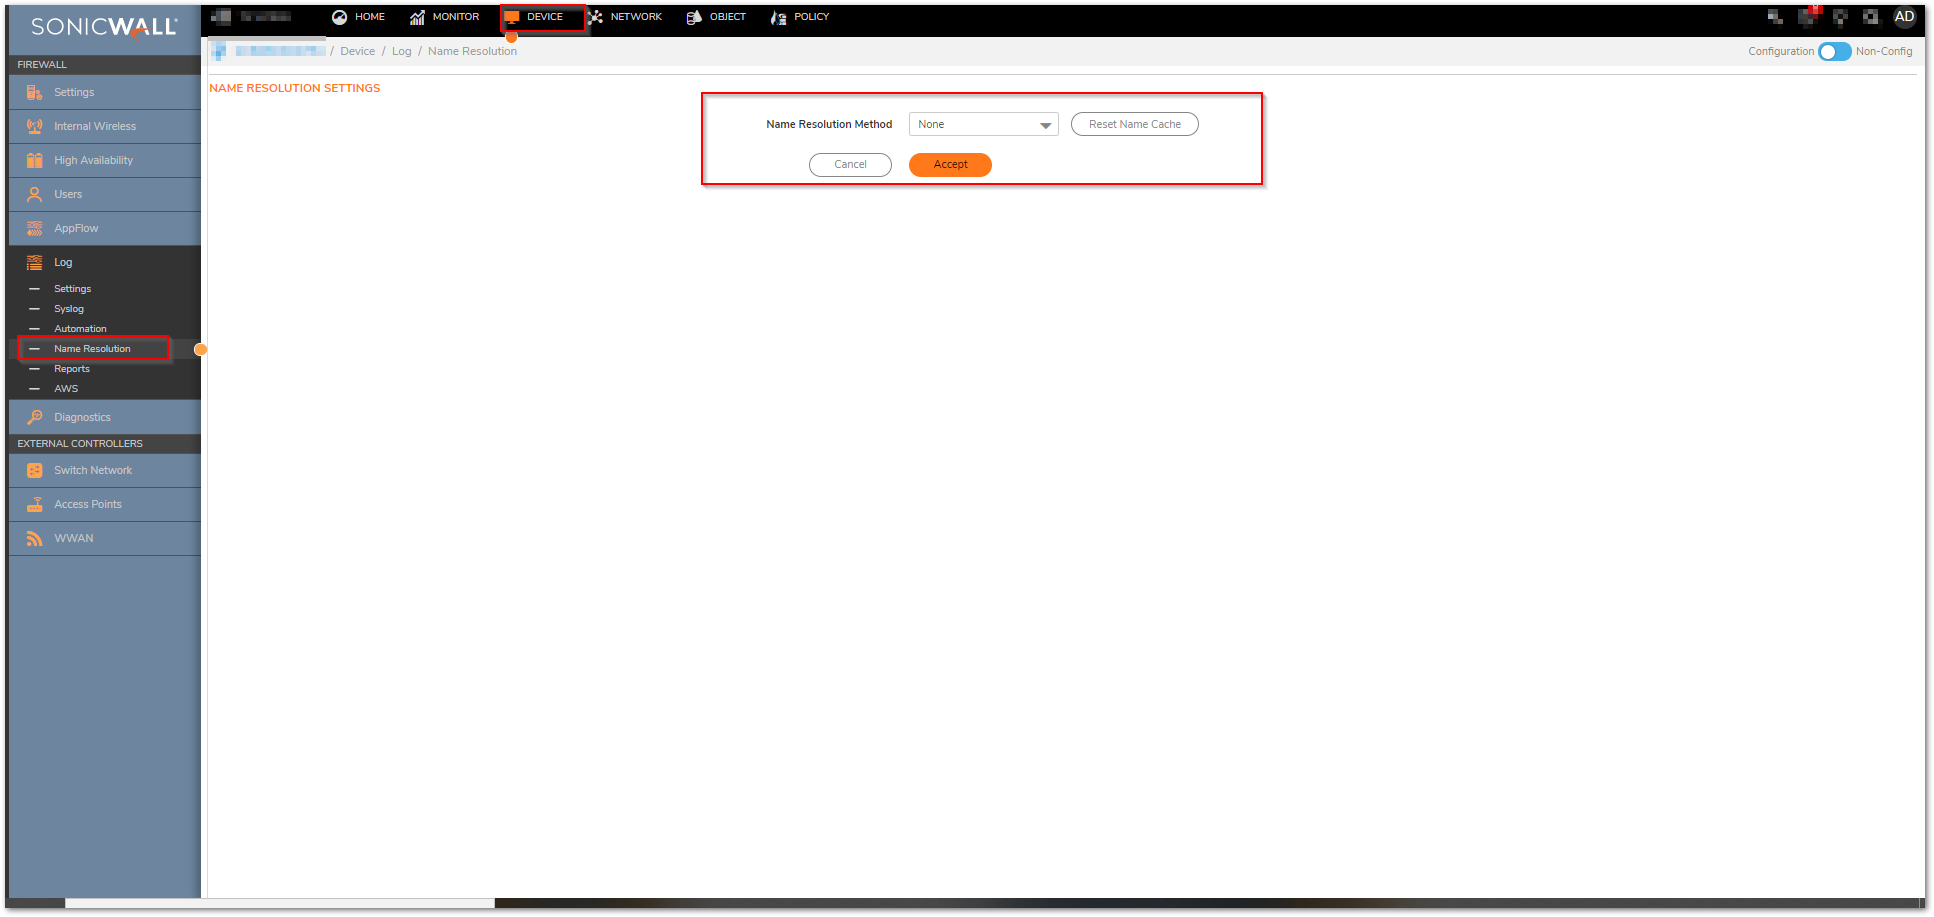
- Navigate to Device | Log | Name Resolution and set Name Resolution Method to None. Click Accept.
- In the URL Bar for your Web Browser, replace the word main with the word diag and press Enter. This will take you to the SonicWall Diagnostic Page. You can follow the below link for the same:
https://<Mgmt-ip>/sonicui/7/m/Mgmt/settings/diag
- Click Internal Settings and look for the following entries.
- Main Log Process Reschedule Interval
- Exempt Redundancy Filter Intervals of Unfiltered Events from Global, Category-Level, and Group-Level Changes
- Set those options as shown below, then click Accept.

Remove Wildcard FQDN Address Objects
- Click Object in the top navigation menu.
- Click Match Objects | Addresses and click the Type Field.
- Look for any Address Objects with the FQDN Type. If these are not in active use, delete them. If they are in active use, consider a work-around in their place.
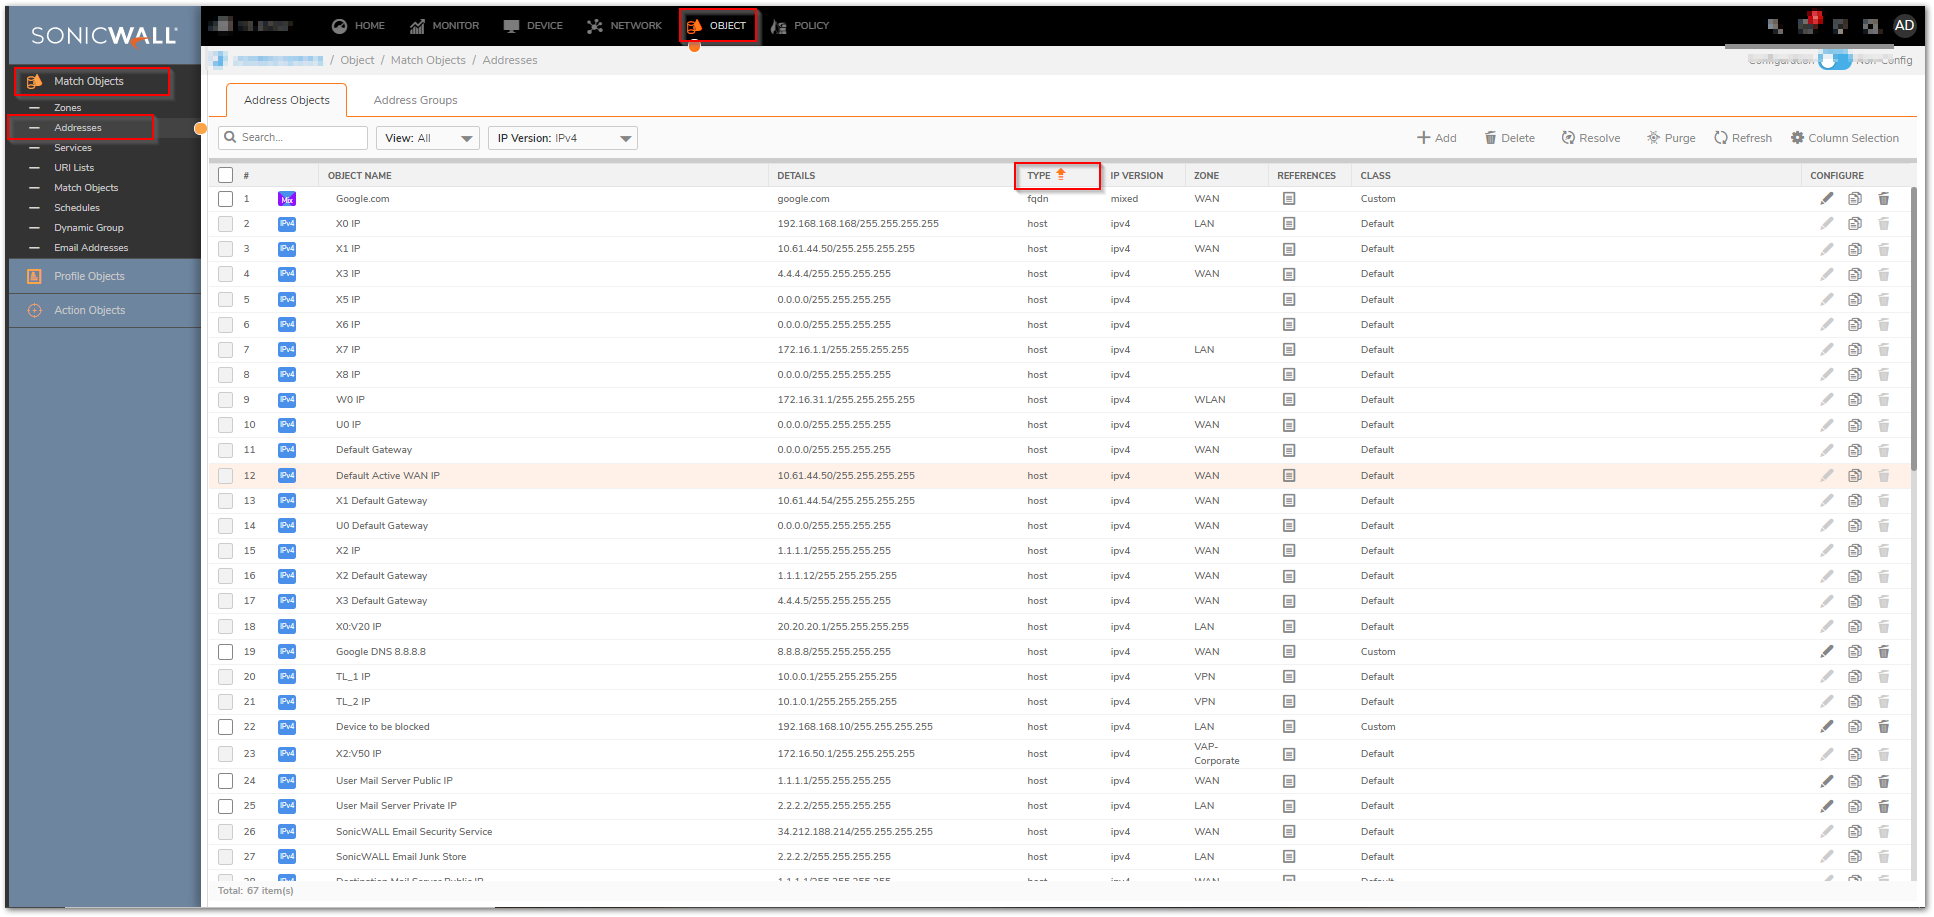
 CAUTION: FQDN Address Objects require that the SonicWall constantly refresh the DNS Entry and store that information. The more FQDN Objects in use, the more traffic generated and stored by the SonicWall.
Remove Disconnected WAN Interfaces
- Click Network in the top navigation menu.
- Click System | Interfaces.
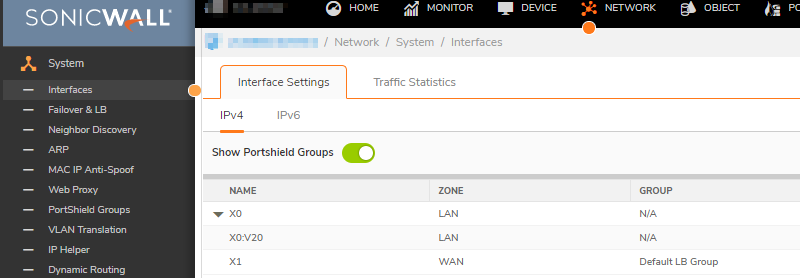
- Look for any Interfaces designated as a WAN which show No Link for the Status Field.
- Unassign these Interfaces if possible. If the Interface will be connected physically in the near future, consider unassigning the Interface and then reconfiguring at a later time.
Remove Unnecessary NAT Policies and Firewall Access Rules
- Click Policy in the top navigation menu.
- Click Rules and Policies | NAT Rules.
- Under View, select to Custom and scan the list of NAT Policies.
- If there are any NAT Policies which are no longer required, delete them.
- Navigate to Rules and Policies | Access Rules.
- Scan the list of Access Rules, if there are any which are no longer required then delete them. If there are any Access Rules which can be combined into one rule, do so.

Disable TCP Compliance with RFC 793 and RFC 1122
 NOTE: This option is only available on certain Firmware versions. If you do not see this option then don't worry as it cannot impact your SonicWall.
- Click Network in the top navigation menu.
- Navigate to Firewall | Flood Protection.
- Disable the checkbox for Enforce strict TCP compliance with RFC 793 and RFC 1122.
- Click Accept.
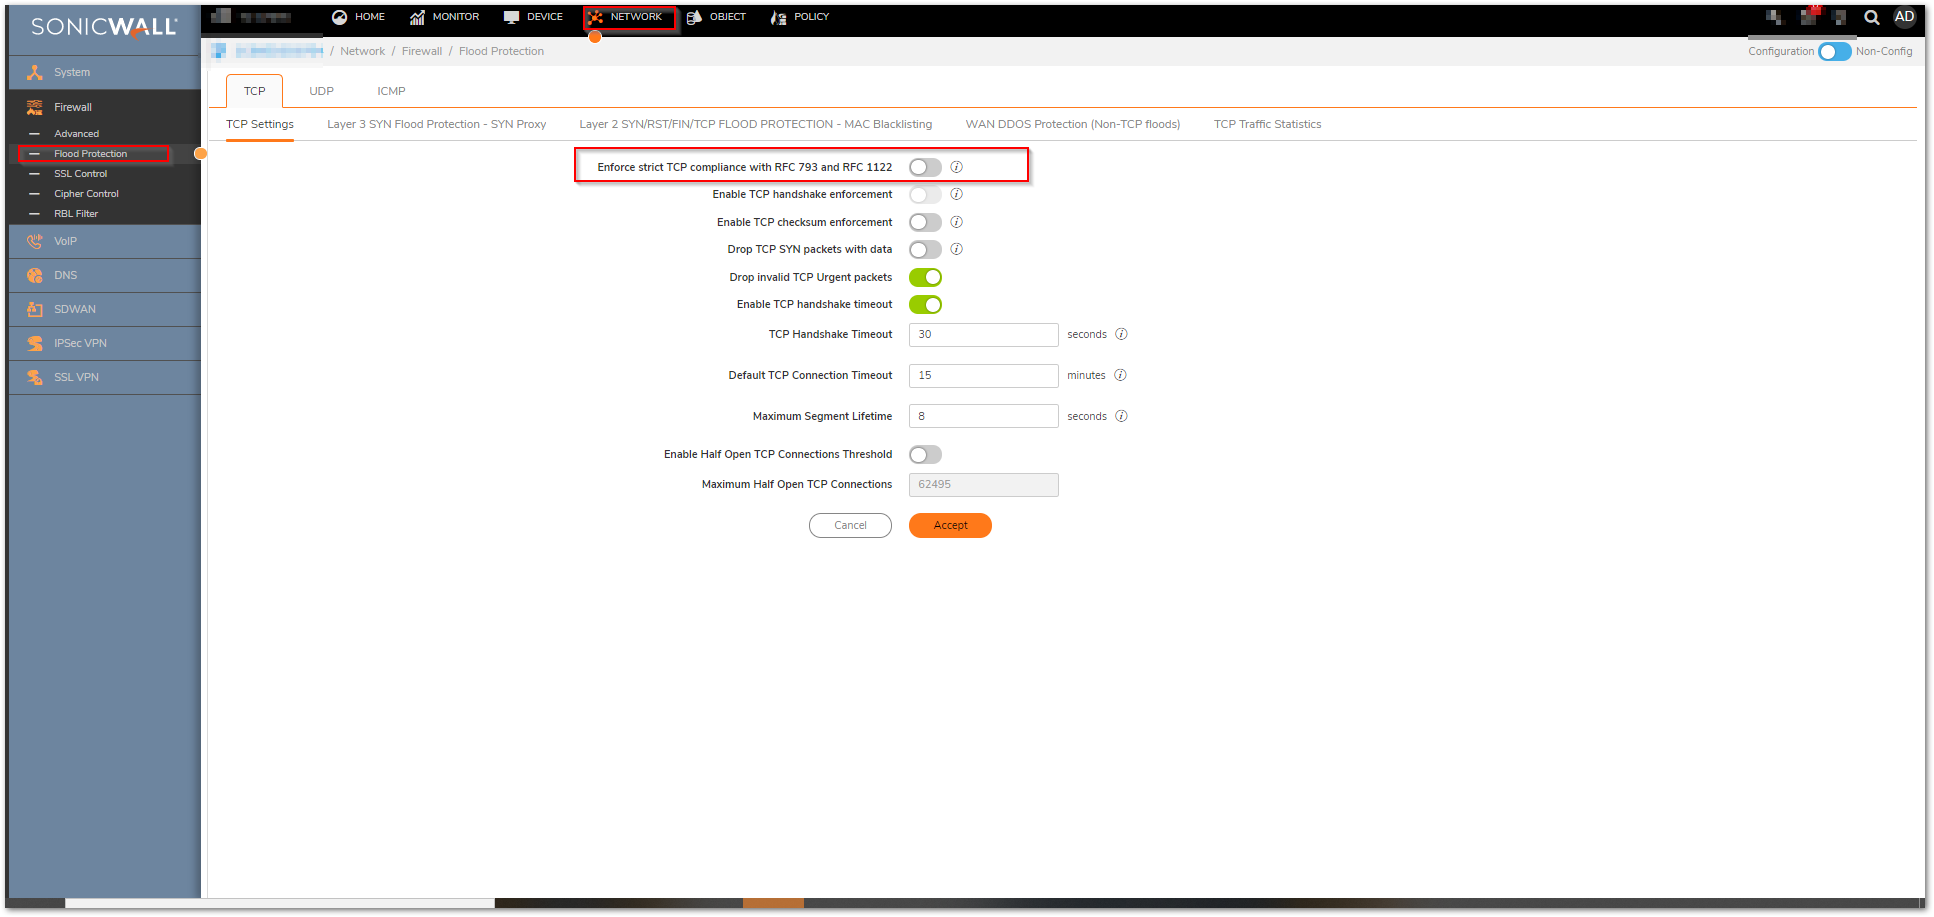
NOTE: These RFCs handle how the SonicWall closes TCP Connections and isn't supported by some legacy devices which can cause CPU Spikes as the SonicWall is unable to close connections. For more information on these RFCs please visit The IETF Request for Comments Homepage.
Resolution for SonicOS 6.5
This release includes significant user interface changes and many new features that are different from the SonicOS 6.2 and earlier firmware. The below resolution is for customers using SonicOS 6.5 firmware.
 NOTE: The below steps can be followed in any order, if you're experiencing high Core 0 usage it's recommended to perform each step and then allow some time for monitoring, usually 1-3 minutes.
Disable AppFlow
- Click Manage in the top navigation menu. Click AppFlow Settings | Flow Reporting , and Uncheck the following, then click Accept.
- Enable Real-Time Data Collection.
- Enable Aggregate AppFlow Report Data Collection.
- Enable AppFlow To Local Collector.
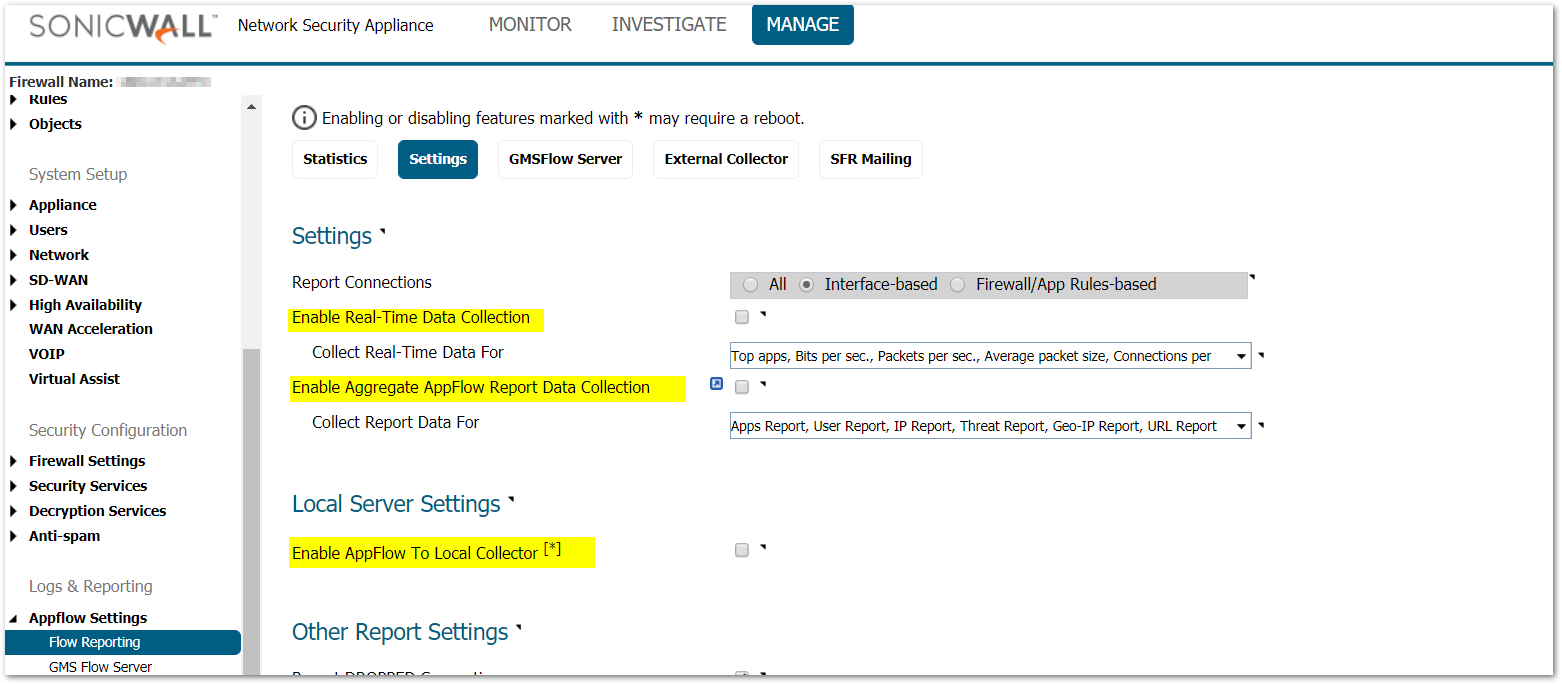
 NOTE: AppFlow is an advanced monitoring tool which is available under Monitor | Live Monitor. If you make use of this tool, it's recommended to skip the above step.
Disable, Remove, or Connect all Inactive IPSec VPN Policies
- Click Manage in the top navigation menu.
- Navigate to VPN | Base Settings.
- Look for any Policies which are Enabled but not currently up. Disable these tunnels via the checkbox on the right hand side of the page, or reconfigure them to be up.

 TIP: If a VPN Policy doesn't show a Green Bubble between the Destinations and Crypto Suite Fields, it isn't up.
Lower the Logging Amount and Set Redundancies
- Click Manage in the top navigation menu.
- Click Log Settings | Base Setup and select Import Logging Template.
- Select Analyzer / Viewpoint / GMS from the drop-down menu, click Apply.
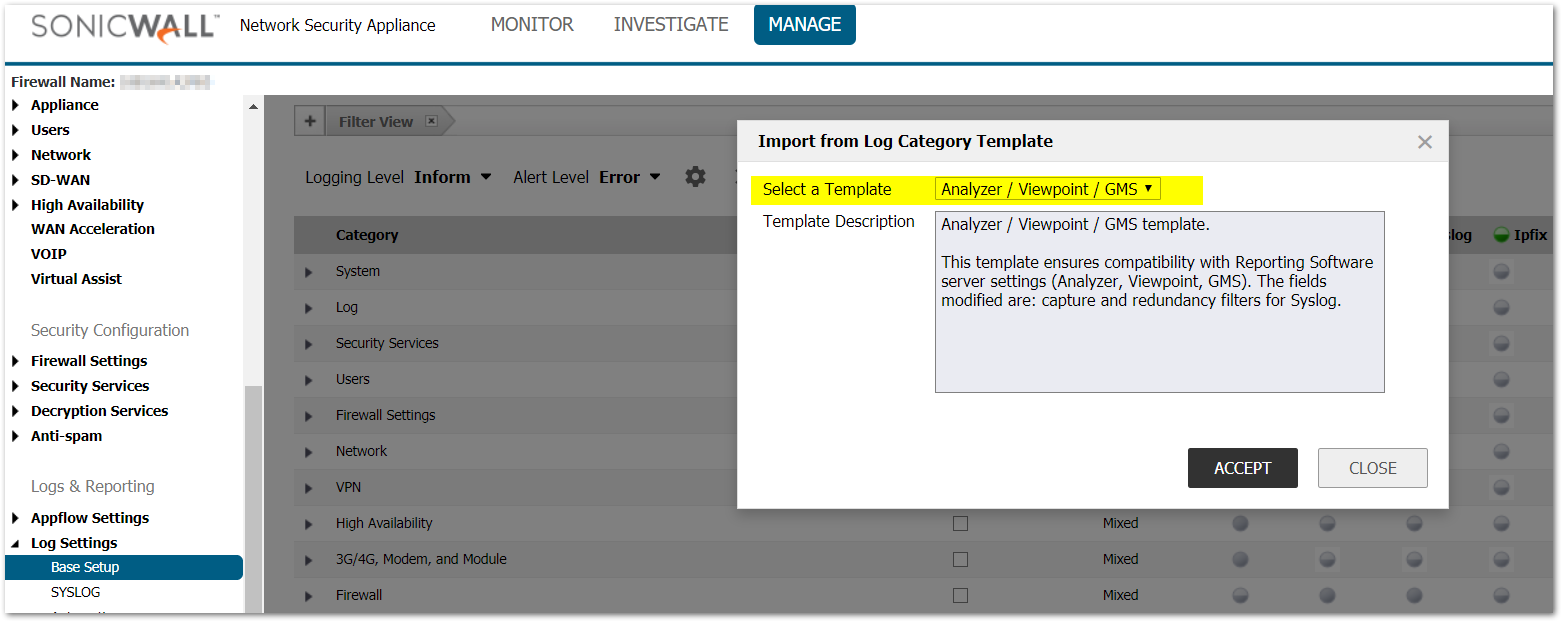
 CAUTION: This will lower the amount of information logged on the SonicWall compared to default values. It may be necessary to revert this change when troubleshooting in the future.
 - Click Manage in the top navigation menu.
- Click Rules | Application Control and set the Global Log Redundancy Filter (Seconds) to 60. Click Accept.
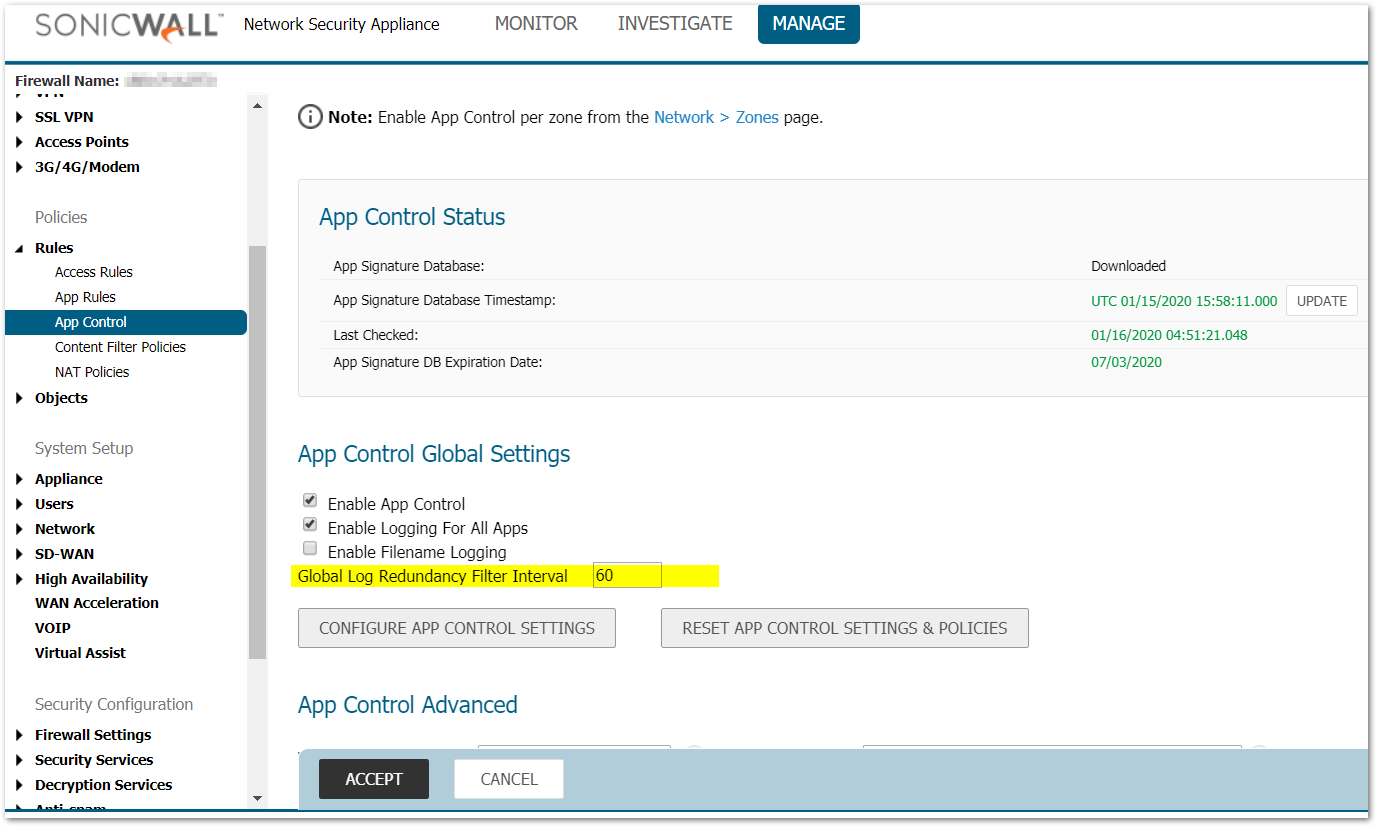
- Navigate to Security Services | Anti-Spyware and set the Low Danger Level Spyware field for Log Redundancy Filter (seconds) to 60. Click Accept.
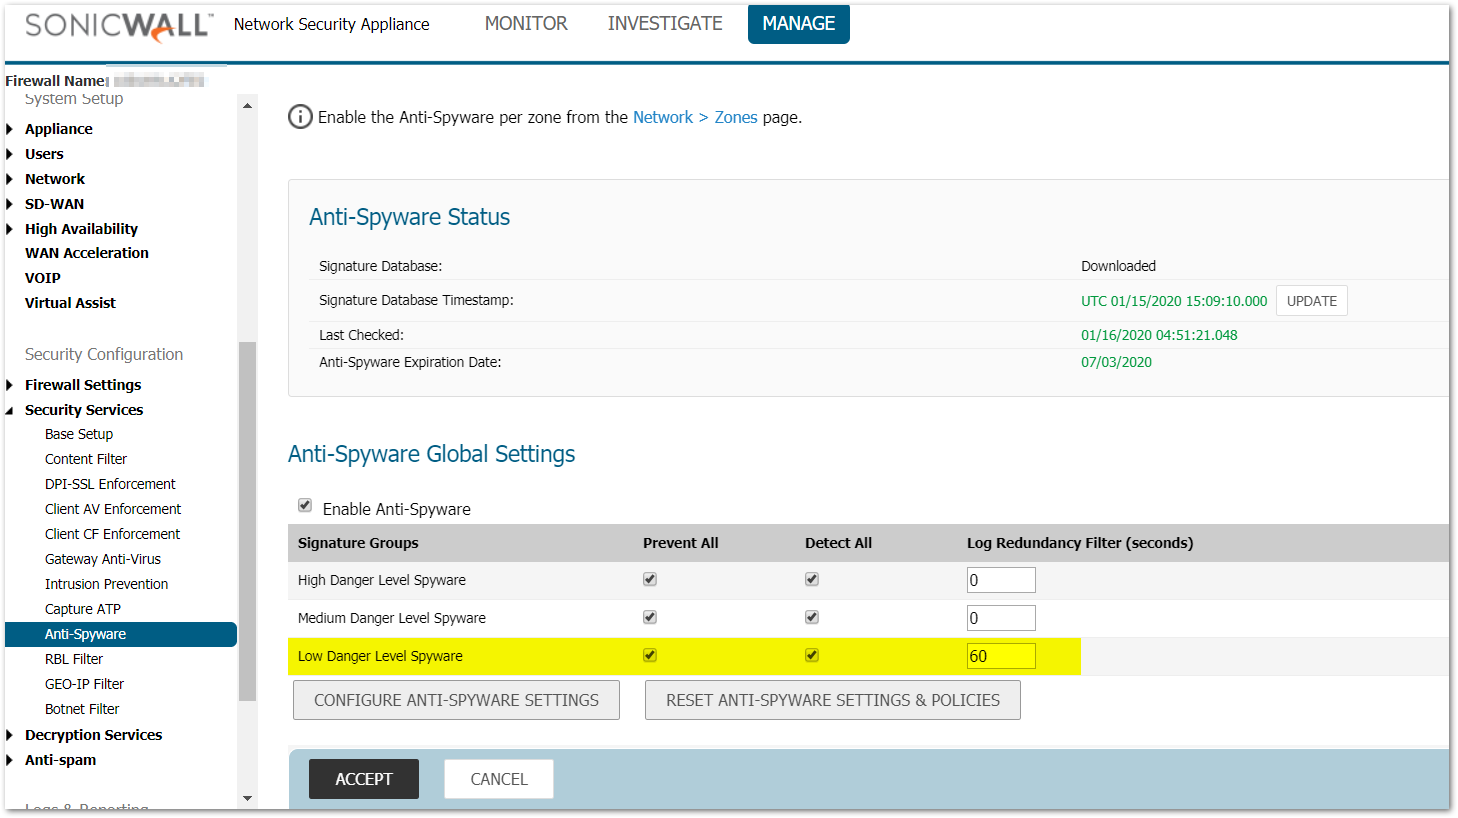
- Navigate to Log Settings | Name Resolution and set Name Resolution Method to None. Click Accept.
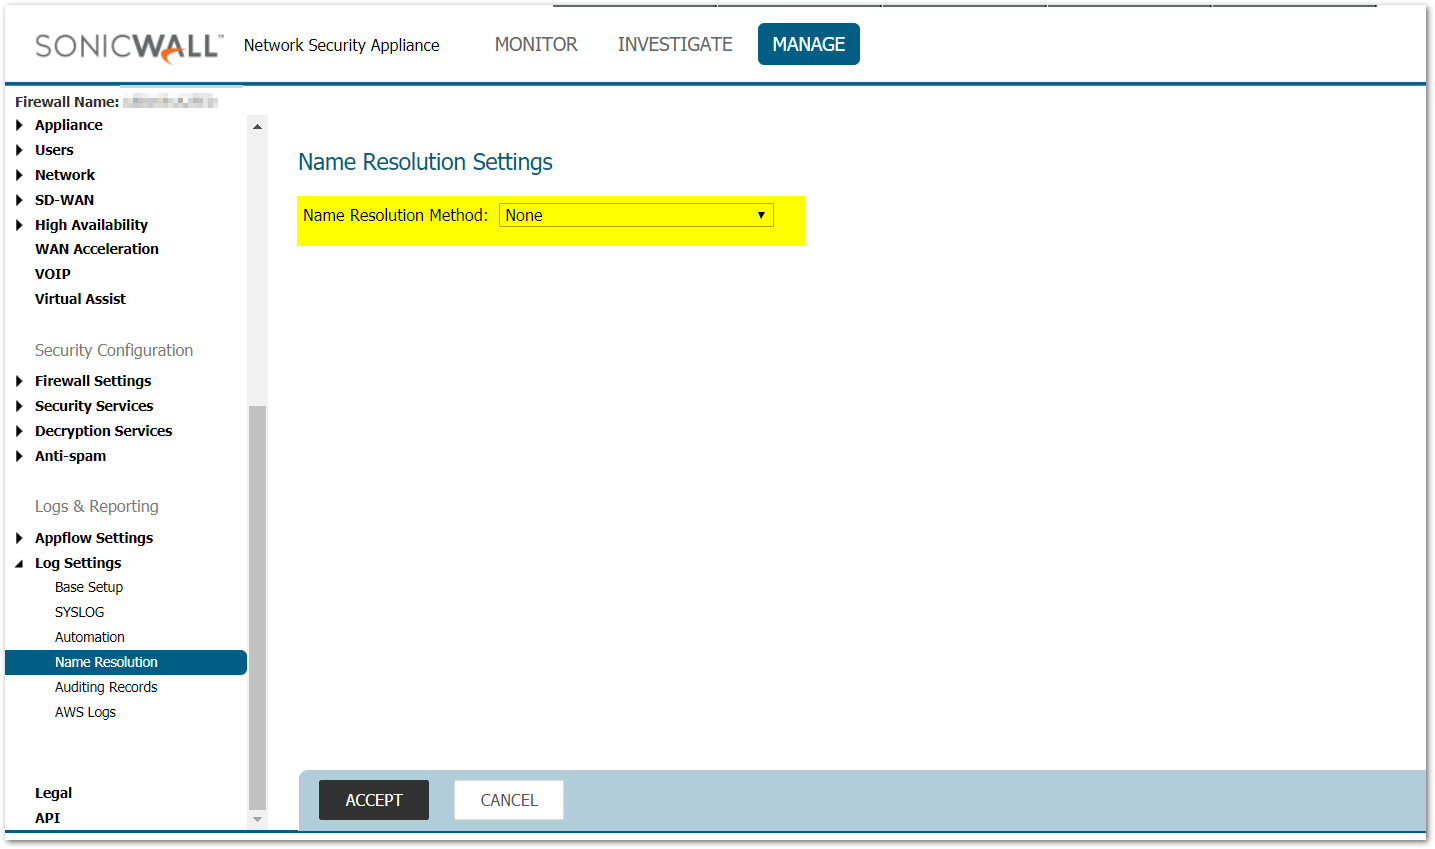
- In the URL Bar for your Web Browser, replace the word main with the word diag and press Enter. This will take you to the SonicWall Diagnostic Page.
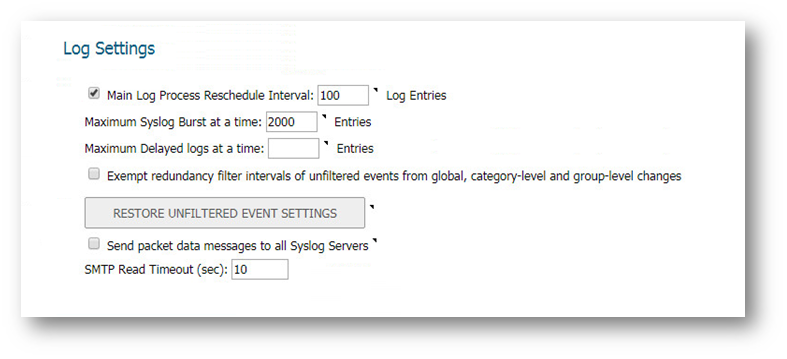
- Click Internal Settings and look for the following entries.
- Main Log Process Reschedule Interval
- Exempt Redundancy Filter Intervals of Unfiltered Events from Global, Category-Level, and Group-Level Changes
- Set those options as shown below, then click Accept.
Remove Wildcard FQDN Address Objects
- Click Manage in the top navigation menu.
- Click Objects | Address Objects and click the Type Field.
- Look for any Address Objects with the FQDN Type. If these are not in active use, delete them. If they are in active use, consider a work-around in their place.
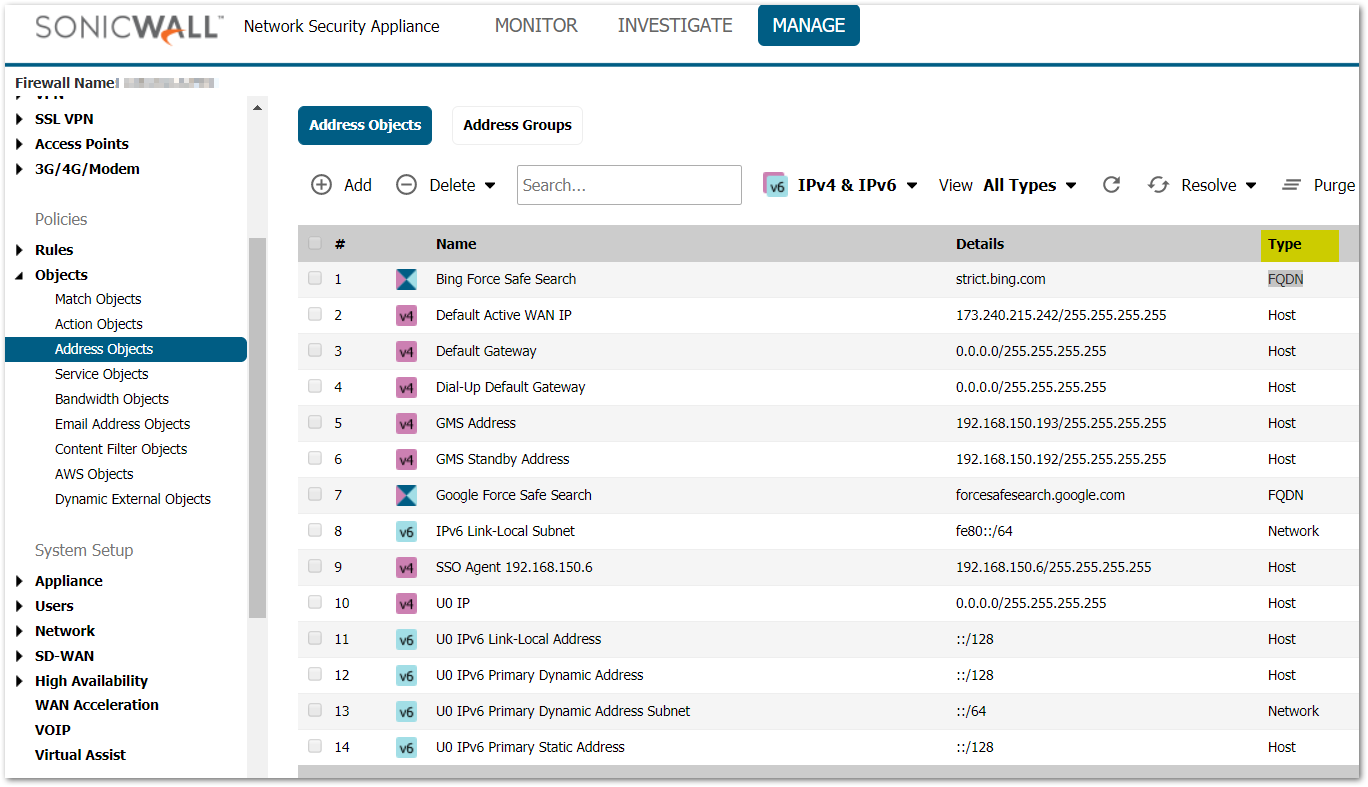
 CAUTION: FQDN Address Objects require that the SonicWall constantly refresh the DNS Entry and store that information. The more FQDN Objects in use, the more traffic generated and stored by the SonicWall.
Remove Disconnected WAN Interfaces
- Click Manage in the top navigation menu.
- Click Network | Interfaces.
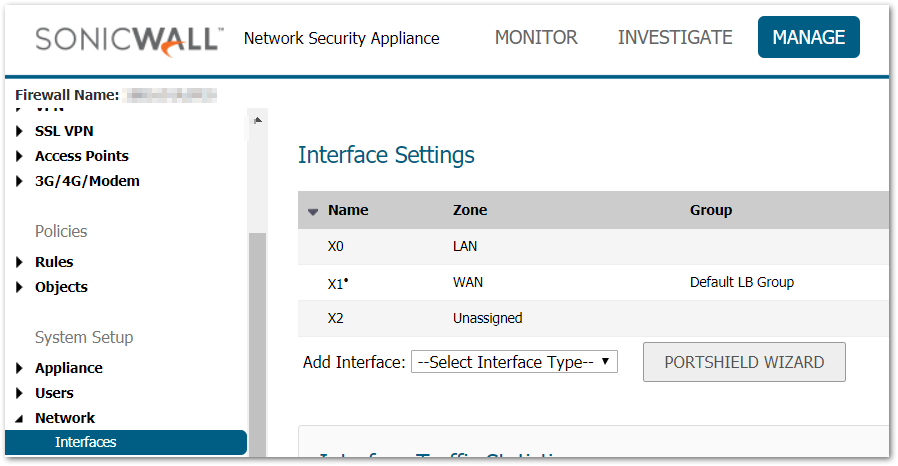
- Look for any Interfaces designated as a WAN which show No Link for the Status Field.
- Unassign these Interfaces if possible. If the Interface will be connected physically in the near future, consider unassigning the Interface and then reconfiguring at a later time.
Remove Unnecessary NAT Policies and Firewall Access Rules
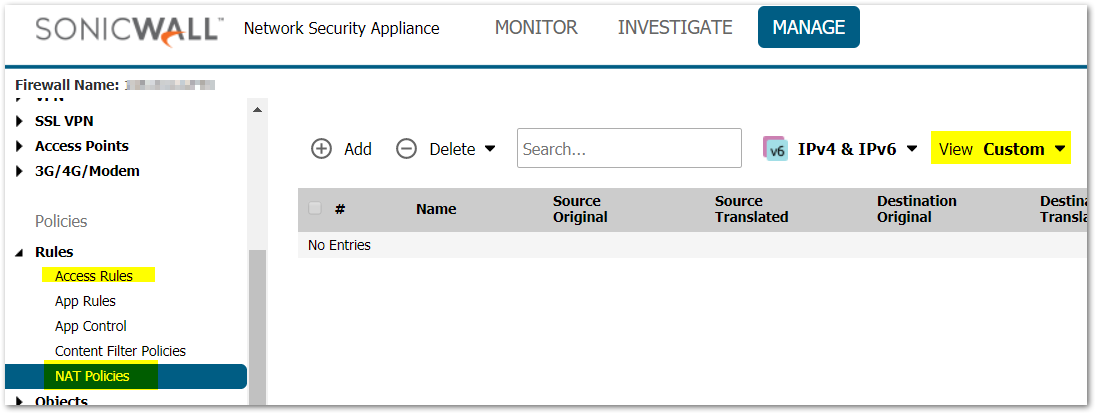
- Click Manage in the top navigation menu.
- Click Rules | NAT Policies.
- Under View, select to Custom and scan the list of NAT Policies.
- If there are any NAT Policies which are no longer required, delete them.
- Navigate to Rules | Access Rules.
- Scan the list of Access Rules, if there are any which are no longer required then delete them. If there are any Access Rules which can be combined into one rule, do so.
 TIP: For more information about NAT Policies and Firewall Access Rules please reference How to Enable Port Forwarding and Allow Access to a Server Through the SonicWall.
Disable TCP Compliance with RFC 793 and RFC 1122
 NOTE: This option is only available on certain Firmware versions. If you do not see this option then don't worry as it cannot impact your SonicWall.
- Click Manage in the top navigation menu.
- Navigate to Firewall Settings | Flood Protection.
- Disable the checkbox for Enforce strict TCP compliance with RFC 793 and RFC 1122.
- Click Accept.
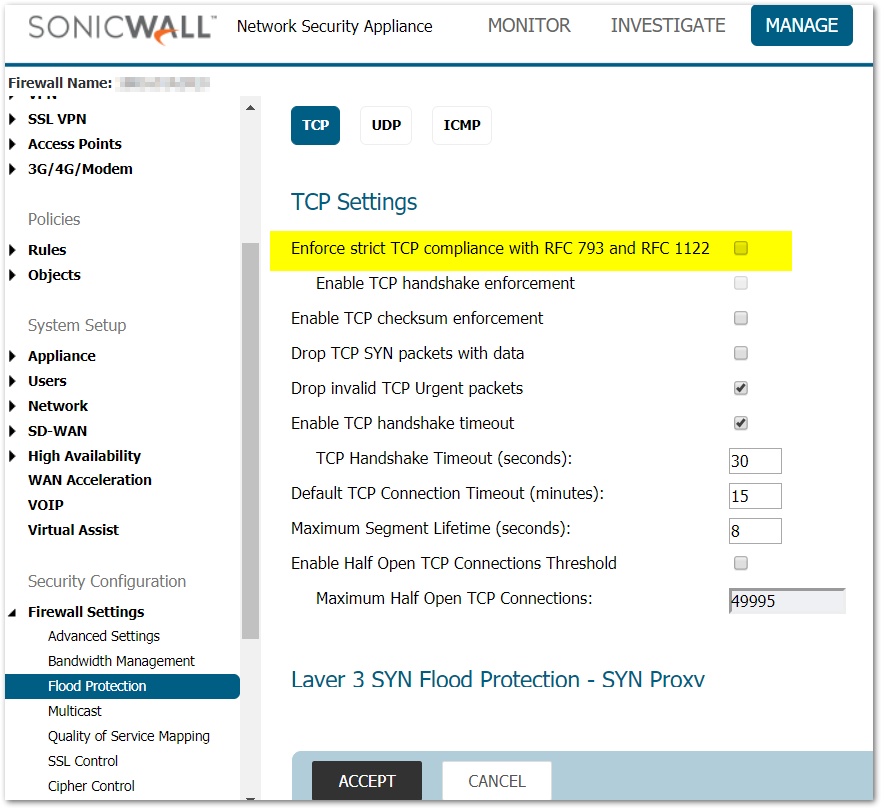
 NOTE: These RFCs handle how the SonicWall closes TCP Connections and isn't supported by some legacy devices which can cause CPU Spikes as the SonicWall is unable to close connections. For more information on these RFCs please visit The IETF Request for Comments Homepage.
Related Articles
- Error:"Invalid API Argument" when modifying the access rules
- Cysurance Partner FAQ
- Configure probe monitoring for WAN Failover and Loadbalancing - SonicWall UTM
Categories
- Firewalls > SonicWall SuperMassive 9000 Series > Networking
- Firewalls > SonicWall SuperMassive E10000 Series > Networking
- Firewalls > TZ Series > Networking
- Firewalls > NSa Series > Networking
- Firewalls > NSv Series > Networking


 YES
YES NO
NO