-
Products
-
SonicPlatform
SonicPlatform is the cybersecurity platform purpose-built for MSPs, making managing complex security environments among multiple tenants easy and streamlined.
Discover More
-
-
Solutions
-
Federal
Protect Federal Agencies and Networks with scalable, purpose-built cybersecurity solutions
Learn MoreFederalProtect Federal Agencies and Networks with scalable, purpose-built cybersecurity solutions
Learn More - Industries
- Use Cases
-
-
Partners
-
Partner Portal
Access to deal registration, MDF, sales and marketing tools, training and more
Learn MorePartner PortalAccess to deal registration, MDF, sales and marketing tools, training and more
Learn More - SonicWall Partners
- Partner Resources
-
-
Support
-
Support Portal
Find answers to your questions by searching across our knowledge base, community, technical documentation and video tutorials
Learn MoreSupport PortalFind answers to your questions by searching across our knowledge base, community, technical documentation and video tutorials
Learn More - Support
- Resources
- Capture Labs
-
- Company
- Contact Us
How can I enable port forwarding and allow access to a server through the SonicWall?


Description
This article describes how to access an Internet device or server behind the SonicWall firewall. This process is also known as opening ports, PATing, NAT or Port Forwarding.
For this process the device can be any of the following:
- Web Server
- FTP Server
- Email Server
- Terminal Server
- DVR (Digital Video Recorder)
- PBX
- SIP Server
- IP Camera
- Printer
- Application Server
- Any custom Server Roles
- Game Consoles
Don't want to read? Watch instead!
Cause
By default the SonicWall disallows all Inbound Traffic that isn't part of a communication that began from an internal device, such as something on the LAN Zone. This is to protect internal devices from malicious access, however it is often necessary to open up certain parts of a network, such as Servers, to the outside world.
To accomplish this the SonicWall needs a Firewall Access Rule to allow the traffic from the public Internet to the internal network as well as a Network Address Translation (NAT) Policy to direct the traffic to the correct device.
Resolution
Resolution for SonicOS 7.X
This release includes significant user interface changes and many new features that are different from the SonicOS 6.5 and earlier firmware. The below resolution is for customers using SonicOS 7.X firmware.
Manually opening Ports / enabling Port forwarding to allow traffic from the Internet to a Server behind the SonicWall using SonicOS involves the following steps:
- Creating the necessary Address Objects
- Creating the appropriate NAT Policies which can include Inbound, Outbound, and Loopback
- Creating the necessary Firewall Access Rules
These steps will also allow you to enable Port Address Translation with or without altering the IP Addresses involved.
 TIP: The Public Server Wizard is a straightforward and simple way to provide public access to an internal Server through the SonicWall. The Public Server Wizard will simplify the above three steps by prompting your for information and creating the necessary Settings automatically. Click Quick Configuration in the top navigation menu.You can learn more about the Public Server Wizard by reading How to open ports using the SonicWall Public Server Wizard.
 CAUTION: The SonicWall security appliance is managed by HTTP (Port 80) and HTTPS (Port 443), with HTTPS Management being enabled by default. If you are using one or more of the WAN IP Addresses for HTTP/HTTPS Port Forwarding to a Server then you must change the Management Port to an unused Port, or change the Port when navigating to your Server via NAT or another method.
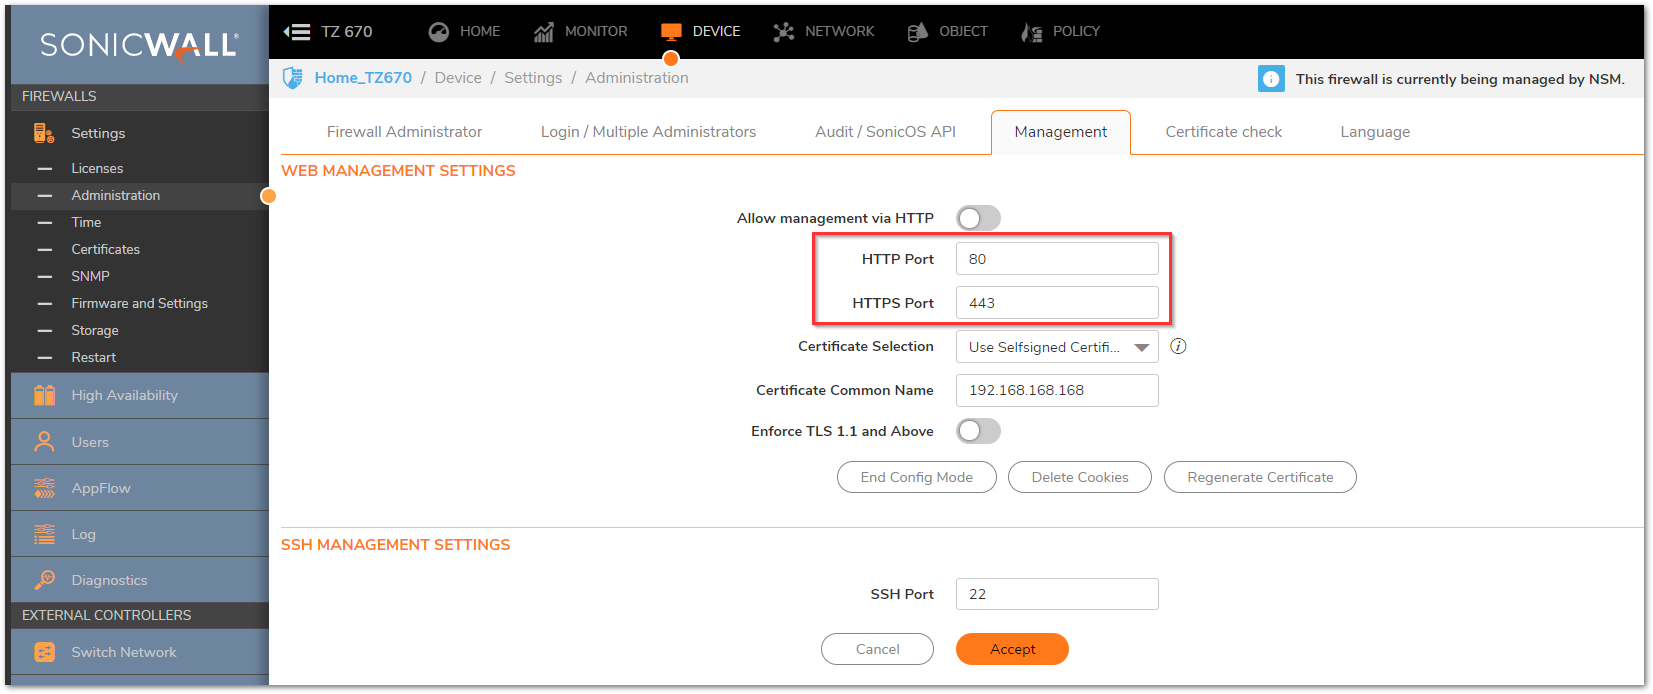
The following walk-through details allowing HTTPS Traffic from the Internet to a Server on the LAN. Once the configuration is complete, Internet Users can access the Server via the Public IP Address of the SonicWall's WAN. Although the examples below show the LAN Zone and HTTPS (Port 443) they can apply to any Zone and any Port that is required. Similarly, the WAN IP Address can be replaced with any Public IP that is routed to the SonicWall, such as a Public Range provided by an ISP.
Creating the necessary Address Objects
- Login to the SonicWall GUI.
- Click Object in the top navigation menu.
- Click Match Objects | Addresses.
- Click Add and create two Address Objects for the Server's Public IP and the Server's Private IP.
- Click Save to add the Address Object to the SonicWall's Address Object Table.
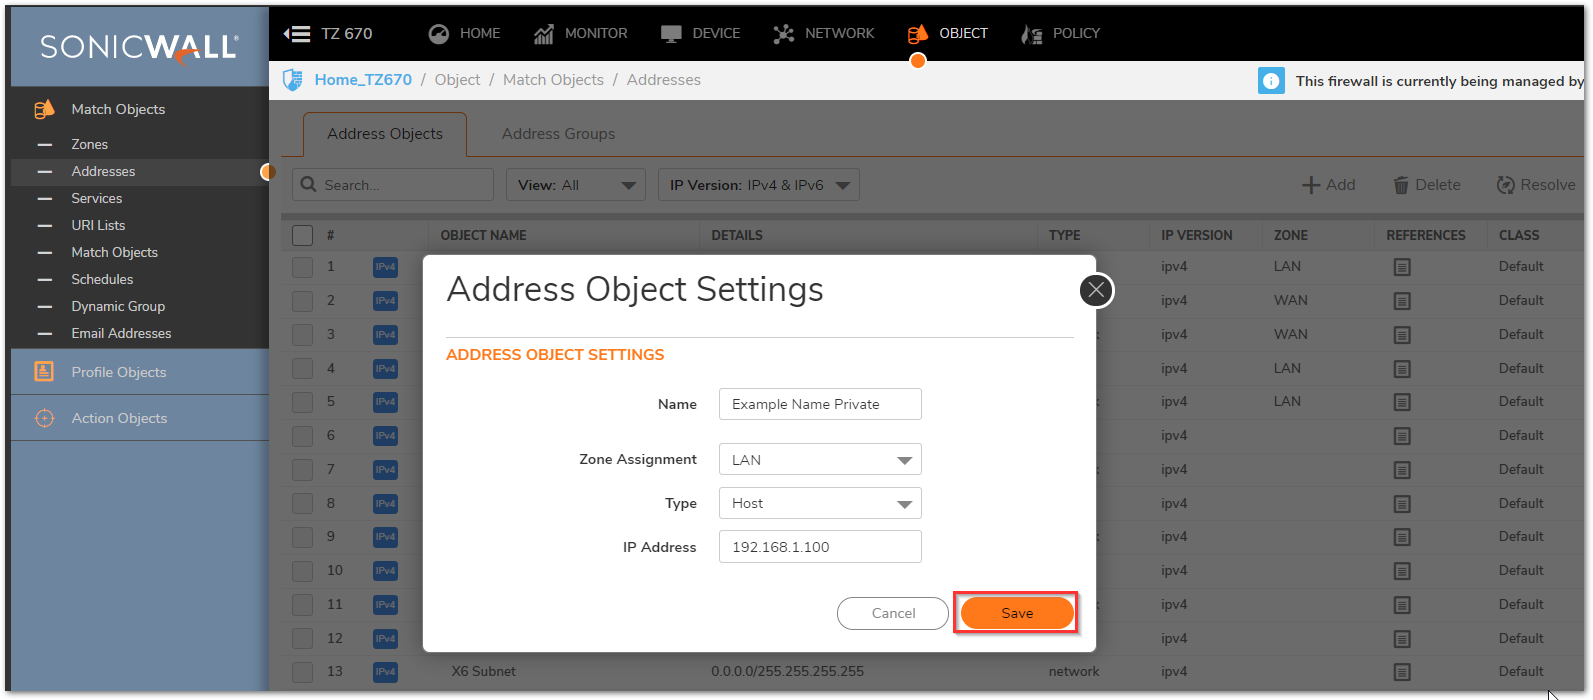
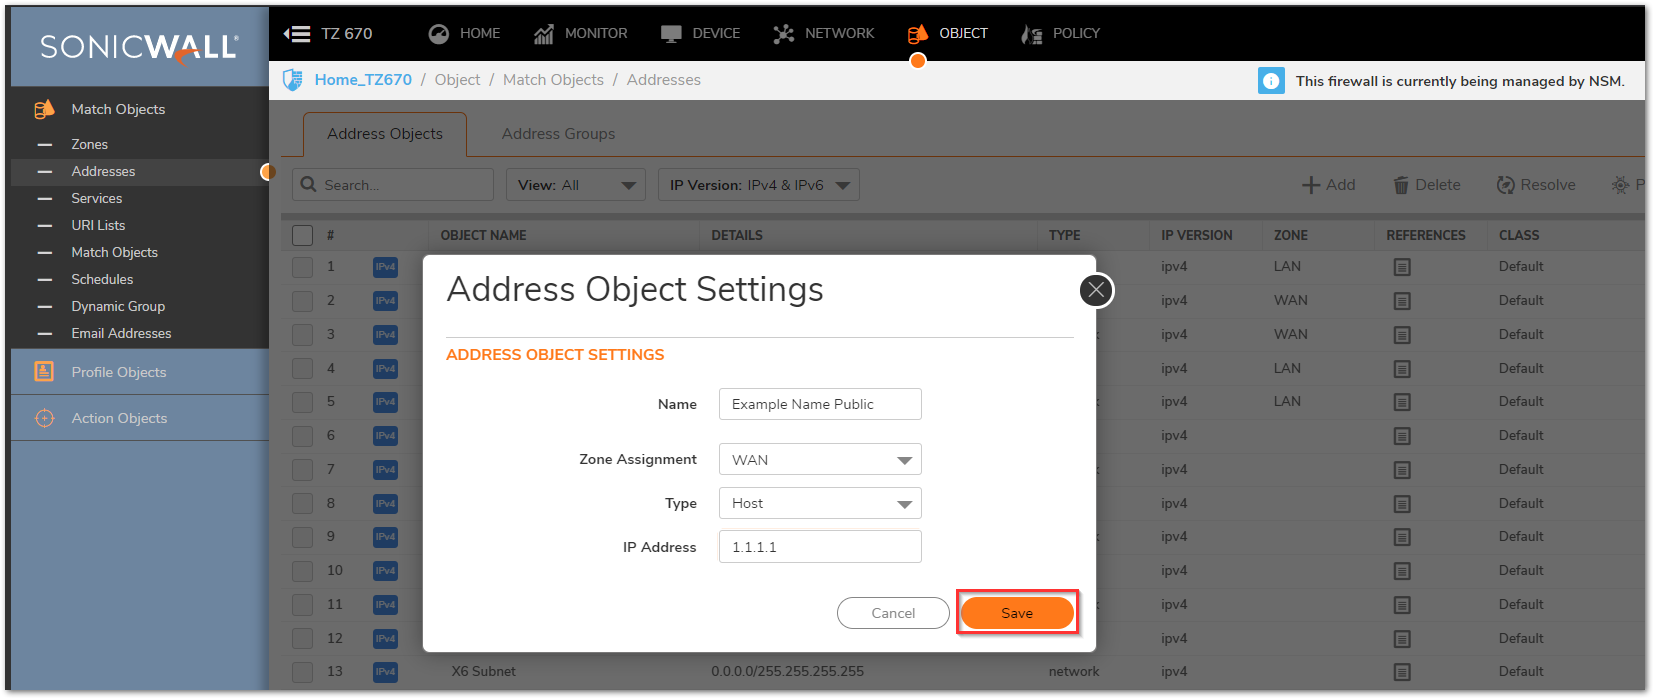
Creating the necessary Service Object
- Click Object in the top navigation menu
- Click Match Objects | Services.
- Click the Add button and create the necessary Service Objects for the Ports required.
- Ensure that you know the correct Protocol for the Service Object (TCP, UDP, etc.). If you're unsure of which Protocol is in use, perform a Packet Capture.
- Click Save to add the Service Object to the SonicWall's Service Object Table.
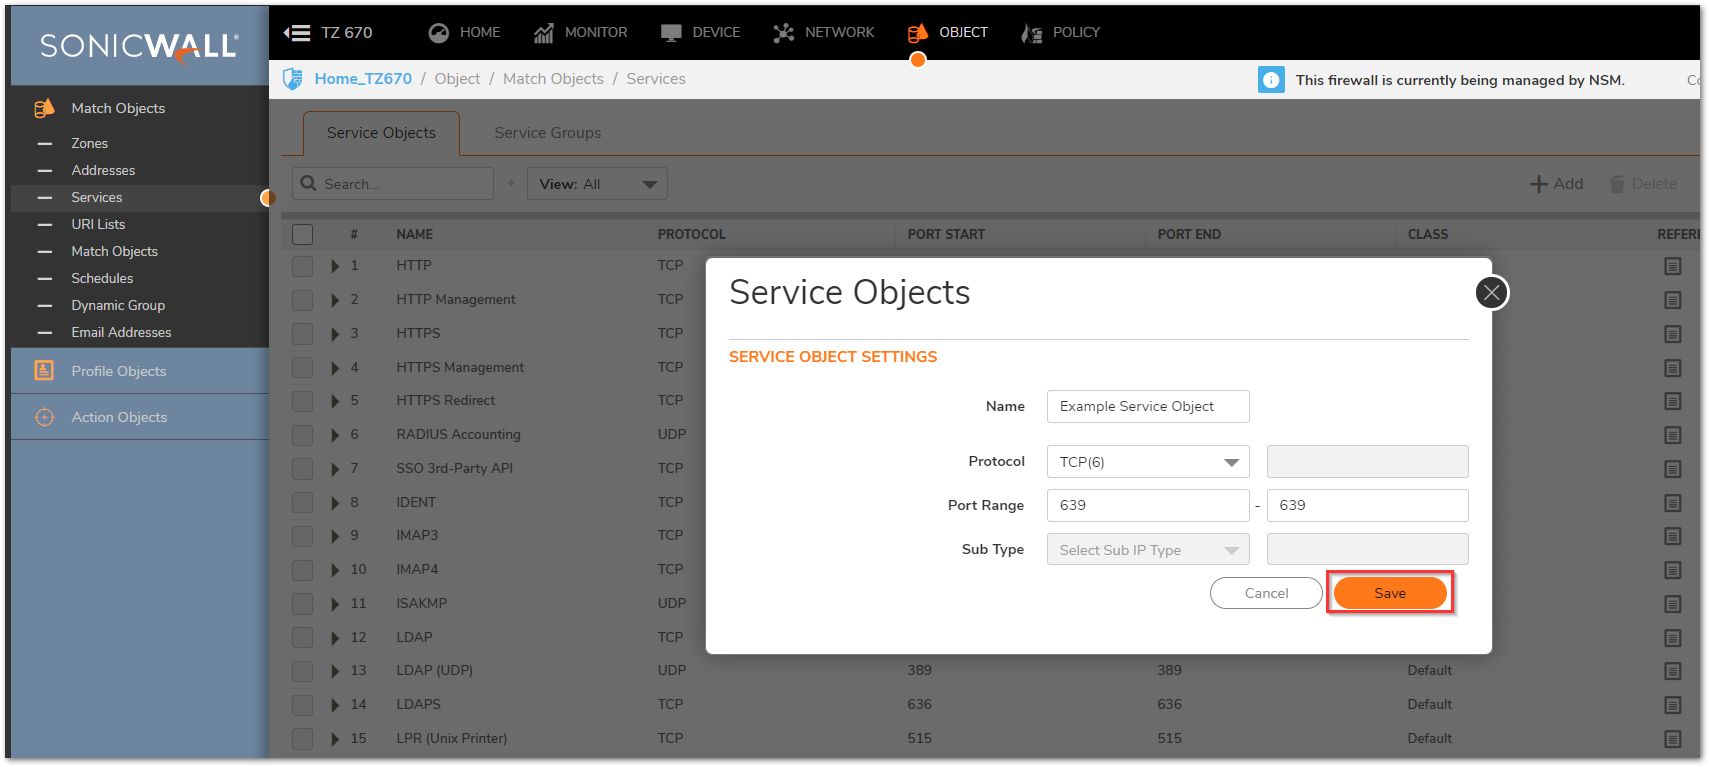
Creating the appropriate NAT Policies which can include Inbound, Outbound, and Loopback
A NAT Policy will allow SonicOS to translate incoming Packets destined for a Public IP Address to a Private IP Address, and/or a specific Port to another specific Port. Every Packet contains information about the Source and Destination IP Addresses and Ports and with a NAT Policy SonicOS can examine Packets and rewrite those Addresses and Ports for incoming and outgoing traffic.
- Click Policy in the top navigation menu.
- Click Rules and Policies| NAT Rules.
- Click the Add button at the bottom of the page and a pop-up window will appear.
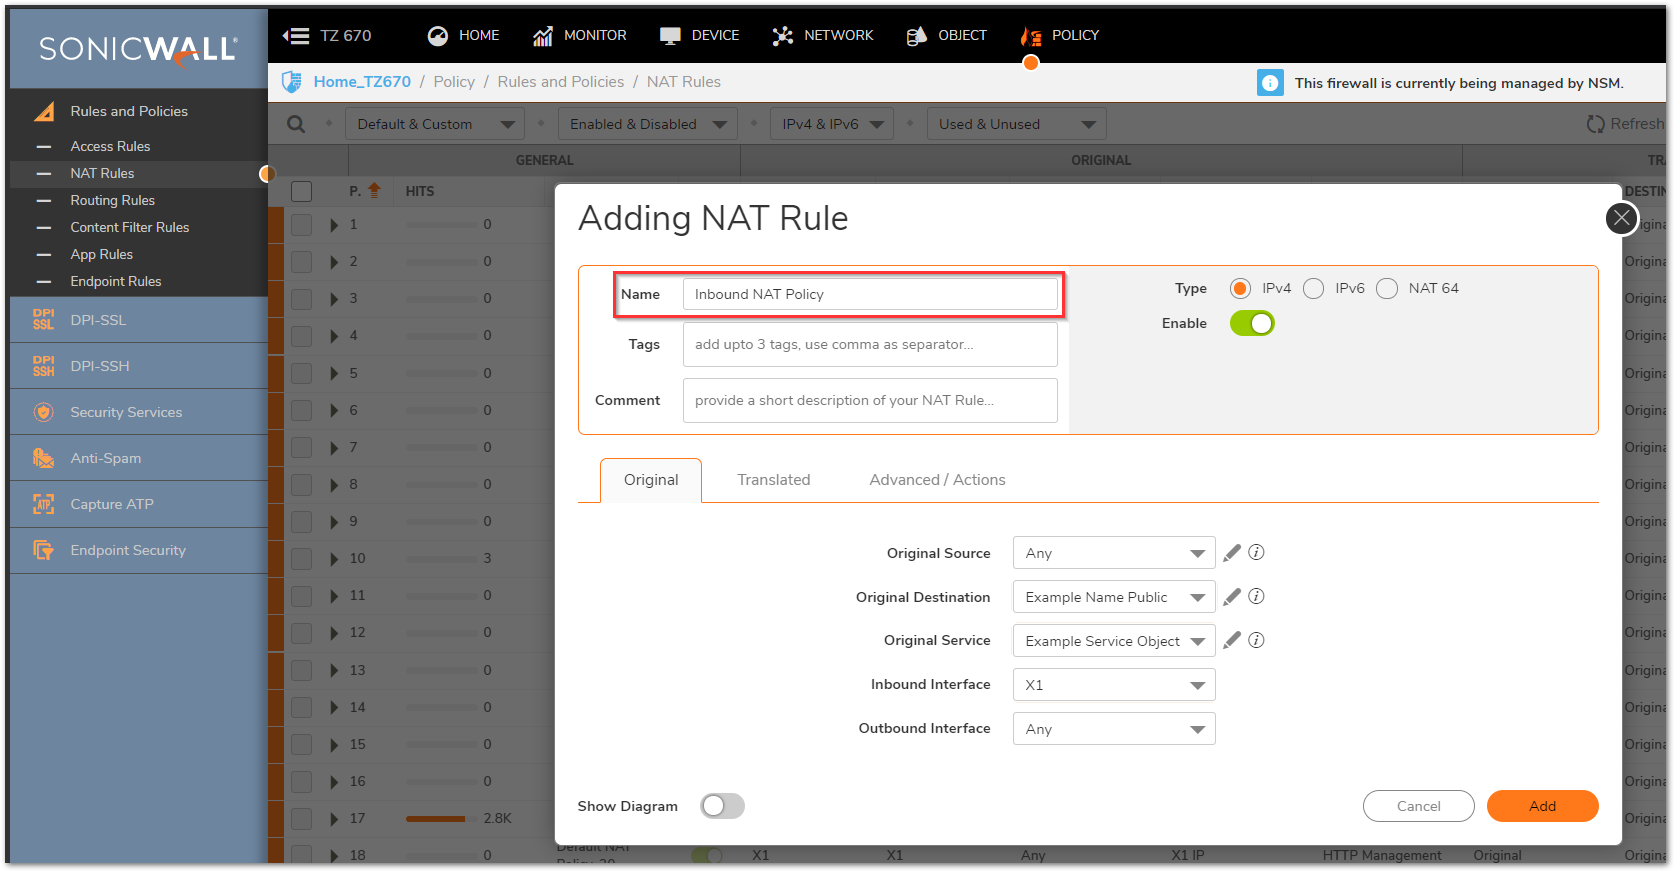
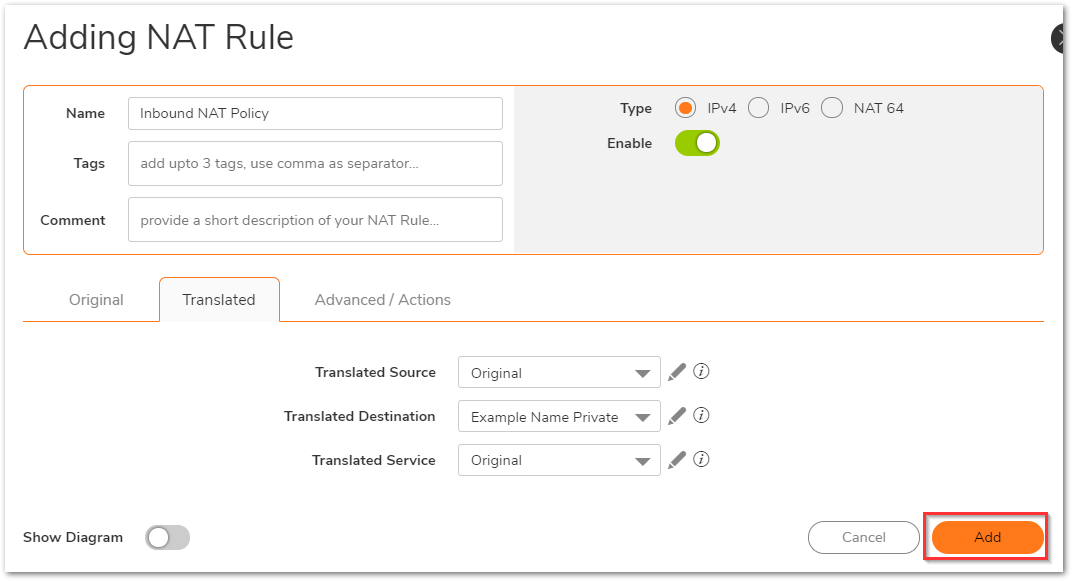
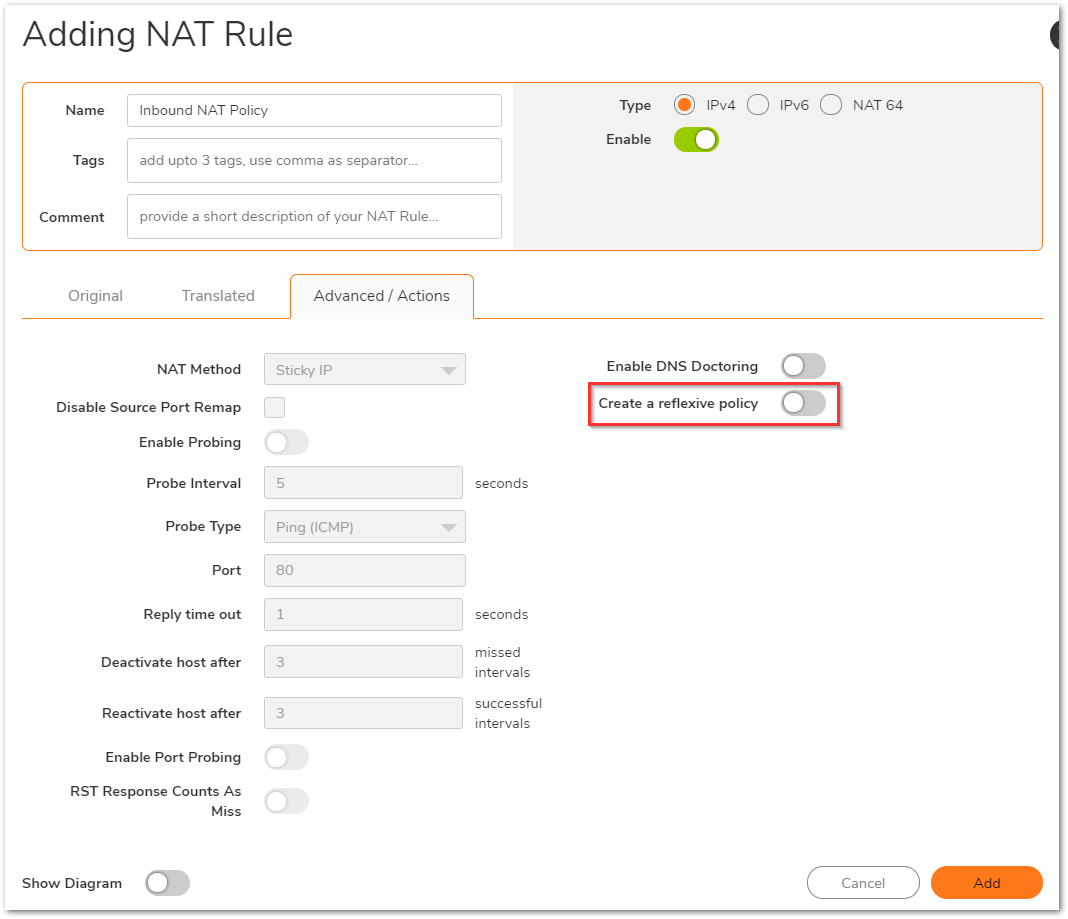
- For the Inbound NAT policy, select the fields as below on the Original and translated tabs. Leave all fields on the Advanced/Actions tab as default. Click on Add to add the NAT Policy to the SonicWall NAT Policy Table.
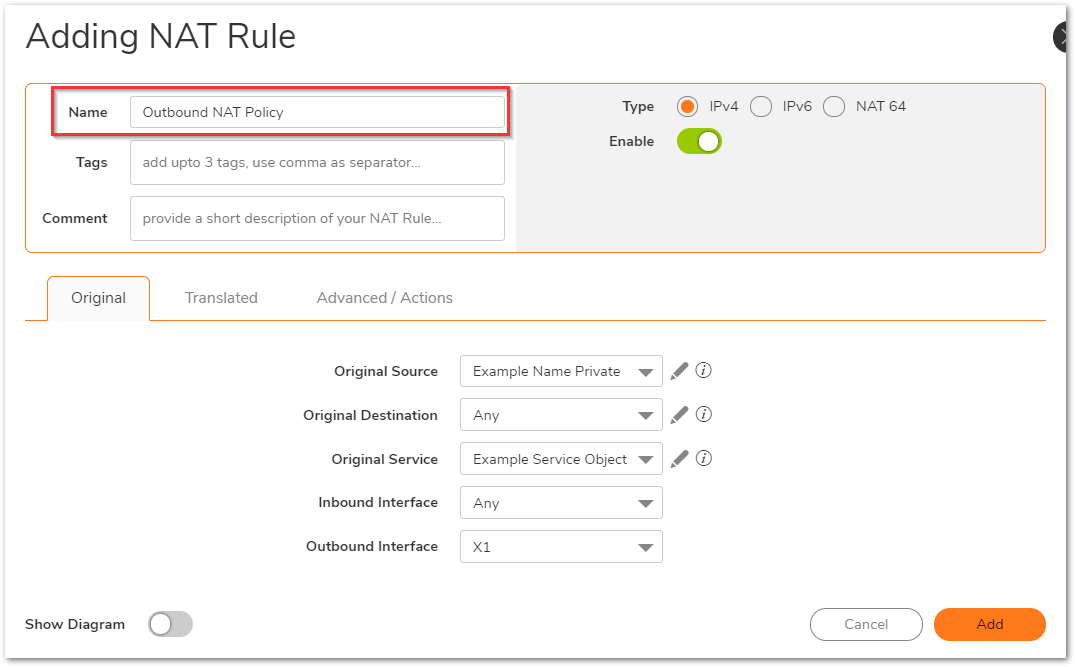
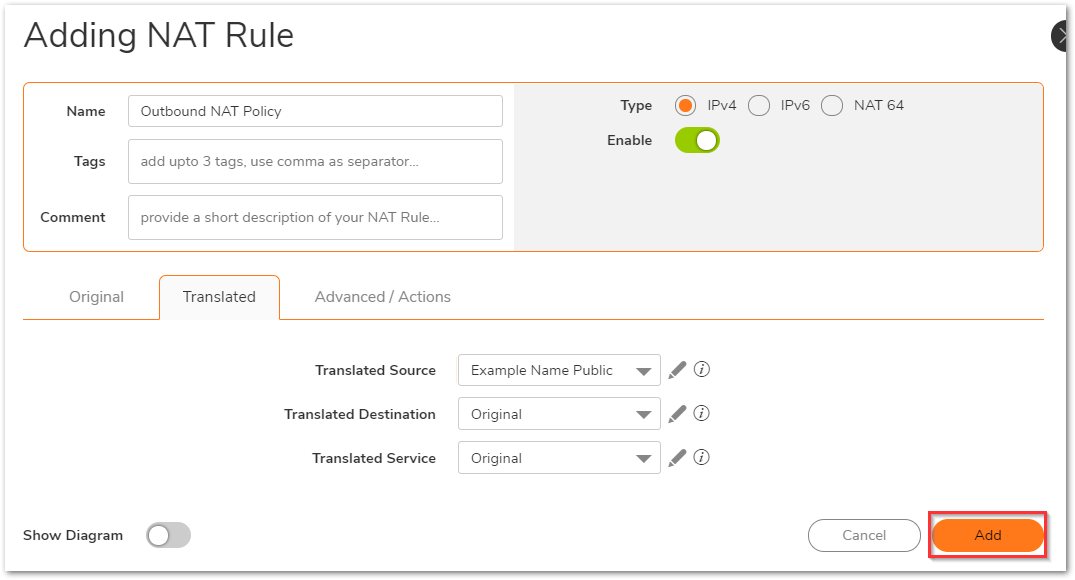
- For the Outbound NAT policy, select the fields as below on the Original and translated tabs. Leave all fields on the Advanced/Actions tab as default. Click on Add to add the NAT Policy to the SonicWall NAT Policy Table.
 NOTE: When creating an inbound NAT Policy you may select the "Create a reflexive policy" checkbox in the Advanced/Actions tab. This will create an inverse Policy automatically, in the example above adding a reflexive policy for the inbound NAT Policy will also create the outbound NAT Policy. This option is not available when editing an existing NAT Policy, only when creating a new Policy.
Loopback NAT Policy
A Loopback NAT Policy is required when Users on the Local LAN/WLAN need to access an internal Server via its Public IP/Public DNS Name. This Policy will "Loopback" the Users request for access as coming from the Public IP of the WAN and then translate down to the Private IP of the Server. Without a Loopback NAT Policy internal Users will be forced to use the Private IP of the Server to access it which will typically create problems with DNS.
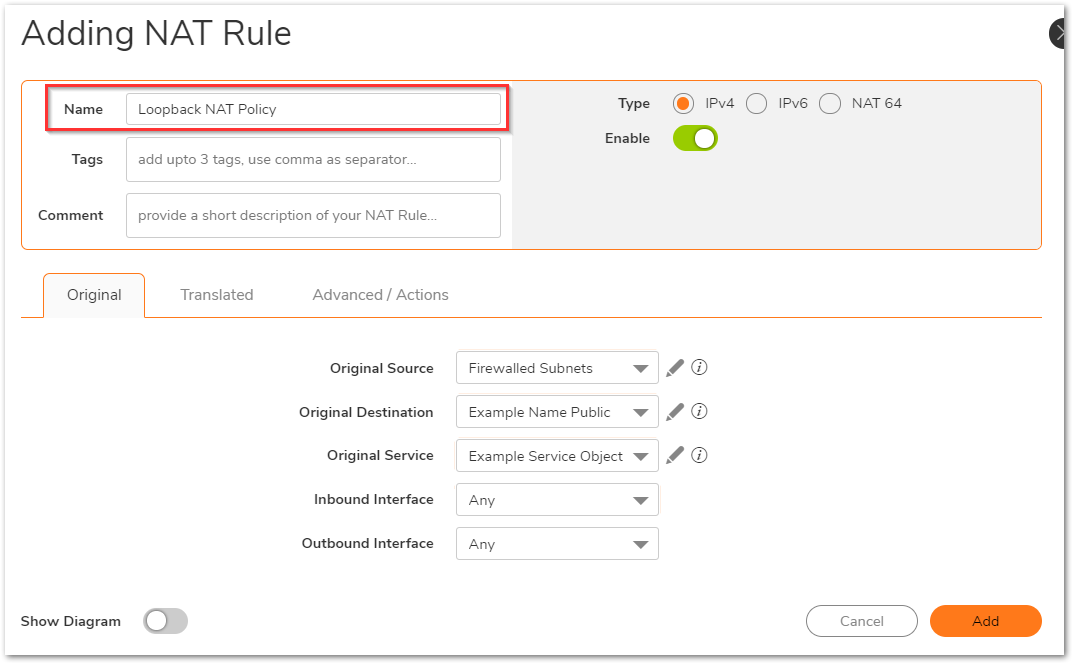
If you wish to access this server from other internal zones using the Public IP address Http://1.1.1.1 consider creating a Loopback NAT Policy:
On the Original tab:- Original Source: Firewalled Subnets
- Original Destination: Example Name Public
- Original Service: Example Service Object
- Inbound Interface: Any
- Outbound Interface: Any
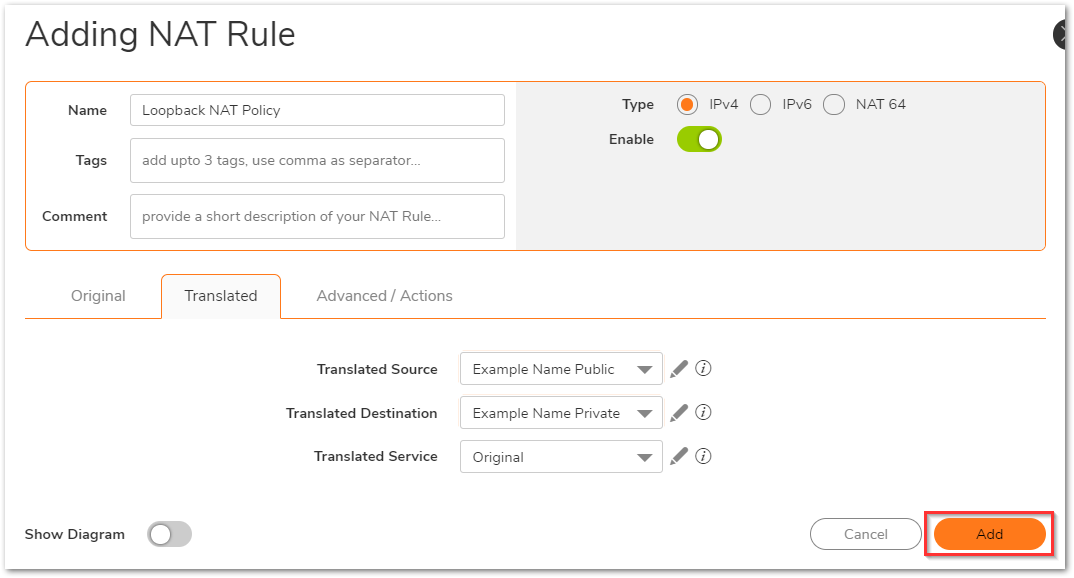
On the translated tab:
- Translated Source: Example Name Public
- Translated Destination: Example Name Private
- Translated Service: Original
Creating the necessary Firewall Access Rules
- Click Policy in the top navigation menu.
- Click Rules and Policies | Access Rules.
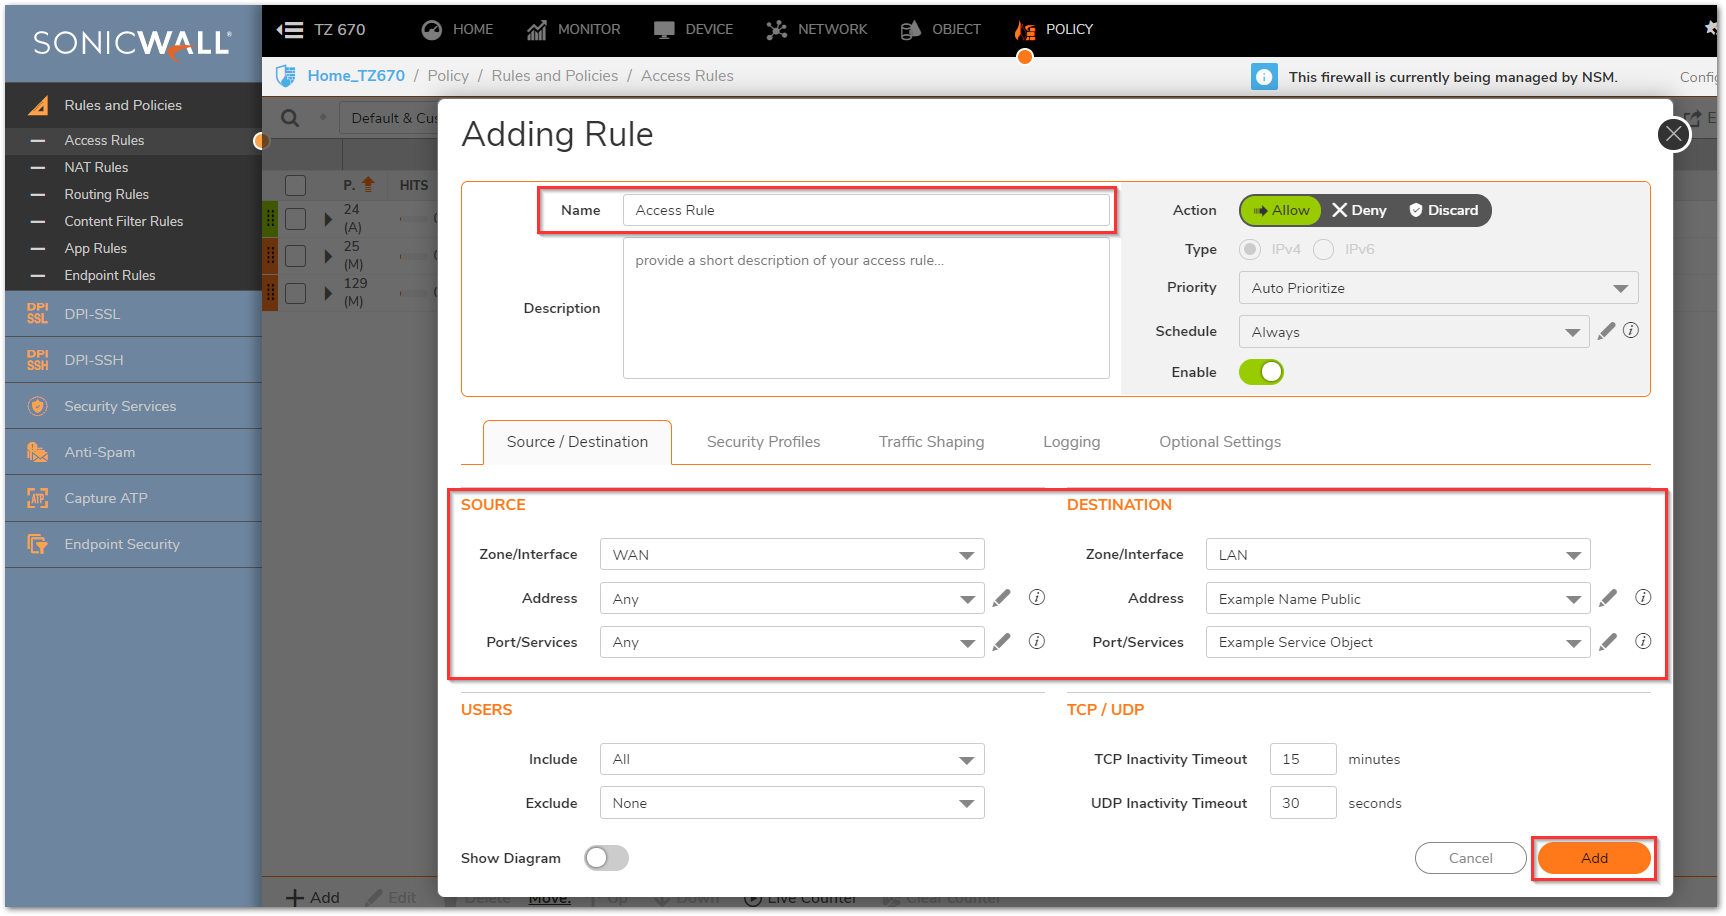
- Select the View Type as Matrix and select your WAN to Appropriate Zone Access Rule. (This will be the Zone the Private IP of the Server resides on.)
- Click the Add button at the bottom of the screen and in the pop-up window create the required Access Rule by configuring the fields as shown below in the Source/Destination tab. Leave all other tabs on default.
- Click Add when finished.
Resolution for SonicOS 6.5
This release includes significant user interface changes and many new features that are different from the SonicOS 6.2 and earlier firmware. The below resolution is for customers using SonicOS 6.5 firmware.
Manually opening Ports / enabling Port forwarding to allow traffic from the Internet to a Server behind the SonicWall using SonicOS involves the following steps:
- Creating the necessary Address Objects
- Creating the appropriate NAT Policies which can include Inbound, Outbound, and Loopback
- Creating the necessary Firewall Access Rules
These steps will also allow you to enable Port Address Translation with or without altering the IP Addresses involved.
 TIP: The Public Server Wizard is a straightforward and simple way to provide public access to an internal Server through the SonicWall. The Public Server Wizard will simplify the above three steps by prompting your for information and creating the necessary Settings automatically. Click Quick Configuration in the top navigation menu.You can learn more about the Public Server Wizard by reading How to open ports using the SonicWall Public Server Wizard.
 CAUTION: The SonicWall security appliance is managed by HTTP (Port 80) and HTTPS (Port 443), with HTTPS Management being enabled by default. If you are using one or more of the WAN IP Addresses for HTTP/HTTPS Port Forwarding to a Server then you must change the Management Port to an unused Port, or change the Port when navigating to your Server via NAT or another method.
The following walk-through details allowing HTTPS Traffic from the Internet to a Server on the LAN. Once the configuration is complete, Internet Users can access the Server via the Public IP Address of the SonicWall's WAN. Although the examples below show the LAN Zone and HTTPS (Port 443) they can apply to any Zone and any Port that is required. Similarly, the WAN IP Address can be replaced with any Public IP that is routed to the SonicWall, such as a Public Range provided by an ISP.
 TIP: If your user interface looks different to the screenshot in this article, you may need to upgrade your firmware to the latest firmware version for your appliance. To learn more about upgrading firmware, please see Procedure to Upgrade the SonicWall UTM Appliance Firmware Image with Current Preferences.
Creating the necessary Address Objects
- Log into the SonicWall GUI.
- Click Manage in the top navigation menu.
- Click Objects | Address Objects.
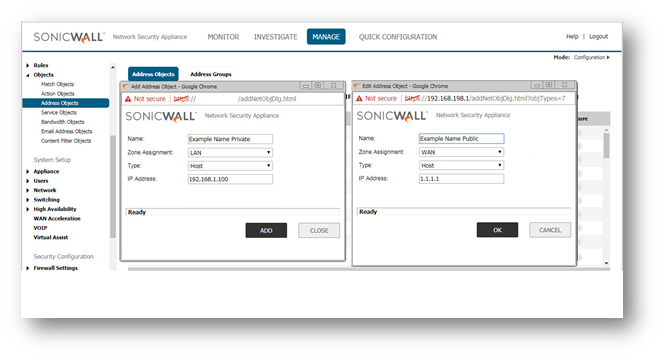
- Click the Add a new Address object button and create two Address Objects for the Server's Public IP and the Server's Private IP.
- Click OK to add the Address Object to the SonicWall's Address Object Table.
Creating the necessary Service Object
- Click Manage in the top navigation menu
- Click Objects | Service Objects.
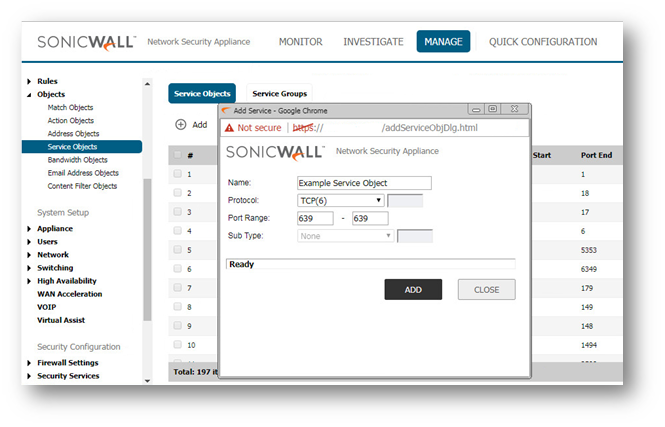
- Click the Add a new Service object button and create the necessary Service Objects for the Ports required.
- Ensure that you know the correct Protocol for the Service Object (TCP, UDP, etc.). If you're unsure of which Protocol is in use, perform a Packet Capture.
- Click OK to add the Service Object to the SonicWall's Service Object Table.
Creating the appropriate NAT Policies which can include Inbound, Outbound, and Loopback
A NAT Policy will allow SonicOS to translate incoming Packets destined for a Public IP Address to a Private IP Address, and/or a specific Port to another specific Port. Every Packet contains information about the Source and Destination IP Addresses and Ports and with a NAT Policy SonicOS can examine Packets and rewrite those Addresses and Ports for incoming and outgoing traffic.
- Click Manage in the top navigation menu.
- Click Rules | NAT Policies.
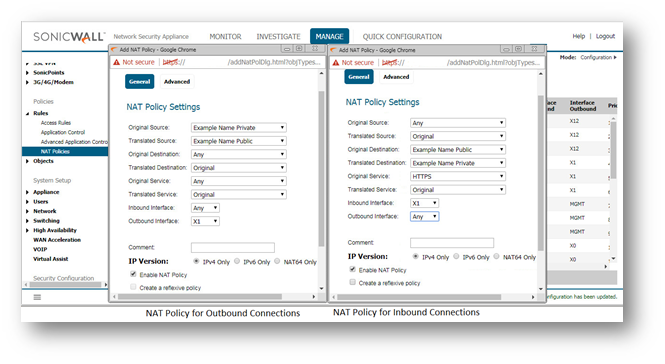
- Click the Add a new NAT Policy button and a pop-up window will appear.
- Click Add to add the NAT Policy to the SonicWall NAT Policy Table.
 NOTE: When creating a NAT Policy you may select the "Create a reflexive policy" checkbox. This will create an inverse Policy automatically, in the example below adding a reflexive policy for the NAT Policy on the left will also create the NAT Policy on the right. This option is not available when configuring an existing NAT Policy, only when creating a new Policy.
Loopback NAT Policy
A Loopback NAT Policy is required when Users on the Local LAN/WLAN need to access an internal Server via its Public IP/Public DNS Name. This Policy will "Loopback" the Users request for access as coming from the Public IP of the WAN and then translate down to the Private IP of the Server. Without a Loopback NAT Policy internal Users will be forced to use the Private IP of the Server to access it which will typically create problems with DNS.
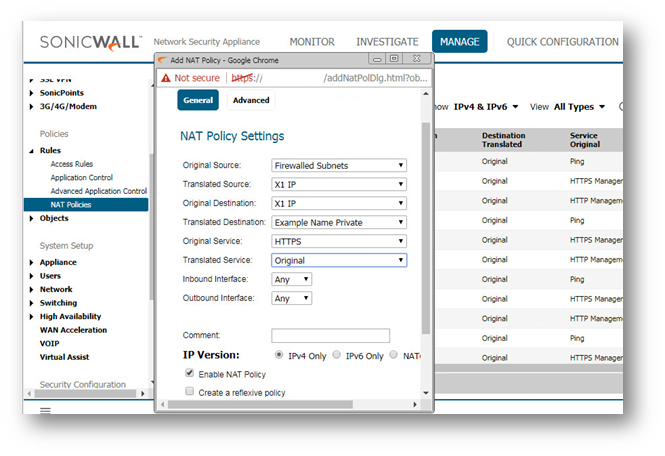
If you wish to access this server from other internal zones using the Public IP address Http://1.1.1.1 consider creating a Loopback NAT Policy:
- Original Source: Firewalled Subnets
- Translated Source: X1 IP
- Original Destination: X1 IP
- Translated Destination: Example Name Private
- Original Service: HTTPS
- Translated Service: Original
- Inbound Interface: Any
- Outbound Interface: Any
- Comment: Loopback policy
- Enable NAT Policy: Checked
- Create a reflexive policy: Unchecked
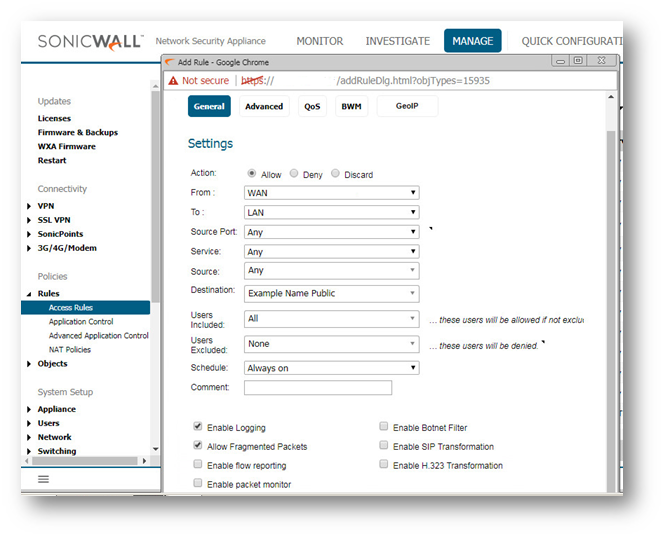
Creating the necessary Firewall Access Rules
- Click Manage in the top navigation menu.
- Click Rules | Access Rules.
- Select the View Type as Matrix and select your WAN to Appropriate Zone Access Rule. (This will be the Zone the Private IP of the Server resides on.)
- Click the Add a new entry/Add... button and in the pop-up window create the required Access Rule by configuring the fields as shown below.
- Click Add when finished..
Related Articles
- How to Block Google QUIC Protocol on SonicOSX 7.0?
- How to block certain Keywords on SonicOSX 7.0?
- How internal Interfaces can obtain Global IPv6 Addresses using DHCPv6 Prefix Delegation
Categories
- Firewalls > SonicWall NSA Series > Networking
- Firewalls > TZ Series > Networking
- Firewalls > NSa Series > Networking
- Firewalls > NSv Series > Networking


 YES
YES NO
NO