-
Products
-
SonicPlatform
SonicPlatform is the cybersecurity platform purpose-built for MSPs, making managing complex security environments among multiple tenants easy and streamlined.
Discover More
-
-
Solutions
-
Federal
Protect Federal Agencies and Networks with scalable, purpose-built cybersecurity solutions
Learn MoreFederalProtect Federal Agencies and Networks with scalable, purpose-built cybersecurity solutions
Learn More - Industries
- Use Cases
-
-
Partners
-
Partner Portal
Access to deal registration, MDF, sales and marketing tools, training and more
Learn MorePartner PortalAccess to deal registration, MDF, sales and marketing tools, training and more
Learn More - SonicWall Partners
- Partner Resources
-
-
Support
-
Support Portal
Find answers to your questions by searching across our knowledge base, community, technical documentation and video tutorials
Learn MoreSupport PortalFind answers to your questions by searching across our knowledge base, community, technical documentation and video tutorials
Learn More - Support
- Resources
- Capture Labs
-
- Company
- Contact Us
How can I configure Tunnel All Internet traffic over Site to Site VPN?


Description
The objective of this article is to explain how to set up a Site to Site VPN between these 2 sites and then route all traffic from remote Site trough the Central Site SonicWall's WAN.
Resolution
Resolution for SonicOS 7.X
This release includes significant user interface changes and many new features that are different from the SonicOS 6.5 and earlier firmware. The below resolution is for customers using SonicOS 7.X firmware.
Create a VPN policy on both sites
- To create a VPN Policy, please follow our suggested articles: (Main Mode, Aggressive Mode).
Create a NAT policy in the Central Site to translate traffic from the Remote Site
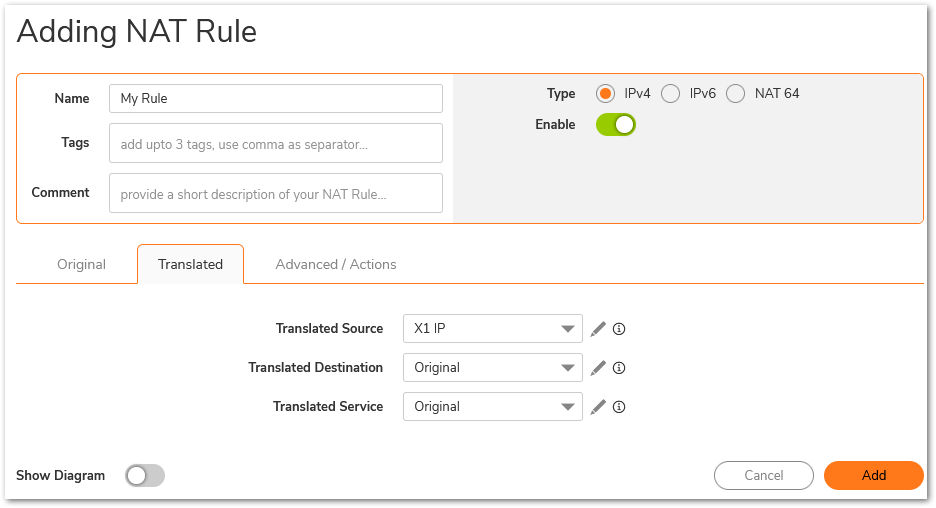
- Create a NAT Policy to translate the Source IP of traffic from the Remote Site to X1 IP of the Central SonicWall.
- Navigate to Policy | Rules and Policies | NAT Rules. Click Add to open the add NAT policy window and set up as shown below and click OK to create this NAT policy. This is an example considering X1 as the WAN interface.

- Navigate to Network | IPSec VPN | Rules and Settings and create the VPN policy for the Remote site. You can name the policy as VPN to Remote Network.
- Select the Network tab and under Local Networks choose Any address. Under Remote Networks, select the address object created for the Remote site

- Go ahead and configure the Remote Site SonicWall.
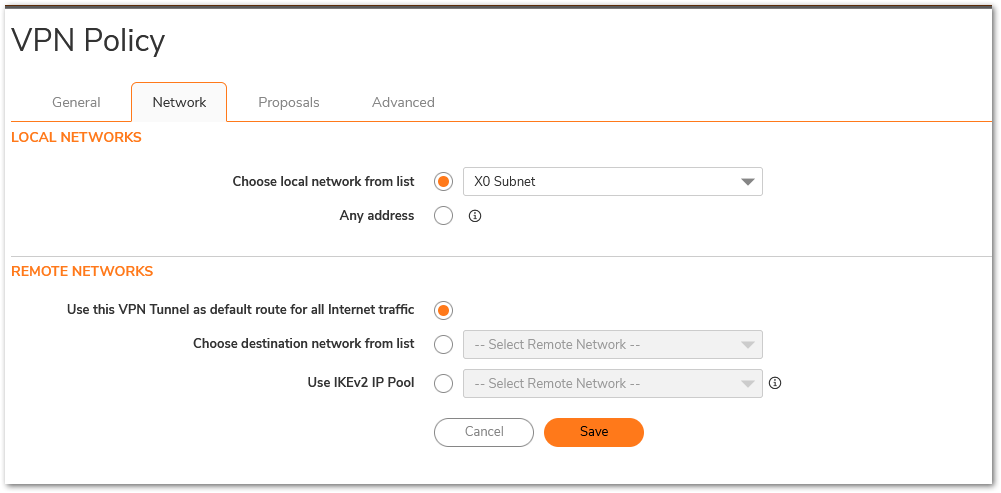
- Navigate to Network | IPSec VPN | Rules and Settings and create the VPN policy for the Remote site. You can name the policy as VPN to Central Network.
- Select the Network tab and under Local Networks you can choose X0 Subnet. Under Remote Networks, select Use this VPN Tunnel as the default route for all Internet traffic.This option routes all internet traffic over this tunnel.
Bring up the Tunnel.
- We will initiate traffic from one site of the tunnel to the other by pinging an IP of a host behind the Central Site.Navigate to Investigate | Tools | System Diagnostics | under Diagnostics Tools, select Ping.
- Ping Lan interface of Central Site SonicWall.
- Test if it is possible to go online by pinging 8.8.8.8.
Resolution for SonicOS 6.5
This release includes significant user interface changes and many new features that are different from the SonicOS 6.2 and earlier firmware. The below resolution is for customers using SonicOS 6.5 firmware.
Create a VPN policy on both sites
- To create a VPN Policy, please follow our suggested articles: (Main Mode, Aggressive Mode).
Create a NAT policy in the Central Site to translate traffic from the Remote Site
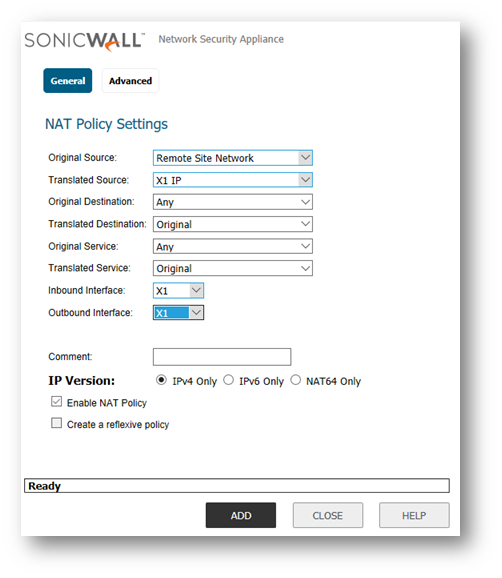
- Create a NAT Policy to translate the Source IP of traffic from the Remote Site to the X1 IP of the Central SonicWall.
- Navigate to Manage | Policies | Rules | NAT policies. Click Add to open the add NAT policy window and set up as shown below and click OK to create this NAT policy. This is an example considering X1 as the WAN interface.
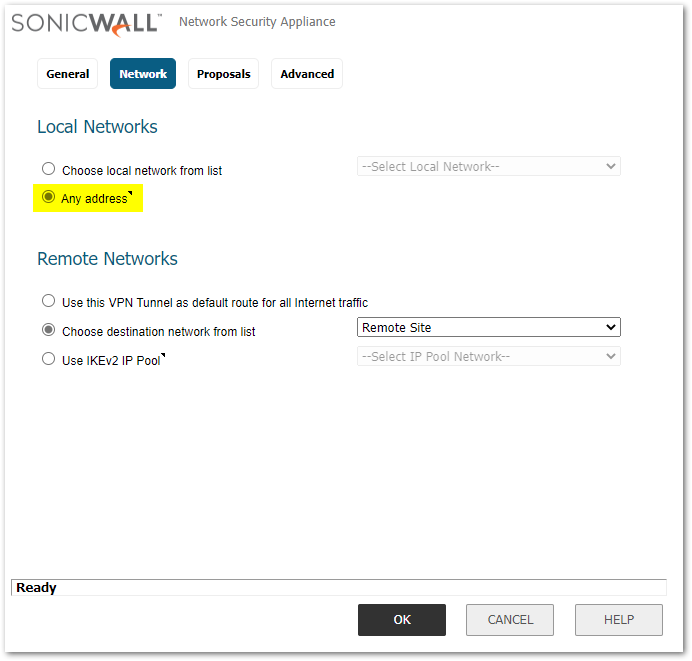
- Navigate to MANAGE | VPN | Base Settings and create the VPN policy for the Remote site. You can name the policy as VPN to Remote Network.
- Select the Network tab and under Local Networks choose Any address. Under Remote Networks, select the address object created for Remote site
- Go ahead and configure the Remote Site SonicWall.
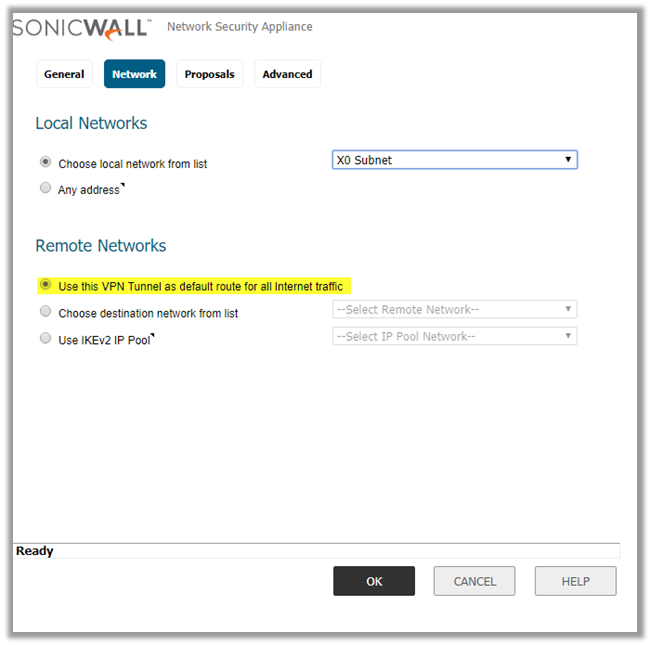
- Navigate to VPN | Base Settings and create the VPN policy for the Remote site. You can name the policy as VPN to Central Network.
- Select the Network tab and under Local Networks you can choose X0 Subnet. Under Remote Networks, select Use this VPN Tunnel as the default route for all Internet traffic. This option routes all internet traffic over this tunnel.
Bring up the Tunnel.
- We will initiate traffic from one site of the tunnel to the other by pinging an IP of a host behind the Central Site. Navigate to Investigate | Tools | System Diagnostics | Under Diagnostics Tools, select Ping.
- Ping Lan interface of Central Site SonicWall.
- Test if it is possible to go online by pinging 8.8.8.8.
Resolution for SonicOS 6.2 and Below
The below resolution is for customers using SonicOS 6.2 and earlier firmware. For firewalls that are generation 6 and newer we suggest to upgrade to the latest general release of SonicOS 6.5 firmware.
Create a VPN policy on both sites
- To create a VPN Policy, please follow our suggested articles: (Main Mode, Aggressive Mode).
Create a NAT policy in Central Site to translate traffic from Remote Site
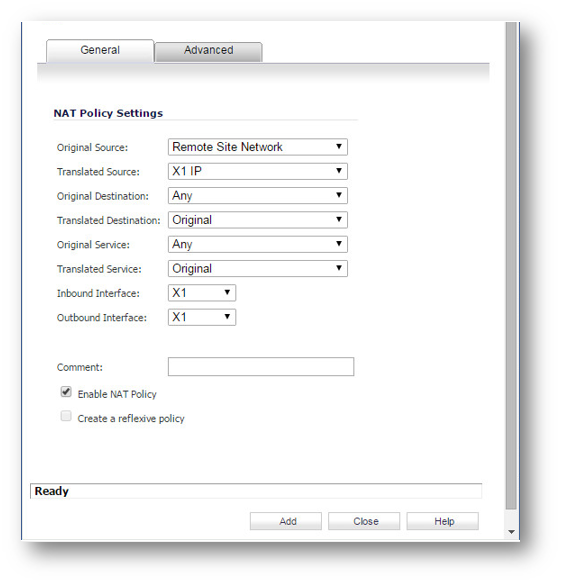
- Create a NAT Policy to translate the Source IP of traffic from the Remote Site to X1 IP of the Central SonicWall.
- Navigate to Network | NAT policies. Click Add to open the add NAT policy window, set up as shown below, and click OK to create this NAT policy.
- Go ahead and configure the Remote Site SonicWall.
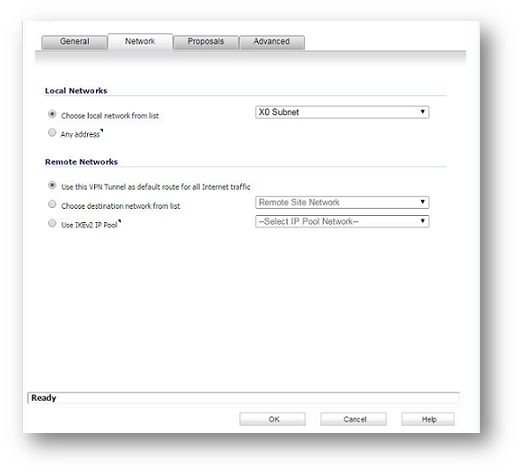
- Navigate to VPN | Settings and create the VPN policy for the Remote site. You can name the policy as VPN to Central Network.
- Select the Network tab and under Local Networks you can chose X0 Subnet. Under Remote Networks, select Use this VPN Tunnel as the default route for all Internet traffic. This option routes all internet traffic over this tunnel.
Bring up the Tunnel.
- We will initiate traffic from one site of the tunnel to the other by pinging an IP of a host behind the Central Site. Navigate to System | Diagnostics | Under Diagnostics Tools, select Ping.
- Ping Lan interface of Central Site SonicWall.
- Test if it is possible to go online by pinging 8.8.8.8.
Related Articles
- How to block like/comment/post/share features of Facebook using App Rules
- How to block various YouTube features using App Rules
- How can I enable or disable SonicWall firewall management access?
Categories
- Firewalls > NSa Series > VPN
- Firewalls > NSv Series > VPN
- Firewalls > TZ Series > VPN


 YES
YES NO
NO