-
Products
-
SonicPlatform
SonicPlatform is the cybersecurity platform purpose-built for MSPs, making managing complex security environments among multiple tenants easy and streamlined.
Discover More
-
-
Solutions
-
Federal
Protect Federal Agencies and Networks with scalable, purpose-built cybersecurity solutions
Learn MoreFederalProtect Federal Agencies and Networks with scalable, purpose-built cybersecurity solutions
Learn More - Industries
- Use Cases
-
-
Partners
-
Partner Portal
Access to deal registration, MDF, sales and marketing tools, training and more
Learn MorePartner PortalAccess to deal registration, MDF, sales and marketing tools, training and more
Learn More - SonicWall Partners
- Partner Resources
-
-
Support
-
Support Portal
Find answers to your questions by searching across our knowledge base, community, technical documentation and video tutorials
Learn MoreSupport PortalFind answers to your questions by searching across our knowledge base, community, technical documentation and video tutorials
Learn More - Support
- Resources
- Capture Labs
-
- Company
- Contact Us
Export the address objects/groups using SonicOS API - Postman and cURL


Description
SonicOS API provides an alternative to the SonicOS Command Line Interface (CLI) for configuring selected functions.
This article only explains how to export the address objects and groups that are already created and save it in a notepad. Please follow the below articles for additional assistance:
- Introduction to SonicOS API
- Creating Address Object and Address Group Object using SonicOS API cURL
- Adding Multiple Address Objects Using SonicOS API
- SonicOS API for adding Address group in Postman and cURL
- Add new address object to an existing group - SonicOS API
You are free to choose Swagger, Postman, Git bash, or any application that allows API calls. If you are using a Linux-based operating system, you can execute cURL from the terminal. Please refer to https://sonicos-api.sonicwall.com for the entire list.
Only the first part of this article would change, depending on the SonicWall model you use. Commands are the same for both Gen6 and Gen7 SonicWall devices.
For this article, I'm using Postman App and will be showing the commands to run on cURL for each step.
Resolution
SonicOS API is disabled by default in SonicOS. Any attempt to access SonicOS API while it is disabled results in an HTTP 403 Forbidden error. To use the SonicOS API, you must enable it, either through the SonicOS Management Interface or from the CLI. Please enable the SonicOS API module in the SonicWall UI.
Gen 7: Enable SonicOS API Gen7
Gen 6: Enable SonicOS API Gen6
The above KB also has the steps on how to log in using API Applications
 CAUTION: My SonicWall IP address is 192.168.168.168 with user credentials as admin/password. This has to be kept in mind while running the commands from the below screenshots.
Step 1: Login using SonicOS API
The following 3 steps need to be performed for every API request.
 NOTE: https://IP-address:port/-- Replace this with your SonicWall's Public or private IP address with the right management port number (If the management port is 443, you can directly use https:// followed by the IP address without the port number too).
a) The HTTP method should be POST and we need to use the URL: https://192.168.168.168/api/sonicos/auth
Under the authorization tab, select Basic Auth and mention the correct admin credentials.

b) Under the settings tab, turn OFF the Enable SSL certificate verification if the firewall is using a self-signed certificate for management.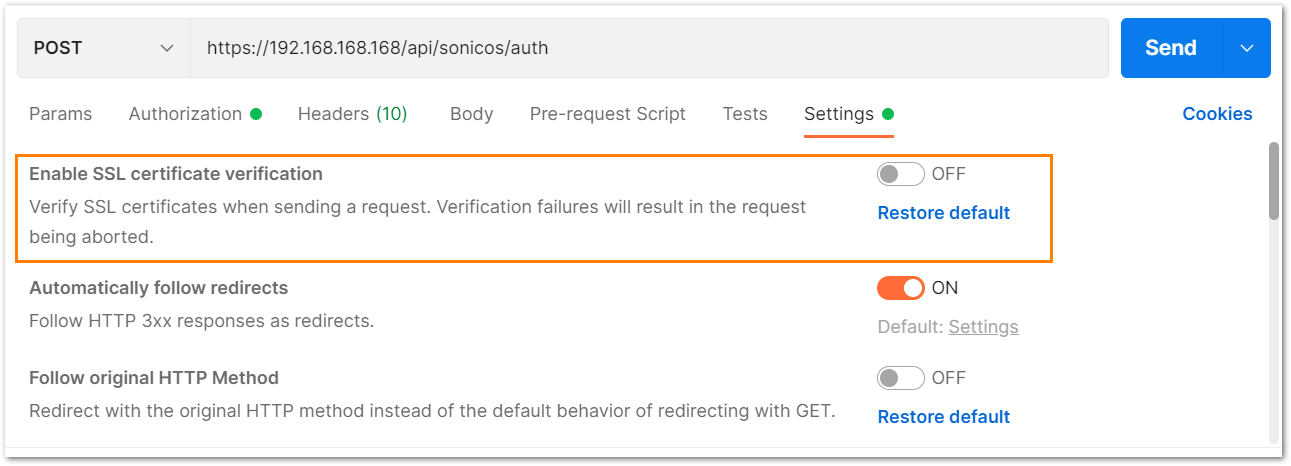
c) Under the headers tab, include application/JSON as the value for keys Accept and Content-type.
d) The Gen 7 devices are token-driven. Use the {"override" : true} under the body to override any older tokens. This is used only during login.
After this, click on the Send button and then you can see the response on the section below. The response should contain a message: "success".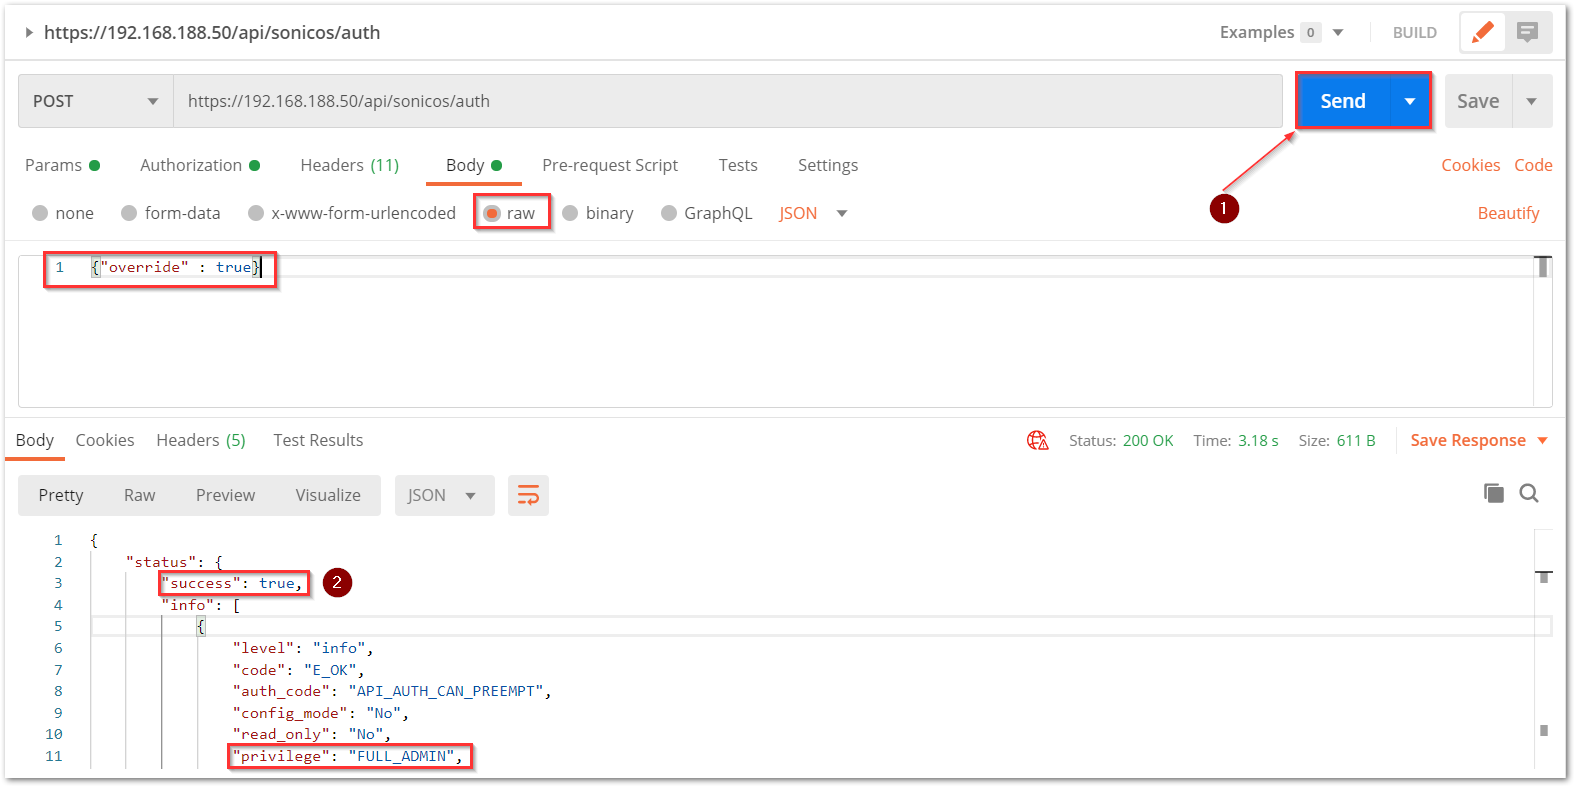
e) After this, click on the Send button and then you can see the response on the section below. The response should contain a message: "success".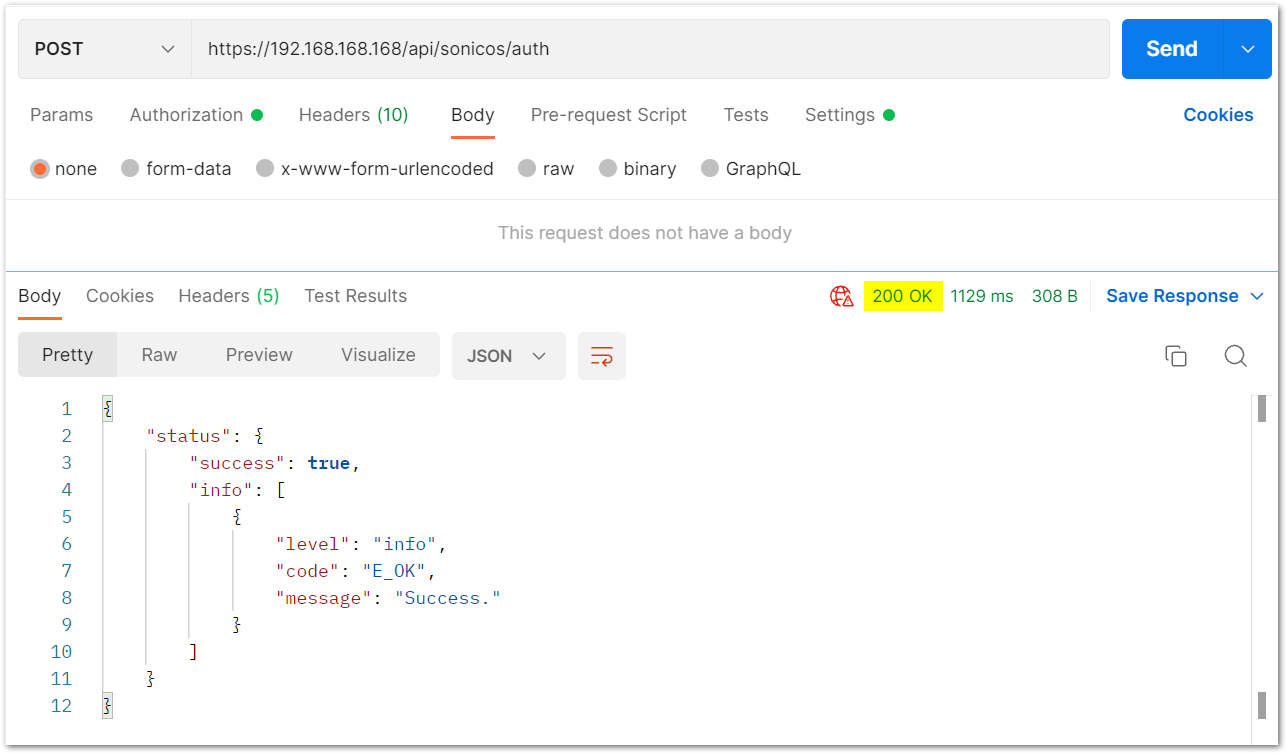
cURL code:
curl --location --request POST 'https://192.168.168.168/api/sonicos/auth' \--header 'Accept: application/Json' \--header 'Content-Type: application/Json' \--header 'Authorization: Basic YWRtaW46cGFzc3dvcmQ=
--data-raw '{"override" : true}'Step 2: Use GET command to query the address objects
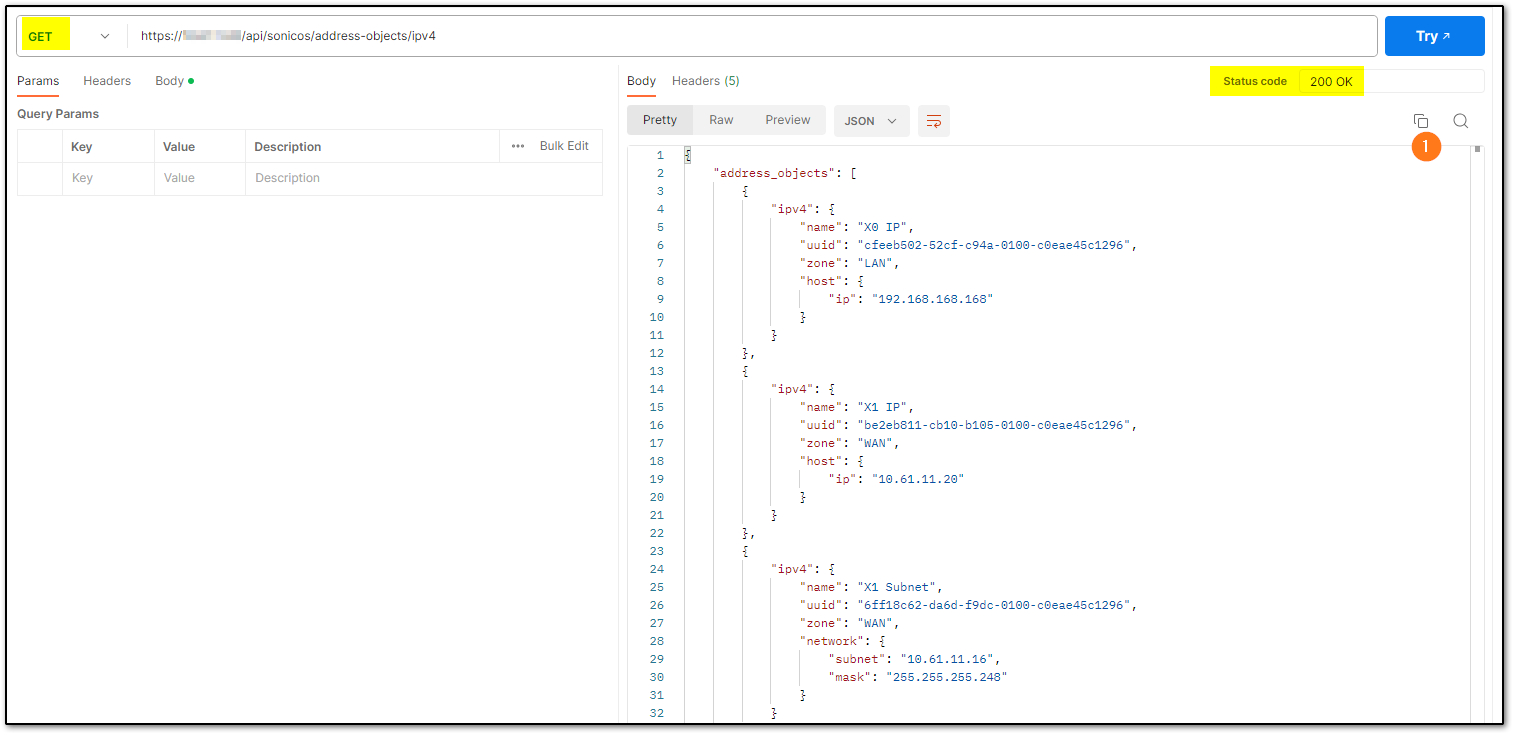
The output is on the right window with a 200 OK status
cURL code:
curl --location --request GET 'https://10.61.11.20/api/sonicos/address-objects/ipv4' \--data '{"override": true}'
Step 3: Also, using the GET command to query the address groups
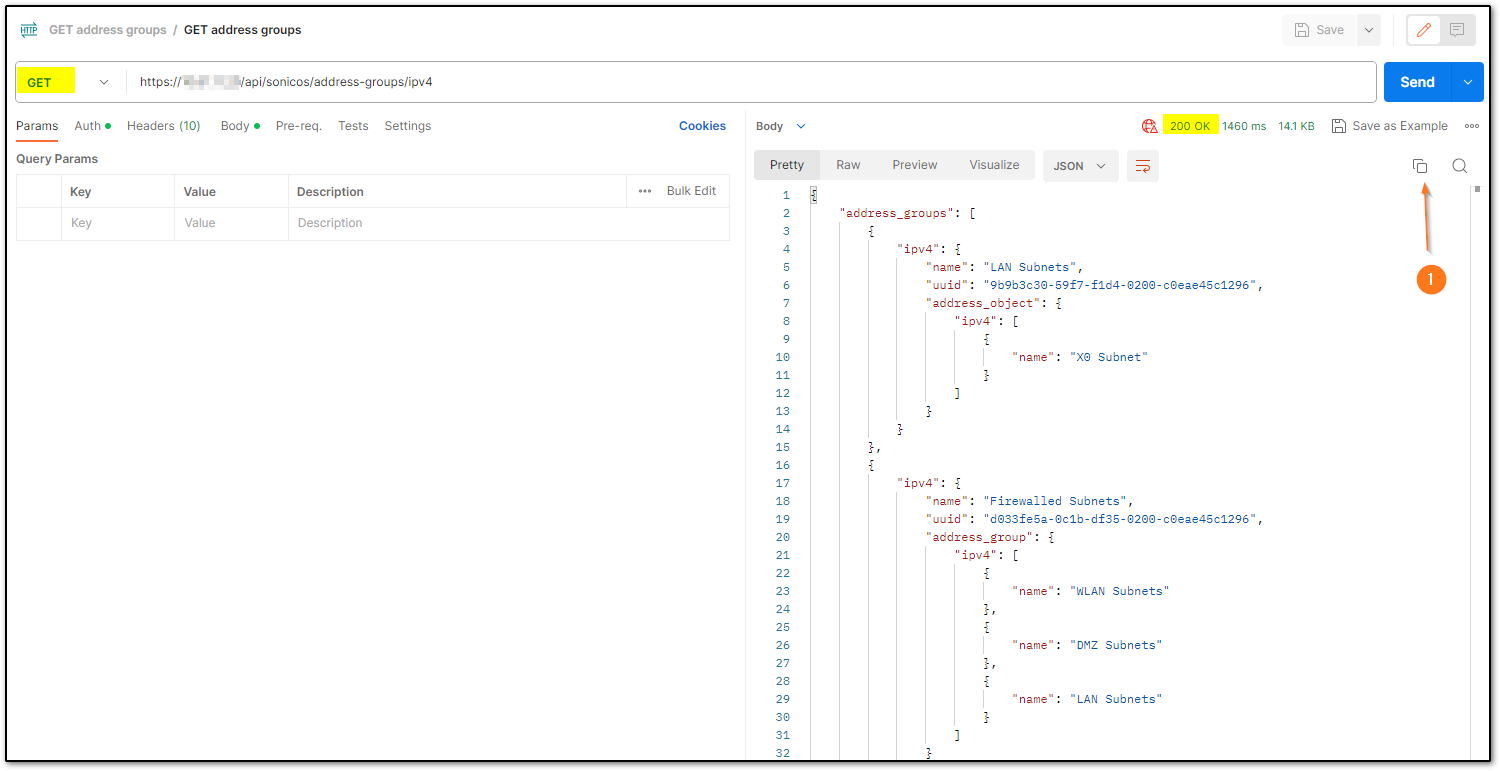
The output is on the right window with a 200 OK status
cURL code:
curl --location --request GET 'https://10.61.11.20/api/sonicos/address-groups/ipv4' \--header 'Content-Type: application/json' \--header 'Authorization: Basic YWRtaW46cGFzc3dvcmQ=' \--data '{"override": true}'
Step 4: Save the output to a notepad
The output is on the right Window in the screenshots above. There is an option to Copy which is also marked in number 1.
The output will be copied which can be pasted in a notepad and saved.
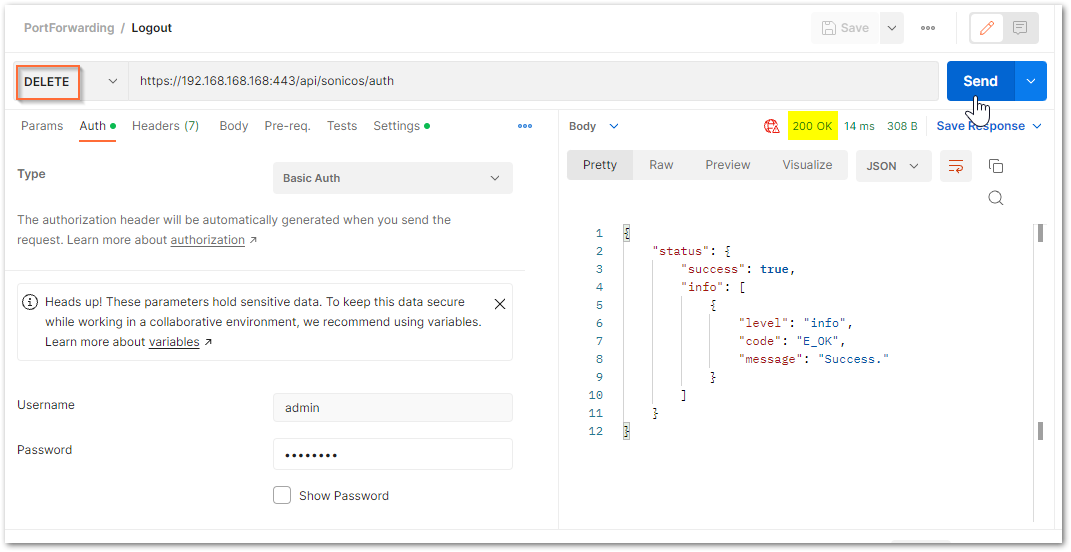
Step 5: Log out the SonicWall with API:
It is recommended to log out from the SonicWall via API once the desired configuration is committed.
In Postman:
cURL code
curl -k -i -u "admin:password" -X DELETE https://192.168.168.168:443/api/sonicos/auth
“admin:password” – needs to be replaced with the actual admin username and password for your SonicWall.
Related Articles
- Error:"Invalid API Argument" when modifying the access rules
- Cysurance Partner FAQ
- Configure probe monitoring for WAN Failover and Loadbalancing - SonicWall UTM


 YES
YES NO
NO