-
Products
-
SonicPlatform
SonicPlatform is the cybersecurity platform purpose-built for MSPs, making managing complex security environments among multiple tenants easy and streamlined.
Discover More
-
-
Solutions
-
Federal
Protect Federal Agencies and Networks with scalable, purpose-built cybersecurity solutions
Learn MoreFederalProtect Federal Agencies and Networks with scalable, purpose-built cybersecurity solutions
Learn More - Industries
- Use Cases
-
-
Partners
-
Partner Portal
Access to deal registration, MDF, sales and marketing tools, training and more
Learn MorePartner PortalAccess to deal registration, MDF, sales and marketing tools, training and more
Learn More - SonicWall Partners
- Partner Resources
-
-
Support
-
Support Portal
Find answers to your questions by searching across our knowledge base, community, technical documentation and video tutorials
Learn MoreSupport PortalFind answers to your questions by searching across our knowledge base, community, technical documentation and video tutorials
Learn More - Support
- Resources
- Capture Labs
-
- Company
- Contact Us
Adding Multiple Address Objects Using SonicOS API


Description
SonicOS API provides an alternative to the SonicOS Command Line Interface (CLI) for configuring selected functions. SonicOS API is disabled by default in SonicOS. Any attempt to access SonicOS API while it is disabled results in an HTTP 403 Forbidden error.
To use the SonicOS API, you must enable it, either through the SonicOS Management Interface or from the CLI.
SonicOS API is supported on all platforms running SonicOS 6.5.4 and higher. NOTE: Commands for adding IPv6, MAC and FQDN address objects and their supported schema can be found in the SonicOS API 6.5.4 Reference Guide
Resolution
You are free to choose Swagger, Postman, Git bash, or any application that allows API calls, if you are using a Linux-based operating system you can execute cURL from the terminal.
Please refer to https://sonicos-api.sonicwall.com for the entire list.
Only the first 2 steps of this article would change, depending on the SonicWall model you use. Commands are the same for both Gen6 and Gen7 SonicWall devices.
For this article, I'm using Postman App and will be showing the commands to run on cURL for each step.
Resolution for SonicOS 7.X
This release includes significant user interface changes and many new features that are different from the SonicOS 6.5 and earlier firmware. The below resolution is for customers using SonicOS 7.X firmware.
Enabling the API Module on the firewall UI.
Login to the SonicWall management UI. Navigate to Device | Settings | Administration | Audit/SonicOS API section. Enable the option 'Enable SonicOS API' and 'Enable RFC-2617 HTTP Basic Access authentication' options.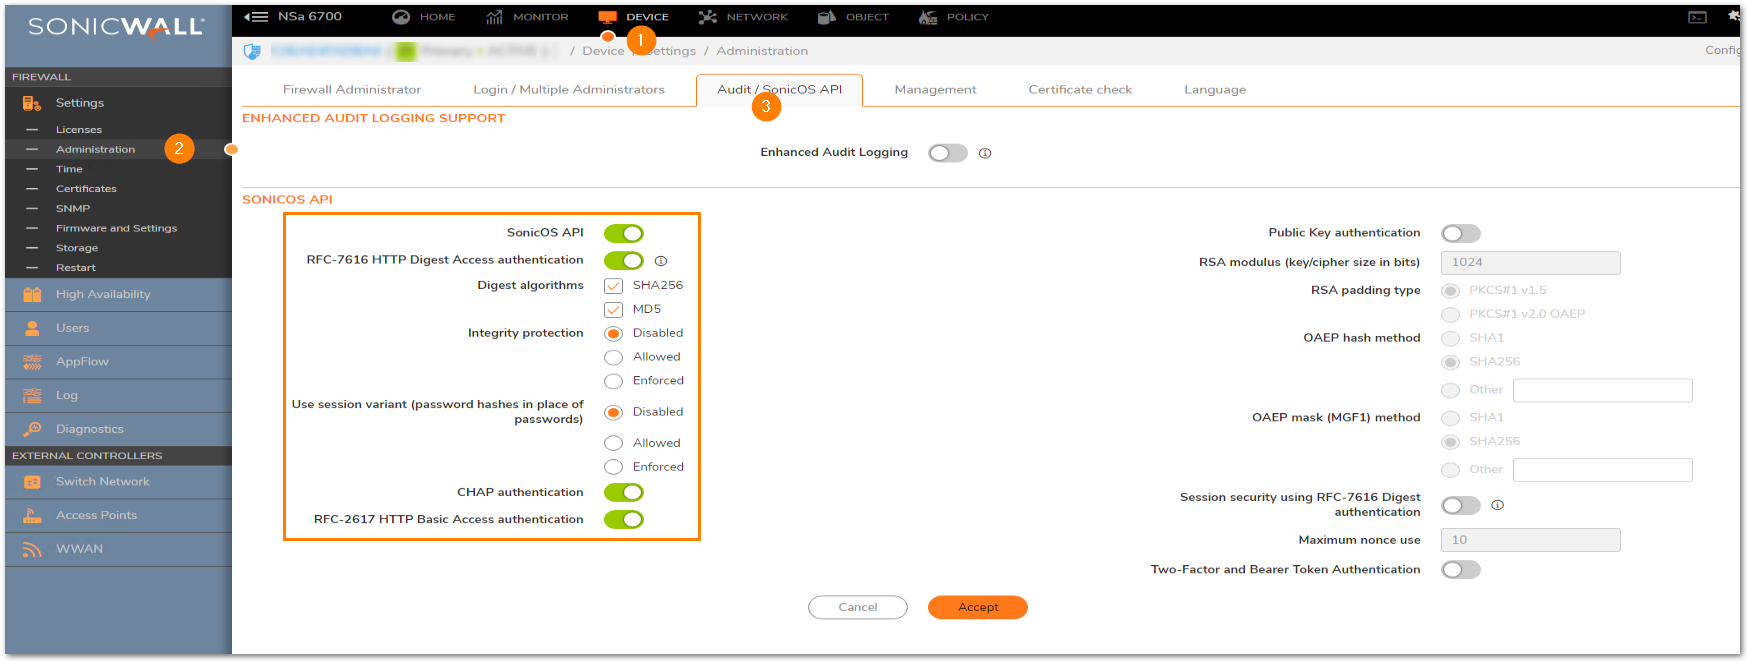
List of applicable APIs:
Navigate to MANAGE | API and click on the link https://SonicOS-api.sonicwall.com. Swagger will prepopulate your SonicWalls’s IP, MGMT Port, and Firmware so it can give you a list of applicable APIs.
Login to the Firewall using Postman
The following 3 steps need to be performed for every API request in Gen7 devices. NOTE: https://IP-address:port/-- Replace this with your SonicWall's Public or private IP address with the right management port number (If the management port is 443, you can directly use https:// followed by the IP address without the port number too).
a) The HTTP method should be POST and we need to use the URL: https://192.168.168.168/api/sonicos/auth
Under the authorization tab, select Basic Auth and mention the correct admin credentials.
b) Under the settings tab, turn OFF the Enable SSL certificate verification if the firewall is using a self-signed certificate for management.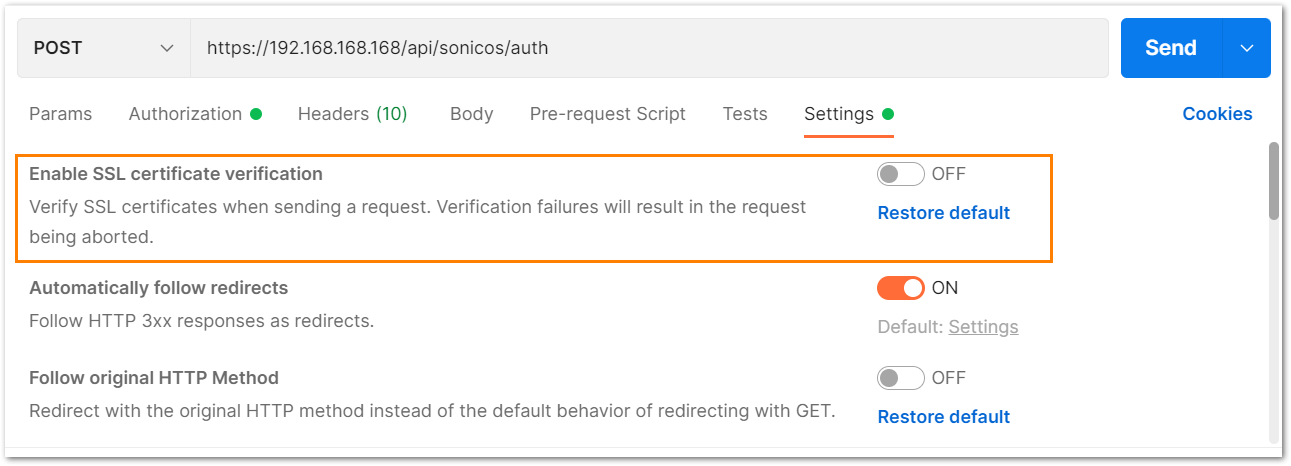
c) Under the headers tab, include application/Json as the value for keys Accept and Content-type.
d) The Gen 7 devices are token-driven. Use the {"override" : true} under the body to override any older tokens. This is used only during login.
After this, click on the Send button and then you can see the response in the section below. The response should contain a message: "success".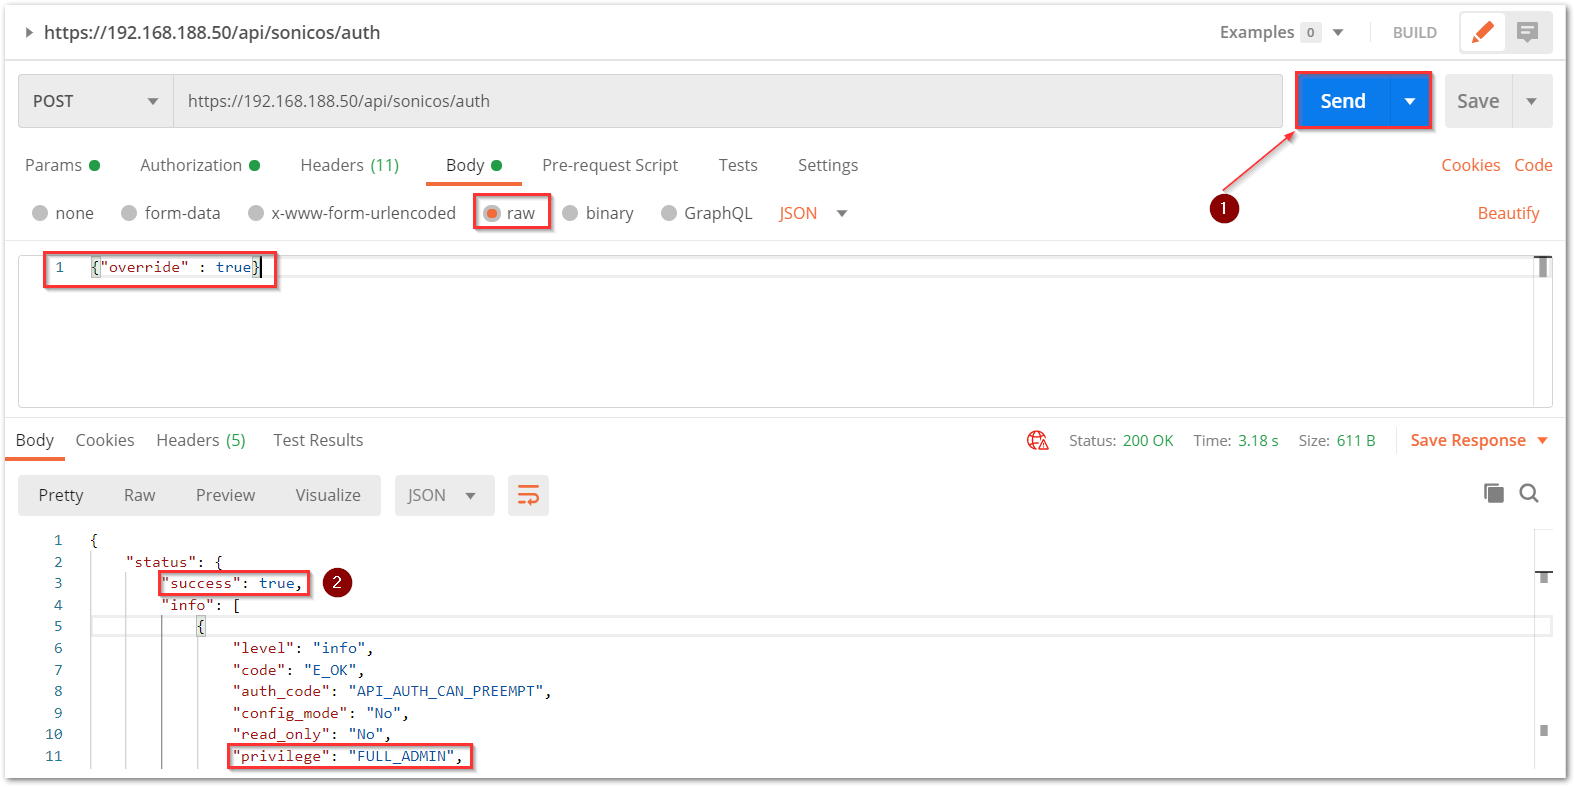
e) After this, click on the Send button and then you can see the response on the section below. The response should contain a message: "success".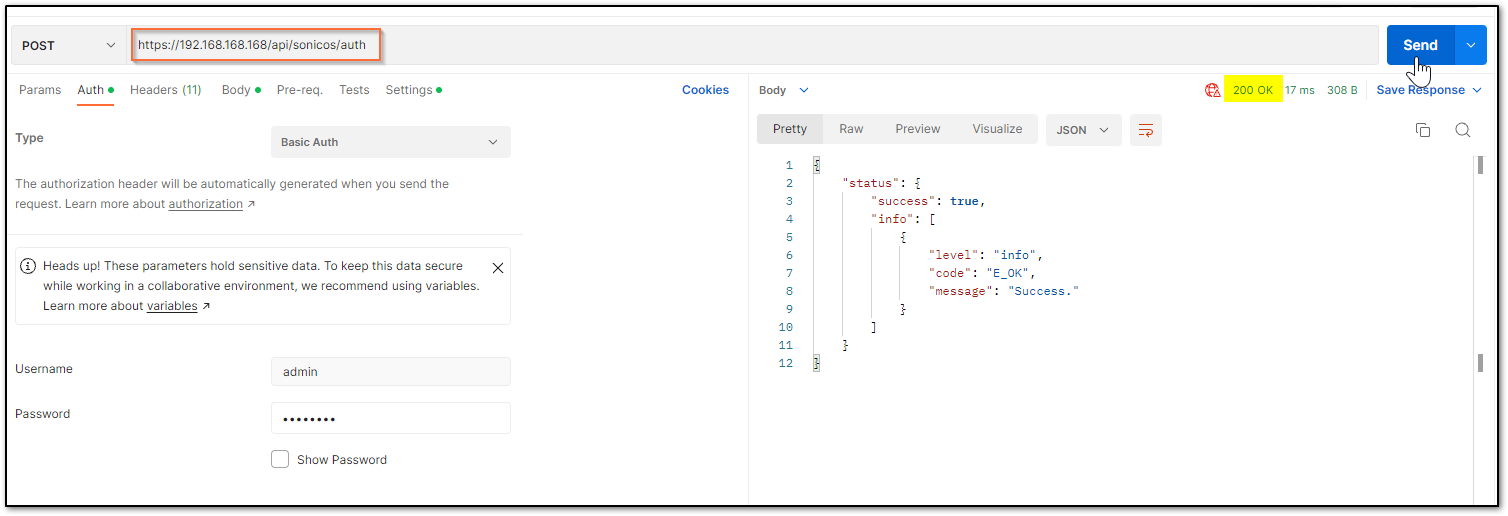 cURL code:
curl --location --request POST 'https://192.168.168.168/api/sonicos/auth' \--header 'Accept: application/Json' \--header 'Content-Type: application/Json' \--header 'Authorization: Basic YWRtaW46cGFzc3dvcmQ=
--data-raw '{"override" : true}'
Command Output should contain a string: "success": true- Adding Multiple Address objects:
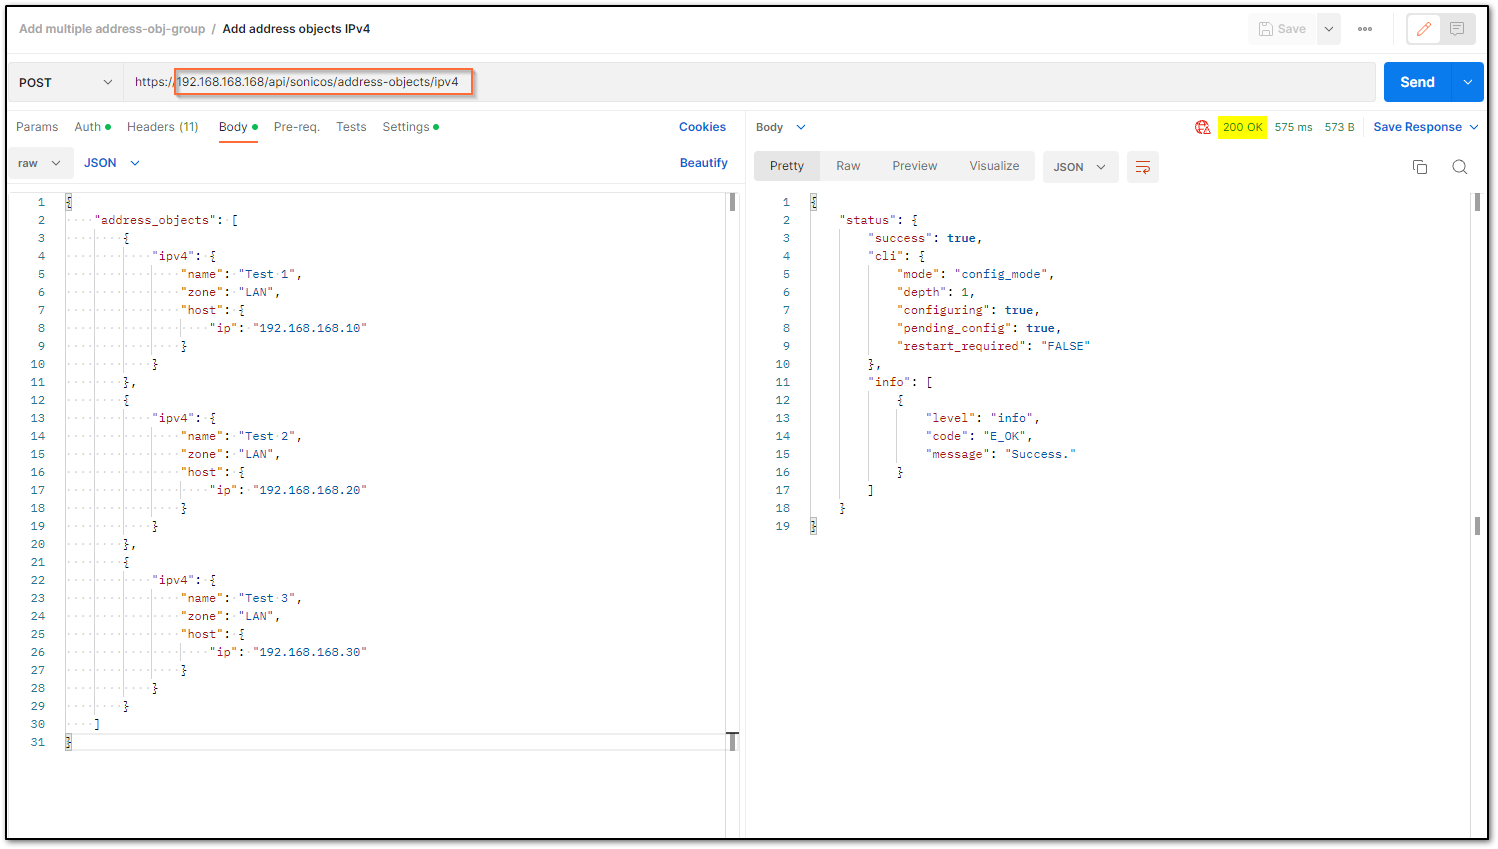
For GitBash or Linux terminal commands :
Need to create a JSON file listing all the address objects to be added. You can use a notepad and add all the address objects as below and save it as a .JSON file.
I am using the name add.JSON and saved it in Desktop for this example.
{
"address_objects": [
{
"ipv4": {
"name": "Test 1",
"zone": "LAN",
"host": {
"ip": "192.168.168.10"
}
}
},
{
"ipv4": {
"name": "Test 2",
"zone": "LAN",
"host": {
"ip": "192.168.168.20"
}
}
},
{
"ipv4": {
"name": "Test 3",
"zone": "LAN",
"host": {
"ip": "192.168.168.30"
}
}
}
]
} NOTE: I have the add.Json file saved on to my desktop and hence I was able to call it into the command, if you have created the Json the file in a different location then make sure you are executing the command from that location.
curl -k -i -X POST "https://192.168.188.200/api/sonicos/address-objects/ipv4" -H "accept: application/Json" -H "Content-Type: application/Json" -d @add.Json
Command Output should have success as the message in the info section as below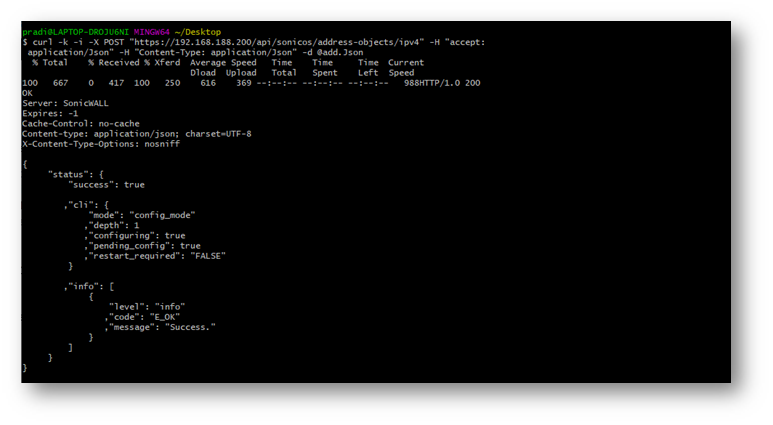
Committing all the configurational changes made with APIs:
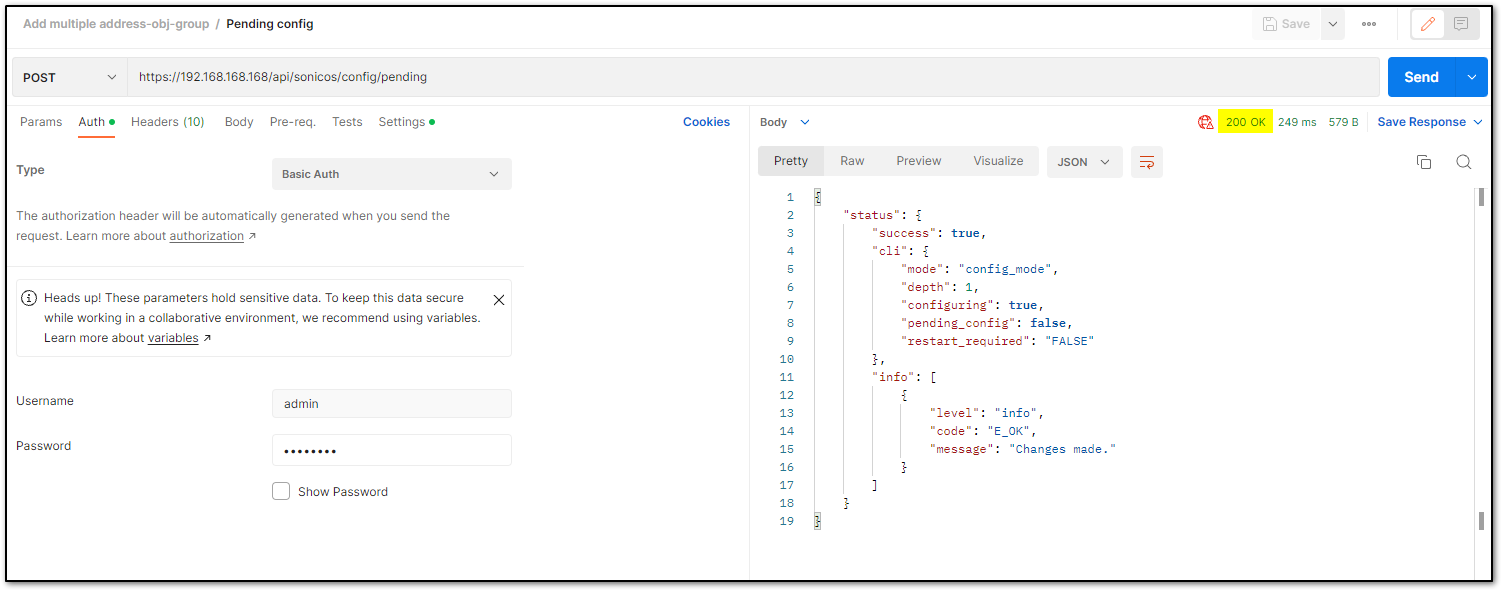
cURL command:curl -L -X POST 'https://192.168.168.168/api/sonicos/config/pending' \
-H 'Content-Type: application/json' \
-H 'Accept: application/json' \
-H 'Authorization: Basic YWRtaW46cGFzc3dvcmQ=' \
--data-raw ''- Log out the SonicWall with API

cURL command:curl -L -X DELETE 'https://192.168.168.168:443/api/sonicos/auth' \-H 'Authorization: Basic YWRtaW46cGFzc3dvcmQ='
 NOTE: All the address objects need to be of the same type Eg: IPv4, IPv6, MAC, FQDN etc. The commands vary based on the type of objects that you are adding.
 CAUTION: If you miss performing the action in Step 5 and Execute the command in Step 6 you will lose all the configuration changes made in the current session.
Resolution for SonicOS 6.5
This release includes significant user interface changes and many new features that are different from the SonicOS 6.2 and earlier firmware. The below resolution is for customers using SonicOS 6.5 firmware.
 EXAMPLE: Let us go through the steps for adding three IPv4 host address objects on zone LAN with IP addresses 192.168.168.10, 192.168.168.20 and 192.168.168.30.
You would need to follow the below steps to add multiple address objects at once using SonicOS APIs.
- Enabling the API Module on the firewall UI
Login to the SonicWall management UI. Navigate to MANAGE | Appliance | Base Settings and scroll down to SonicOS API section. Enable the option 'Enable SonicOS API' and 'Enable RFC-2617 HTTP Basic Access authentication' option.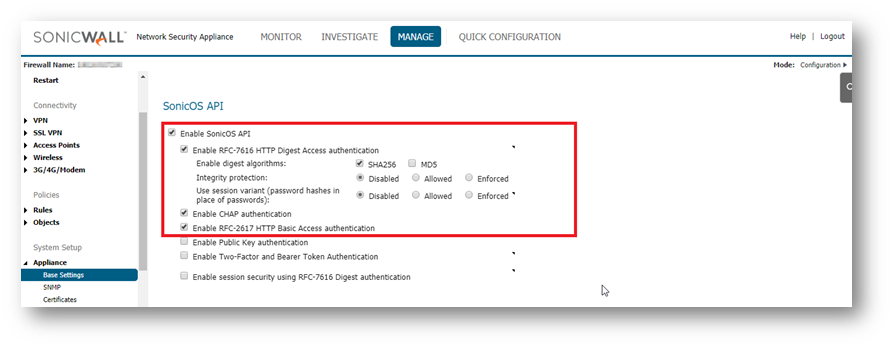
- List of applicable APIs
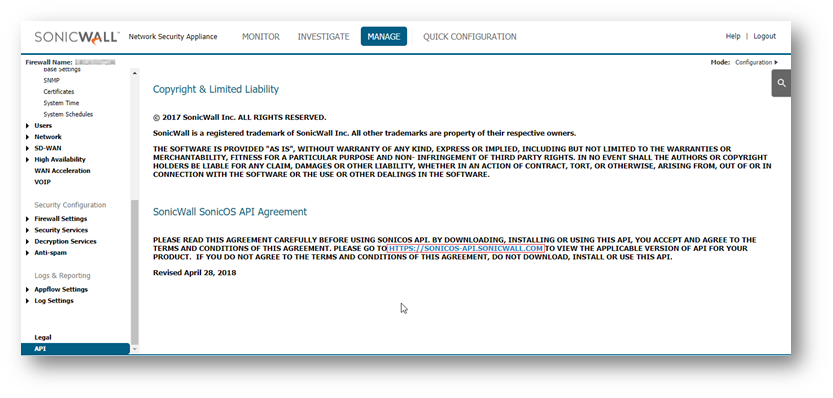
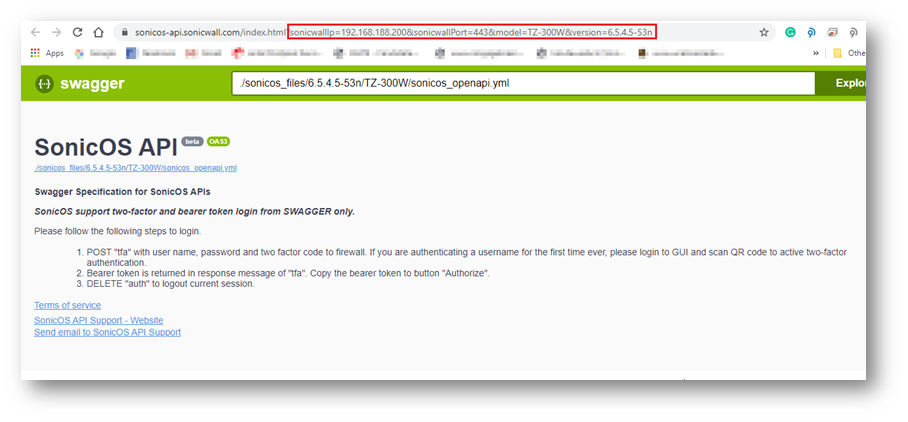
Navigate to MANAGE | API and click on the link https://SonicOS-api.sonicwall.com. Swagger will prepopulate your SonicWalls’s IP, MGMT Port, Firmware so it can give you a list of applicable APIs. TIP: You are free to choose Swagger, Postman, Git bash, or any application that allows API calls, if you are using a Linux based operating system you can execute cURL from the terminal. For this article I am using Git bash on Windows.
Log in using Postman:

Login to the Firewall using Git bash.curl -k -i -u "admin:password" -X POST https://192.168.188.200:443/api/sonicos/auth
"admin:password" – Replace this with your SonicWall's "username : password"
https://192.168.188.200:443/-- Replace this with your SonicWalls Public or private IP address with the right management port number (If the management port is 443, you can directly use https:// followed by the IP address without the port number too)
Command Output should contain a string: "success": true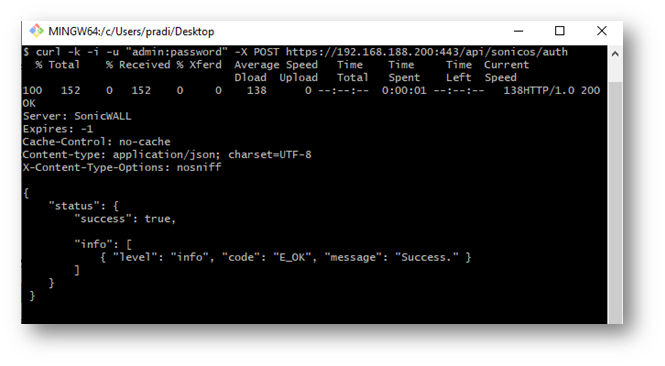
- Adding Multiple Address objects:

For GitBash or Linux terminal commands :
Adding all the address objects in the add.JSON file.
Creating the JSON file listing all the address objects to be added.
You can use a notepad and add all the address objects as below and save is as a .JSON file. I am using the name add.JSON for this example.
{
"address_objects": [
{
"ipv4": {
"name": "Test 1",
"zone": "LAN",
"host": {
"ip": "192.168.168.10"
}
}
},
{
"ipv4": {
"name": "Test 2",
"zone": "LAN",
"host": {
"ip": "192.168.168.20"
}
}
},
{
"ipv4": {
"name": "Test 3",
"zone": "LAN",
"host": {
"ip": "192.168.168.30"
}
}
}
]
} NOTE: I have the add.Json file saved on to my desktop and hence I was able to call it into the command, if you have created the Json the file in a different location then make sure you are executing the command from that location.
curl -k -i -X POST "https://192.168.188.200/api/sonicos/address-objects/ipv4" -H "accept: application/Json" -H "Content-Type: application/Json" -d @add.Json
Command Output should have success as the message in the info section as below
 NOTE: Commands for adding IPv6, MAC and FQDN address objects and their supported schema can be found in the SonicOS API 6.5.4 Reference Guide
 - Committing all the configurational changes made with APIs:
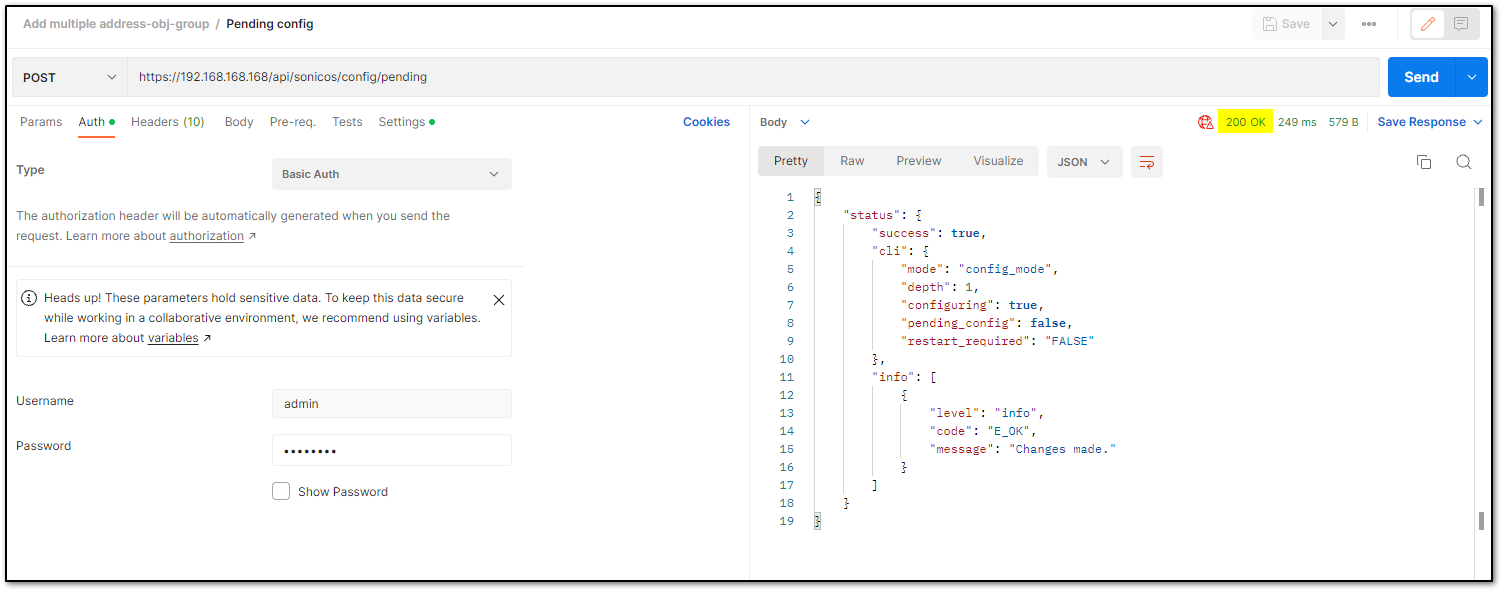
curl -k -X POST "https://192.168.188.200/api/sonicos/config/pending" -H "accept: application/Json"
https://192.168.188.200/-- Replace this with your SonicWall's Public or private IP address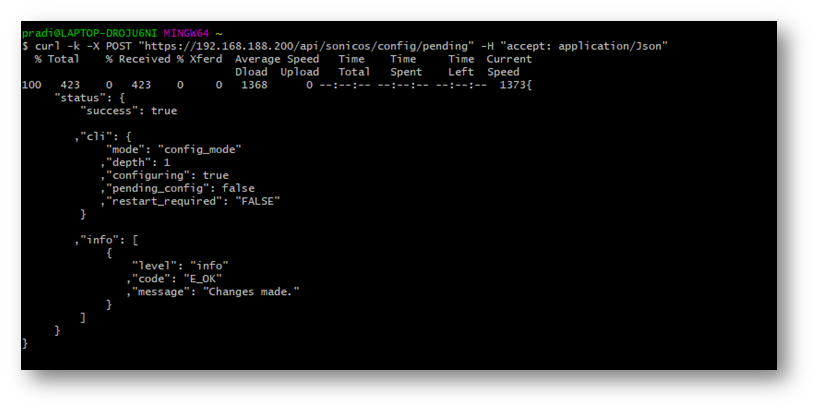
We have Only used the POST method in most of the API calls for this Article because we are only Adding things into the configuration, there are other methods Like GET, DELETE, PUT and etc. I recommend that you go through https://SonicOS-api.sonicwall.com for more API commands. - Log out the SonicWall with API
It is recommended to log out from the SonicWall via API once the desired configuration is committed.
curl -k -i -u "admin:password" -X DELETE https://192.168.188.200/api/sonicos/auth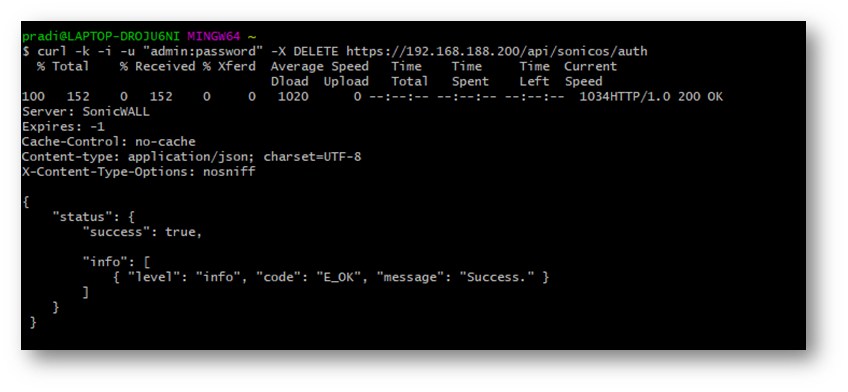
 CAUTION: If you miss to perform the action in Step 5 and Execute the command in Step 6 you will lose all the configuration changes made in the current session.
You can manually log in to the firewall to check the changes made
Navigate to MANAGE | Objects | Address objects to check for the changes.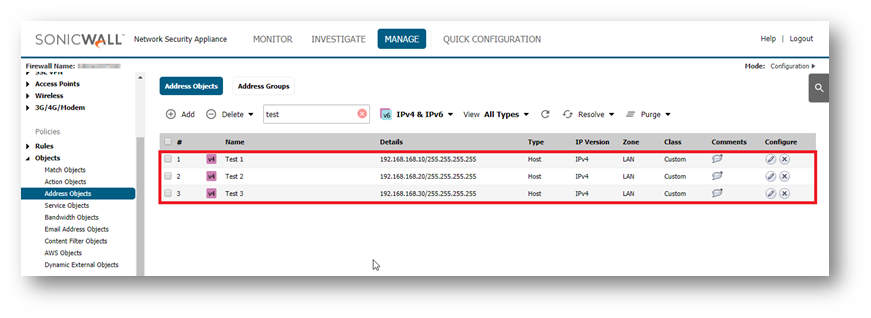
Related Articles
- How to Block Google QUIC Protocol on SonicOSX 7.0?
- How to block certain Keywords on SonicOSX 7.0?
- How internal Interfaces can obtain Global IPv6 Addresses using DHCPv6 Prefix Delegation


 YES
YES NO
NO