-
Products
-
SonicPlatform
SonicPlatform is the cybersecurity platform purpose-built for MSPs, making managing complex security environments among multiple tenants easy and streamlined.
Discover More
-
-
Solutions
-
Federal
Protect Federal Agencies and Networks with scalable, purpose-built cybersecurity solutions
Learn MoreFederalProtect Federal Agencies and Networks with scalable, purpose-built cybersecurity solutions
Learn More - Industries
- Use Cases
-
-
Partners
-
Partner Portal
Access to deal registration, MDF, sales and marketing tools, training and more
Learn MorePartner PortalAccess to deal registration, MDF, sales and marketing tools, training and more
Learn More - SonicWall Partners
- Partner Resources
-
-
Support
-
Support Portal
Find answers to your questions by searching across our knowledge base, community, technical documentation and video tutorials
Learn MoreSupport PortalFind answers to your questions by searching across our knowledge base, community, technical documentation and video tutorials
Learn More - Support
- Resources
- Capture Labs
-
- Company
- Contact Us
Capture Client-Autotask Integration via Email2AT


Description
What is Email2AT?
Email2AT is a powerful parsing tool from MSPintegrations that can cross reference and update tickets in Autotask from client support emails, and automated the alerts. It allows Customers/Partners to create fully customized SonicWall Capture Client inbound email workflows for Autotask; tickets are associated with the correct account and customer every time.
- Extract the text using regular expressions and text matching.
- Custom Autotask queries
- Create and update any available Autotask API entity (tickets, accounts, configuration items, UDFs, contracts, billing items, etc.).
- Close tickets automatically
- Currently, we support these types of Capture Client alerts to create a ticket on Autotask.
- Threat related alerts
- Device Events
Platform Setup
Refer to the MSPintegrations Docs Page for more details.
- The first step is to signup on to the MSPintegrations login page- https://console.mspintegrations.com with your company email id. By default, MSPintegrations offers a 30-day trial license for the new customer.
- The next step is to configure Autotask, which includes
- Create API Security Level
- Create API User and generate API Key
- Update API User for Impersonation
- Contact and Resource Impersonation (Optional)
- Login to the MSPintegrations console and navigate to the top right and click on your logged-in Profile name and click on Autotask API Credentials.

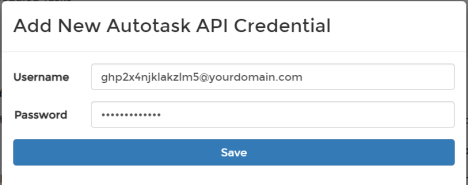
- Once you are at Autotask API Credentials Page, click on New Button at the left bottom. It will open a new dialog box, enter the new Autotask API credentials which were generated during step 2 in Configure Autotask section above, and hit save. We have entered a dummy username and password for your reference.
- In case you want to add or delete a user from MSPintegrations to manage and create the rules, navigate to the Top right and click on your name and then click Users.
- Click on New, enter the user's email id, and send an invite to the user.
- To delete the user, select the user you want to delete and click delete. Refer to the link for more details.
- Refer to the Link to edit or enter the company information.
Alert Settings
- Now, to start with the Alerts setup click on Email2AT on the Top. You get two Options there on the Page:
1.Hosted Mailboxes - Create one or more mailboxes to receive inbound emails on any or all of your domains. You need to configure this email address on Capture Client Tenant, so it sends the real- time alert emails to this Hosted mailbox. Once Alert emails have been received on Emalil2AT, it will start processing the emails in Queue to create the Ticket on Autotask as per the configured rules accordingly.
2. Remote Mailboxes - Email2AT can monitor the Remote Mailboxes on O365 and IMAP. Once it receives any alert emails on the configured mailbox, Email2AT fetches the email and starts processing and creating the Ticket on Autotask as per the configured rules accordingly.
- Email2AT recommends using the Hosted Mailboxes to avoid Latency. For this use-cases demonstration, we will be using Hosted Mailboxes. To start with Hosted Mailbox,
- First, you need to create a New Domain and then create a Mailbox under that new Domain.
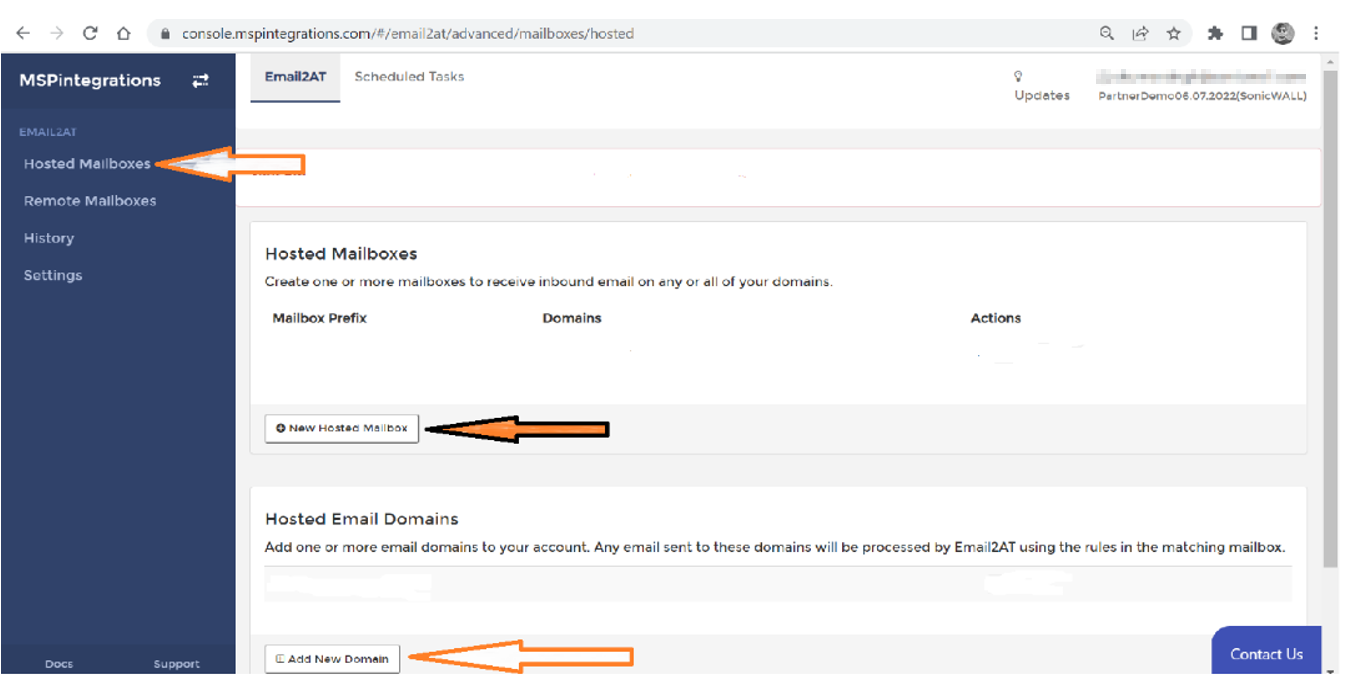
- Go to the Email2AT page and click on Add New Domain under Hosted Email Domains section.
- It opens a new dialog box and gives 2 Options to select as follows:
- Hosted Domains - No Additional setup is required.
- Custom Domains - Need MX record changes.
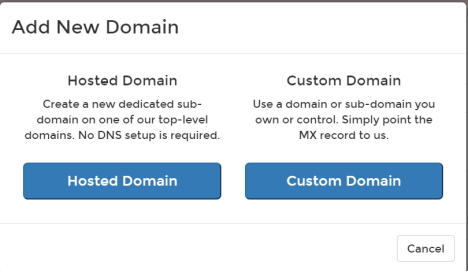
- Select the Hosted Domain, enter a subdomain prefix and then select a top-level domain and click on Activate button.

- This new Hosted Domain will be activated for you. Once activated, you can see the created domain under Hosted Email Domains.
- Now, go to Hosted Mailboxes section, and click New Hosted Mailbox. It opens a new box- Select Address Type, Enter the email address prefix and select the Domain which you created in the last step. Once you have entered the required information, hit the Save button at the Bottom.

- Once you have saved it, the newly created mailbox would show up under Hosted Mailboxes section
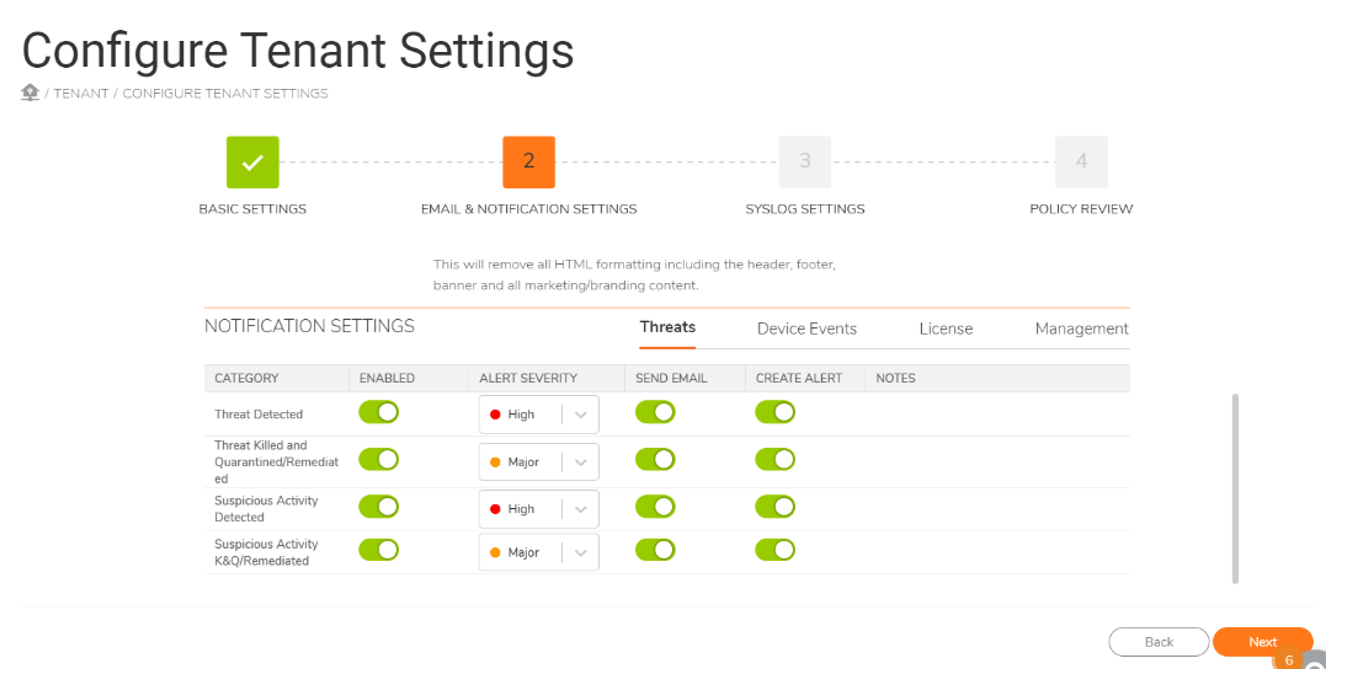
- Now, login to SonicWall Capture Client Tenant and configure this newly created email in Alert and Notification settings so that Capture Client forwards the defined Alert emails to this newly hosted Email address. Please refer to this Knowledge Base Article to know how to configure Alerts and Notifications in Capture Client.
- Toggle the Send Email button for all the Alert Categories you would want to send the email and create and Autotask Ticket via Email2AT.
Prerequisites
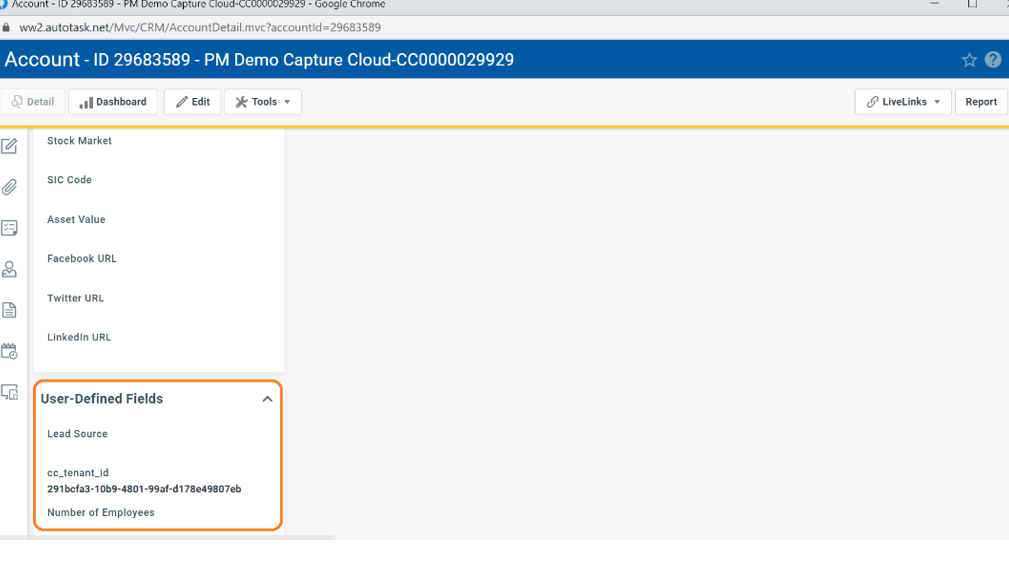
Before we start configuring the Rules on Email2AT, we need to make sure Autotask is already set up. We expect customers have already added the Accounts in Autotask, Email2AT will match the User-Defined Fields (UDF) on Autotask- "cc_tenant_id" (available part of the notification email) from the Capture Client Tenant setting page.
To create a new user-defined field, follow the below steps:
- Login to Autotask and navigate to Admin → User-Defined Fields
- Click on New and enter the Name- "cc_tenant_id" (case sensitive)
- And select the Field Type to Text (Single Line)
- Go to your account and edit your account and add your Capture Client Tenant id in the UDF section- cc_tenant_id and save. (Note: in the below screenshot, we have entered some random tenant id numbers for example)
- Make sure that CC Tenant ID should be the copied exact value in the Autotask UDF under the cc_tenant_id value. The same parameters would be matched in Email2AT rule processing to create and assign the ticket to matched account.
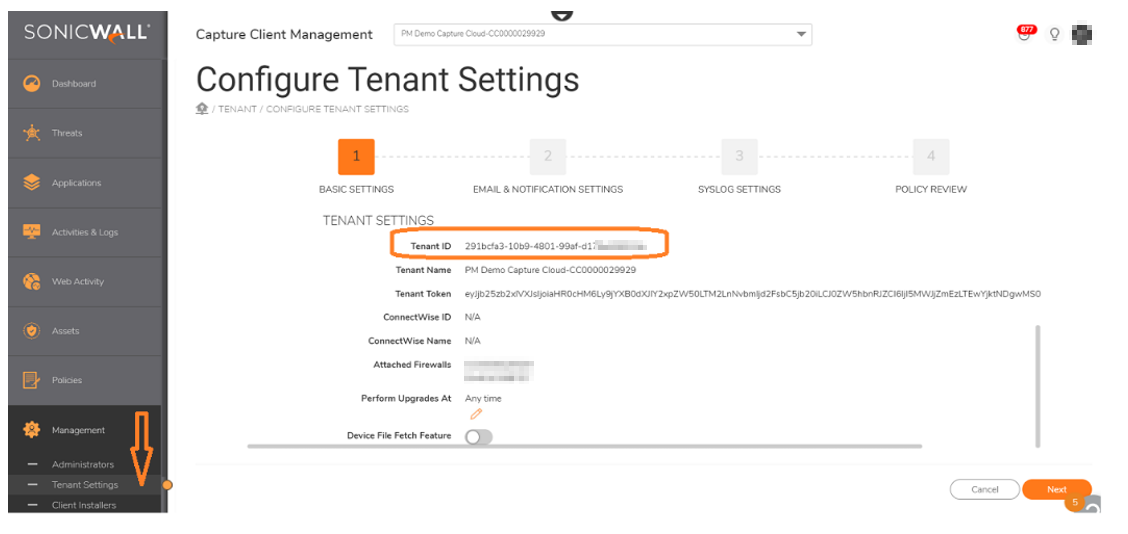
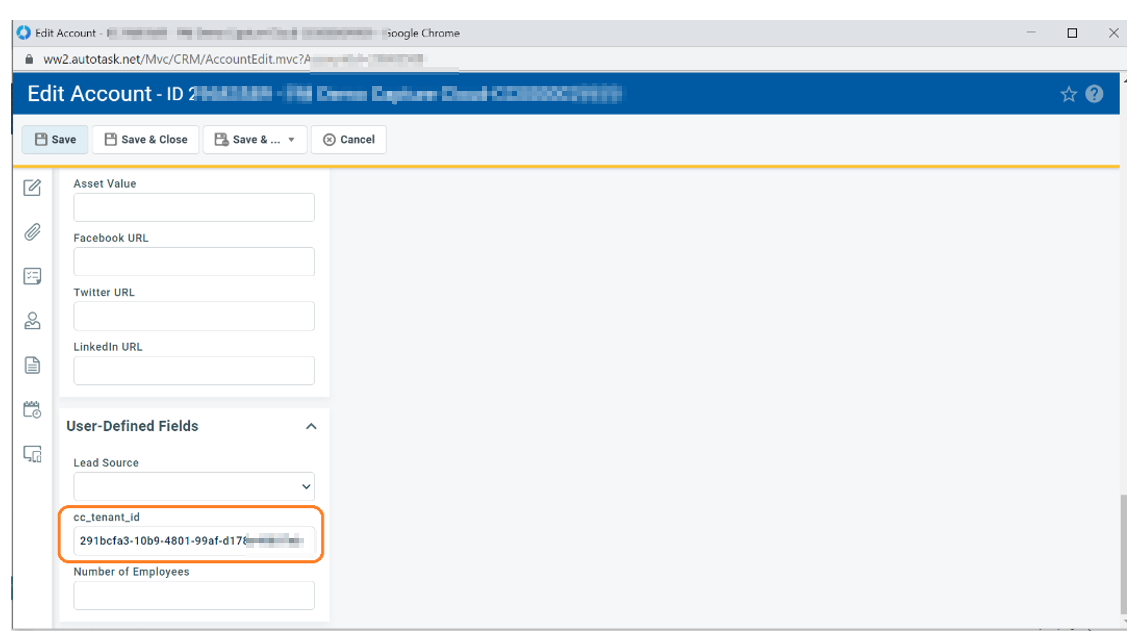
Now, to make this newly added UDF visible in the Account, follow the below steps:
- Navigate to Admin → Features & Settings
- Go to the section- Accounts & Contacts and expand it
- Click on Account Categories
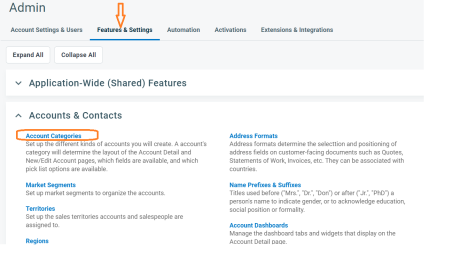
- Now, on the next page, you have two options- Standard and non-standard
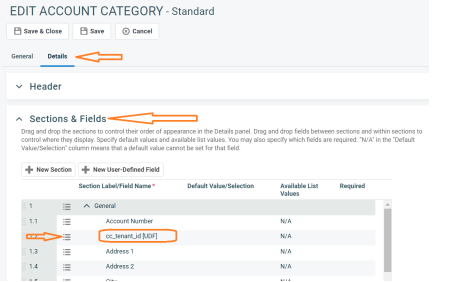
- Select the Standard option and click on 3 dotted lines to edit this section
- Go to Details Tab and scroll down to Sections & Fields
- Scroll down to your newly created Field Name - cc_tenant_id and then click on three dotted lines and select make visible
- You may move this Field Name to the Top as per your requirement
- Once you are done, Click Save & Close.
Rules
Once you have all the setup ready, now create the rules to process the emails accordingly. There are two options:
- You can create the rules manually by yourself.
- Use the SonicWall Capture Client Alert Rule Library from Email2AT portal.
For his demonstration, we would take the second option. So let’s start the Rules:
- To set up the rules go to Hosted Mailboxes, and click the Edit button next to your email id.

- On the next- Rules Page, you see all the rules which are created already if any.
- If you want to create a New Rule, Click on New Rule Button

- Instead, you can click on Import from Library Option to use the predefined rules Specific to SonicWall Capture Client. Click on the Import button.
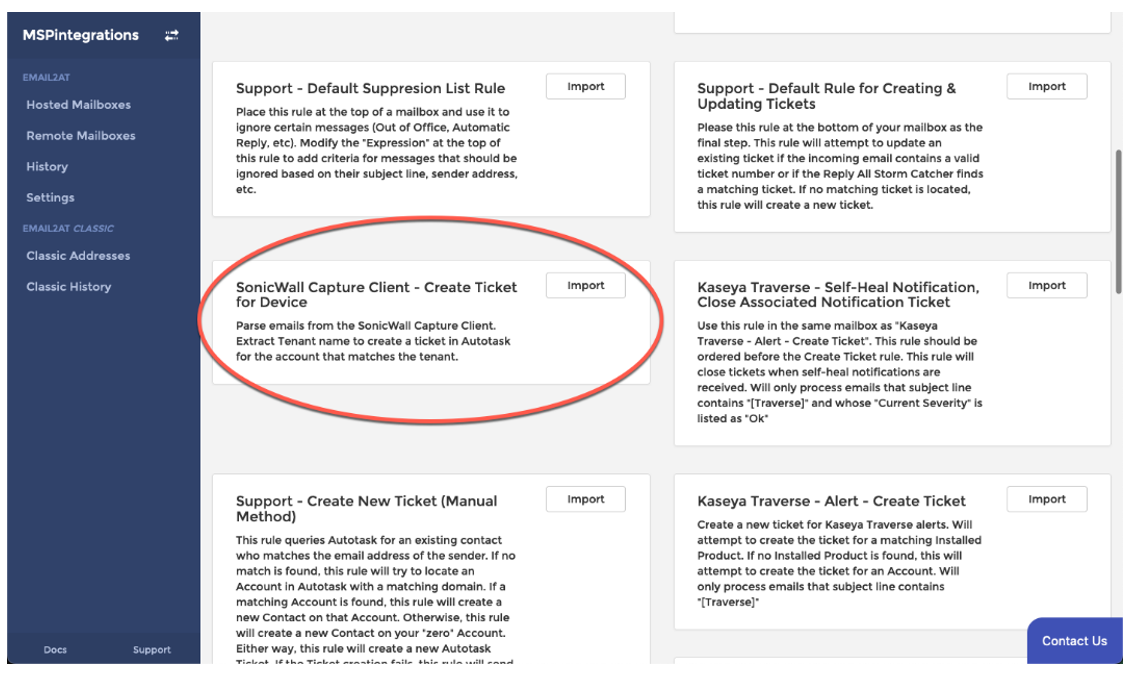
- On the next page, it shows all the rules created under this Library. Click the check box- Rule is Active
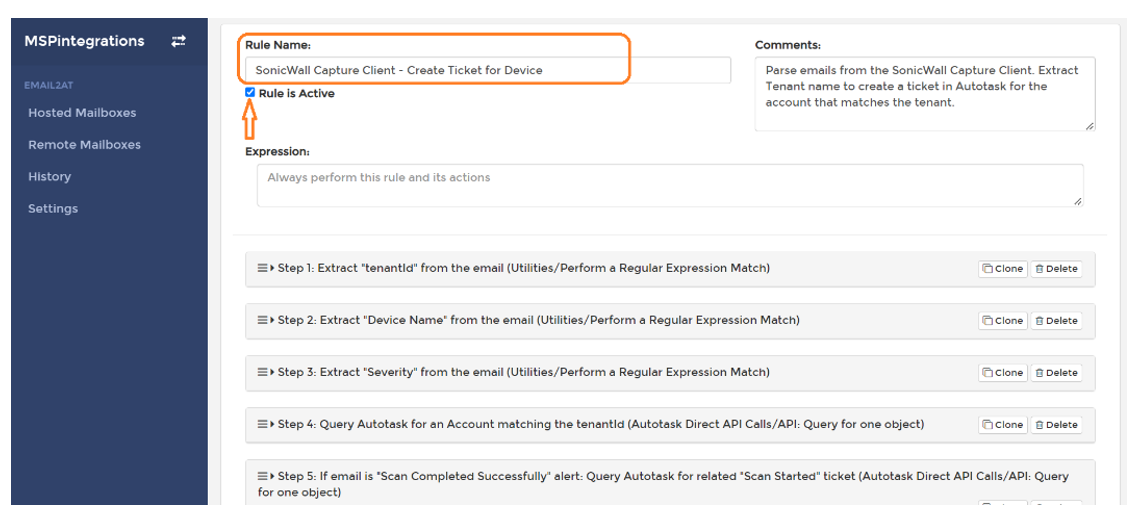
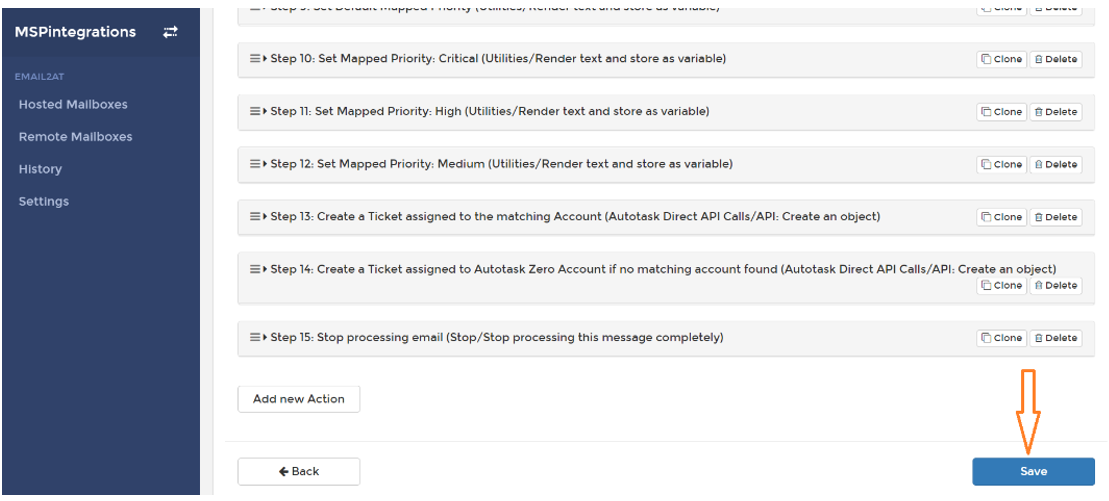
- You can change the parameters if you want. Once you are done with the changes, Scroll down to the bottom of the page and hit the Save button.
Understanding the Parsing Rules:
- Step 1: Extract Capture Client "tenantId" from the email (Utilities/Perform a Regular Expression Match)- In the body of the email, this step will look for "tenantId=" and then store what's immediately after it in the property custom.parsed_tenantid.TenantID.
- Step 2: Extract "Device Name" from the email (Utilities/Perform a Regular Expression Match)- In the body of the email, this step will look for "Device" and then store what's immediately after it in the property custom.parsed_devicename.DeviceName
- Step 3: Extract "Severity" from the email (Utilities/Perform a Regular Expression Match)- In the body of the email, this step will look for "Severity" and then store what's immediately after it in the property custom.parsed_severity.Severity
- Step 4: Query Autotask for an Account matching the tenantId (Autotask Direct API Calls/API: Query for one object)- If the property custom.parsed_tenantid.TenantID has a value (because it was exctracted in step 1), this step will query Autotask for an account by that name. HINT: We recommend creating, in Autotask, a new Account User-Defined Field called "cc_tenent_id" and using that Autotask UDF to store each Account's SonicWALL Tenant ID. Then, modify the query in this step and change the "Account Name" field to that UDF.
- Step 5: If email is "Scan Completed Successfully" alert: Query Autotask for related "Scan Started" ticket (Autotask Direct API Calls/API: Query for one object)- This rule is specific to Scan related emails only to query for an existing open ticket for device id.
- Step 6: If email is "Scan Completed Successfully" alert: Add note to "Scan Started" ticket (Autotask Direct API Calls/API: Create an object) - If email found on step 5, add the ticket note to that ticket
- Step 7: If email is "Scan Completed Successfully" alert: Set status of "Scan Started" ticket to Complete (Autotask Direct API Calls/API: Update object)- Close the Scan started ticket if found on the step 5.
- Step 8: If email is "Scan Completed Successfully" alert: Stop processing this email (Stop/Stop processing this message completely)- Stop processing the Scan-related emails.
- Step 9: Set Default Mapped Priority (Utilities/Render text and store as variable)- This is the default priority to Low for the ticket that will be created at the end of the list of actions. This value may be overridden by the next few steps.
- Step 10: Set Mapped Priority: Critical (Utilities/Render text and store as variable)- If the incoming email is "Severity" (from step 3) of "Critical" or "High", update the property for the soon-to-be-created Autotask ticket priority to "Critical"
- Step 11: Set Mapped Priority: High (Utilities/Render text and store as variable)- If the incoming email is "Severity" (from step 3) of "Major", update the property for the soon-to-be-created Autotask ticket priority to "High"
- Step 12: Set Mapped Priority: Medium (Utilities/Render text and store as variable)- If the incoming email is "Severity" (from step 3) of "Minor", update the property for the soon-to-be-created Autotask ticket priority to "Medium".
IMP: We have mapped Capture Client Alert Severity with Autotask with the below parameters to assign the Priority in the Autotask ticket:
CC Severity | Autotask Priority |
Critical | Critical |
High | |
Major | High |
Minor | Medium |
Low | Low |
Normal | |
Info |
13. Step 13: Create a Ticket assigned to the matching Account (Autotask Direct API Calls/API: Create an object)- If an account was located in step 4, this step will create a new ticket associated to the account located in step 4.
14. Step 14: Create a Ticket assigned to Autotask Zero Account if no matching account found (Autotask Direct API Calls/API: Create an object)- If an account was not located in step 4, this step will create a new ticket associated to the internal Autotask "Zero" account.
15. Step 15: Stop processing email (Stop/Stop processing this message completely)- Stop processing the email
- You can edit the rule parameters as per your requirement. Once the rule is saved, you can see the imported rules in your list on the Rules page in the active Rules set. You can enable/disable the rules from this page by clicking the check box next to the Rules.
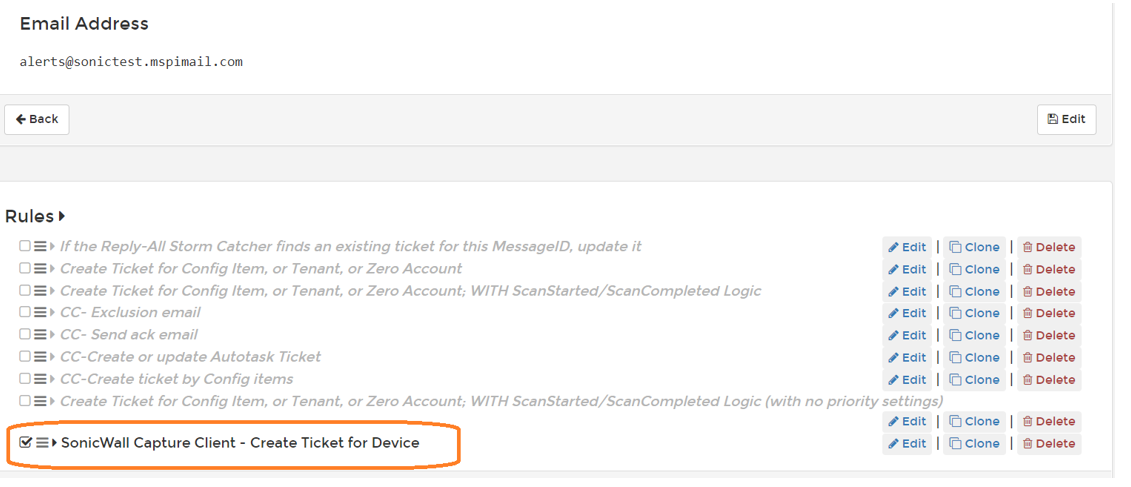
- Rule settings completed; you can edit your rules as per your requirement
Testing
- To test the Functionality, Go to Capture Client installed Machine and generate some alerts so that Alerts are sent to Email2AT.
- On Email2AT, go to Email2AT History under the History section on the left.
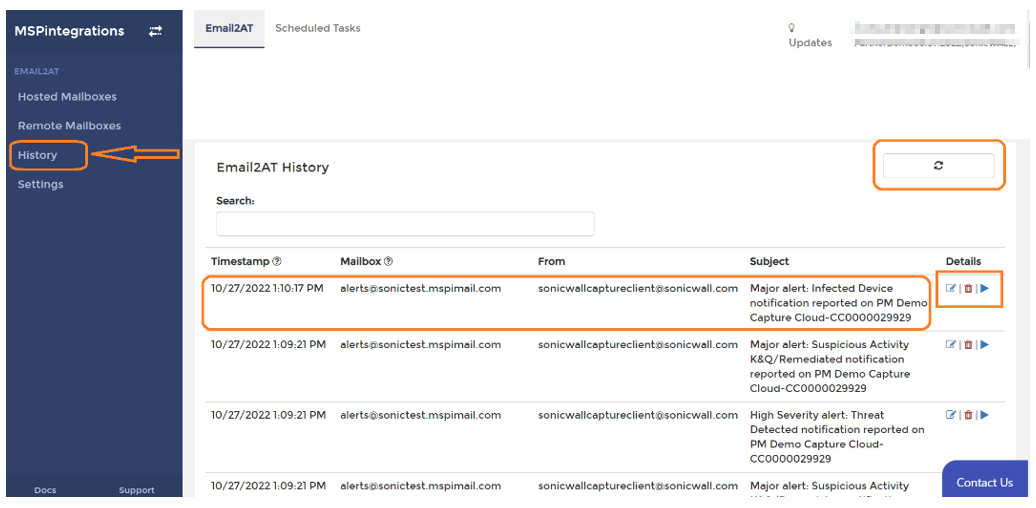
- On the History page- You can see the alerts email from Capture Client (sonicwallcaptureclient@sonicwall.com) with Timestamp and Subject.
- If you don't see the new alert emails on this page, please click the refresh button on the Top to reload the email history.
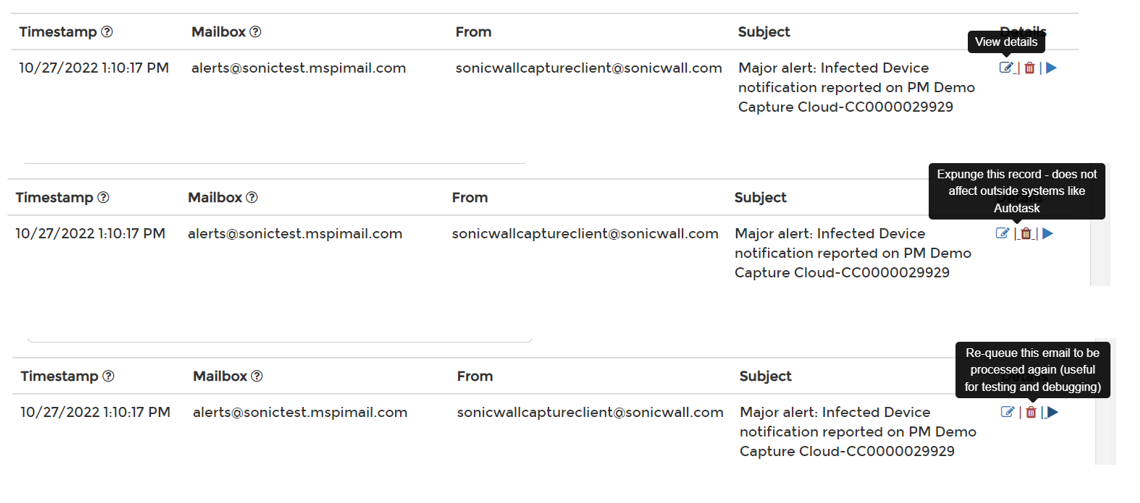
- You got 3 buttons on the extreme right of the received emails
- View Button- Click on this button to view the email and its processing
- Delete Button - Click on this button to delete this email and exclude it from the history. Note: If this email is already processed and Autotask is created, then this button won't delete the impact the Autotask
- Replay (Re-queue email) - Click on this button to re-process (re-queue) this email to test the functionality and create a new ticket for the same alert
- Now click on the View button of the message you want to see the details, it opens the message history
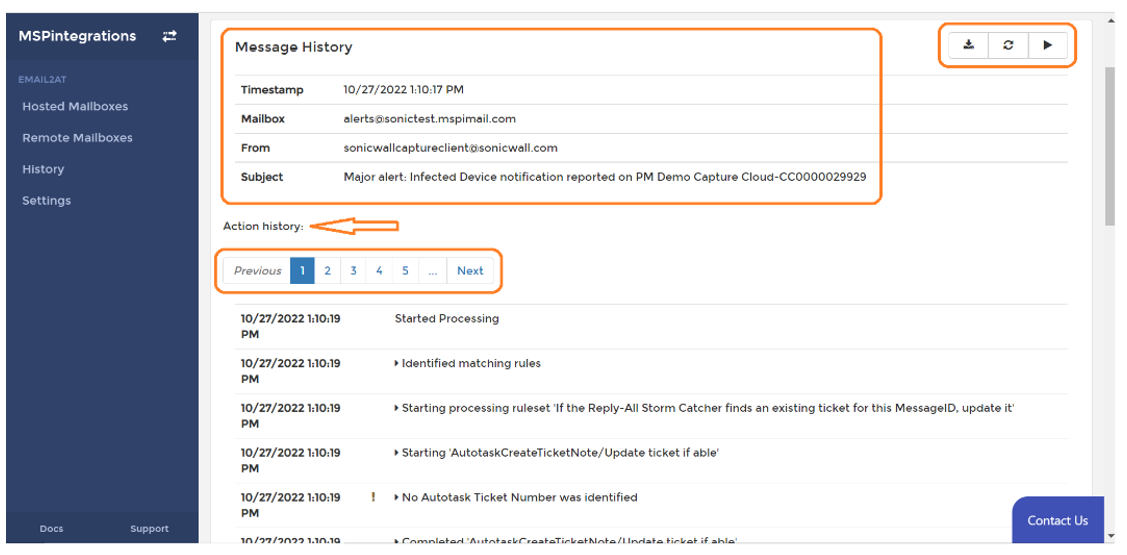
- Email2AT start processing the emails as soon as it receives the email in the Queue. And it starts processing each rule if matched and skips the rule if the parameters don't match.
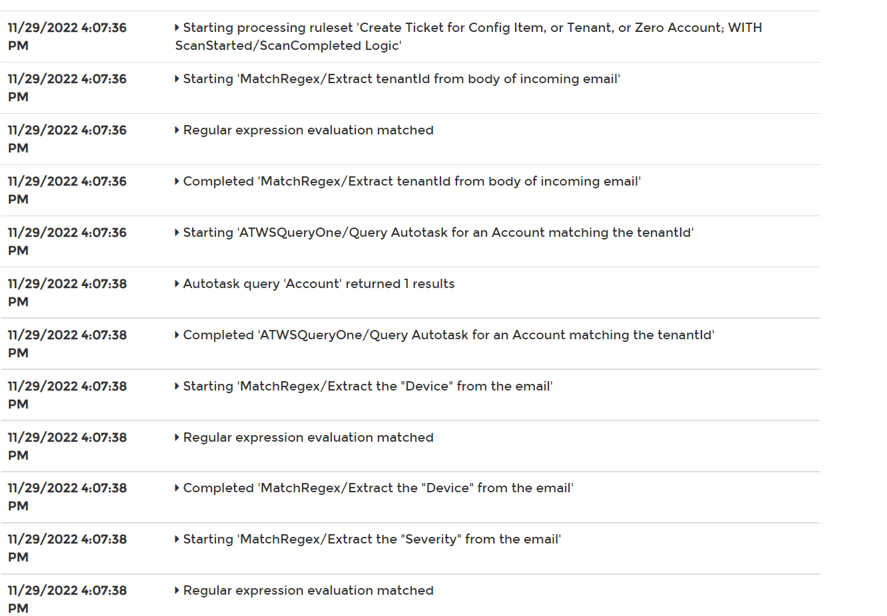
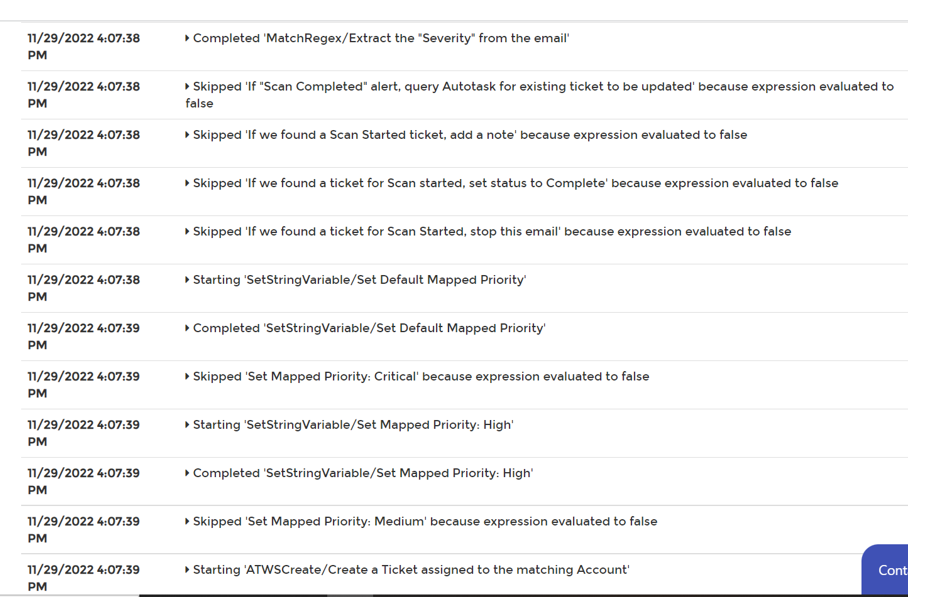
- Click on the next page on the Top
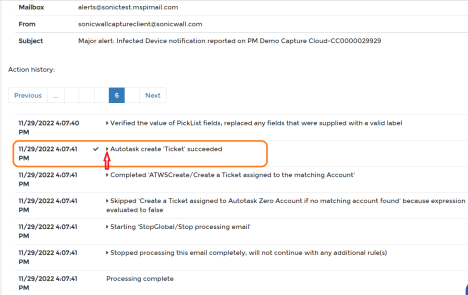
- If all the parameters matched the rules, Email2AT creates an Autotask Ticket for the alert. Click on the button to see the details and ticket number.
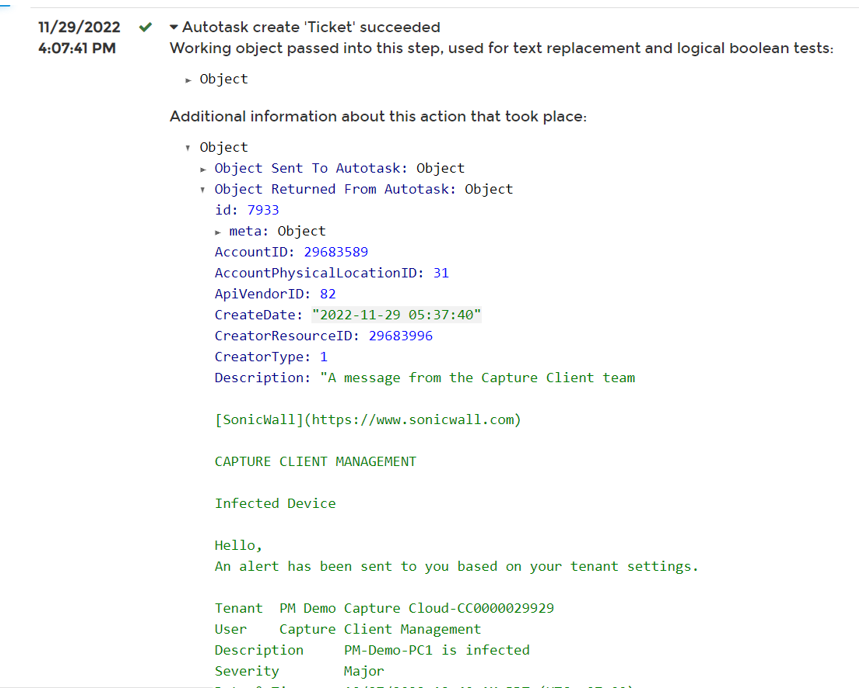
- Scroll down to the Autotask ticket details section to see the Autotask Ticket number. Now you can login on to Autotask and
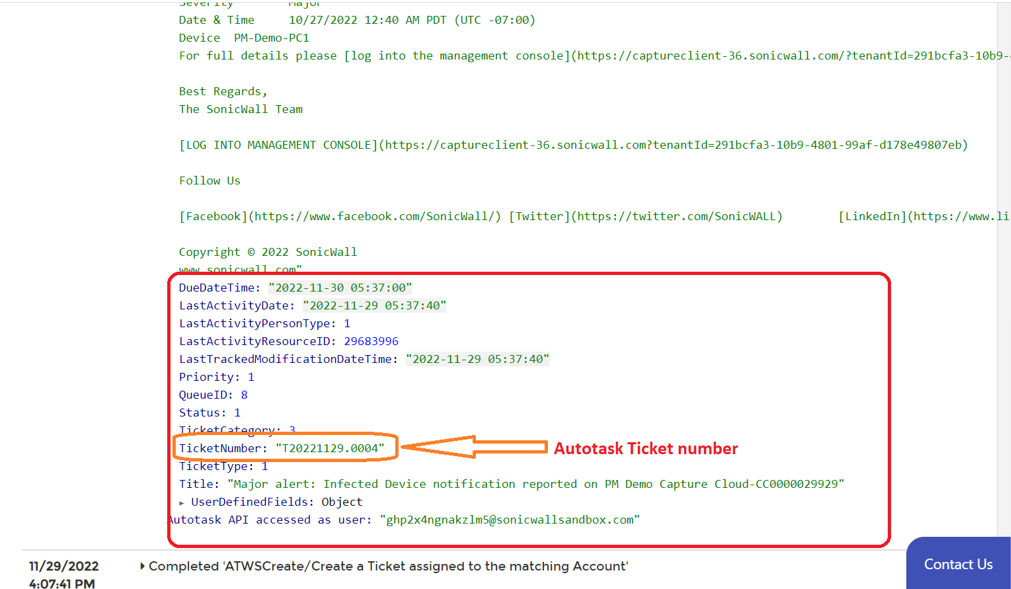
- Go to Autotask and Enter the Ticket number in the Search pane to get the ticket details. You can notice Ticket is created under your matched Account and with High priority.

- If you want to avoid manual steps to search and open the ticket, Go to History and "Autotask Create Ticket Succeeded" Step → Go to below → Object → Object Returned From Autotask → Meta → autotask_url:
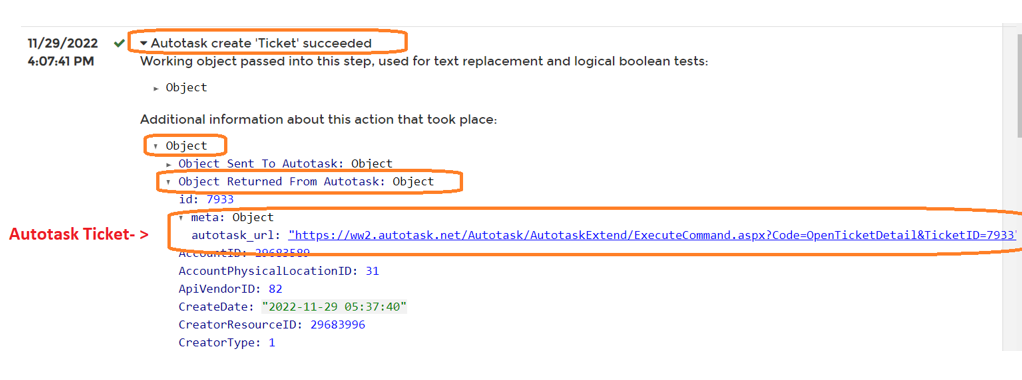
- Clicking on this URL will redirect you to Autotask and open the associated ticket.
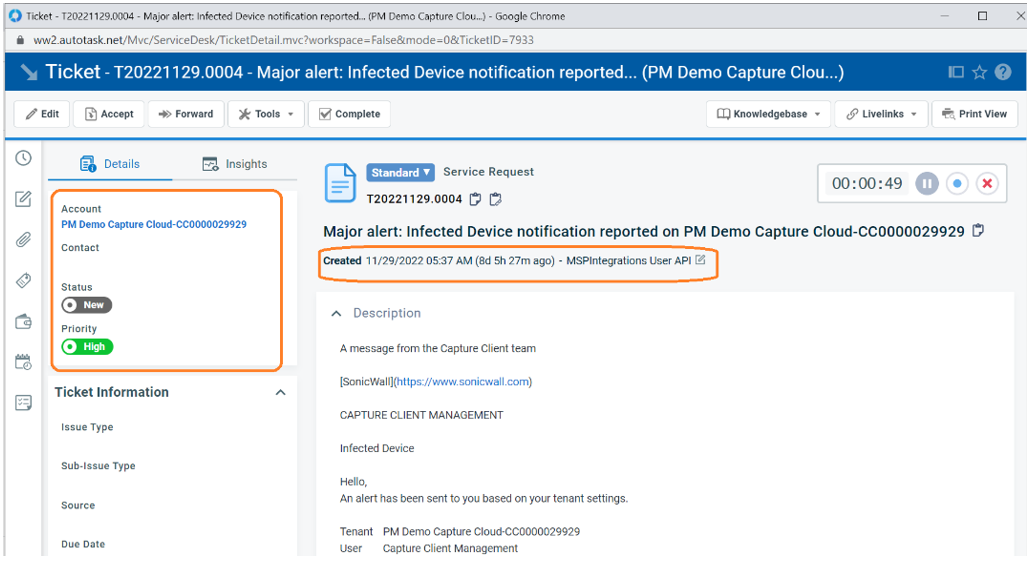
- Click on Account to verify the Tenant details under UDF.
Related Articles
- SentinelOne agent command line tool
- Capture Client Agent Return Codes - Phase 1
- Configure Email and Notification(Alerts) in Capture Client for Tenants


 YES
YES NO
NO