


How to configure and use the Auto Export tool
 03/26/2020
  1,049 People found this article helpful
 455,357 Views

Description
How to configure and use the Auto Export tool
Resolution
This article applies only to MS Windows environments, but to all GMS/Analyzer versions (installed as VA or on Windows OS)
How to configure the tool
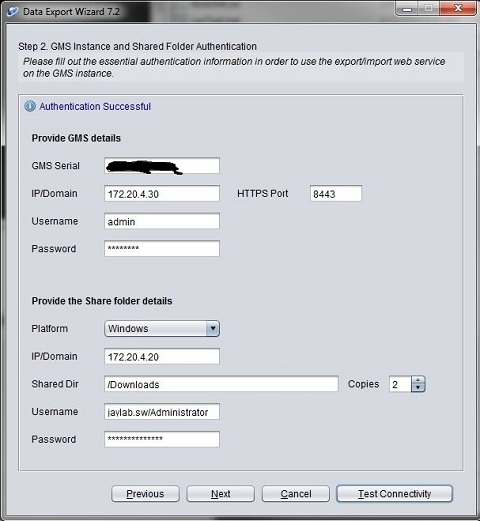
From top to bottom fill in the following information:
GMS/Analyzer serial number
IP address of GMS/Analyzer
Username: admin
Password
HTTPS Port (default is 8443, however this can vary based on configuration)
Platform: The lab is Windows based and the network share is hosted on a Windows 2012 R2 server, hence Windows.
IP address of the host
Shared Dir: Even though it is a Windows environment / has to be used, due to the way the Auto Export tool is programmed. The FQDN is not needed.
Username: domainname/username
Password:
When all is filled out, test the connectivity and then hit the “Next” button in order to select, what the tool shall export to the network share. Then save the script as well.
How to use the tool
What we configured, is just a script, it’s an *.ec file which is encrypted and can only be used by the auto export tool.
In order to actually kick off an export of the backups, you will have to configure a scheduled task with the MS Task Scheduler:
Open the Task Scheduler and create a new task. Give it a name and go to the “Actions” tab.
Configure it as shown in the screenshot:
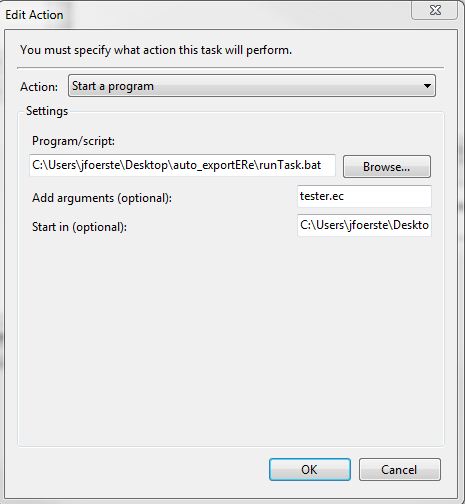
The “Add arguments” section needs to be filled out with the name of the *.ec file you have configured earlier.
The “Start in” field contains the location of runTask.bat and has to be filled out as well.
You can configure schedules of this task to your liking.
Related Articles
- NSM: How to Export Firewall Tech Support Report(TSR) from NSM
- NSM - How to configure SDWAN for Hub and Spoke VPN
- How to export CSC users on NSM
 YES
YES NO
NO