-
Products
-
SonicPlatform
SonicPlatform is the cybersecurity platform purpose-built for MSPs, making managing complex security environments among multiple tenants easy and streamlined.
Discover More
-
-
Solutions
-
Federal
Protect Federal Agencies and Networks with scalable, purpose-built cybersecurity solutions
Learn MoreFederalProtect Federal Agencies and Networks with scalable, purpose-built cybersecurity solutions
Learn More - Industries
- Use Cases
-
-
Partners
-
Partner Portal
Access to deal registration, MDF, sales and marketing tools, training and more
Learn MorePartner PortalAccess to deal registration, MDF, sales and marketing tools, training and more
Learn More - SonicWall Partners
- Partner Resources
-
-
Support
-
Support Portal
Find answers to your questions by searching across our knowledge base, community, technical documentation and video tutorials
Learn MoreSupport PortalFind answers to your questions by searching across our knowledge base, community, technical documentation and video tutorials
Learn More - Support
- Resources
- Capture Labs
-
- Company
- Contact Us
Wireless Client Bridge Configuration - Inbuilt Wireless


Description
The wireless appliance provides Internet/network access by bridging wirelessly to another SonicWALL Wireless device / SonicPoint access point/ External Hotspot (eg Mobile Phone), selected on the Wireless > Status page. Selecting Wireless Client Bridge mode allows for the possibility of secure network communications between physically separate locations, without the need for long and costly Ethernet cabling runs, and we can route our Internet traffic through the Wireless Interface.
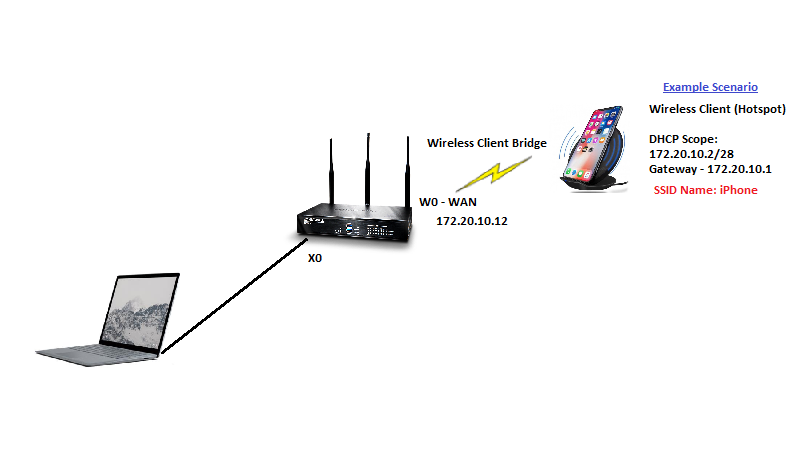
Resolution
Configuring Wireless Client Bridge Radio Mode
CAUTION: Changing the radio role from Access Point mode to Wireless Client Bridge mode disconnects any existing wireless clients.
To configure wireless settings for Wireless Client Bridge mode for SonicOS, complete the following steps:
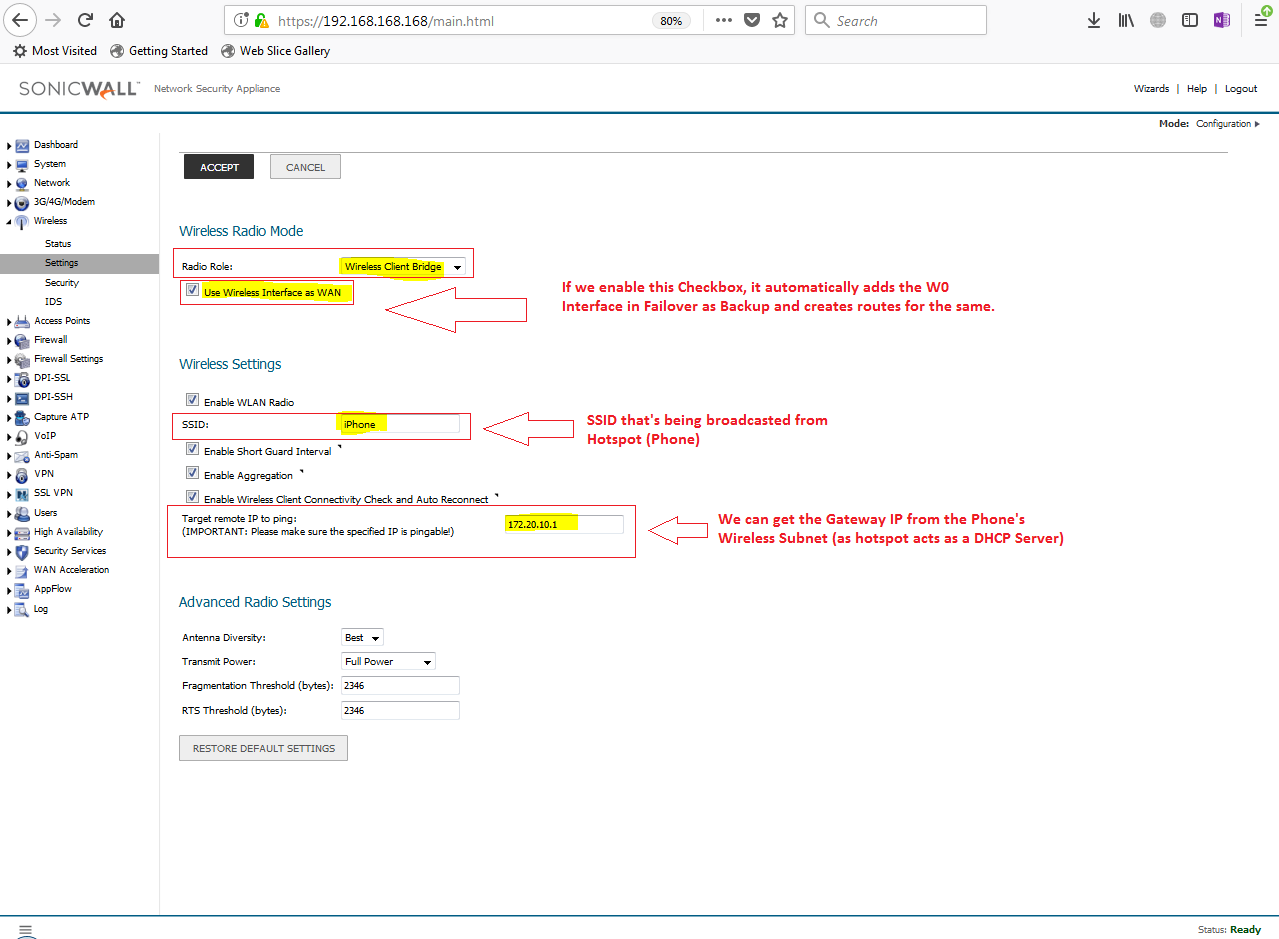
- To enable Wireless networking on this device, select Enable WLAN Radio. Select Radio Mode as "Wireless Client Bridge". You can enable the checkbox "Use Wireless Interface as WAN" for the automatic adding of the W0 interface in WAN LB & Failover.
- Enter your Service Set Identification (SSID) in the SSID text-field.
- Click the Channel drop-down menu, then select the desired channel.
- Select Enable Short Guard Interval to enable a higher Tx/Rx rate (if the client supports it). This option only applies for 802.11n mode.
- Select Enable Aggregation to aggregate the wireless packets on L2 to earn higher performance (if the client supports it). This option only applies for 802.11n mode
- Select Enable Wireless Client Connectivity Check and Auto Reconnect to periodically check the wireless client connectivity by pinging a user defined IP address. In case of connection lost, complete an auto reconnection. Enter the target remote IP address to ping in the text-field.
- Click the Antenna Diversity drop-down menu, then select one of the following:
- Best
- Antenna 1 — Antenna closest to the power supply
- Antenna 2 - Click the Transmit Power drop-down menu, then select one of the following:
- High
- Medium
- Low
- Lowest - Enter the desired fragmentation threshold (in bytes) in the Fragmentation Threshold text-field.
- Enter the desired Request-to-Send (RTS) threshold (in bytes) in the RTS Threshold text-field
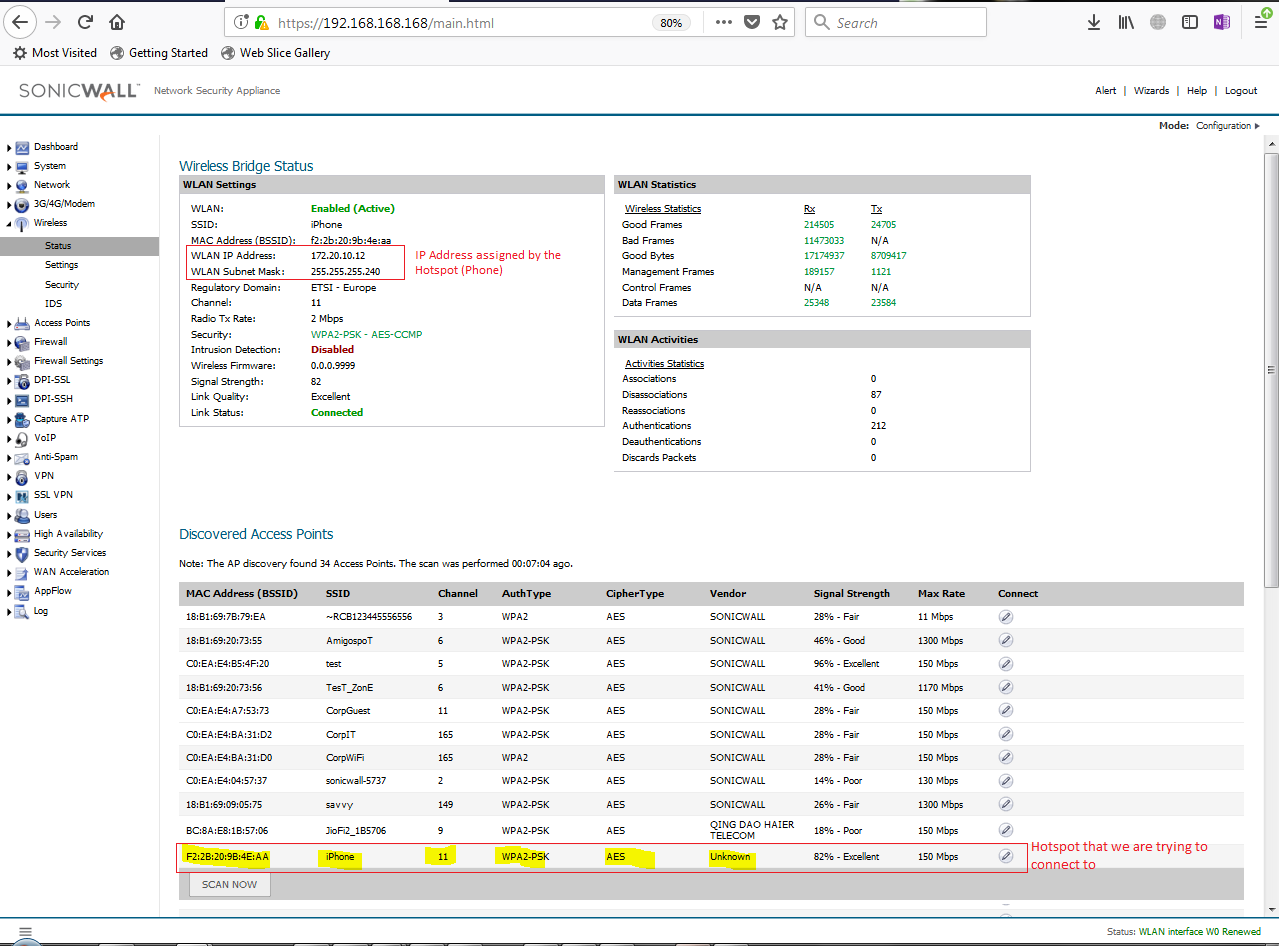
Once the Information is correct, we can verify the WLAN IP on the Wireless Status Page.
Configuration Steps (Snapshots) :
- Under Wireless > Settings (Selecting the Radio Role, SSID)
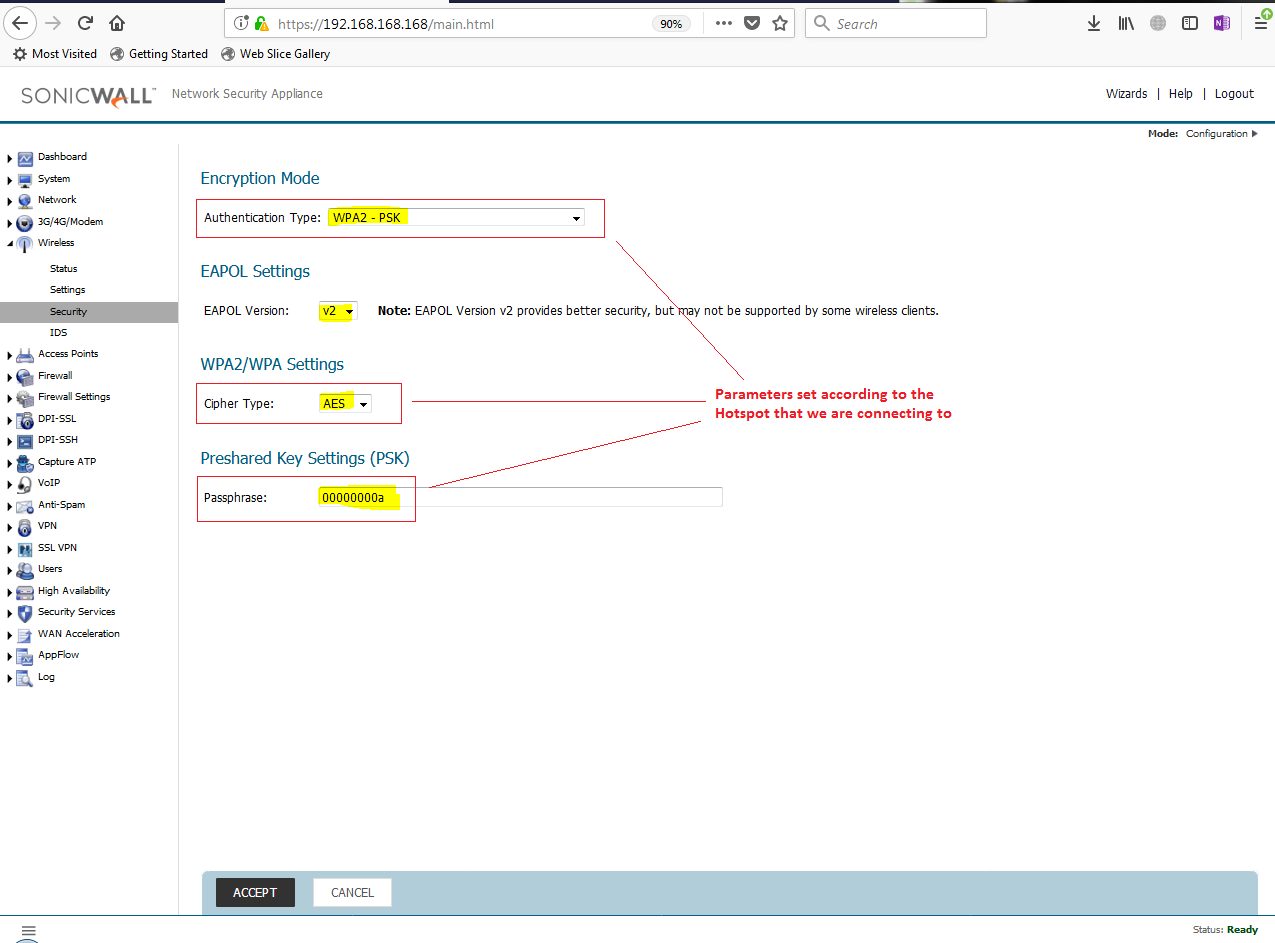
- Under Wireless > Security (Putting the Parameters for the SSID)
- Under Wireless > Status (Checking the WLAN IP (Received from the Hotspot)
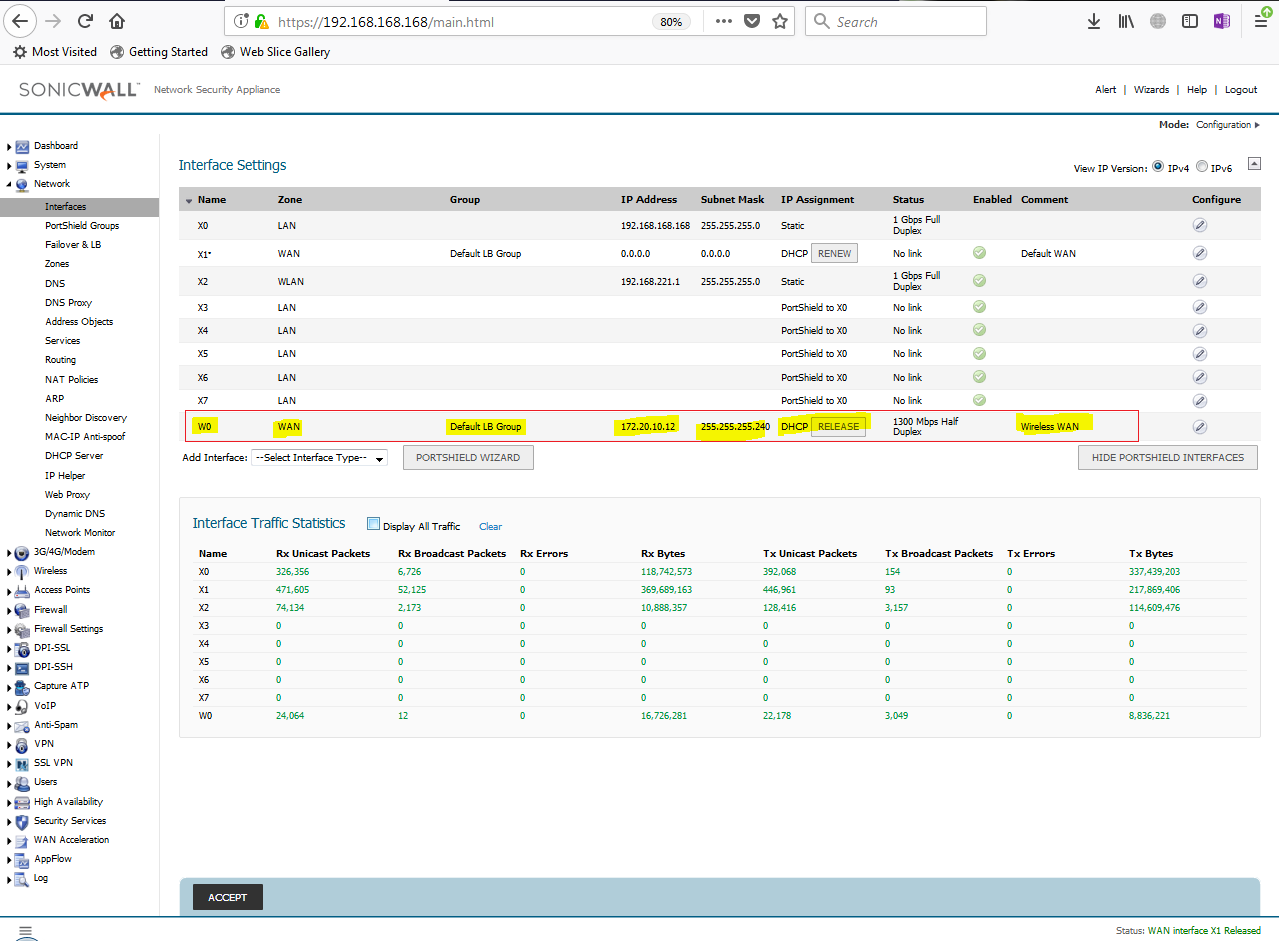
- Network > Interfaces (W0 Interface Status)
- System > Diagnostics Test
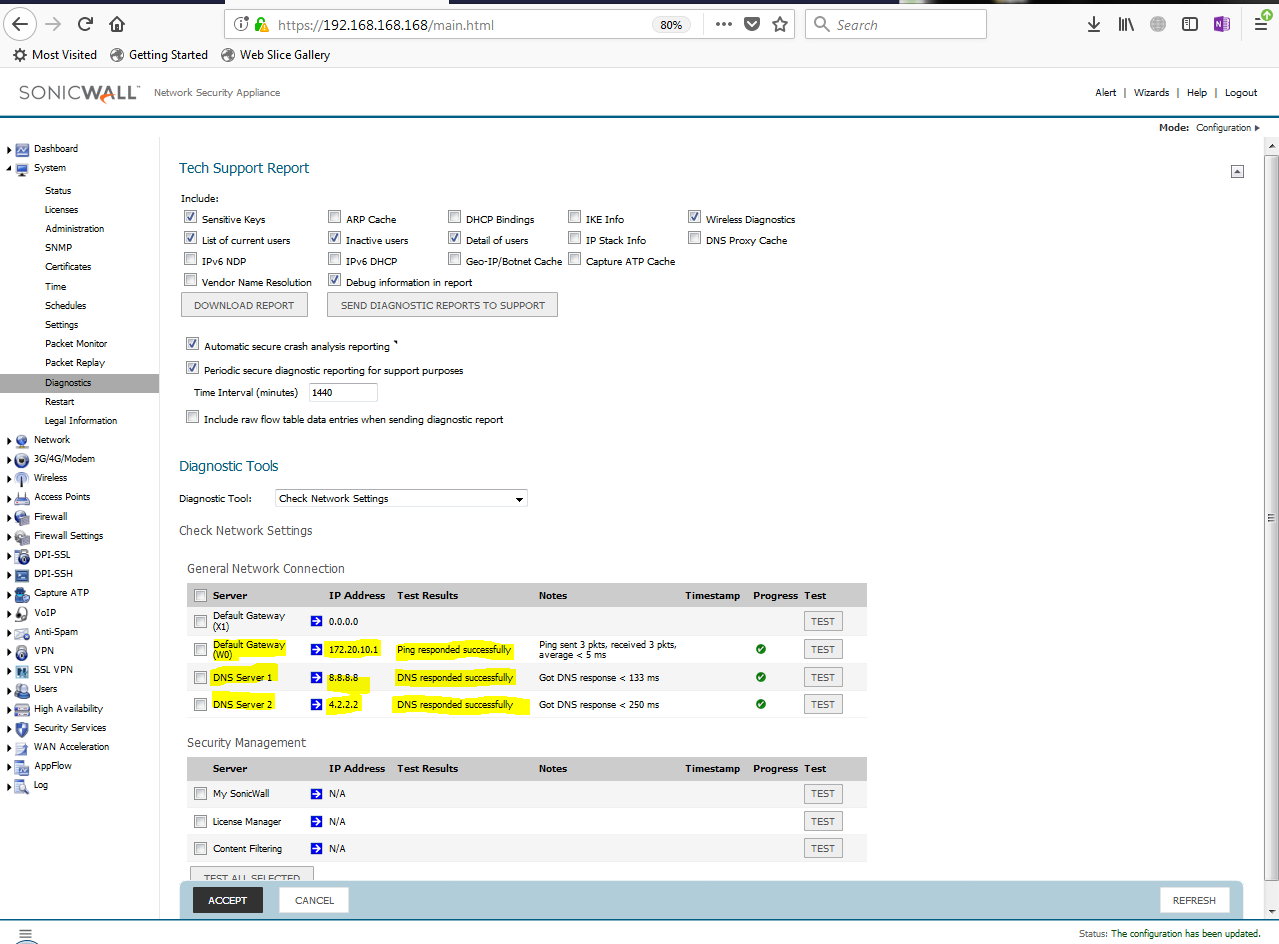
This way the Wireless Client Bridge can be used for the Wireless Connectivity.
Related Articles
- Error:"Invalid API Argument" when modifying the access rules
- Cysurance Partner FAQ
- Configure probe monitoring for WAN Failover and Loadbalancing - SonicWall UTM


 YES
YES NO
NO