-
Products
-
SonicPlatform
SonicPlatform is the cybersecurity platform purpose-built for MSPs, making managing complex security environments among multiple tenants easy and streamlined.
Discover More
-
-
Solutions
-
Federal
Protect Federal Agencies and Networks with scalable, purpose-built cybersecurity solutions
Learn MoreFederalProtect Federal Agencies and Networks with scalable, purpose-built cybersecurity solutions
Learn More - Industries
- Use Cases
-
-
Partners
-
Partner Portal
Access to deal registration, MDF, sales and marketing tools, training and more
Learn MorePartner PortalAccess to deal registration, MDF, sales and marketing tools, training and more
Learn More - SonicWall Partners
- Partner Resources
-
-
Support
-
Support Portal
Find answers to your questions by searching across our knowledge base, community, technical documentation and video tutorials
Learn MoreSupport PortalFind answers to your questions by searching across our knowledge base, community, technical documentation and video tutorials
Learn More - Support
- Resources
- Capture Labs
-
- Company
- Contact Us
VPN: How to restrict traffic over a site to site VPN tunnel using NAT over VPN(SonicOS Enhanc


Description
VPN: How to restrict traffic over a site to site VPN tunnel using NAT over VPN(SonicOS Enhanced)
Resolution
Feature/Application:
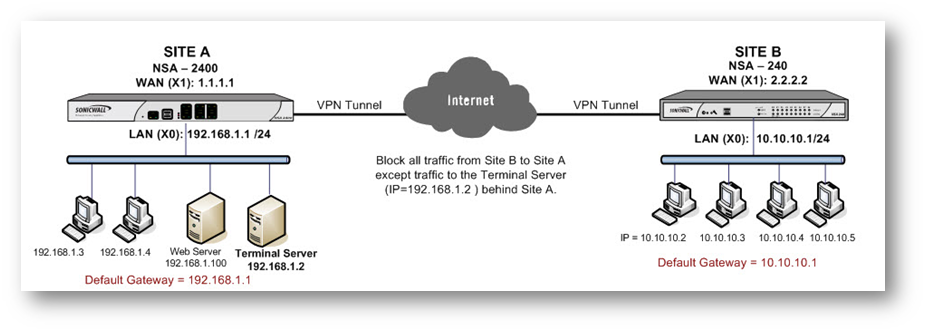
This article illustrates how to restric traffic over a site to site VPN tunnel using the Apply NAT Policies feature in SonicWall VPN GUI.
Site A (NSA 2400)
WAN (X1) IP: 1.1.1.1
LAN (X0) IP: 192.168.1.0/24Site B (NSA 240)
WAN (X1) IP: 2.2.2.2
LAN (X0) IP: 10.10.10.0/24Terminal Server IP Address: 192.168.1.2
Subnet Mask: 255.255.255.0
Default Gateway: 192.168.1.1 (X0 IP)Default gateway of hosts
10.10.10.1 (X0 IP)
Procedure:
Site A (NSA 2400) configuration:
Step 1. Login to the SonicWall Management Interface
Step 2. Navigate to the Network > Address Objects page.
Step 3. Create a new Address Object named "Remote Site LAN" with details as per the screenshot:
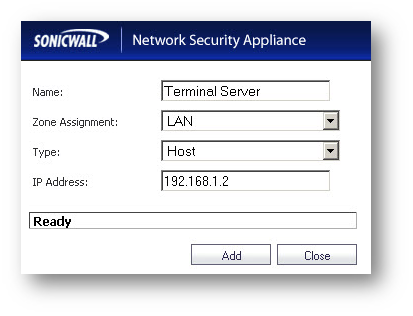
Step 4. Create a new Address Object named "Terminal Server" with details as per the screenshot:
Step 5. Navigate to the VPN > Settings page.
Step 6. Create a VPN policy with details as per the following screenshots.
Step 7. Click OK to save.
Step 8. Navigate to the Network > NAT Policies page.
Step 9. Select the Custom Policies radio button.
Step 10.Edit the automatically created NAT Policy and change the Translated Destination to "Original".

Site B (NSA 240) configuration:
Step 1. Login to the SonicWall Management Interface
Step 2. Navigate to the Network > Address Objects page.
Step 3. Create a new Address Object named "Remote Site Terminal Server" with details as per the screenshot:
Step 4. Click OK to save.
Step 5. Navigate to the VPN > Settings page.
Step 6. Create a VPN policy with details as per the following screenshots.
Step 7. Click OK to save.
The Tunnel have to be activated by initiating a ping from a host behind the NSA 240 to the Terminal Server IP 192.168.1.2.
How to Test:
- Test by pinging other hosts behind the NSA 2400 and it should fail.
- Likewise, hosts behind the NSA 2400 will be able to ping all hosts behind the NSA 240.
Related Articles
- Error:"Invalid API Argument" when modifying the access rules
- Cysurance Partner FAQ
- Configure probe monitoring for WAN Failover and Loadbalancing - SonicWall UTM
Categories
- Firewalls > TZ Series
- Firewalls > SonicWall SuperMassive E10000 Series
- Firewalls > SonicWall SuperMassive 9000 Series
- Firewalls > SonicWall NSA Series


 YES
YES NO
NO