-
Products
-
SonicPlatform
SonicPlatform is the cybersecurity platform purpose-built for MSPs, making managing complex security environments among multiple tenants easy and streamlined.
Discover More
-
-
Solutions
-
Federal
Protect Federal Agencies and Networks with scalable, purpose-built cybersecurity solutions
Learn MoreFederalProtect Federal Agencies and Networks with scalable, purpose-built cybersecurity solutions
Learn More - Industries
- Use Cases
-
-
Partners
-
Partner Portal
Access to deal registration, MDF, sales and marketing tools, training and more
Learn MorePartner PortalAccess to deal registration, MDF, sales and marketing tools, training and more
Learn More - SonicWall Partners
- Partner Resources
-
-
Support
-
Support Portal
Find answers to your questions by searching across our knowledge base, community, technical documentation and video tutorials
Learn MoreSupport PortalFind answers to your questions by searching across our knowledge base, community, technical documentation and video tutorials
Learn More - Support
- Resources
- Capture Labs
-
- Company
- Contact Us
VPN: Configuring Site to Site VPN using the Wizards/Quick Configuration feature on SonicWall


Description
The VPN Policy Wizards/Quick Configuration section walks you step-by-step through the configuration of Site to Site VPN on the SonicWall. After the configuration is completed, the wizard creates the necessary VPN settings for the selected VPN policy. You can use the SonicWall Management Interface for optional advanced configuration options.
Resolution
Resolution for SonicOS 7.X
This release includes significant user interface changes and many new features that are different from the SonicOS 6.5 and earlier firmware. The below resolution is for customers using SonicOS 7.X firmware.
Using the VPN Quick Configuration to Configure Site to Site VPN using Preshared Secret
- Click Wizards button on the right side of the top Navigation menu.

- In the Configuration Guide select VPN Guide and click Next.

- In the VPN Guide page, select Site-to-Site and click Next.
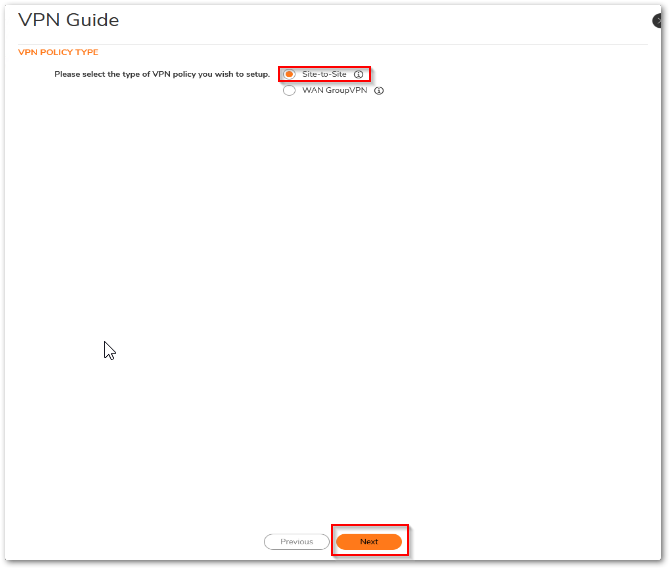
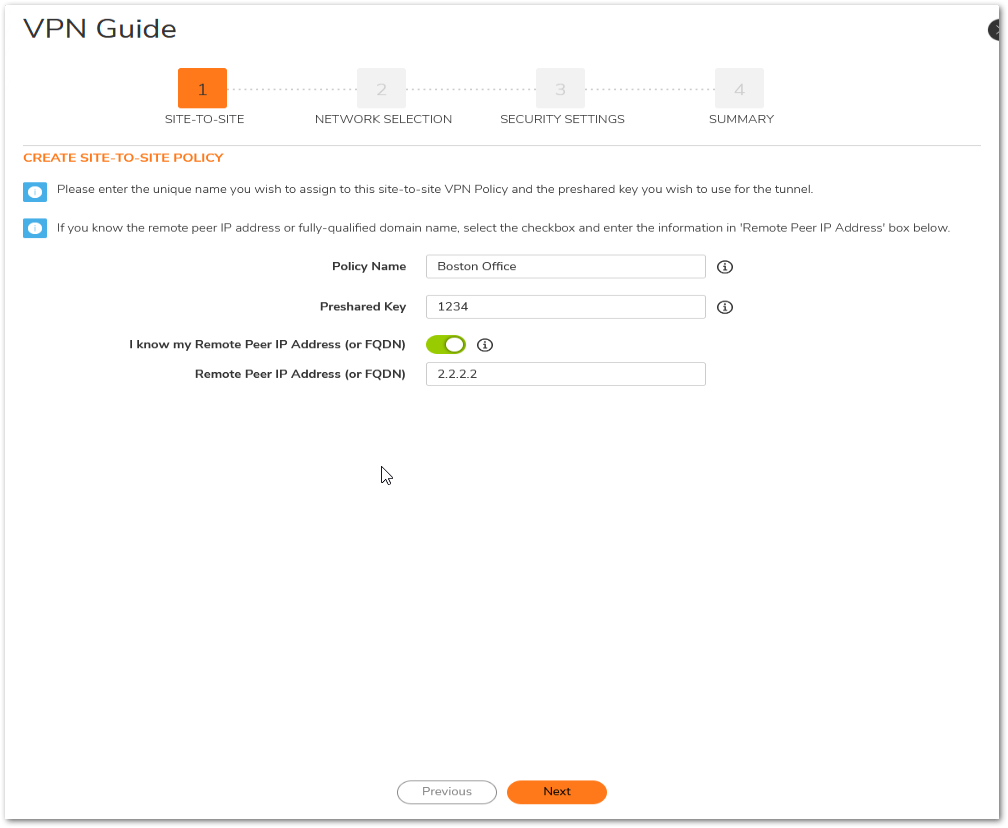
- In the Create Site-to-Site Policy page, enter the following information.
- Policy Name: Enter a name you can use to refer to the policy.
 EXAMPLE: Boston Office.
 - Preshared Key: Enter a character string to use to authenticate traffic during IKE Phase 1 negotiation. You can use the default SonicWall generated Preshared Key.
- I know my Remote Peer IP Address (or FQDN): If you check this option, this SonicWall can initiate the contact with the named remote peer. If you do not check this option, the peer must initiate contact to create a VPN tunnel. This device will use aggressive mode for IKE negotiation.
- Remote Peer IP Address (or FQDN): If you checked the option above, enter the IP address or Fully Qualified Domain Name (FQDN) of the remote peer.
 EXAMPLE:boston.yourcompany.com
- Policy Name: Enter a name you can use to refer to the policy.
- Click Next.
- In the Network Selection page, select the local and destination resources this VPN will be connecting.
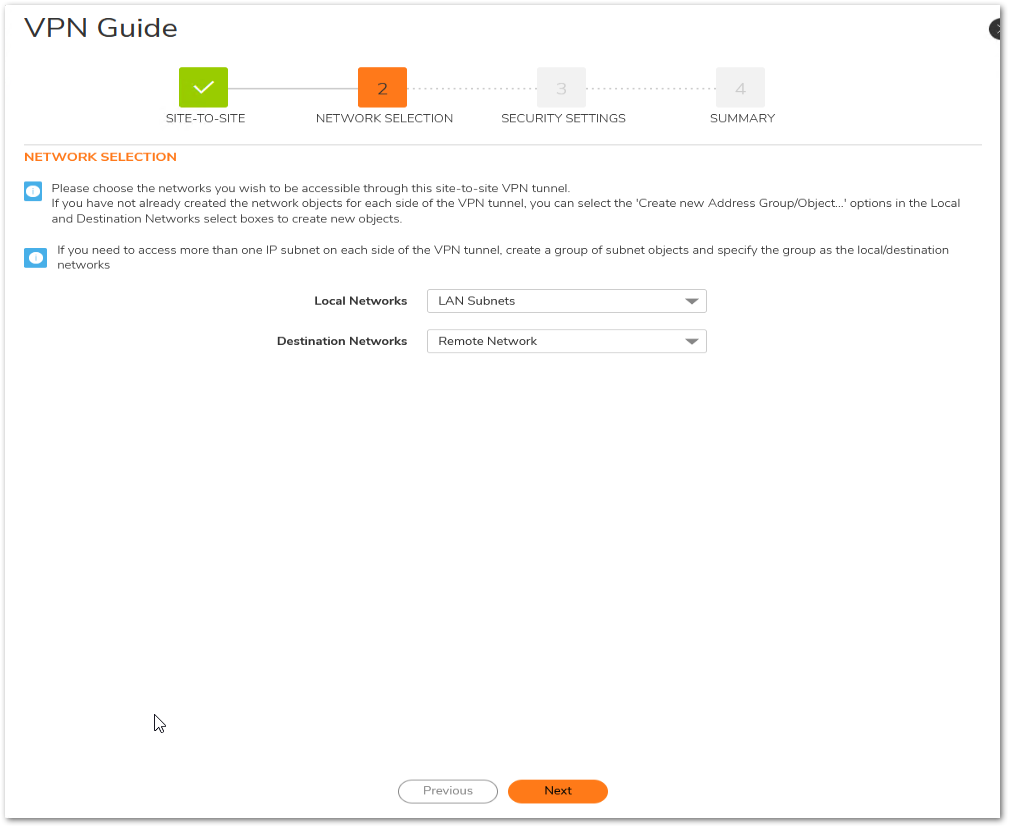
- Local Networks: Select the local network resources protected by this SonicWall that you are connecting with this VPN. You can select any address object or group on the device, including networks, subnets, individual servers, and interface IP addresses. If the object or group you want has not been created yet, select Create Object or Create Group. Create the new object or group in the dialog box that pops up. Then select the new object or group.
 EXAMPLE: select LAN Subnets.
 - Destination Networks: Select the network resources on the destination end of the VPN Tunnel. If the object or group does not exist, select Create new Address Object or Create new Address Group. When creating an Address Object, make sure the Zone is VPN. If the remote network has multiple network segments and you wish to include this in the VPN, create multiple Address Objects and create a group to add them to.

- Local Networks: Select the local network resources protected by this SonicWall that you are connecting with this VPN. You can select any address object or group on the device, including networks, subnets, individual servers, and interface IP addresses. If the object or group you want has not been created yet, select Create Object or Create Group. Create the new object or group in the dialog box that pops up. Then select the new object or group.
- Click Next.
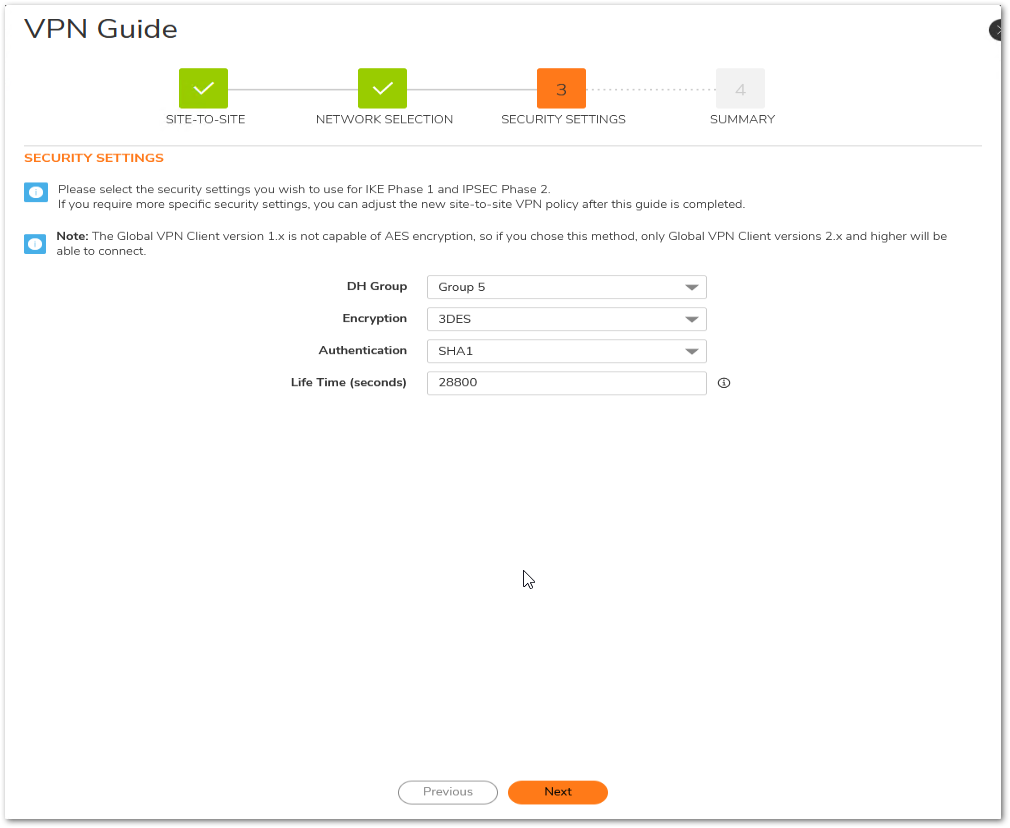
- In the IKE Security Settings page, select the security settings for IKE Phase1 & IKE Phase2 negotiations and for the VPN tunnel. You can use the default settings.
- DH Group: The Diffie-Hellman (DH) group are the group of numbers used to create the key pair. Each subsequent group uses larger numbers to start with. You can choose Group 1, Group 2, or Group 5. The VPN Uses this during IKE negotiation to create the key pair.
- Encryption: This is the method for encrypting data through the VPN Tunnel. The methods are listed in order of security. DES is the least secure and the and takes the least amount of time to encrypt and decrypt. AES-256 is the most secure and takes the longest time to encrypt and decrypt. You can choose. DES, 3DES, AES-128, or AES-256. The VPN uses this for all data through the tunnel.
- Authentication: This is the hashing method used to authenticate the key, once it is exchanged during IKE negotiation. You can choose MD5 or SHA-1.
- Life Time (seconds): This is the length of time the VPN tunnel stays open before needing to re-authenticate. The default is eight hours (28800).
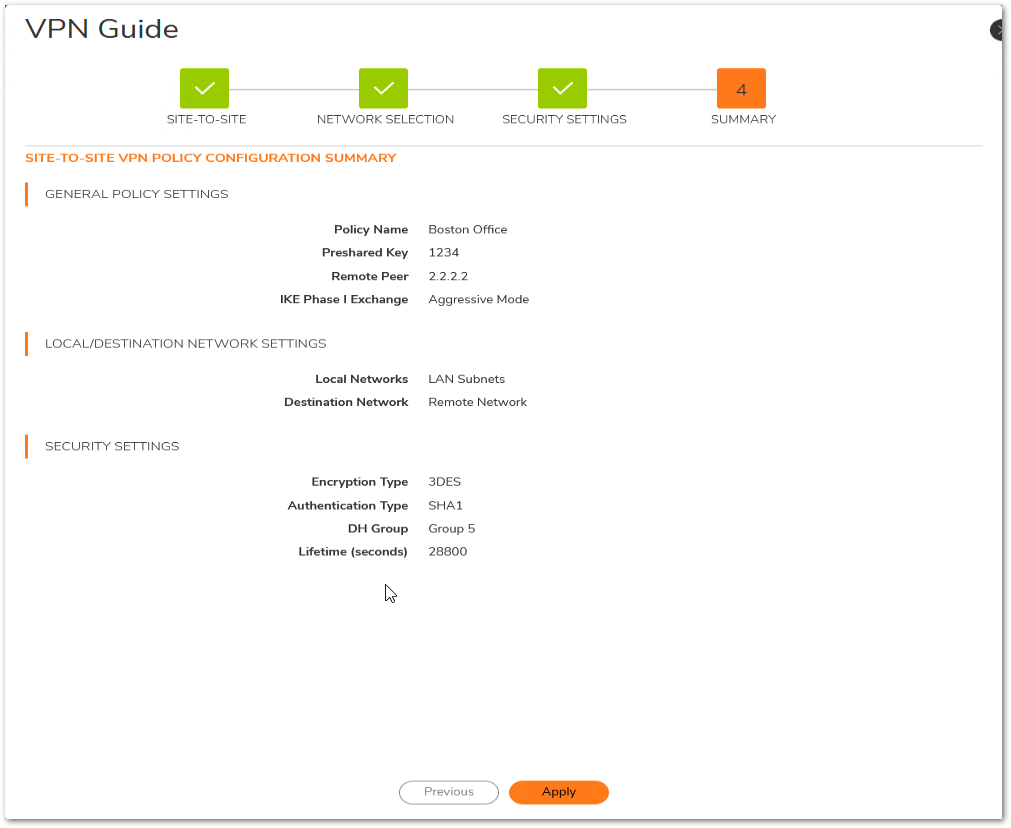
- The Configuration Summary page details the settings that will be pushed to the security appliance when you apply the configuration.
- Click Apply to create the VPN.
How to Test
To verify that your VPN tunnel is working properly, it is necessary to ping the IP address of a computer on the remote network. By pinging the remote network, you send data packets to the remote network and the remote network replies that it has received the data packets. Your administrator supplies the remote IP address that you can use for testing. The following steps explain how to ping a remote IP address.
- Locate the Windows Start button in the lower left hand corner of the desktop operating system. Click Start, then Run, and then type command in the open filepath box. A DOS window opens to the C:> prompt.
- Type ping, then the IP address of the host computer. Press Enter to begin the data communication.
- A successful ping communication returns data packet information to you. An unsuccessful ping returns a message of Request Timed Out.
Resolution for SonicOS 6.5
This release includes significant user interface changes and many new features that are different from the SonicOS 6.2 and earlier firmware. The below resolution is for customers using SonicOS 6.5 firmware.
Using the VPN Quick Configuration to Configure Site to Site VPN using Preshared Secret
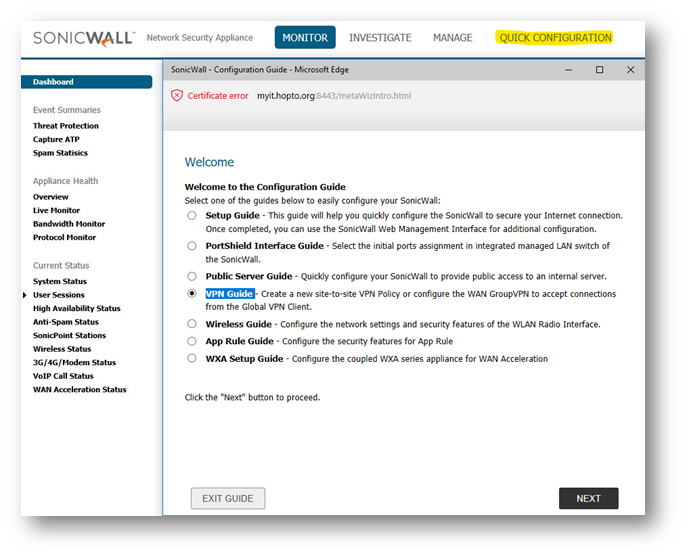
- Click Quick Configuration on the top Navigation menu.
- In the Welcome to the SonicWall Configuration Guide select VPN Guide and click Next.
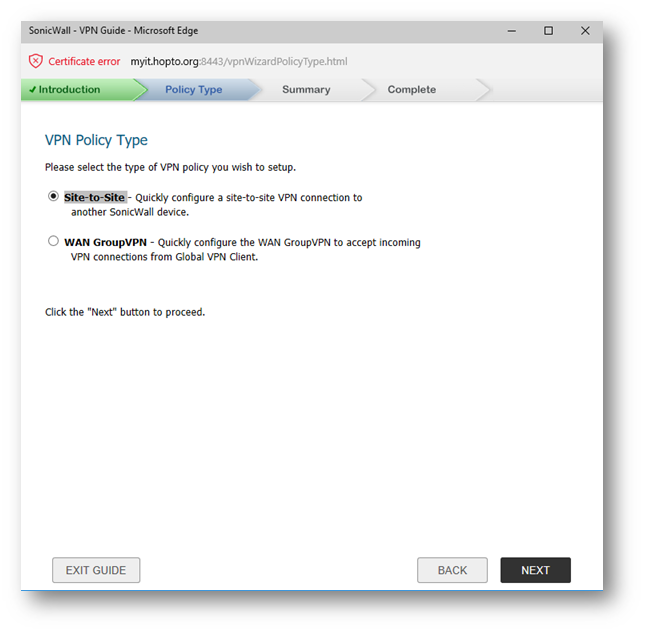
- In the VPN Policy Type page, select Site-to-Site and click Next.
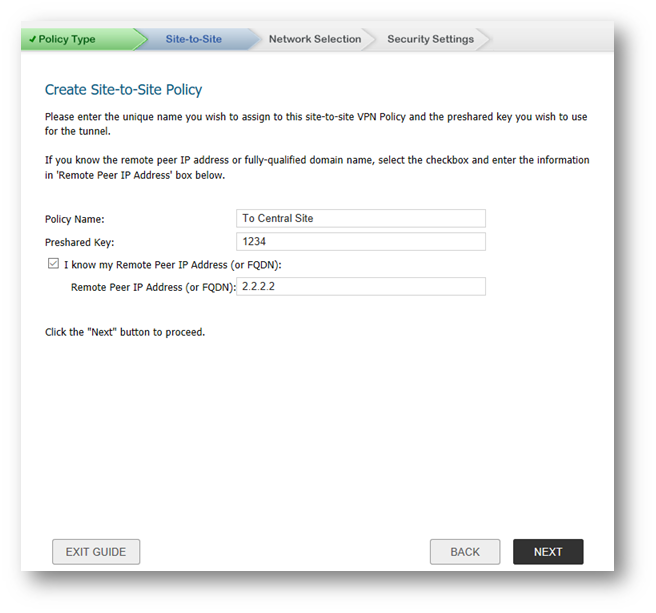
- In the Create Site-to-Site Policy page, enter the following information.
- Policy Name: Enter a name you can use to refer to the policy.
 EXAMPLE: Boston Office.
 - Preshared Key: Enter a character string to use to authenticate traffic during IKE Phase 1 negotiation. You can use the default SonicWall generated Preshared Key.
- I know my Remote Peer IP Address (or FQDN): If you check this option, this SonicWall can initiate the contact with the named remote peer. If you do not check this option, the peer must initiate contact to create a VPN tunnel. This device will use aggressive mode for IKE negotiation.
- Remote Peer IP Address (or FQDN): If you checked the option above, enter the IP address or Fully Qualified Domain Name (FQDN) of the remote peer.
 EXAMPLE:boston.yourcompany.com
- Policy Name: Enter a name you can use to refer to the policy.
- Click Next.
- In the Network Selection page, select the local and destination resources this VPN will be connecting.
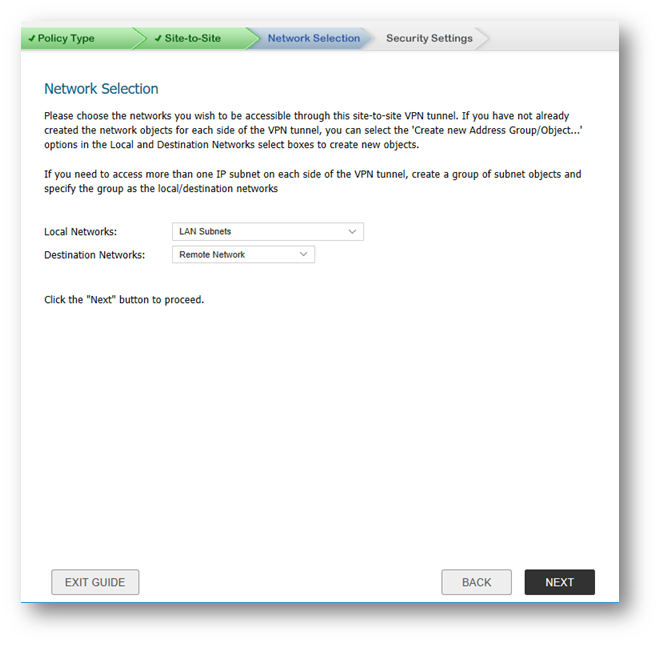
- Local Networks: Select the local network resources protected by this SonicWall that you are connecting with this VPN. You can select any address object or group on the device, including networks, subnets, individual servers, and interface IP addresses. If the object or group you want has not been created yet, select Create Object or Create Group. Create the new object or group in the dialog box that pops up. Then select the new object or group.
 EXAMPLE: select LAN Subnets.
 - Destination Networks: Select the network resources on the destination end of the VPN Tunnel. If the object or group does not exist, select Create new Address Object or Create new Address Group. When creating an Address Object, make sure the Zone is VPN. If the remote network has multiple network segments and you wish to include this in the VPN, create multiple Address Objects and create a group to add them to.

- Local Networks: Select the local network resources protected by this SonicWall that you are connecting with this VPN. You can select any address object or group on the device, including networks, subnets, individual servers, and interface IP addresses. If the object or group you want has not been created yet, select Create Object or Create Group. Create the new object or group in the dialog box that pops up. Then select the new object or group.
- Click Next.
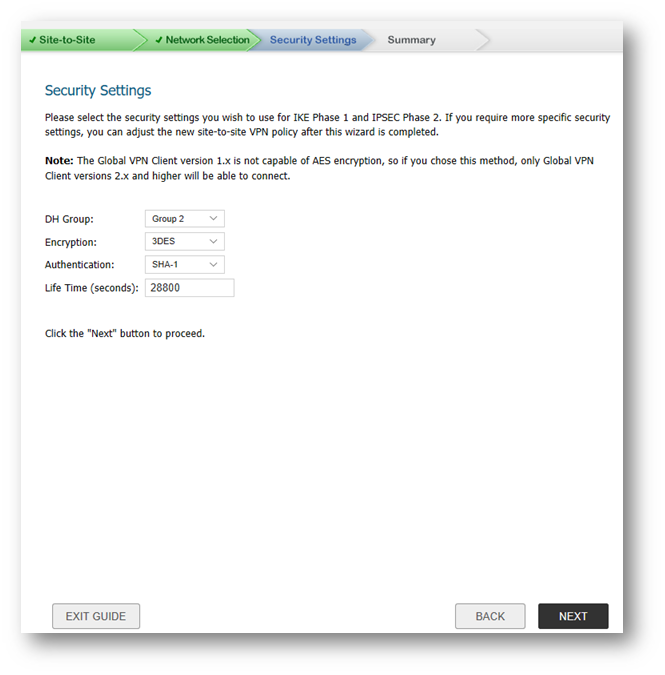
- In the IKE Security Settings page, select the security settings for IKE Phase1 & IKE Phase2 negotiations and for the VPN tunnel. You can use the default settings.
- DH Group: The Diffie-Hellman (DH) group are the group of numbers used to create the key pair. Each subsequent group uses larger numbers to start with. You can choose Group 1, Group 2, or Group 5. The VPN Uses this during IKE negotiation to create the key pair.
- Encryption: This is the method for encrypting data through the VPN Tunnel. The methods are listed in order of security. DES is the least secure and the and takes the least amount of time to encrypt and decrypt. AES-256 is the most secure and takes the longest time to encrypt and decrypt. You can choose. DES, 3DES, AES-128, or AES-256. The VPN uses this for all data through the tunnel.
- Authentication: This is the hashing method used to authenticate the key, once it is exchanged during IKE negotiation. You can choose MD5 or SHA-1.
- Life Time (seconds): This is the length of time the VPN tunnel stays open before needing to re-authenticate. The default is eight hours (28800).
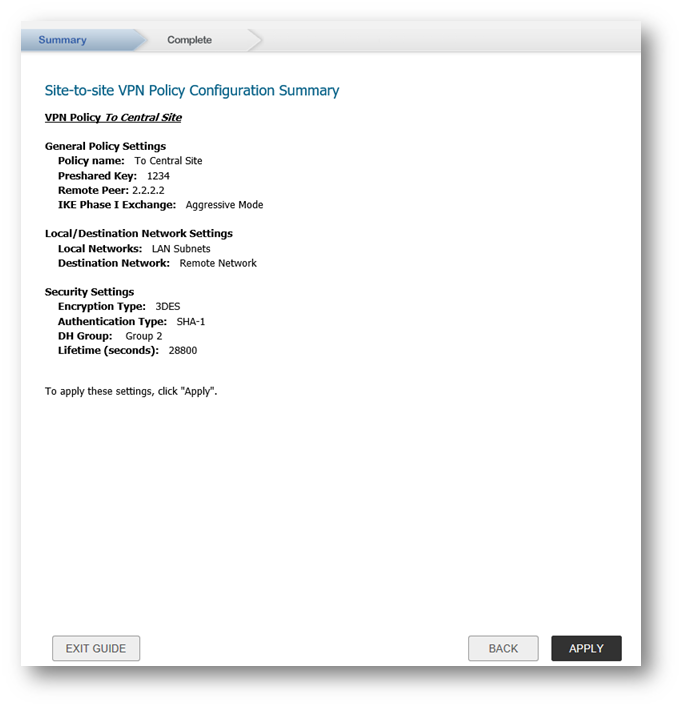
- The Configuration Summary page details the settings that will be pushed to the security appliance when you apply the configuration.
- Click Apply to create the VPN.
How to Test
To verify that your VPN tunnel is working properly, it is necessary to ping the IP address of a computer on the remote network. By pinging the remote network, you send data packets to the remote network and the remote network replies that it has received the data packets. Your administrator supplies the remote IP address that you can use for testing. The following steps explain how to ping a remote IP address.
- Locate the Windows Start button in the lower left hand corner of the desktop operating system. Click Start, then Run, and then type command in the open filepath box. A DOS window opens to the C:> prompt.
- Type ping, then the IP address of the host computer. Press Enter to begin the data communication.
- A successful ping communication returns data packet information to you. An unsuccessful ping returns a message of Request Timed Out.
Related Articles
- How to Block Google QUIC Protocol on SonicOSX 7.0?
- How to block certain Keywords on SonicOSX 7.0?
- How internal Interfaces can obtain Global IPv6 Addresses using DHCPv6 Prefix Delegation
Categories
- Firewalls > NSa Series > VPN
- Firewalls > NSv Series > VPN
- Firewalls > TZ Series > VPN


 YES
YES NO
NO