-
Products
-
SonicPlatform
SonicPlatform is the cybersecurity platform purpose-built for MSPs, making managing complex security environments among multiple tenants easy and streamlined.
Discover More
-
-
Solutions
-
Federal
Protect Federal Agencies and Networks with scalable, purpose-built cybersecurity solutions
Learn MoreFederalProtect Federal Agencies and Networks with scalable, purpose-built cybersecurity solutions
Learn More - Industries
- Use Cases
-
-
Partners
-
Partner Portal
Access to deal registration, MDF, sales and marketing tools, training and more
Learn MorePartner PortalAccess to deal registration, MDF, sales and marketing tools, training and more
Learn More - SonicWall Partners
- Partner Resources
-
-
Support
-
Support Portal
Find answers to your questions by searching across our knowledge base, community, technical documentation and video tutorials
Learn MoreSupport PortalFind answers to your questions by searching across our knowledge base, community, technical documentation and video tutorials
Learn More - Support
- Resources
- Capture Labs
-
- Company
- Contact Us
Upgrade to Email Security Appliance's Firmware is halted/stuck/not working.


Description
Issue with Firmware Upgrade
Cause
Firmware upgrade is halted/stuck/not working.
Resolution
Upgrade to Email Security Appliance’s Firmware is halted/stuck/not working.
If you notice that the upgrade process is taking more than a couple of hours, it may not be doing the upgrade at all.
To fix the issue check the following steps:
Download most recent firmware from your mysonicwall.com account (under Download Center).
 NOTE: While upgrading Sonicwall Email Security to latest firmware , make sure to follow the right upgrade path. Please refer the link below.
https://www.sonicwall.com/en-us/support/knowledge-base/180511141925681
- Make sure you have downloaded the correct version from your mysonicwall based on your model number.
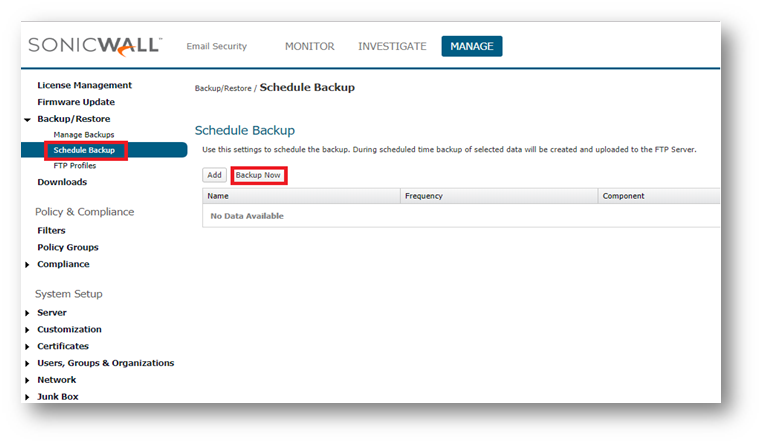
- Take Backup of current configuration under Manage | Backup/restore | Scheduled Backup . Click on the "Backup now" Button.

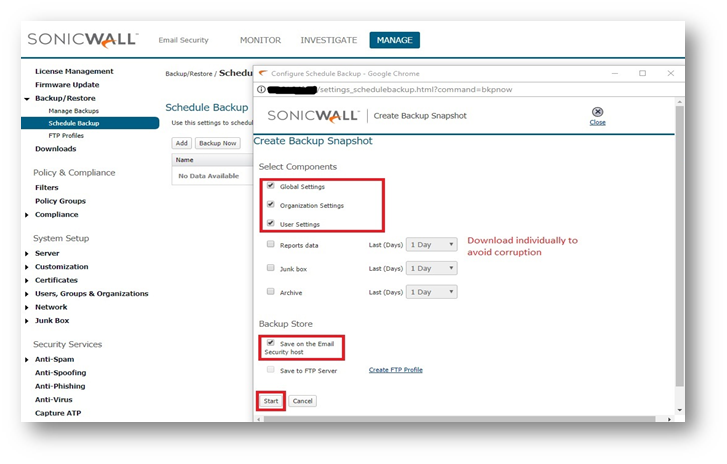
- You will get a dialog box as below. Check Global Settings, Organization Settings, User Settings (these three together) and under Backup Store, check “Save on the Email Security host “(This is going to back up your data in Email security host).
- Click on start, this will start backing up on your email security host.

Recommended: Individually backup report data, junk box and archive choosing the required days of data.
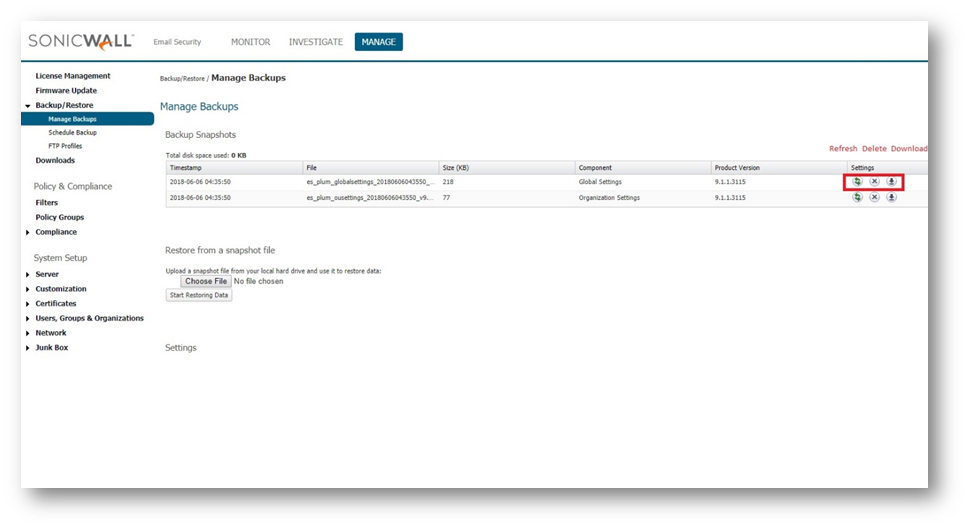
- Once the backup is complete, you will find these backed up data under Backup/Restore | Manage Backups, showing the time stamp of the backup, size, component and product version.
- Under settings you have option to refresh, delete or download the backup. Clicking on Download button, downloads the data to local drive.

- Run the upgrade only from a local LAN and or over the internet or a VPN connection. ( meaning your workstation where you have the downloaded file and Email security device should be on the same Network- LAN)
- SSH into the appliance using the putty software. (You can download it from internet)
- Login to putty giving your IP address of email security server and port 22
- At the login prompt type “snwlcli”
- On next login use admin username and password as on your ES webUI.
- You should get a “SNWLCLI:>” prompt
- stop all services and then start only tomcat service using the command
- snwlcli>stop appservices
- snwlcli>start tomcat ( so that you could login to UI to apply patch file)
- Login back to the web interface and apply the patch under Manage | Firmware update . Choose the firmware and apply patch.
- ES appliance required re-boot after applying the patch upgrade. Run a continuous ping to ES appliance (ping –t x.x.x.x.) to monitor re boot status.
Once the device comes back after the re-boot it should have the latest/ new firmware that you applied on it.
Please contact technical support if your upgrade fails after following all the steps mentioned in this article.
See Also:
Migration of settings from one server to another
How to upgrade firmware on Email security Appliances
 CAUTION: Do not edit the firmware file name.
Related Articles
- Email Security: How to download the Outlook Junk Tool?
- Configuring SonicWall Email Security to Ensure Maximum effectiveness, High Throughput
- How to exclude the domain from DHA scanning?
Categories
- Email Security > Email Security Appliance
- Email Security > Email Security Software
- Email Security > Hosted Email Security


 YES
YES NO
NO