


-
Products
-
Gen 7 Firewalls
SonicWall's Gen 7 platform-ready firewalls offer performance with stability and superior threat protection — all at an industry-leading TCO.
Read More
-
-
Solutions
-
Federal
Protect Federal Agencies and Networks with scalable, purpose-built cybersecurity solutions
Learn MoreFederalProtect Federal Agencies and Networks with scalable, purpose-built cybersecurity solutions
Learn More - Industries
- Use Cases
-
-
Partners
-
Partner Portal
Access to deal registration, MDF, sales and marketing tools, training and more
Learn MorePartner PortalAccess to deal registration, MDF, sales and marketing tools, training and more
Learn More - SonicWall Partners
- Partner Resources
-
-
Support
-
Support Portal
Find answers to your questions by searching across our knowledge base, community, technical documentation and video tutorials
Learn MoreSupport PortalFind answers to your questions by searching across our knowledge base, community, technical documentation and video tutorials
Learn More - Support
- Resources
- Capture Labs
-
- Company
- Contact Us
Unable to Log in to SonicWall security appliance after modifying default Login page content
 10/14/2021
  51 People found this article helpful
 467,571 Views

Description
In SonicWall, login page can be customized using HTML Script. If login page is customized without appropriate design, it will result in Users not able to access the Management GUI of the SonicWall security appliance. This article explains how to reset the Management GUI back to default HTML script and how to access default management GUI at the time of the issue.
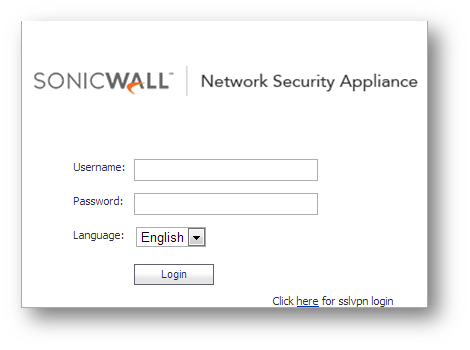
Default SonicWall Login page is as below
Resolution
Resolution for SonicOS 6.5
This release includes significant user interface changes and many new features that are different from the SonicOS 6.2 and earlier firmware. The below resolution is for customers using SonicOS 6.5 firmware.
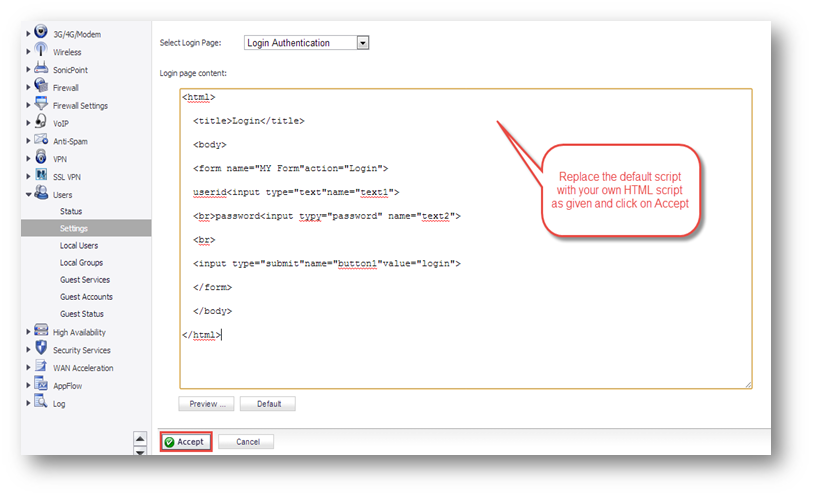
To modify the content login to SonicWall management GUI:
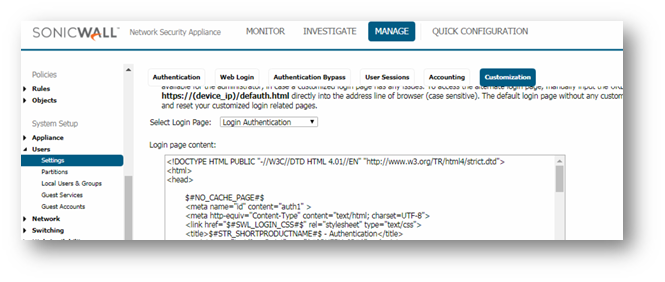
- Navigate to the Manage tab.
- Navigate to Users | Settings page and click Customization tab.
- Next to Select login page, select Login Authentication from Drop down box.
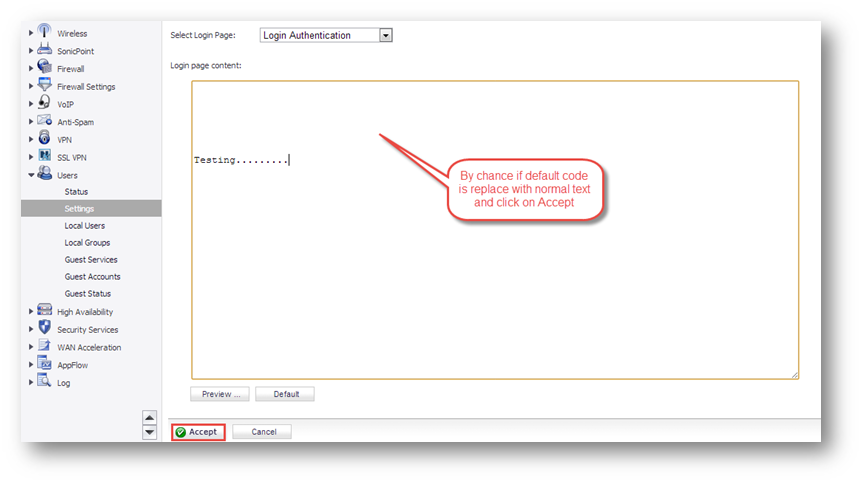
- Under Login page content, change the Default Script with own HTML script.
- Click Accept.
- By accident, if content is changed to normal text, this will result in not showing username/password text boxes upon accessing the management GUI next time.
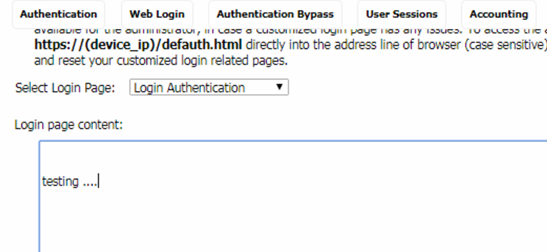
- User will not be able to login to SonicWall management GUI, upon entering the IP address of the SonicWall security appliance, and the login screen will be shown as below.
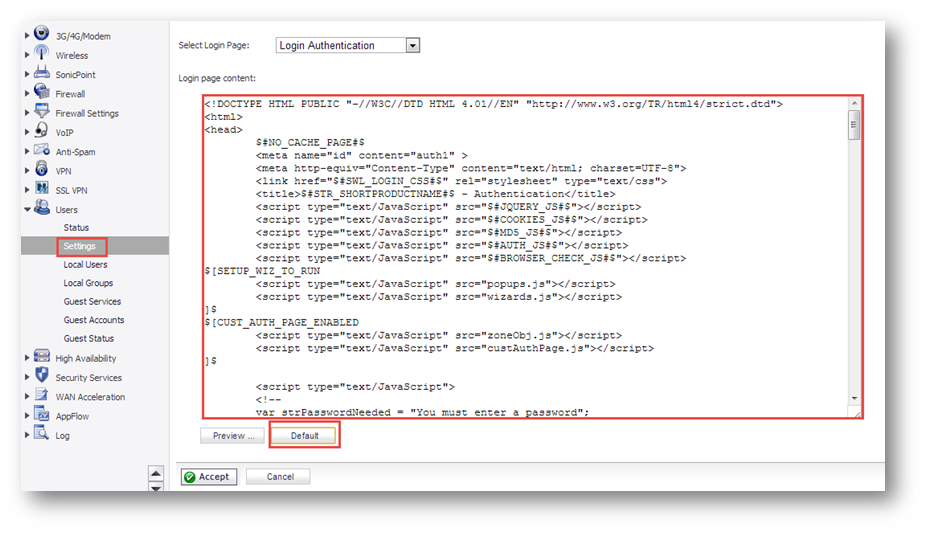
- To access the default login page, manually input the URL: https://(device_ip)/defauth.html directly into the address line of web browser (case sensitive).
The default login page without any customization is then displayed, allowing you to login into SonicWall security appliance and reset your customized login pages.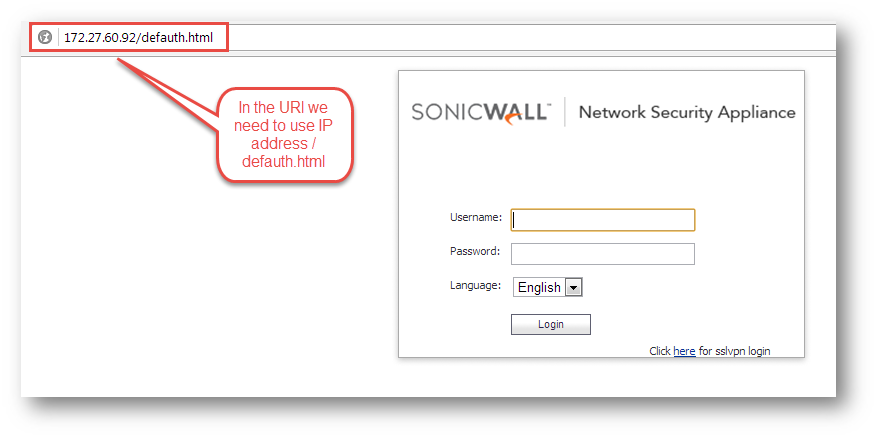
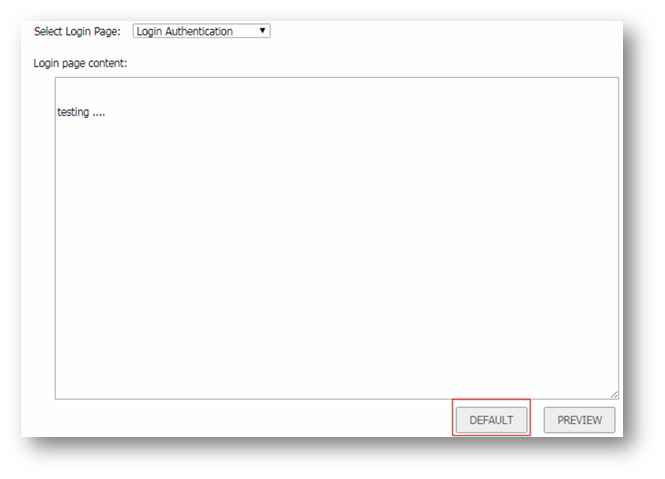
- Log in to SonicWall security appliance.
- Go to the Manage tab.
- Navigate to Users | Settings page and click on the Customization tab.
- Scroll Down and click Default button.
How to Test:
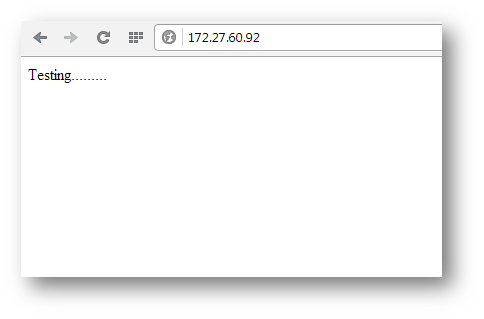
Log in to SonicWall Security Appliance using its IP address(172.27.60.92) and it will display its default login window as shown below.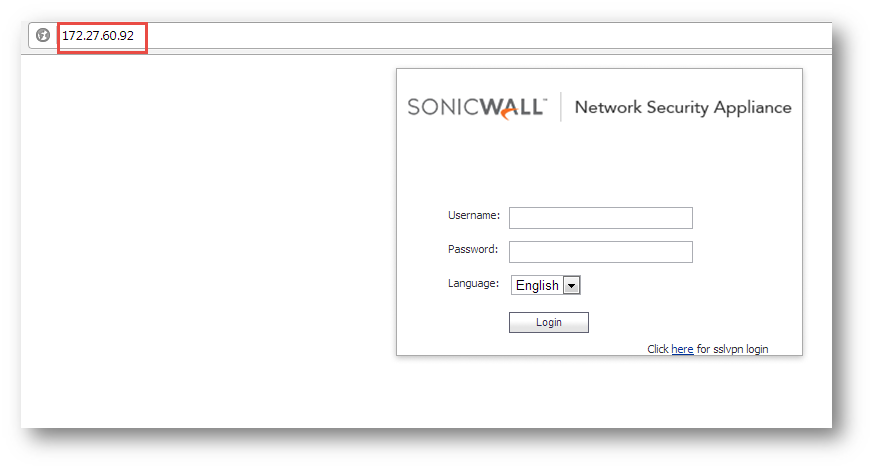
 NOTE: Firmware 5.8.1.8 and above in 5.8 series, there is special note under User | Settings as below. To set a custom login page, choose the Login Page type in the drop-down list below. Then click the Default Page button, edit the HTML content in the text field and click Accept button to save your settings.
 CAUTION: Be careful to verify the HTML of your custom login page before deploying it, because HTML errors may cause the login page to not function properly.
 TIP:An alternative login page is always available for the administrator, in case a customized login page has any issues. To access the alternate login page, manually input the URL: http://(device_ip)/defauth.html or https://(device_ip)/defauth.html directly into the address line of browser (case sensitive). The default login page without any customization is then displayed, allowing you to login as normal and reset your customized login related pages.
Resolution for SonicOS 6.2 and Below
The below resolution is for customers using SonicOS 6.2 and earlier firmware. For firewalls that are generation 6 and newer we suggest to upgrade to the latest general release of SonicOS 6.5 firmware.
To modify the content login to SonicWall management GUI:
- Navigate to Users | Settings page and on the right side you will see Customize Login Page.
- Next to Select login page, select Login Authentication from drop down box.
- Under Login page content, change the Default Script with own HTML script.
- Click Accept.
- By accident, if content is changed to normal text, this will result in not showing username/password text boxes upon accessing the management GUI next time.
- User will not be able to login to SonicWall management GUI, upon entering the IP address of the SonicWall security appliance, and the login screen will be shown as below.
- To access the Default login page, manually input the URL: https://(device_ip)/defauth.html directly into the address line of web browser (case sensitive).
The default login page without any customization is then displayed, allowing you to login into SonicWall security appliance and reset your customized login pages. - Log in to SonicWall security appliance and navigate to User | Settings, under Customize Login page click Default button and click Accept.
How to Test:
Log in to SonicWall security appliance using its IP address(172.27.60.92) and it will display its default login window as shown below:
NOTE: Firmware 5.8.1.8 and above in 5.8 series, there is special note under User | Settings as below. To set a custom login page, choose the Login Page type in the drop-down list below. Then click the Default Page button, edit the HTML content in the text field and click Accept.
CAUTION: Be careful to verify the HTML of your custom login page before deploying it, because HTML errors may cause the login page to not function properly.
TIP: An alternative login page is always available for the administrator, in case a customized login page has any issues. To access the alternate login page, manually input the URL: http://(device_ip)/defauth.html or https://(device_ip)/defauth.html directly into the address line of browser (case sensitive). The default login page without any customization is then displayed, allowing you to login as normal and reset your customized login related pages.
Related Articles
- Configuring split DNS over site to site VPN
- How to enable DNS Doctoring?
- Understanding TCP Handshake violation
Categories
- Firewalls > NSa Series > Firewall Management
- Firewalls > TZ Series > Firewall Management UI
- Firewalls > NSv Series > Firewall Management
 YES
YES NO
NO