-
Products
-
SonicPlatform
SonicPlatform is the cybersecurity platform purpose-built for MSPs, making managing complex security environments among multiple tenants easy and streamlined.
Discover More
-
-
Solutions
-
Federal
Protect Federal Agencies and Networks with scalable, purpose-built cybersecurity solutions
Learn MoreFederalProtect Federal Agencies and Networks with scalable, purpose-built cybersecurity solutions
Learn More - Industries
- Use Cases
-
-
Partners
-
Partner Portal
Access to deal registration, MDF, sales and marketing tools, training and more
Learn MorePartner PortalAccess to deal registration, MDF, sales and marketing tools, training and more
Learn More - SonicWall Partners
- Partner Resources
-
-
Support
-
Support Portal
Find answers to your questions by searching across our knowledge base, community, technical documentation and video tutorials
Learn MoreSupport PortalFind answers to your questions by searching across our knowledge base, community, technical documentation and video tutorials
Learn More - Support
- Resources
- Capture Labs
-
- Company
- Contact Us
Two-factor Authentication with Quest Defender for SonicWall Global VPN Clients


Description
Quest Defender enhances security by enabling two-factor authentication & multi-factor authentication to network, web and applications-based resources. This article describes how to configure Quest Defender to perform two-factor authentication of Global VPN Clients (GVC).
Resolution
Quest Defender Configuration
Defender installation involves installing the following components:
-
Defender Management Console: Installs MMC Snap-ins, Schema updates and a Defender OU in Active Directory Users and Computers.
-
Defender Security Server (DSS): Authenticates RADIUS and Defender Agent requests Access Nodes.
-
Defender Security Server User License
-
Defender Desktop Token License
 NOTE: The Screenshots and configuration steps described here are of Defender version 5.7. Installation of the Quest Defender application is not covered here. Step by step instructions are described in Defender 5.7 Installation Guide. For the purpose of this article all components are installed in a Windows 2008 server with trial Defender license and tokens.
Defender Security Server configuration
Click on Defender Security Server on the Start menu to open the Defender Security Server Configuration window.
-
On the Active Directory LDAP tab, enter the IP address or hostname of the AD LDAP server
-
Under Port, enter the LDAP port number: 389. Under SSL Port enter the LDAPs port number: 636. This is optional.
-
Under Service Account Credentials, enter the DN of the user. In this example, a user called defender has been created with Domain Admin rights.
-
Click on Apply to save the changes.
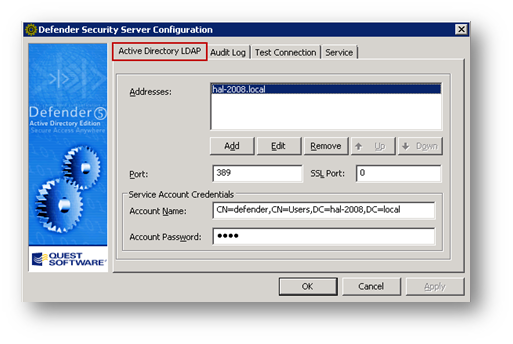
In the Service tab, you can stop and restart the Defender Security Server service.

Defender Management Console
The Defender Management Console enables you to create and configure Defender Security Servers. The Defender Security Server is the point in your network where user authentication is performed. If authentication is successful, the user is allowed access to the network.
Open the Defender OU in Active Directory Users and Computers.
Configure RADIUS Payload
The RADIUS Payload is information that is passed from the Defender Security Server to the Network Access Server where the user authentication attempt originated.
- Navigate to the RADIUS Payload page
- Right click and click on New and select Defender RADIUS Payload to create a new RADIUS Payload.
 Configure Security Policy
The security policy is assigned to a user, user group, access node or security server.
-
Navigate to the Defender | Policies page.
-
Right click and click on New and select Defender Policy to create a Defender Security Policy.
-
The authentication methods selected here are AD password and Token.
-
The Logon Attempts have been set here as 1, this can be changed.
 Defender 5.7 Configuration Guide
Configure Defender Security Servers (DSS)
The Defender Security Server is the point in your network where user authentication is performed. If authentication is successful, the user is allowed access to the network.
-
Navigate to the Defender | Security Servers page.
-
Right click and click on New and select Defender Security Server to create a DSS.
-
The IP Address must be the IP Address of the machine where this Defender Security Server is located. In this example the DSS is the same as the management console.
-
The Defender Security Server (prompts) can be left as it is.
-
Click on OK to save.
-
In the properties of the newly created DSS, click on the Policy tab and click on Select to select the Security Policy created earlier.
-
Click on the RADIUS Payload tab, click on Select to select the RADIUS Payload created earlier.
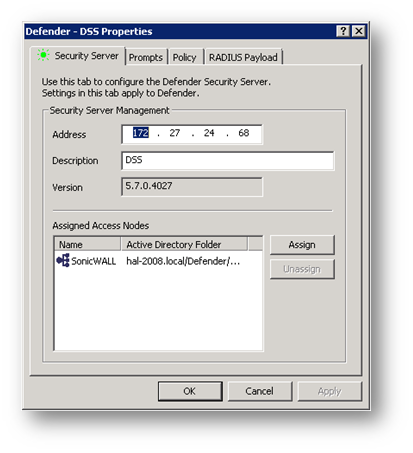
The indicator light located in the top left hand corner of the Defender Security Server dialog box is red while the Defender Security Server is refreshing the data. When the Access Nodes has been assigned, a green light is displayed.
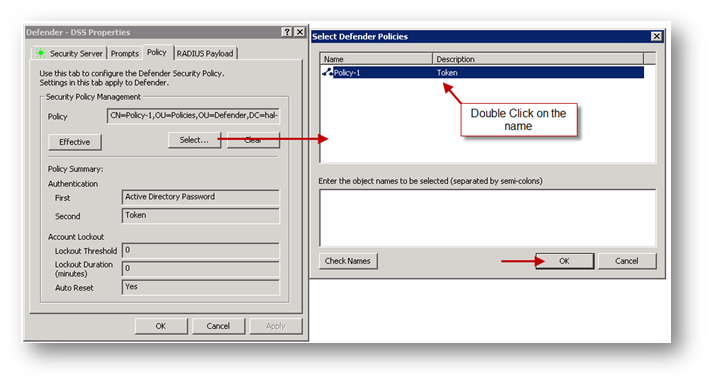
For more information, see Page # 82 of the Defender 5.7 Configuration Guide
Configure Access Node
The Access Node is the point in your network where you need to challenge the user to verify their identity, for example, a firewall or VPN server. At the access node, the user will be prompted to enter their logon credentials. This may be a user ID, password and token authentication information. The access node sends the user’s logon credentials to the Defender Security Server for authentication. If authentication is successful, the user is granted access to the network.
-
Navigate to the Defender | Access Nodes page.
-
Right click and click on New and select Defender Access Node to create a Defender Access Node.
-
Enter the IP address or DNS name of the SonicWall X0 interface.
-
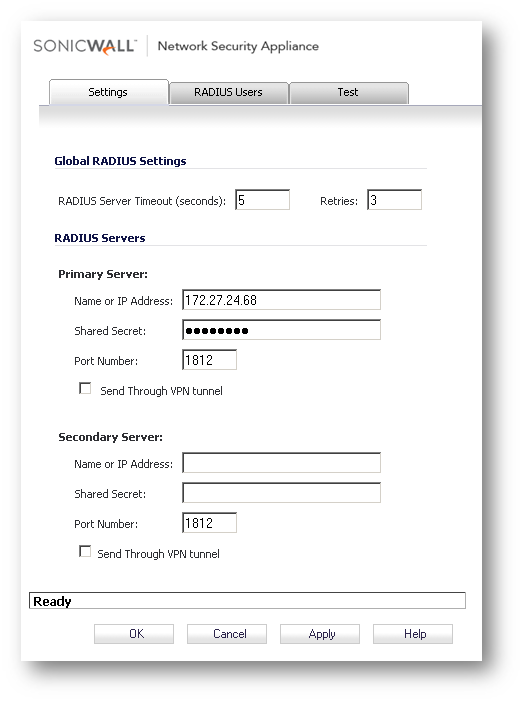
Set Auth Port as 1812, which is the default RADIUS port.
-
Click on OK to save.
-
In the properties of the newly created Access Node, under Node Type, select Radius Agent.
-
In the Shared Secret field, enter a secret. This must be identical to the Shared Secret in the SonicWall RADIUS configuration.
-
Set User ID as SAM Account Name.
-
Under Assigned to, click on Assign to select the DSS earlier created.
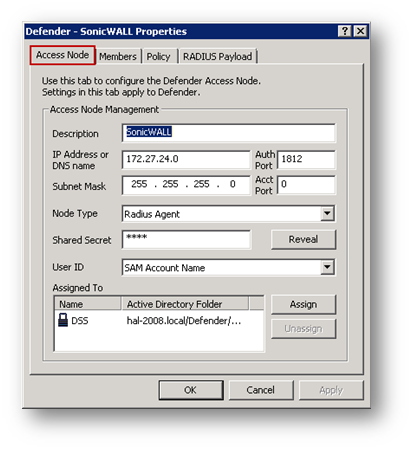
11. Navigate to the Policy tab.
12. Click on Select to select the Security Policy created earlier.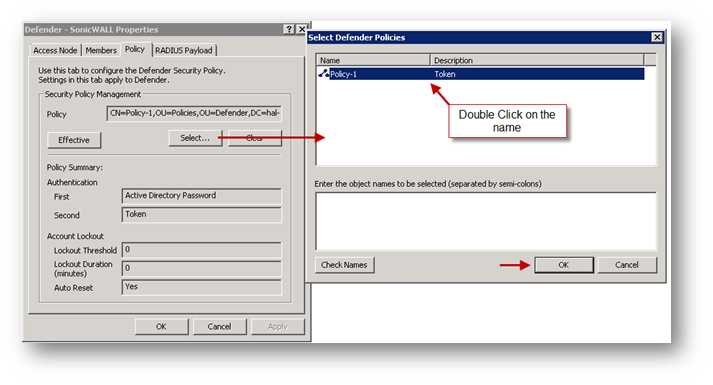
For more information, see Page # 24 of the Defender 5.7 Configuration Guide
Defender Tokens
The Defender token serial number is used to associate the token with a user and can be used for later reference or for tracking purposes. A list of serial numbers for the tokens that you have purchased is supplied as part of your Defender package. The serial number is also located on the back of hardware tokens.
For importing Defender Token Serial Numbers, refer page # 102 of the Defender Configuration Guide .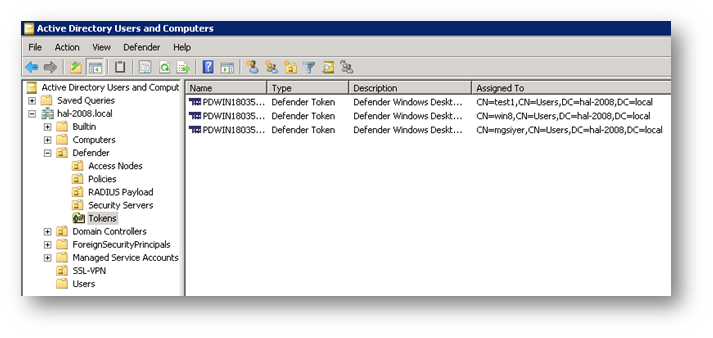
Assign Hardware / Software Token
Depending on your installation, install/configure hardware or software token. Refer the following Quest Defender documents:
Defender Token Administration Guide
Defender Hardware Token User Guide
Quest Soft Token for Windows Desktop User Guide
Select the Defender tab and click on Add to add a token. Defender 5.7 Configuration Guide
SonicWall RADIUS Configuration
-
Login to the SonicWall management GUI.
-
Navigate to the Users | Settings page.
-
Select RADIUS as the authentication method and click on Configure.
-
Configure the RADIUS settings as follows:
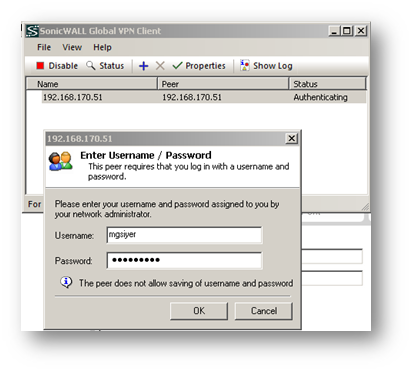
Connecting the SonicWall Global VPN Client with AD Username/Password and Windows Desktop Token.
-
Start the GVC client connection.
-
Enter your AD username and password at the authentication prompt.
-
When prompted to enter Response, copy the SNK Challenge.
-
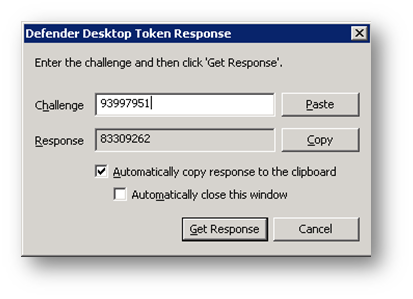
Enter Challenge in the Defender Desktop Token app.
-
Click on Get Response and copy it to clipboard.
-
Enter Response.

Related Articles
- Error:"Invalid API Argument" when modifying the access rules
- Cysurance Partner FAQ
- Configure probe monitoring for WAN Failover and Loadbalancing - SonicWall UTM
Categories
- Firewalls > TZ Series
- Firewalls > SonicWall SuperMassive E10000 Series
- Firewalls > SonicWall SuperMassive 9000 Series
- Firewalls > SonicWall NSA Series


 YES
YES NO
NO