-
Products
-
SonicPlatform
SonicPlatform is the cybersecurity platform purpose-built for MSPs, making managing complex security environments among multiple tenants easy and streamlined.
Discover More
-
-
Solutions
-
Federal
Protect Federal Agencies and Networks with scalable, purpose-built cybersecurity solutions
Learn MoreFederalProtect Federal Agencies and Networks with scalable, purpose-built cybersecurity solutions
Learn More - Industries
- Use Cases
-
-
Partners
-
Partner Portal
Access to deal registration, MDF, sales and marketing tools, training and more
Learn MorePartner PortalAccess to deal registration, MDF, sales and marketing tools, training and more
Learn More - SonicWall Partners
- Partner Resources
-
-
Support
-
Support Portal
Find answers to your questions by searching across our knowledge base, community, technical documentation and video tutorials
Learn MoreSupport PortalFind answers to your questions by searching across our knowledge base, community, technical documentation and video tutorials
Learn More - Support
- Resources
- Capture Labs
-
- Company
- Contact Us
The GVC log shows error: Failed to renew the IP address for the virtual interface


Description
When you enable the connection on the GVC software the status remains at "Acquiring IP", and the message "Failed to renew the IP address for Virtual Interface" is logged in the GVC software.
Resolution
Resolution for SonicOS 7.X
This release includes significant user interface changes and many new features that are different from the SonicOS 6.5 and earlier firmware. The below resolution is for customers using SonicOS 7.X firmware.
DHCP Server settings
1. Login to your SonicWall management page and click on Manage tab on top of the page
2. Navigate to Network | DHCP Server settings page, edit the X0 interface DHCP Scope Lease under DHCPv4 Server Lease Scopes section to get DHCP Server Configuration window and increase the range.

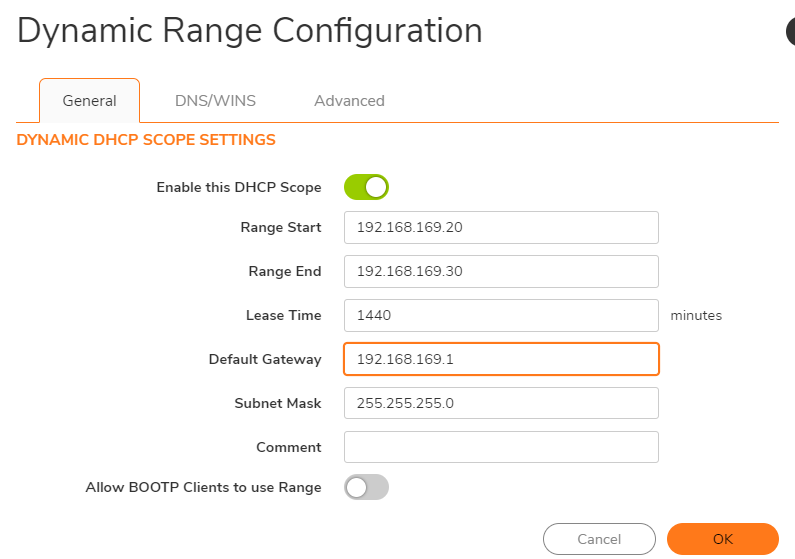
3. When done with change, click OK button to save settings and then click Accept button on bottom.
>> DHCP Over VPN Settings
4. Navigate to Network tab and go to IPsecVPN | DHCP over VPN page.
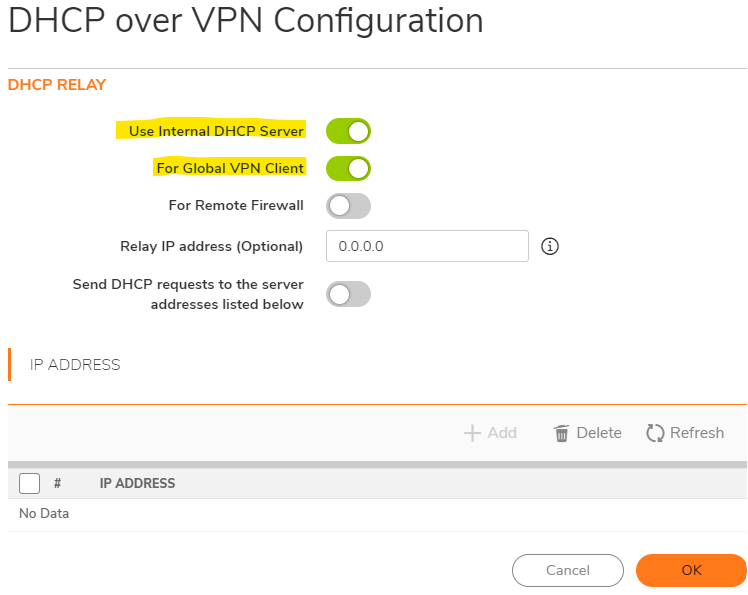
- Under DHCP over VPN section, Select Central Gateway from drop-down box and click Configure button.
- In DHCP over VPN Configuration Window, enable "Use Internal DHCP Server" checkbox.
- Enable "For Global VPN Client" checkbox.
- Click OK button to save settings.

or
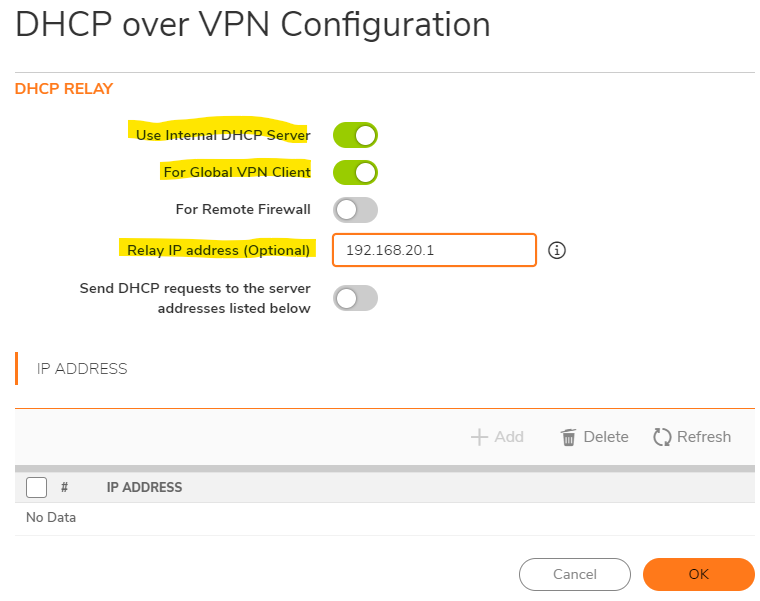
5. If you are using another Interface's DHCP scope (e.g. X2, X3,etc.) for GVC softwares, then enter the appropriate interface's IP address in the Relay IP address (optional) field:
or
6. If you are using a 3rd party external DHCP server (e.g. LAN, DMZ,etc.) for the GVC softwares, then select "Send DHCP requests to the server addresses listed below", click on the Add button and enter the DHCP server's IP address.

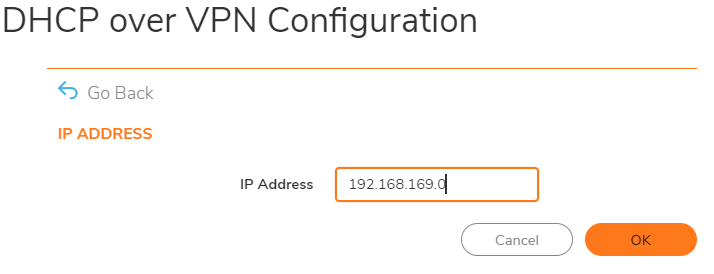
7. When done, Click OK to save settings.
How to Test:
Try connecting from the GVC software and the connection should succeed.
Resolution for SonicOS 6.5
This release includes significant user interface changes and many new features that are different from the SonicOS 6.2 and earlier firmware. The below resolution is for customers using SonicOS 6.5 firmware.
DHCP Server settings
1. Login to your SonicWall management page and click on Manage tab on top of the page
2. Navigate to Network | DHCP Server settings page, edit the X0 interface DHCP Scope Lease under DHCPv4 Server Lease Scopees section to get DHCP Server Configuration window and increase the range..

3. When done with change, click OK button to save settings and then click Accept button on bottom.
>> DHCP Over VPN Settings
4. Navigate to Manage tab and go to VPN | DHCP over VPN page.
- Under DHCP over VPN section, Select Central Gateway from drop-down box and click Configure button.
- In DHCP over VPN Configuration Window, enable "Use Internal DHCP Server" checkbox.
- Enable "For Global VPN Client" checkbox.
- Click OK button to save settings.
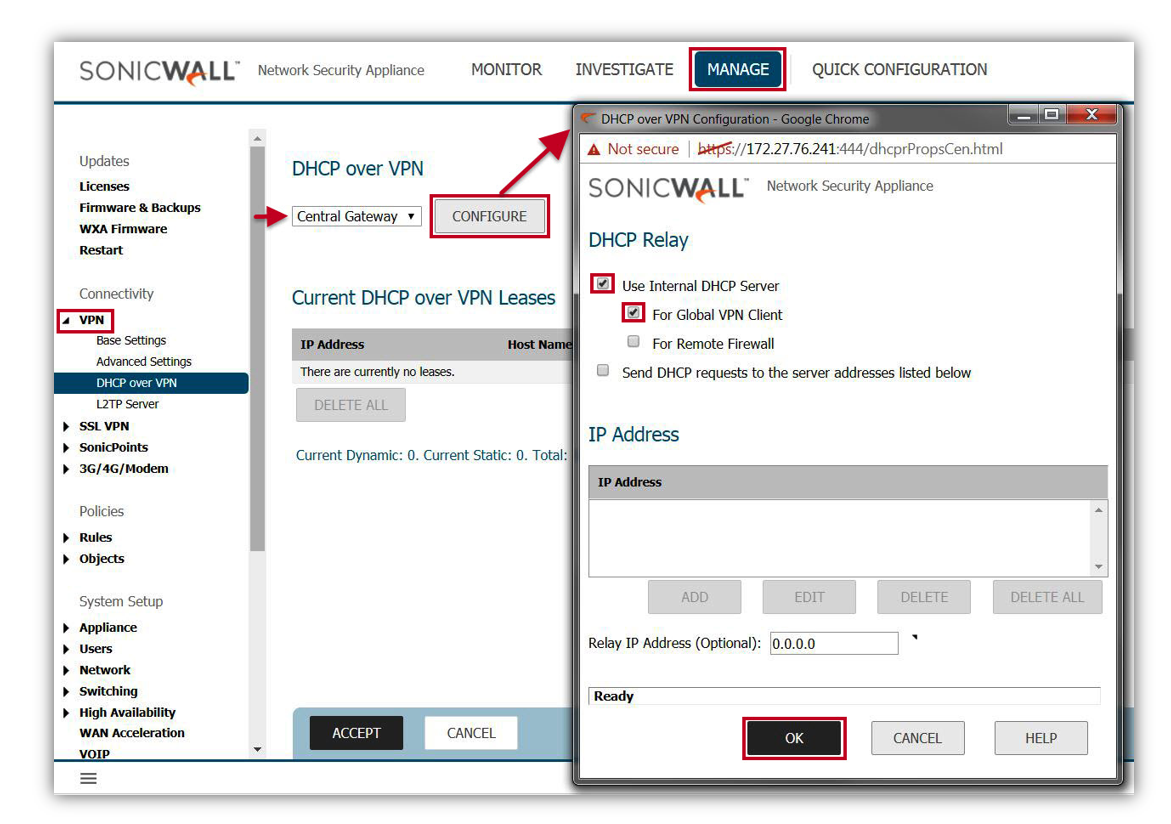
or
5. If you are using another Interface's DHCP scope (e.g. X2, X3,etc.) for GVC softwares, then enter the appropriate interface's IP address in the Relay IP address (optional) field:
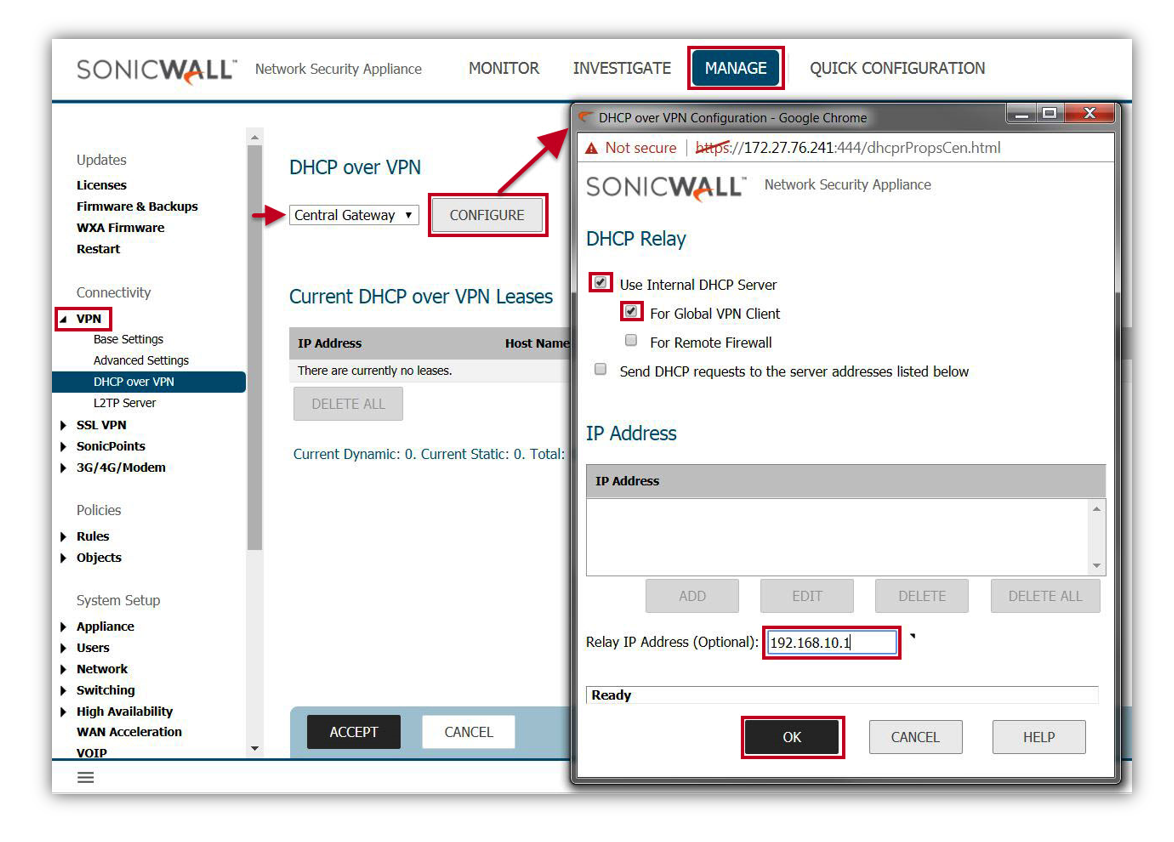
or
6. If you are using a 3rd party external DHCP server (e.g. LAN, DMZ,etc.) for the GVC softwares, then select "Send DHCP requests to the server addresses listed below", click on the Add button and enter the DHCP server's IP address.
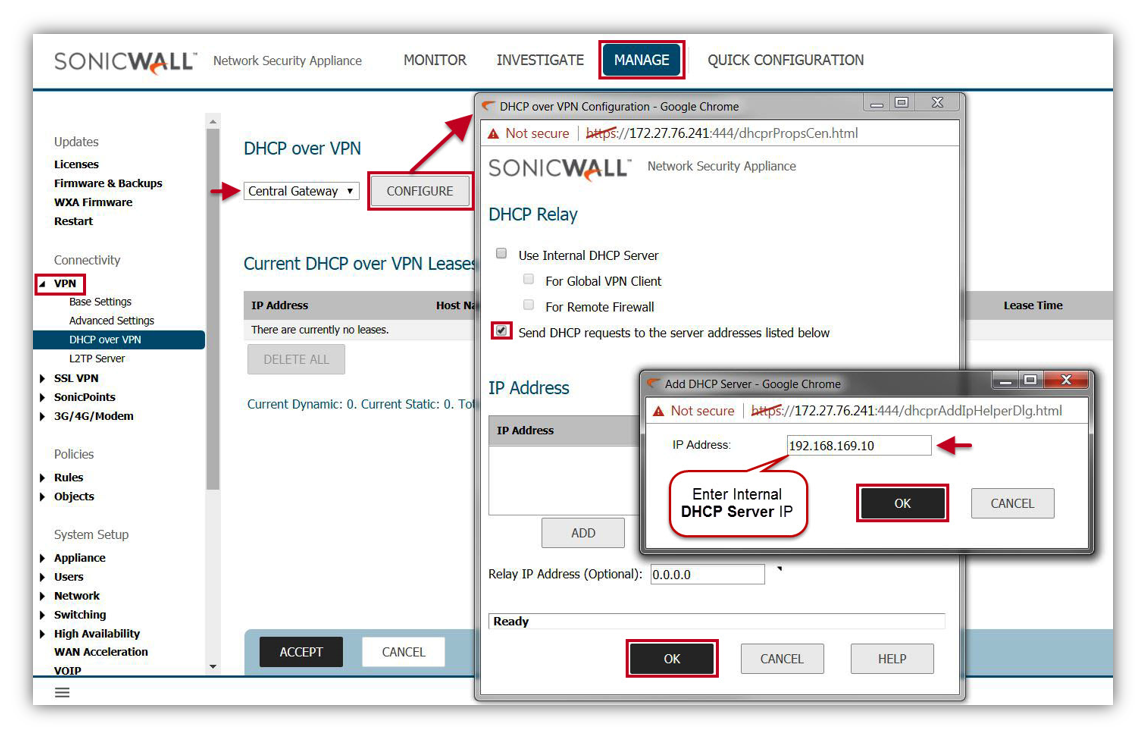
7. When done, Click OK to save settings.
How to Test:
Try connecting from the GVC software and the connection should succeed.
Resolution for SonicOS 6.2 and Below
The below resolution is for customers using SonicOS 6.2 and earlier firmware. For firewalls that are generation 6 and newer we suggest to upgrade to the latest general release of SonicOS 6.5 firmware.
DHCP Server settings
- Login to the SonicWall Management Interface.
- Navigate toNetwork | DHCP Server page, edit the X0 interface 's DHCP Scope Lease and increase the range.
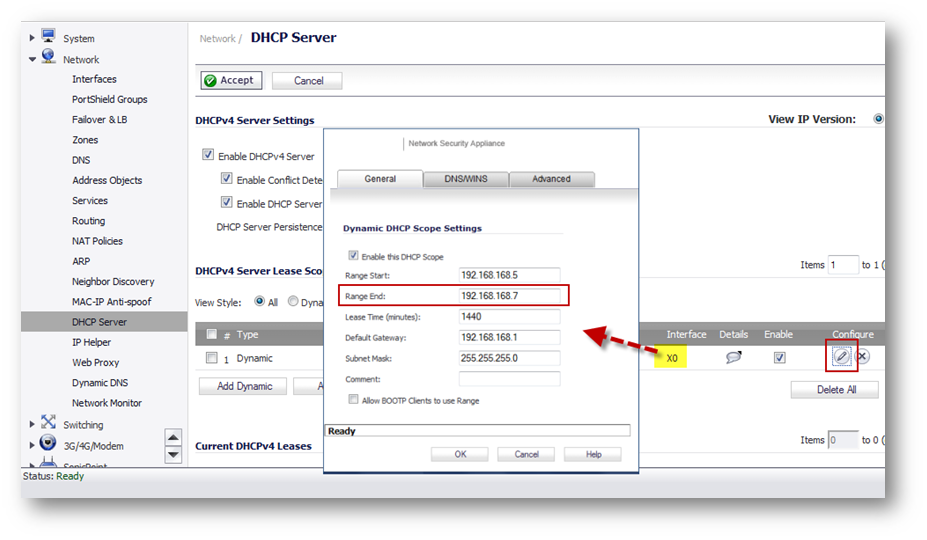
- When done, click on OK and then Accept button on top.
DHCP Over VPN Settings
Navigate to theVPN | DHCP Over VPNpage and then click on Configure button
5. In the pop-up window if you are using the X0 interface's DHCP scope as your DHCP server for GVC softwares, select "Use Internal DHCP Server" and then select For Global VPN Client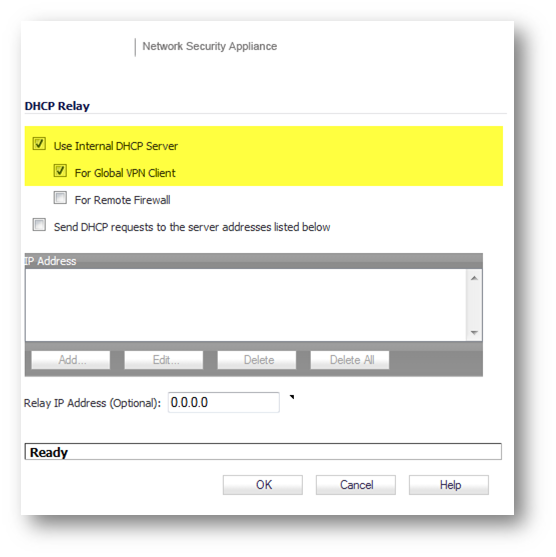
or
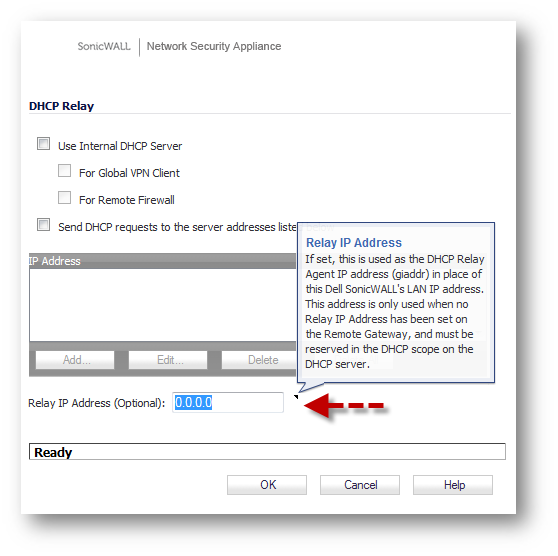
6. If you are using another Interface's DHCP scope (e.g. X2, X3,etc.) for GVC softwares, then enter the appropriate interface's IP address in the Relay IP address (optional) field:
or
7. If you are using a 3rd party external DHCP server (e.g. LAN, DMZ,etc.) for the GVC softwares, then select "Send DHCP requests to the server addresses listed below", click on the Add button and enter the DHCP server's IP address.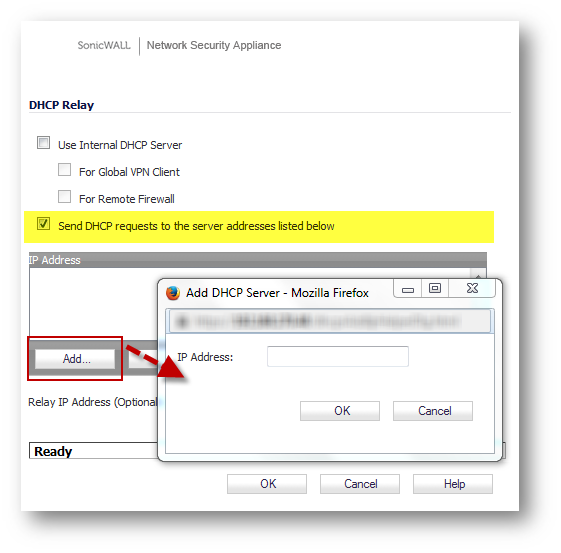
8. When done, Click OK.
How to Test:
Try connecting from the GVC software and the connection should succeed.
Related Articles
- Error:"Invalid API Argument" when modifying the access rules
- Cysurance Partner FAQ
- Configure probe monitoring for WAN Failover and Loadbalancing - SonicWall UTM
Categories
- Firewalls > SonicWall NSA Series
- Firewalls > SonicWall SuperMassive 9000 Series
- Firewalls > SonicWall SuperMassive E10000 Series
- Firewalls > TZ Series


 YES
YES NO
NO