SonicWall CAS Manual Integration with Office 365
01/13/2022
26 People found this article helpful
384,775 Views
Description
Section 1:
Journal Rule
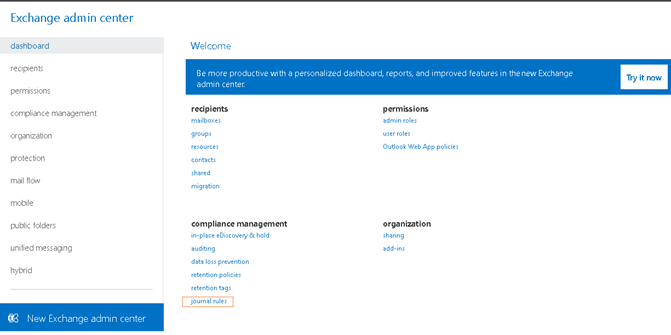
1.1 Use Classic Exchange admin center, in the Exchange admin center under ‘compliance management’ select ‘journal rules’.
![Image](https://sonicwall.rightanswers.com/portal/app/portlets/results/onsitehypermedia/090220109262704.png?linkToken=eyJ0eXAiOiJKV1QiLCJhbGciOiJIUzI1NiJ9.eyJpc3MiOiJzb25pY3dhbGwiLCJleHAiOjE3NTM0OTk0MDUsImlhdCI6MTcyMTk2MzQwNX0.sSqSQZL-FPfWQrLxLYwQUzSmUpm8hfsXBAxs5mEktj4)
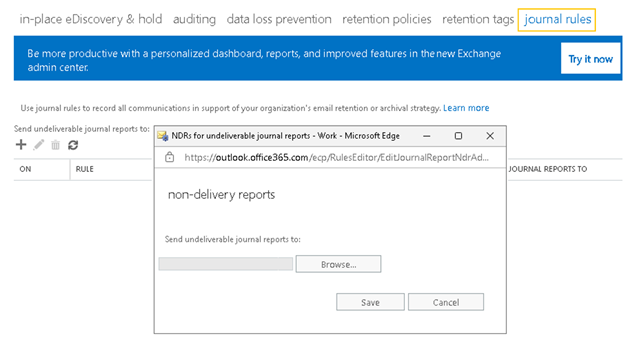
1.2 Add an account to receive journal reports that can’t be delivered to the journal destination.Click ‘Browser’ button to select an user, also could create a new user for this purpose.
![Image](https://sonicwall.rightanswers.com/portal/app/portlets/results/onsitehypermedia/090220109465664.png?linkToken=eyJ0eXAiOiJKV1QiLCJhbGciOiJIUzI1NiJ9.eyJpc3MiOiJzb25pY3dhbGwiLCJleHAiOjE3NTM0OTk0MDUsImlhdCI6MTcyMTk2MzQwNX0.sSqSQZL-FPfWQrLxLYwQUzSmUpm8hfsXBAxs5mEktj4)
1.3 Click the plus button to add a new rule and fill out the fields in the popup window.
![Image](https://sonicwall.rightanswers.com/portal/app/portlets/results/onsitehypermedia/090220109657431.png?linkToken=eyJ0eXAiOiJKV1QiLCJhbGciOiJIUzI1NiJ9.eyJpc3MiOiJzb25pY3dhbGwiLCJleHAiOjE3NTM0OTk0MDUsImlhdCI6MTcyMTk2MzQwNX0.sSqSQZL-FPfWQrLxLYwQUzSmUpm8hfsXBAxs5mEktj4)
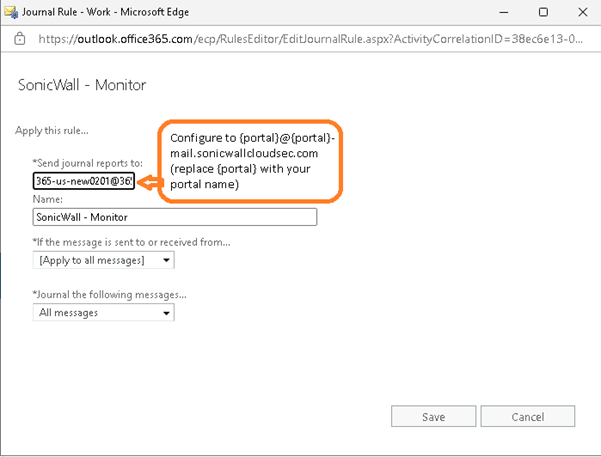
Note that in some configurations we refer to {portal}, this is an indication of your portal name. For
example, if your CAS portal url is ‘abc.sonicwallcloudsec.com', then you will need to replace ‘{portal}’ with
‘abc’ and should be added as abc@abc-mail.sonicwallcloudsec.com in the above Journal rule.
Section 2:
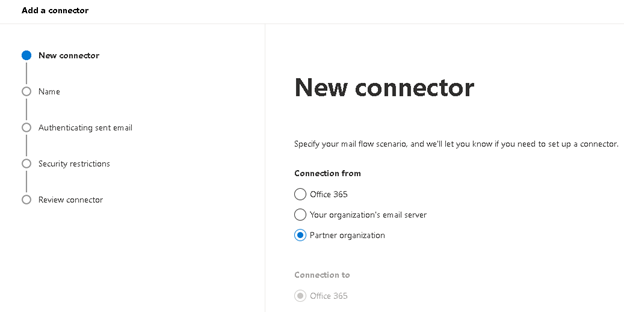
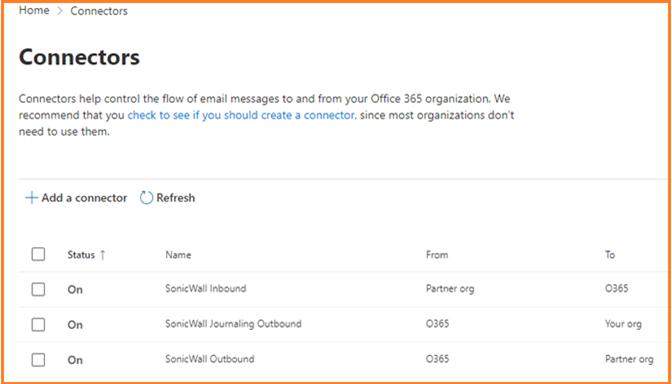
2.1.1 From Exchange admin center under ‘mail flow’ select ‘connectors’ to create 3 connectors.
![Image](https://sonicwall.rightanswers.com/portal/app/portlets/results/onsitehypermedia/090220109155809.png?linkToken=eyJ0eXAiOiJKV1QiLCJhbGciOiJIUzI1NiJ9.eyJpc3MiOiJzb25pY3dhbGwiLCJleHAiOjE3NTM0OTk0MDUsImlhdCI6MTcyMTk2MzQwNX0.sSqSQZL-FPfWQrLxLYwQUzSmUpm8hfsXBAxs5mEktj4)
![Image](https://sonicwall.rightanswers.com/portal/app/portlets/results/onsitehypermedia/090220109597103.png?linkToken=eyJ0eXAiOiJKV1QiLCJhbGciOiJIUzI1NiJ9.eyJpc3MiOiJzb25pY3dhbGwiLCJleHAiOjE3NTM0OTk0MDUsImlhdCI6MTcyMTk2MzQwNX0.sSqSQZL-FPfWQrLxLYwQUzSmUpm8hfsXBAxs5mEktj4)
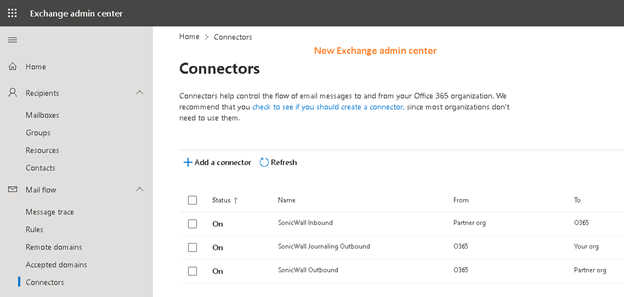
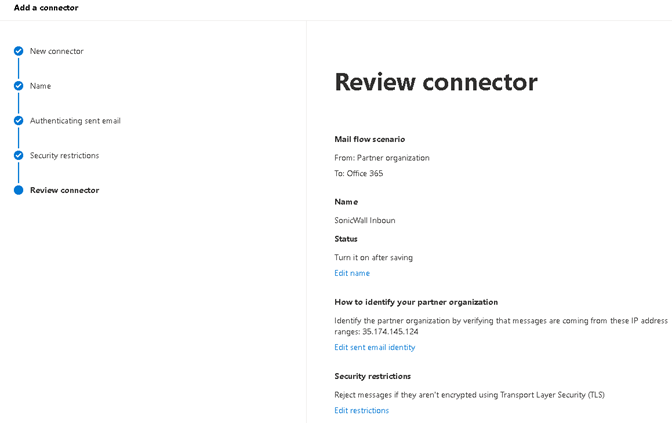
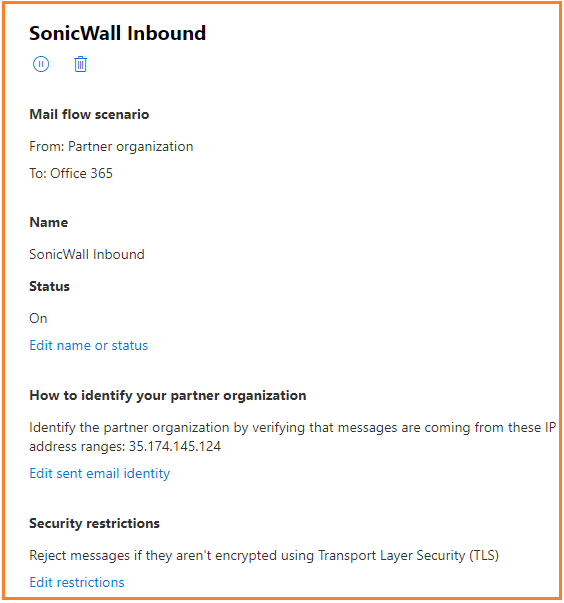
2.1.2 Add ‘SonicWall Inbound’ connector. Select connection from ‘Partner organization’. To ‘Office 365’ is selected.
![Image](https://sonicwall.rightanswers.com/portal/app/portlets/results/onsitehypermedia/090220109100519.png?linkToken=eyJ0eXAiOiJKV1QiLCJhbGciOiJIUzI1NiJ9.eyJpc3MiOiJzb25pY3dhbGwiLCJleHAiOjE3NTM0OTk0MDUsImlhdCI6MTcyMTk2MzQwNX0.sSqSQZL-FPfWQrLxLYwQUzSmUpm8hfsXBAxs5mEktj4)
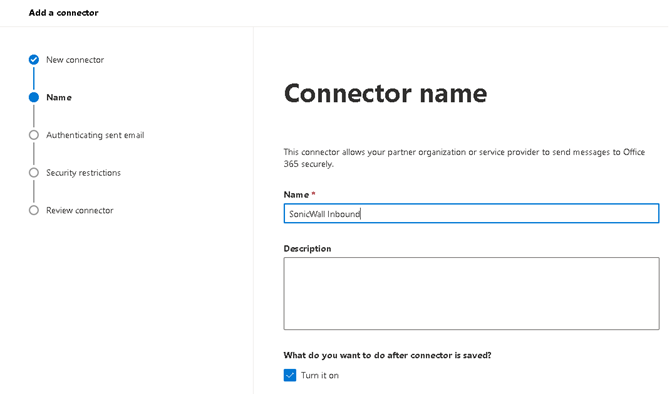
2.1.3 Name the connector ‘SonicWall Inbound’ and option to enter the description. ‘Turn it on’ is automatically checked. Click ‘Next’.
![Image](https://sonicwall.rightanswers.com/portal/app/portlets/results/onsitehypermedia/090220109429107.png?linkToken=eyJ0eXAiOiJKV1QiLCJhbGciOiJIUzI1NiJ9.eyJpc3MiOiJzb25pY3dhbGwiLCJleHAiOjE3NTM0OTk0MDUsImlhdCI6MTcyMTk2MzQwNX0.sSqSQZL-FPfWQrLxLYwQUzSmUpm8hfsXBAxs5mEktj4)
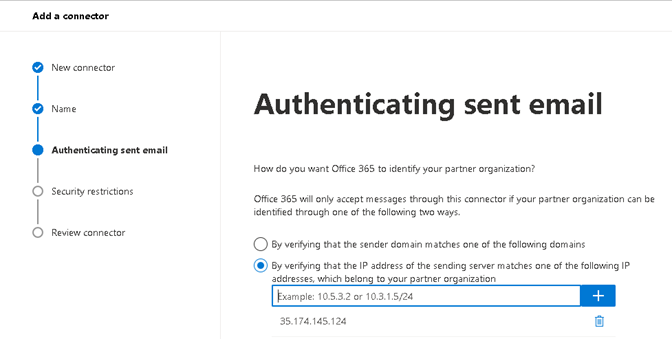
2.1.4 Select ‘By verifying the IP address of the sending server matches one of the following IP address…
Enter IP ’35.174.145.124’ and click ‘+’ to add.
![Image](https://sonicwall.rightanswers.com/portal/app/portlets/results/onsitehypermedia/090220109957272.png?linkToken=eyJ0eXAiOiJKV1QiLCJhbGciOiJIUzI1NiJ9.eyJpc3MiOiJzb25pY3dhbGwiLCJleHAiOjE3NTM0OTk0MDUsImlhdCI6MTcyMTk2MzQwNX0.sSqSQZL-FPfWQrLxLYwQUzSmUpm8hfsXBAxs5mEktj4)
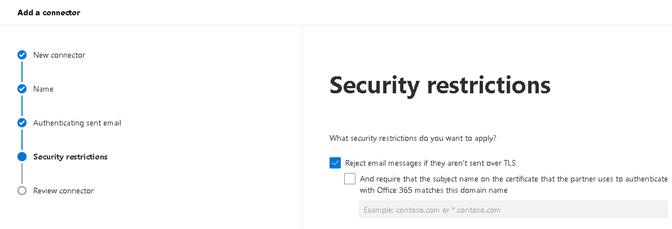
2.1.5 Select ‘Reject email messages if they aren’t sent over TLS’.
![Image](https://sonicwall.rightanswers.com/portal/app/portlets/results/onsitehypermedia/090220109915165.png?linkToken=eyJ0eXAiOiJKV1QiLCJhbGciOiJIUzI1NiJ9.eyJpc3MiOiJzb25pY3dhbGwiLCJleHAiOjE3NTM0OTk0MDUsImlhdCI6MTcyMTk2MzQwNX0.sSqSQZL-FPfWQrLxLYwQUzSmUpm8hfsXBAxs5mEktj4)
2.1.6 After done reviewing the configuration click ‘Create connector’.
![Image](https://sonicwall.rightanswers.com/portal/app/portlets/results/onsitehypermedia/090220109322663.png?linkToken=eyJ0eXAiOiJKV1QiLCJhbGciOiJIUzI1NiJ9.eyJpc3MiOiJzb25pY3dhbGwiLCJleHAiOjE3NTM0OTk0MDUsImlhdCI6MTcyMTk2MzQwNX0.sSqSQZL-FPfWQrLxLYwQUzSmUpm8hfsXBAxs5mEktj4)
![Image](https://sonicwall.rightanswers.com/portal/app/portlets/results/onsitehypermedia/090220109618925.png?linkToken=eyJ0eXAiOiJKV1QiLCJhbGciOiJIUzI1NiJ9.eyJpc3MiOiJzb25pY3dhbGwiLCJleHAiOjE3NTM0OTk0MDUsImlhdCI6MTcyMTk2MzQwNX0.sSqSQZL-FPfWQrLxLYwQUzSmUpm8hfsXBAxs5mEktj4)
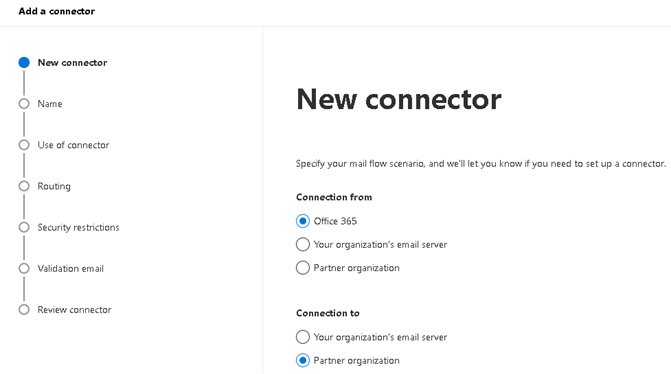
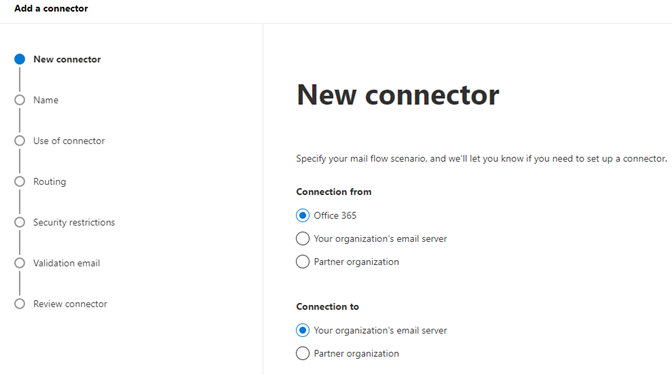
3.1.1 Add ‘SonicWall Outbound’ connector. Select Connection from ‘Office 365’ to ‘Partner organization’.
![Image](https://sonicwall.rightanswers.com/portal/app/portlets/results/onsitehypermedia/090220109666948.png?linkToken=eyJ0eXAiOiJKV1QiLCJhbGciOiJIUzI1NiJ9.eyJpc3MiOiJzb25pY3dhbGwiLCJleHAiOjE3NTM0OTk0MDUsImlhdCI6MTcyMTk2MzQwNX0.sSqSQZL-FPfWQrLxLYwQUzSmUpm8hfsXBAxs5mEktj4)
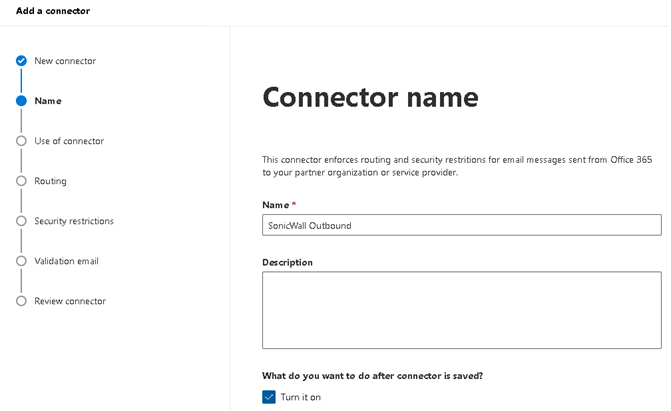
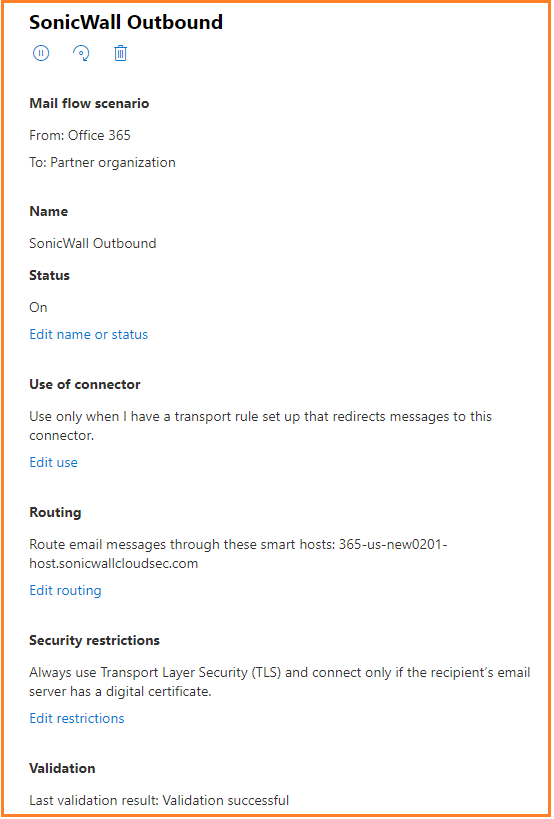
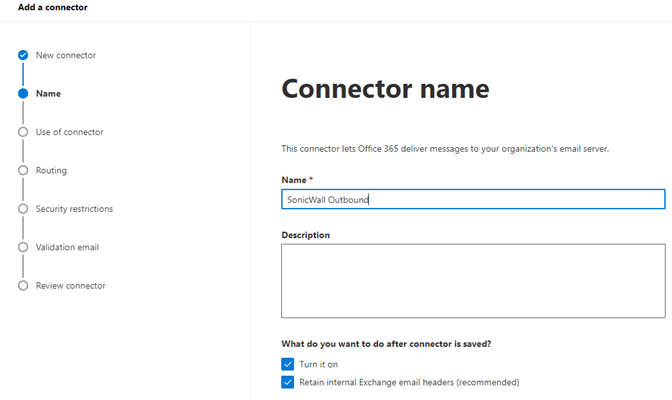
3.1.2 Name the connector ‘SonicWall Outbound’ and option to enter the description. ‘Turn it on’ was automatically checked. Click ‘Next’.
![Image](https://sonicwall.rightanswers.com/portal/app/portlets/results/onsitehypermedia/090220109373882.png?linkToken=eyJ0eXAiOiJKV1QiLCJhbGciOiJIUzI1NiJ9.eyJpc3MiOiJzb25pY3dhbGwiLCJleHAiOjE3NTM0OTk0MDUsImlhdCI6MTcyMTk2MzQwNX0.sSqSQZL-FPfWQrLxLYwQUzSmUpm8hfsXBAxs5mEktj4)
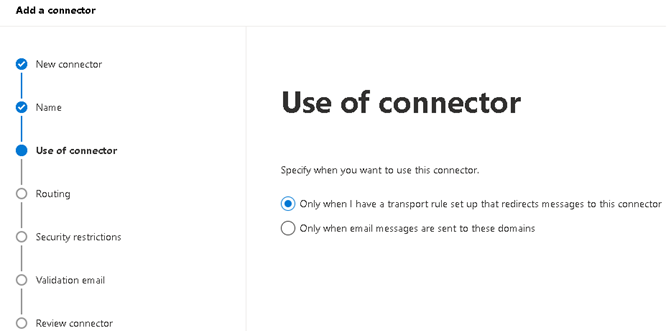
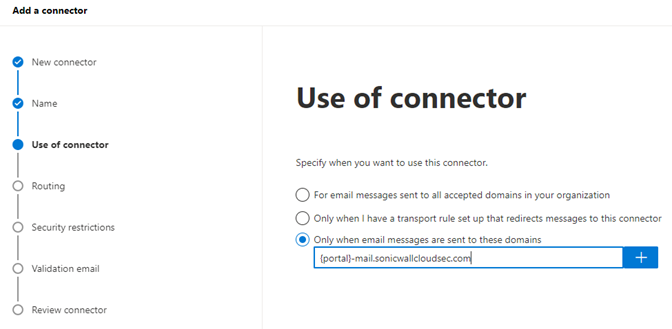
3.1.3 Select ‘Only when I have a transport rule setup that redirects messages to this connector’.
![Image](https://sonicwall.rightanswers.com/portal/app/portlets/results/onsitehypermedia/090220109218955.png?linkToken=eyJ0eXAiOiJKV1QiLCJhbGciOiJIUzI1NiJ9.eyJpc3MiOiJzb25pY3dhbGwiLCJleHAiOjE3NTM0OTk0MDUsImlhdCI6MTcyMTk2MzQwNX0.sSqSQZL-FPfWQrLxLYwQUzSmUpm8hfsXBAxs5mEktj4)
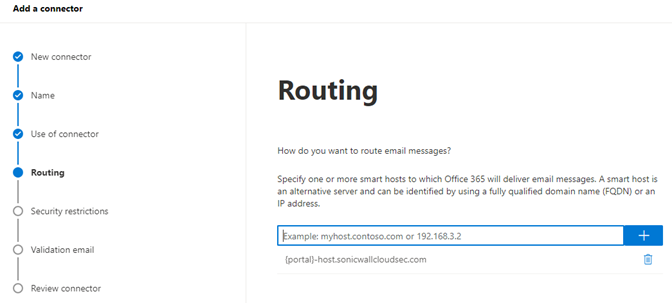
3.1.4 Routing: Select ‘Route email through these smart hosts’. Enter {portal}-host.sonicwallcloudsec.com and click plus sign.
![Image](https://sonicwall.rightanswers.com/portal/app/portlets/results/onsitehypermedia/090220109138515.png?linkToken=eyJ0eXAiOiJKV1QiLCJhbGciOiJIUzI1NiJ9.eyJpc3MiOiJzb25pY3dhbGwiLCJleHAiOjE3NTM0OTk0MDUsImlhdCI6MTcyMTk2MzQwNX0.sSqSQZL-FPfWQrLxLYwQUzSmUpm8hfsXBAxs5mEktj4)
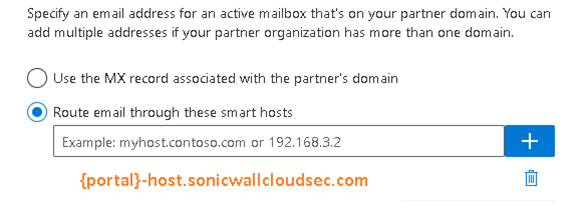
Note that in some configurations we refer to {portal}, this is an indication of your CAS portal name. For
example, if your CAS portal url is ‘abc.sonicwallcloudsec.com', then you will need to replace ‘{portal}’ with
‘abc’ and should be added as abc-host.sonicwallcloudsec.com in the above ‘SonicWall Outbound’ Connector.
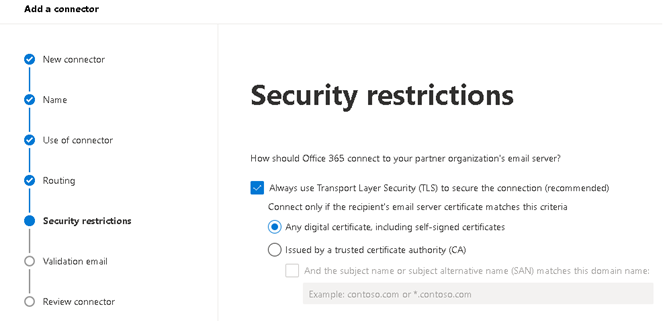
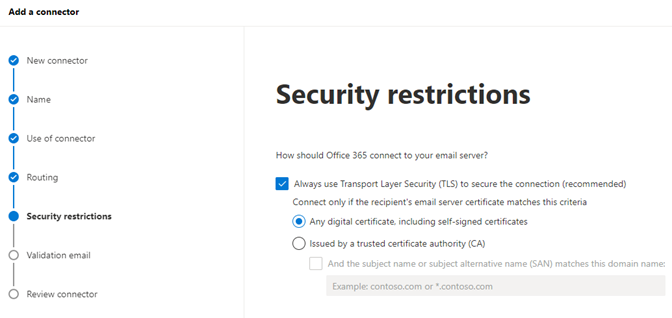
3.1.5 Check Always use Transport Layer Security (TLS) to secure the connection (recommended) and select ‘Any digital certificate, including self-signed certificates.
![Image](https://sonicwall.rightanswers.com/portal/app/portlets/results/onsitehypermedia/090220109333006.png?linkToken=eyJ0eXAiOiJKV1QiLCJhbGciOiJIUzI1NiJ9.eyJpc3MiOiJzb25pY3dhbGwiLCJleHAiOjE3NTM0OTk0MDUsImlhdCI6MTcyMTk2MzQwNX0.sSqSQZL-FPfWQrLxLYwQUzSmUpm8hfsXBAxs5mEktj4)
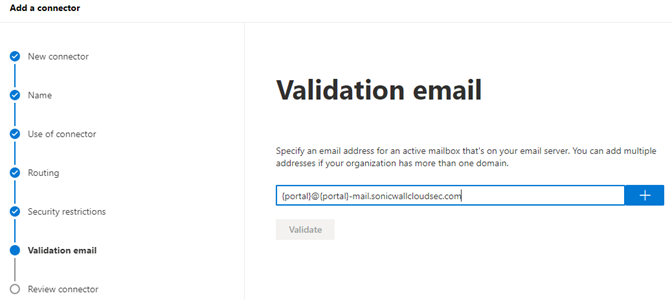
3.1.6 Enter {portal}@{portal}-mail.sonicwallcloudsec.com to validate email. Review connector and click ‘Create Connector’.
![Image](https://sonicwall.rightanswers.com/portal/app/portlets/results/onsitehypermedia/090220109546589.png?linkToken=eyJ0eXAiOiJKV1QiLCJhbGciOiJIUzI1NiJ9.eyJpc3MiOiJzb25pY3dhbGwiLCJleHAiOjE3NTM0OTk0MDUsImlhdCI6MTcyMTk2MzQwNX0.sSqSQZL-FPfWQrLxLYwQUzSmUpm8hfsXBAxs5mEktj4)
4.1.1 Add ‘SonicWall Journaling Outbound’ connector.
![Image](https://sonicwall.rightanswers.com/portal/app/portlets/results/onsitehypermedia/090220109467486.png?linkToken=eyJ0eXAiOiJKV1QiLCJhbGciOiJIUzI1NiJ9.eyJpc3MiOiJzb25pY3dhbGwiLCJleHAiOjE3NTM0OTk0MDUsImlhdCI6MTcyMTk2MzQwNX0.sSqSQZL-FPfWQrLxLYwQUzSmUpm8hfsXBAxs5mEktj4)
![Image](https://sonicwall.rightanswers.com/portal/app/portlets/results/onsitehypermedia/090220109562445.png?linkToken=eyJ0eXAiOiJKV1QiLCJhbGciOiJIUzI1NiJ9.eyJpc3MiOiJzb25pY3dhbGwiLCJleHAiOjE3NTM0OTk0MDUsImlhdCI6MTcyMTk2MzQwNX0.sSqSQZL-FPfWQrLxLYwQUzSmUpm8hfsXBAxs5mEktj4)
![Image](https://sonicwall.rightanswers.com/portal/app/portlets/results/onsitehypermedia/090220109720571.png?linkToken=eyJ0eXAiOiJKV1QiLCJhbGciOiJIUzI1NiJ9.eyJpc3MiOiJzb25pY3dhbGwiLCJleHAiOjE3NTM0OTk0MDUsImlhdCI6MTcyMTk2MzQwNX0.sSqSQZL-FPfWQrLxLYwQUzSmUpm8hfsXBAxs5mEktj4)
![Image](https://sonicwall.rightanswers.com/portal/app/portlets/results/onsitehypermedia/090220109891494.png?linkToken=eyJ0eXAiOiJKV1QiLCJhbGciOiJIUzI1NiJ9.eyJpc3MiOiJzb25pY3dhbGwiLCJleHAiOjE3NTM0OTk0MDUsImlhdCI6MTcyMTk2MzQwNX0.sSqSQZL-FPfWQrLxLYwQUzSmUpm8hfsXBAxs5mEktj4)
![Image](https://sonicwall.rightanswers.com/portal/app/portlets/results/onsitehypermedia/090220109427294.png?linkToken=eyJ0eXAiOiJKV1QiLCJhbGciOiJIUzI1NiJ9.eyJpc3MiOiJzb25pY3dhbGwiLCJleHAiOjE3NTM0OTk0MDUsImlhdCI6MTcyMTk2MzQwNX0.sSqSQZL-FPfWQrLxLYwQUzSmUpm8hfsXBAxs5mEktj4)
![Image](https://sonicwall.rightanswers.com/portal/app/portlets/results/onsitehypermedia/090220109944156.png?linkToken=eyJ0eXAiOiJKV1QiLCJhbGciOiJIUzI1NiJ9.eyJpc3MiOiJzb25pY3dhbGwiLCJleHAiOjE3NTM0OTk0MDUsImlhdCI6MTcyMTk2MzQwNX0.sSqSQZL-FPfWQrLxLYwQUzSmUpm8hfsXBAxs5mEktj4)
![Image](https://sonicwall.rightanswers.com/portal/app/portlets/results/onsitehypermedia/090220109388625.png?linkToken=eyJ0eXAiOiJKV1QiLCJhbGciOiJIUzI1NiJ9.eyJpc3MiOiJzb25pY3dhbGwiLCJleHAiOjE3NTM0OTk0MDUsImlhdCI6MTcyMTk2MzQwNX0.sSqSQZL-FPfWQrLxLYwQUzSmUpm8hfsXBAxs5mEktj4)
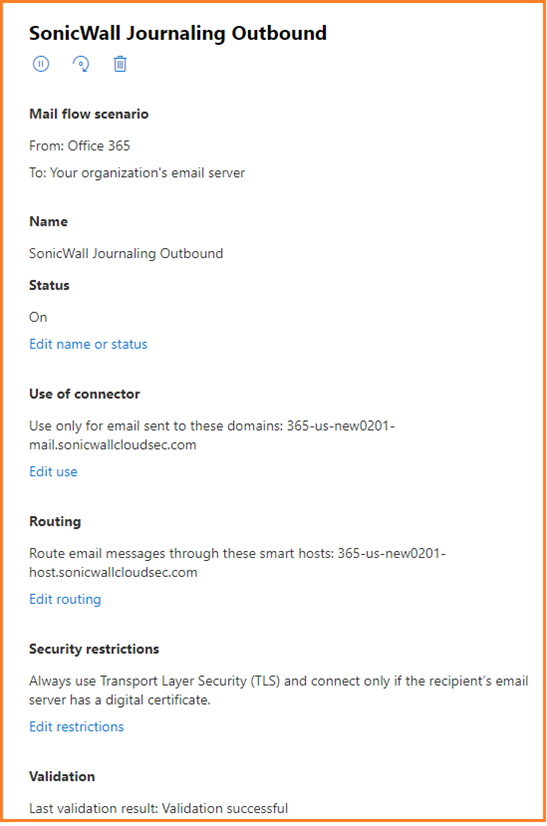
After all 3 connectors finished:
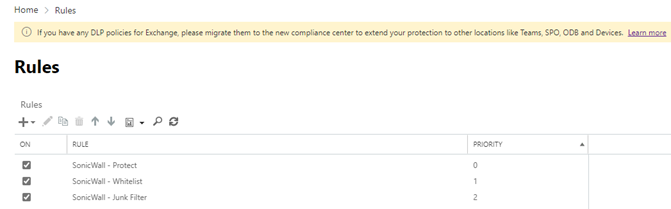
![Image](https://sonicwall.rightanswers.com/portal/app/portlets/results/onsitehypermedia/090220109601160.png?linkToken=eyJ0eXAiOiJKV1QiLCJhbGciOiJIUzI1NiJ9.eyJpc3MiOiJzb25pY3dhbGwiLCJleHAiOjE3NTM0OTk0MDUsImlhdCI6MTcyMTk2MzQwNX0.sSqSQZL-FPfWQrLxLYwQUzSmUpm8hfsXBAxs5mEktj4)
Section 3:
Mail Flow Rule
![Image](https://sonicwall.rightanswers.com/portal/app/portlets/results/onsitehypermedia/090220109728445.png?linkToken=eyJ0eXAiOiJKV1QiLCJhbGciOiJIUzI1NiJ9.eyJpc3MiOiJzb25pY3dhbGwiLCJleHAiOjE3NTM0OTk0MDUsImlhdCI6MTcyMTk2MzQwNX0.sSqSQZL-FPfWQrLxLYwQUzSmUpm8hfsXBAxs5mEktj4)
![Image](https://sonicwall.rightanswers.com/portal/app/portlets/results/onsitehypermedia/090220109240799.png?linkToken=eyJ0eXAiOiJKV1QiLCJhbGciOiJIUzI1NiJ9.eyJpc3MiOiJzb25pY3dhbGwiLCJleHAiOjE3NTM0OTk0MDUsImlhdCI6MTcyMTk2MzQwNX0.sSqSQZL-FPfWQrLxLYwQUzSmUpm8hfsXBAxs5mEktj4)
![Image](https://sonicwall.rightanswers.com/portal/app/portlets/results/onsitehypermedia/090220109457139.png?linkToken=eyJ0eXAiOiJKV1QiLCJhbGciOiJIUzI1NiJ9.eyJpc3MiOiJzb25pY3dhbGwiLCJleHAiOjE3NTM0OTk0MDUsImlhdCI6MTcyMTk2MzQwNX0.sSqSQZL-FPfWQrLxLYwQUzSmUpm8hfsXBAxs5mEktj4)
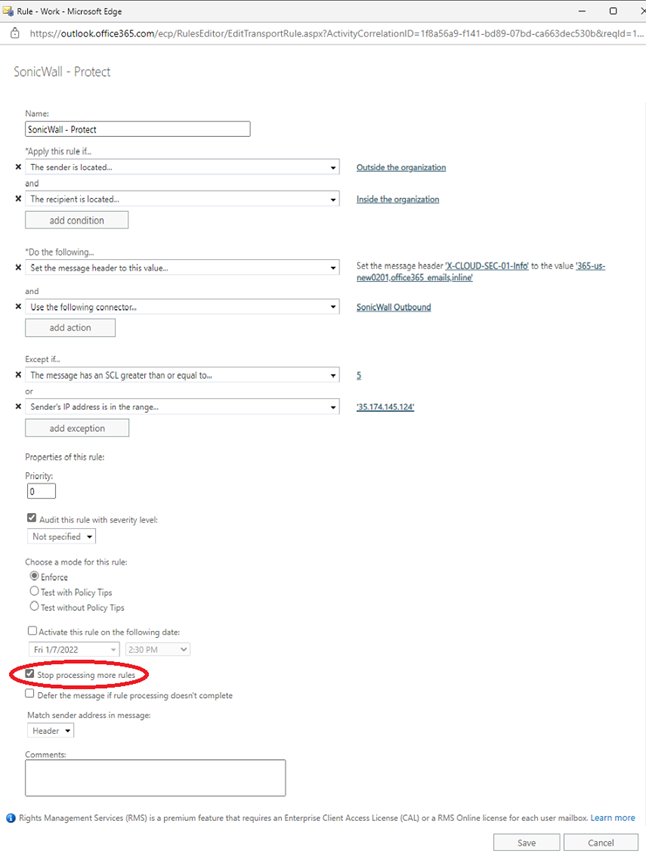
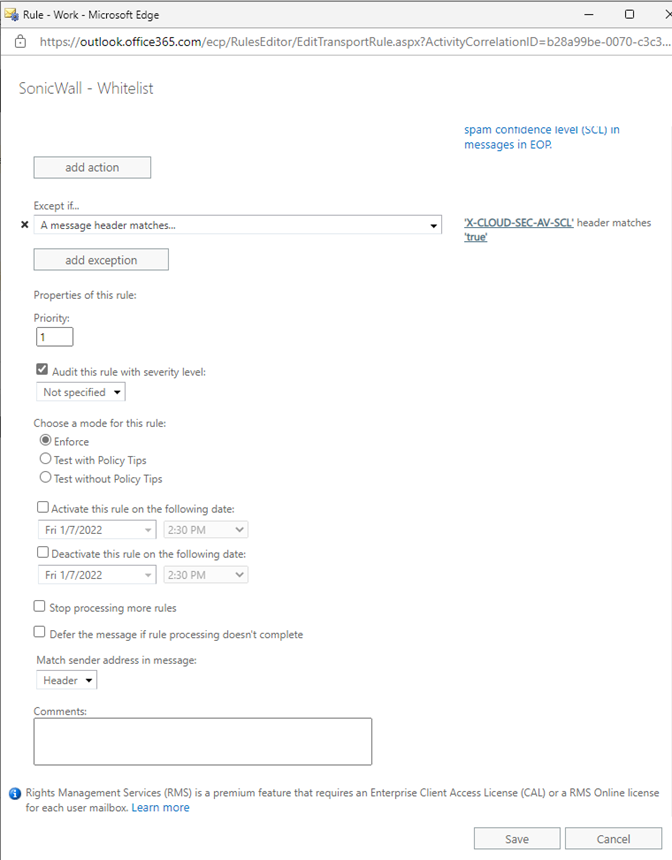
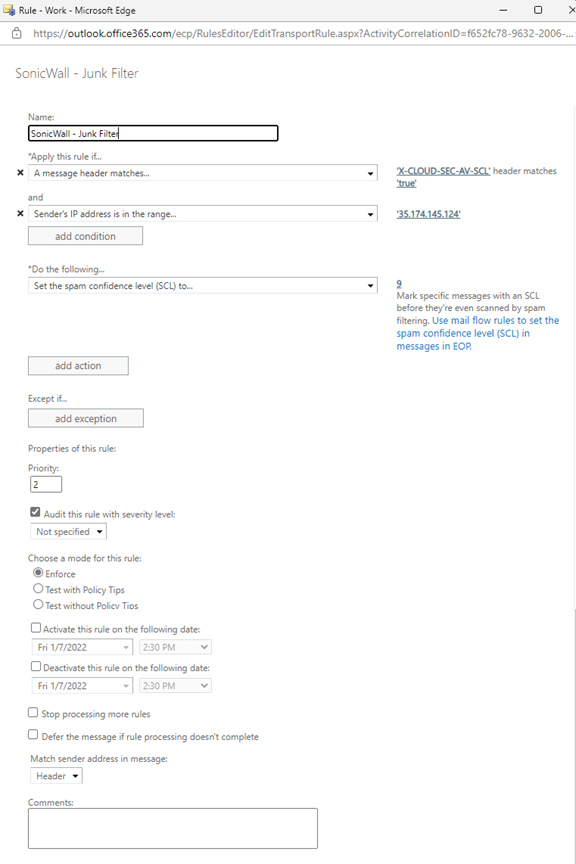
After completed all three rules.
![Image](https://sonicwall.rightanswers.com/portal/app/portlets/results/onsitehypermedia/090220109836721.png?linkToken=eyJ0eXAiOiJKV1QiLCJhbGciOiJIUzI1NiJ9.eyJpc3MiOiJzb25pY3dhbGwiLCJleHAiOjE3NTM0OTk0MDUsImlhdCI6MTcyMTk2MzQwNX0.sSqSQZL-FPfWQrLxLYwQUzSmUpm8hfsXBAxs5mEktj4)
Once all above configured in Exchange admin center then CAS Admin can login to cloud.sonicwall.com to start onboarding O365Mail and select manual option.
Related Articles
Categories