-
Products
-
SonicPlatform
SonicPlatform is the cybersecurity platform purpose-built for MSPs, making managing complex security environments among multiple tenants easy and streamlined.
Discover More
-
-
Solutions
-
Federal
Protect Federal Agencies and Networks with scalable, purpose-built cybersecurity solutions
Learn MoreFederalProtect Federal Agencies and Networks with scalable, purpose-built cybersecurity solutions
Learn More - Industries
- Use Cases
-
-
Partners
-
Partner Portal
Access to deal registration, MDF, sales and marketing tools, training and more
Learn MorePartner PortalAccess to deal registration, MDF, sales and marketing tools, training and more
Learn More - SonicWall Partners
- Partner Resources
-
-
Support
-
Support Portal
Find answers to your questions by searching across our knowledge base, community, technical documentation and video tutorials
Learn MoreSupport PortalFind answers to your questions by searching across our knowledge base, community, technical documentation and video tutorials
Learn More - Support
- Resources
- Capture Labs
-
- Company
- Contact Us
SonicWall Bootstrapping for Automated Deployments on KVM Platform


Description
This document provides information about the SonicWall NSv Series release on the KVM platform that includes details on the bootstrap process for automated deployments. The example used in the screenshots are from Ubuntu based Linux flavor. Bootstrapper can build ISO images using custom bootstrap.xml and init-cfg templates. This ISO can then be attached to the ‘cdrom’ slot on a KVM virtual machine to begin the bootstrap process.
NSv tries bootstrapping when the instance is not registered and/or when instance is reset to factory-defaults. The bootstrap happens in late stage of system startup. There are several stages of bootstrap. The first one is to check if bootstrap file exists in the system. It will mount virtual cdrom and then search for file in the following order:
- sonicos.bootstrap
- user_data
- user-data
It stops and read content from the first file found as bootstrap configurations for KVM platform. It will then check the data in the bootstrap file, the file must have valid SN and auth-code (not necessarily valid in back-end database, but at least in valid FORMAT) for bootstrap to happen.
- Bootstrap first applies SerialNumber, auth-code, and interface setting, and SonicOS login credentials, then it will restart system.
- Bootstrap then tries to register NSv if network is available. If that succeeds, then it will reboot again.
- Interface bootstrapping and login bootstrapping are independent from each other. Will still apply login information even if there is an error in interface configuration and vice-versa.
- Only static or DHCP is supported for interface configuration during bootstrapping.
- Only LAN/WAN on zone configuration is allowed and can only bootstrap interfaces X0 or X1. Settings for other interfaces are skipped.
- Only SSH management is supported.
- Only online registration is supported, so network must be up for it to work. It will try to register for a limited period of time after bootup, if that fails then there is no re-try.
During the bootstrap process, NSv may reboot several times. If everything works fine, there will be a message "No need to bootstrap because NSv is registered" at the end. Otherwise, user will need to check system console to see what went wrong during bootstrap.
Please note that the design of bootstrapping is to only support a very basic set of configurations to keep bootstrap as simple as possible. Once the box is registered and network is up, users can make use of SonicOS API for automation of any other configurations that are not supported by bootstrap.
Resolution
Detailed Bootstrap Process:
- Bootstrap configuration file:
Format: json file{
"username": "",
"password": "",
"serialnumber": "",
"authorization": "",
"mySonicwallAcct": "",
"mySonicwallPass": "",
"licensingToken": "",
"interface": [
{
"name" : "x0",
"type" : "dhcp"
},
{
"name" : "x1",
"management_ssh": "on",
"type" : "static",
"ip" : "1.1.1.2",
"netmask": "255.255.255.0",
"gateway": "1.1.1.1",
"dns1": "8.8.8.8",
"dns2": "8.8.8.9",
"dns3": "8.8.8.7"
}
]
}serialnumber, authorization, mySonicwallAcct, mySonicwallPass. licensing token are used for NSv registration.
username/password is the admin account used to access NSv web GUI.
interface type can be either dhcp or static.
if set to static, user can set Ip address, subnet mask, gateway, dns1, dns2 or dns3.
Current json format only includes two interfaces
 NOTE: If you create iso on your own, then please name the configuration file name as "sonicos.bootstrap". Starting SonicOS 7.0.1 release, user can also make use of token based registrations so instead of serial, auth-code, mysonicwall username and password, just use the token value. Only NSv 270, 470 and 870 NSv models support SonicOS 7 firmware and above. The json file name must be sonicos.bootstrap and must use the same folder that will be used to generate the iso file.
Below is an e.g that can be followed.
open a terminal in Ubuntu/equivalent*:
vim sonicos.bootstrap
Store your bootstrap file content into sonicos.bootstrap
save and exit - How to make ISO:
On linux system, you can use genisoimage to create an iso. One example command is: "genisoimage -o
bootstrap.iso -V sosv_config -R -J myconfig/"
Check if you can run genisoimage, if not, try to install with "sudo apt install genisoimage"
sonicos.bootstrap and the iso file must be in the same folder and the -J option is must.
a) mkdir myconfig
b) cd myconfig
c) vim sonicos.bootstrap
d) cd ..
e) "genisoimage -o bootstrap.iso -V sosv_config -R -J myconfig/" - How to use the ISO:
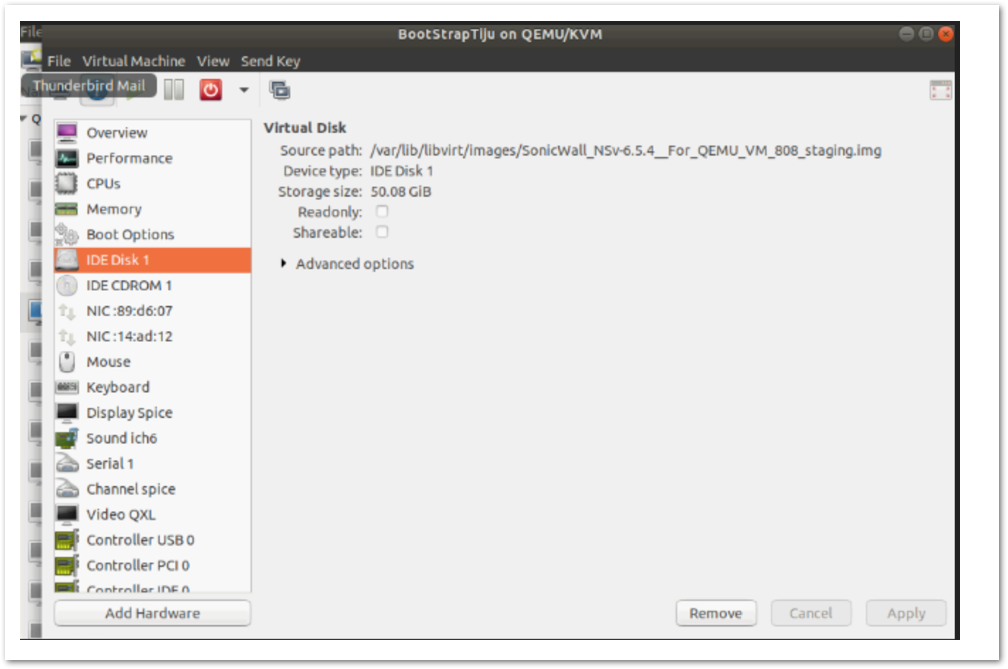
Add the SonicWall KVM Image in the source path of IDE Disk 1
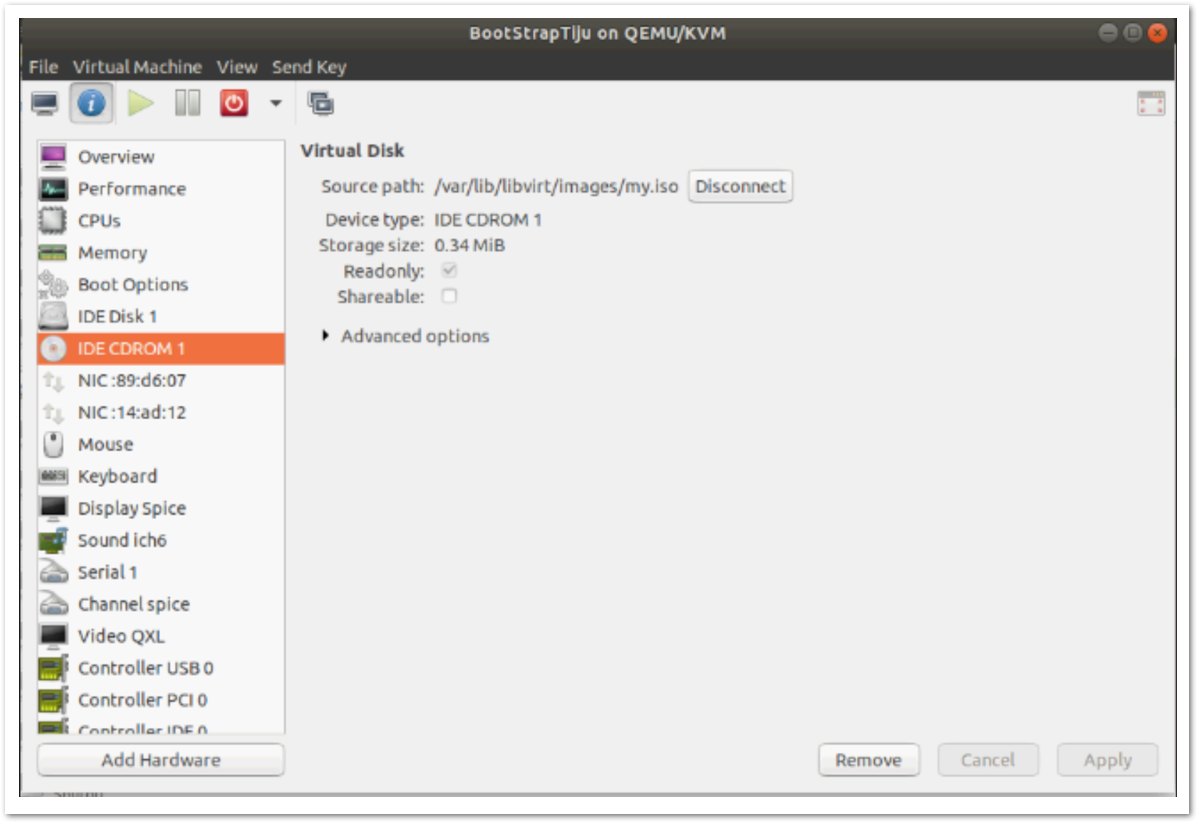
Add a CD-ROM device to your NSv VM.
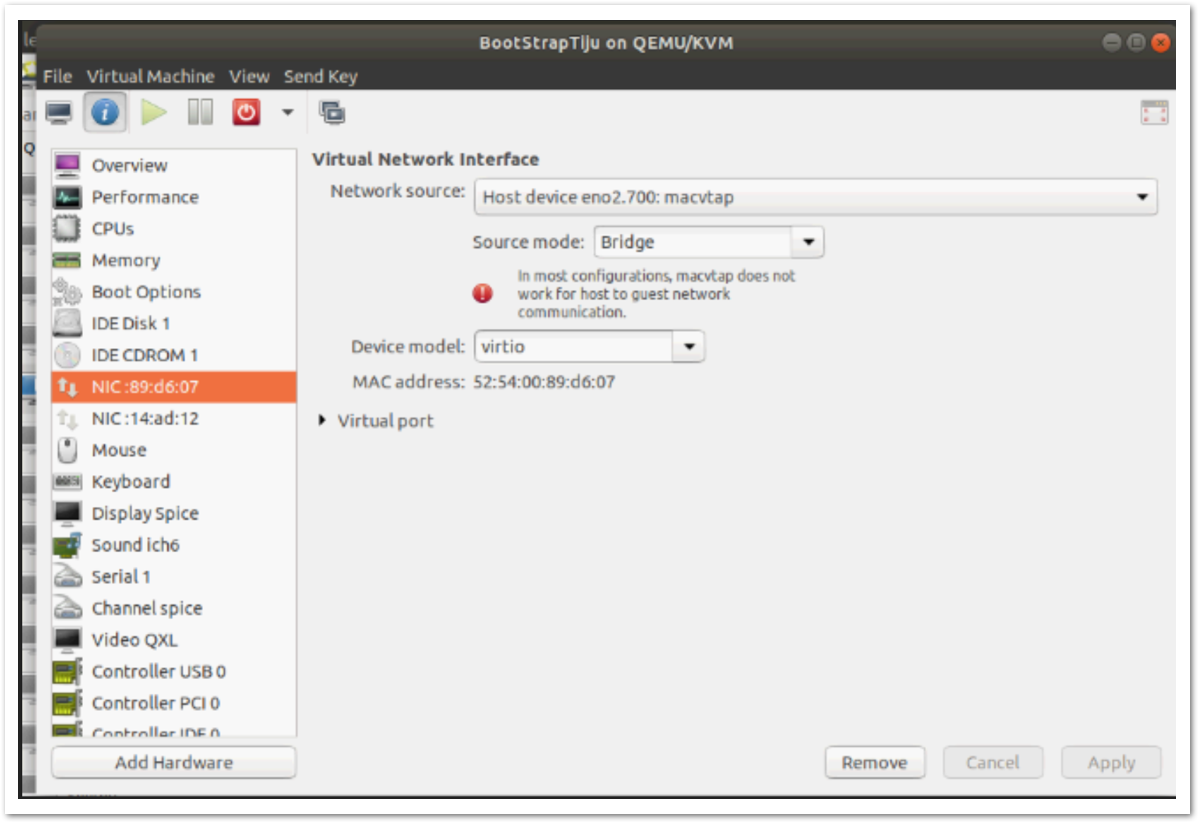
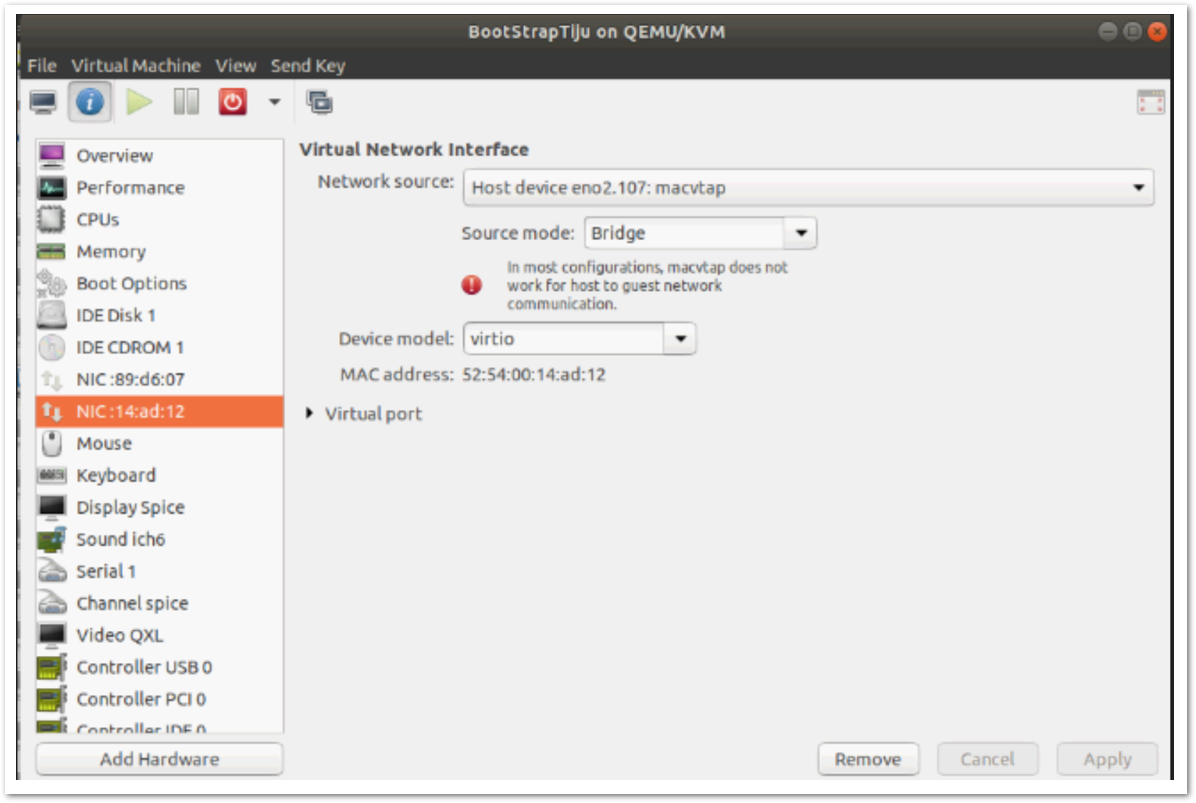
From source path, select the bootstrap.iso. my.iso is the file in above snippet. The json file name must be sonicos.bootstrap and must use folder to generate the iso file, and the -J option is must require. Make sure to add two NICs. One for X0 and another for X1 as shown in below two snippets.

- Then bootup your NSv by clicking begin installation. It will reboot few times during deployment. Once it finishes, you should have your NSv configured the way you want in your bootstrap file. If not, please check NSv console log.
Troubleshooting Steps:
- If bootstrap fails, please boot into debug mode, it shows more debug information and should indicate what is going wrong.
- if you see "can't find or read bootstrap file", please check your bootstrap file name, and then the json format. Install jq on ubuntu and run "cat your_bootstrap_file | jq" to check.
Supported Platforms
Bootstrapping for automated deployments is supported on the following SonicWall KVM virtual firewall models :
Additional Details
For more release notes and documentation on KVM platform, please logon to mysonicwall portal using your mysonicwall account. You can also refer to technical documentation on www.sonicwall.com for getting started guide.
Related Articles
- Error:"Invalid API Argument" when modifying the access rules
- Cysurance Partner FAQ
- Configure probe monitoring for WAN Failover and Loadbalancing - SonicWall UTM


 YES
YES NO
NO