-
Products
-
SonicPlatform
SonicPlatform is the cybersecurity platform purpose-built for MSPs, making managing complex security environments among multiple tenants easy and streamlined.
Discover More
-
-
Solutions
-
Federal
Protect Federal Agencies and Networks with scalable, purpose-built cybersecurity solutions
Learn MoreFederalProtect Federal Agencies and Networks with scalable, purpose-built cybersecurity solutions
Learn More - Industries
- Use Cases
-
-
Partners
-
Partner Portal
Access to deal registration, MDF, sales and marketing tools, training and more
Learn MorePartner PortalAccess to deal registration, MDF, sales and marketing tools, training and more
Learn More - SonicWall Partners
- Partner Resources
-
-
Support
-
Support Portal
Find answers to your questions by searching across our knowledge base, community, technical documentation and video tutorials
Learn MoreSupport PortalFind answers to your questions by searching across our knowledge base, community, technical documentation and video tutorials
Learn More - Support
- Resources
- Capture Labs
-
- Company
- Contact Us
SMB SSL-VPN: Setting up SSl-VPN behind SonicWall UTM Appliance with multiple portals with unique Ce


Description
SMB SSL-VPN: Setting up SSl-VPN behind SonicWall UTM Appliance with multiple portals with unique Certificate per portal.
Resolution
Introduction
This technote is an example of how to stup an SSL-VPN device with multiple portals, and a unique certificate per portal behind a SonicWall UTM device.
It is possible to set up 2 portals with 2 separate certificates if you have more that one public IP available to use. In order to do this, first import the certificates.
Setup
1) Create and import certificates
For step by step instructions for importing certificates click here SSL_VPN: Creating and Installing Digital Certificates on SonicWall SSL VPN Appliances
2) Create the portals
In this example we’ll create two portals, one for sales and one for accounting.
Go to Portals and click add.
In this example we will call the portal sales.
Modify the HTML for the login message if you would wish to customize the login page.
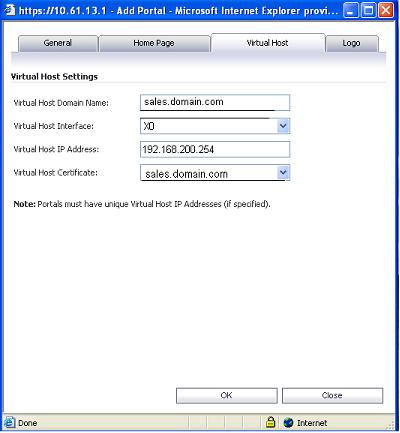
Now click on the virtual host tab.
Type in sales for the Virtual Host Domain Name.
Set the drop down menu for Virtual Host Interface to X0.
For the virtual host IP put in an IP address that is in the same subnet as the SSL's X0 IP, in this example 192.168.200.254.
Now choose the sales certificate from the Virtual Host Certificate drop down menu.
Click OK.
Repeat this process for accounting, only make the virtual host IP different than sales, in this case 192.168.200.253.

3) Setup the UTM device
In order to complete this install, you will need to make Nat policies mapping the public IP’s to the private virtual IP’s of the Portals on the SSL.
Create an inbound and outbound NAT policy per portal.
In this example two NAT policy pairs must be created, one for sales and one for accounting.
In this example we will Nat the public IP of 75.42.50.26 to the virtual host IP for sales which was 192.168.200.254. and we will Nat the public IP of 75.42.50.25 to the virtual host IP for accounting which was 192.168.200.253.
Inbound NAT Policy
From Network>Nat policies click Add.
Original source is.............. any
Translated source is .........Original
Original destination is.......Create a new address object
Call the object.....................sales public
Zone assignment is ............WAN
Type is................................. Host
Ip Address...........................75.42.50.26
Click OK.

Translated destination is.....Create a new address object
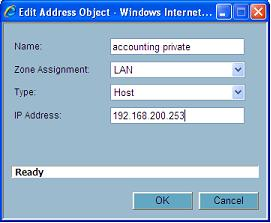
Call the object..................... sales private
Zone assignment is.............. LAN
Type is..................................Host
Ip address is..........................192.168.200.254
Click OK

Original service is.................HTTPS
Translated service is..............Original
Inbound interface is..............Wan or X1
Outbound interface is............Any
Comment...............................Inbound sales ssl
Click OK

Outbound NAT policy
From Network>Nat policies click Add.
Original source is .................sales private
Translated source is ...............sales public
Original destination is ............Any
Translated destination is.........Original
Original service is ....................HTTPS
Translated service is ................Original
Inbound interface is..................LAN or X0
Outbound interface is................WAN or X1
Comment...................................Outbound sales ssl
Click OK.

Above needs to be repeated for the Accounting portal using address object pair: accounting public/private 75.42.50.25/192.168.200.253


In our example the SSL-VPN device is on the LAN zone, thus WAN to LAN firewall rules will also be needed to allow HTTPS to the public IP address objects “sales public” and “accounting public”
From Firewall>Access Rules in matrix view, WAN to LAN.
Click Add
Action is....................................Allow
Service is ..................................HTTPS
Source is....................................Any
Destination is.............................sales public
Check the “Allow Fragmented Packets” check box.
Click OK

Duplicate this rule for a destination of accounting public.
Related Articles
- How to download Client Installation package and the access agents from the appliance using WinSCP
- SMA 1000: How to update Advanced EPC Signatures to the Latest Version
- If OTP is enabled, NX disconnects after SMA100 Connect Agent installation


 YES
YES NO
NO