-
Products
-
SonicPlatform
SonicPlatform is the cybersecurity platform purpose-built for MSPs, making managing complex security environments among multiple tenants easy and streamlined.
Discover More
-
-
Solutions
-
Federal
Protect Federal Agencies and Networks with scalable, purpose-built cybersecurity solutions
Learn MoreFederalProtect Federal Agencies and Networks with scalable, purpose-built cybersecurity solutions
Learn More - Industries
- Use Cases
-
-
Partners
-
Partner Portal
Access to deal registration, MDF, sales and marketing tools, training and more
Learn MorePartner PortalAccess to deal registration, MDF, sales and marketing tools, training and more
Learn More - SonicWall Partners
- Partner Resources
-
-
Support
-
Support Portal
Find answers to your questions by searching across our knowledge base, community, technical documentation and video tutorials
Learn MoreSupport PortalFind answers to your questions by searching across our knowledge base, community, technical documentation and video tutorials
Learn More - Support
- Resources
- Capture Labs
-
- Company
- Contact Us
Security Service Bundle for Wireless Network Manager (WNM)


Description
The Security Policies page displays all of the security policies configured on your network and provides options for managing, adding, and editing security policies. These policies add extra layers of security beyond that available from network policies.
Only licensed security policies can be applied to an SSID or SSID group managed in your Wireless Network Manager network. If you try to apply a policy that is not licensed, a screen tip appears indicating that this policy needs to be licensed.
A few of the security services included in Wireless Network Manager are:
- Geo-IP & Botnet
- Cloud Anti-Virus
- Content Filtering Service
Resolution
Geo-IP & Botnet
These two security features provide extra safety by allowing you to choose specific countries to block, or to block attacks from Botnets. These are networks of compromised computers transmitting malware, spam, or other destructive files. Each of these features need separate licenses, available from MySonicWall.

The bottom two sections of the Add New Security Policy page give you the option of enabling Geo-IP and/or Botnet blocking on this policy.
- Fill in your GEO-IP and Botnet choices, including any IPs you wish to exclude from the ban.
- Click OK to apply the selections you have made.
Cloud Anti-Virus
Cloud Anti-Virus (Cloud AV) is an advanced feature of Wireless Network Manager. This cloud-based anti-virus service provides real-time file virus scanning and reporting without consuming local computing resources. Multi-Engine Cloud AV is supported on the SonicWave appliance. Once you have created Cloud AV security policies, you can add them to an SSID group.
To create a new Cloud AV policy
- Navigate to Security > Security Policies.
- Click Add +. The first Add New Security Policy displays.
- In the Name field, enter the name of the security policy you want to add.
- From the Type list, select Cloud-AV Security Policy.
- Click Next.
- When the second Add New Security Policy screen displays, click Enable to enable the security policy you created.
Content Filtering Service Security Policies
Content Filtering Service (CFS) is a web-filtering service that blocks inappropriate, unproductive, and illegal or malicious web content according to your specifications. CFS inspects web page traffic based on HTTP and HTTPS protocols, and blocks or logs websites based on pre-configured blacklists and whitelists. CFS includes tools for creating and applying policies that allow or deny access to sites based on individual or group identity, time of day, and over 90 other categories you pre-select. This feature is based on SonicWave Virtual Access Point (Virtual SSID) architecture. All user configuration is VAP (Virtual Access Point)-based.
Content Filtering Service Security Policies for Wireless Network Manager includes below topics:
Creating Content Filtering Service Security Policies
You can create CFS security policies and select which categories you want them to block.
To create a CFS security policy
- Navigate to Security > Security Policies.
- Click Add +. The Add New Security Policypage displays.

- In the Namefield, enter a name for the policy.
- In the Typefield, select CFS Security Policy from the drop down list.
- Click Next. The Add New Security Policyscreen display.

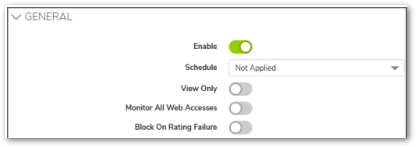
- Toggle Enable to enable the CFS policy you are creating. From the dropdown list, choose the Schedule.

- Click View Only if you want CFS to log website access instead of blocking the websites.
- Select CFS Categories based on your requirements. To select all the categories, click Select All.
- When you click OK, the CFSpolicy is enabled and listed on the Security > Security Policies page according to the criteria you have chosen.
Editing Content Filtering Service Categories
The CFS categories that provide customization options for blocking specific types of websites can be changed at any time.
To edit Content Filtering Service categories
Navigate to Security > Security Policies.

- Click Edit/Config next to the policy you want to change. The Edit Security Policy page displays.
- Click Select All to select all Content Filtering Service categories, or choose specific categories to block specific types of websites.
- Click Submit to apply the Content Filtering Service policy.
Related Articles
- SonicWall deprecates support for WEP and TKIP encryption on SonicOS 8.0.0
- End of sale "SMA and Sonicwave" product for India.
- What is the WPA2 KRACK exploit and is SonicWall vulnerable?


 YES
YES NO
NO