-
Products
-
SonicPlatform
SonicPlatform is the cybersecurity platform purpose-built for MSPs, making managing complex security environments among multiple tenants easy and streamlined.
Discover More
-
-
Solutions
-
Federal
Protect Federal Agencies and Networks with scalable, purpose-built cybersecurity solutions
Learn MoreFederalProtect Federal Agencies and Networks with scalable, purpose-built cybersecurity solutions
Learn More - Industries
- Use Cases
-
-
Partners
-
Partner Portal
Access to deal registration, MDF, sales and marketing tools, training and more
Learn MorePartner PortalAccess to deal registration, MDF, sales and marketing tools, training and more
Learn More - SonicWall Partners
- Partner Resources
-
-
Support
-
Support Portal
Find answers to your questions by searching across our knowledge base, community, technical documentation and video tutorials
Learn MoreSupport PortalFind answers to your questions by searching across our knowledge base, community, technical documentation and video tutorials
Learn More - Support
- Resources
- Capture Labs
-
- Company
- Contact Us
Pending reboot prompt troubleshooting during Capture Client install/upgrade


Description
From Capture Client for Windows v3.7.2 the Capture Client install and upgrade process will check if the device is pending a reboot action due to OS or application upgrades; if this check returns a true value, the agent installs/upgrade process will terminate and provide a prompt to perform a reboot. This is because a device pending reboot may not have the latest updates applied and is not in a recommended state to provide assurance of protection from malware and other threats.
Resolution
Capture Client checks presence of below registry keys to determine a pending reboot action:
· HKEY_LOCAL_MACHINE\SOFTWARE\Microsoft\Windows\CurrentVersion\WindowsUpdate\Auto Update\RebootRequired
· HKEY_LOCAL_MACHINE\SYSTEM\CurrentControlSet\Control\Session Manager\PendingFileRenameOperations
Please note, that the Capture Client or SentinelOne agent will not modify the value of this key.
If the endpoint is prompting you to reboot when installing or upgrading the Capture Client agent, here are some steps to take:
Verify and ensure MSI installation is not blocked.
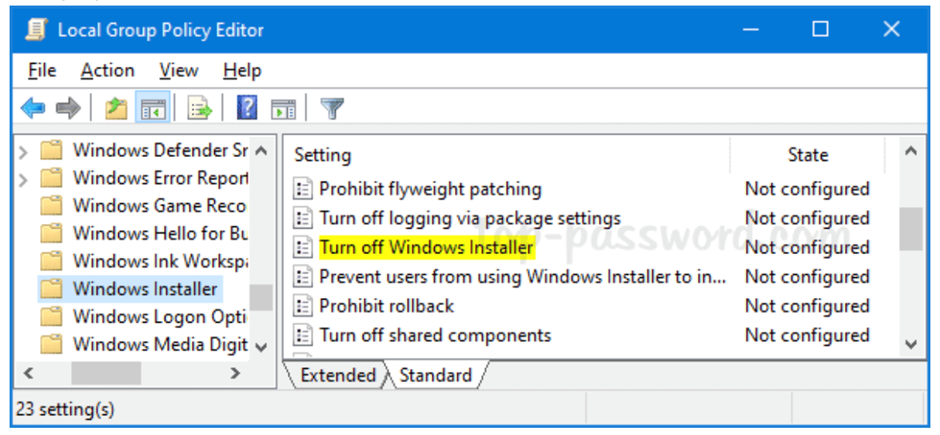
- Open Local Group Policy Editor and expand Computer Configuration -> Administrative Templates -> Windows Components -> Windows Installer. Double-click the policy named “Turn off Windows Installer” in the right pane.

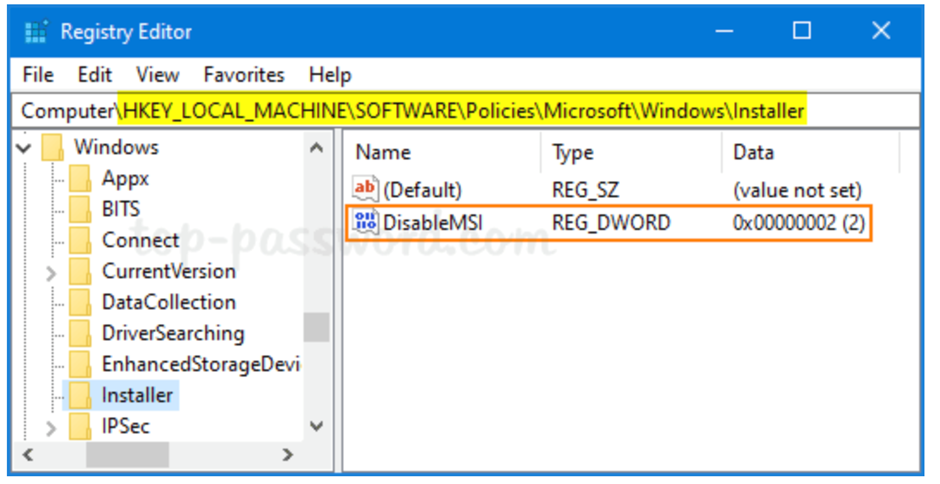
- Alternatively, Open Registry Editor and browse to: HKEY_LOCAL_MACHINE\Software\Policies\Microsoft\Windows\Installer.
- If the Installer subkey exists, Double-click the 32-bit DWORD DisableMSI in the right pane, and set the value to 0.

- Close Registry Editor and reboot Windows to make the changes take effect.
Verify if installation is forbidden by System Policy
- Edit Group Policy settings for Windows Installer
- Press Windows key + R. In the Run dialog box type gpedit.msc and hit Enter to open Local Group Policy Editor.
- Inside the Local Group Policy Editor, use the left pane to navigate to the path below:
- Computer Configuration | Administrative Templates | Windows Components | Windows Installer
- On the right pane, double-click on Turn off Windows Installer entry to edit its properties.
- In the properties window, set the radio button to Not Configured.
- Click Apply | OK to exit the properties window.
- Next, still, on the right pane, double-click on Prohibit non-administrators from applying vendor signed updates entry to edit its properties.
- In the properties window, set the radio button to Disabled.
- Click Apply | OK to exit the properties window.
- Exit Group Policy Editor.
- Now, try installing the software again and see if it completes successfully. Otherwise, try the next solution.
Modify Local Security Policy Settings
- Press Windows key + R.
- In the Run dialog box type secpol.MSC to open the Local Security Policy Editor.
- In the left pane, select Software Restriction Policies under Security Settings. The No Software Restriction Policies Defined will be displayed on the right pane.
- Next, click the Action menu and select New Software Restriction Policies.
- Next, double-click the Enforcement entry in the right pane to edit its properties.
- Now, select the radio button for All users except the local administrators option under Apply software restriction policies to the following users section.
- Click Apply |OK.
- Exit Local Security Policy Editor.
- See if the software installation is resolved or not. If the latter is the case, try the next solution.
References:
https://www.top-password.com/blog/turn-off-windows-installer-to-block-msi-package/
https://www.thewindowsclub.com/fix-error-1625-this-installation-is-forbidden-by-system-policy
https://www.top-password.com/blog/open-local-group-policy-editor-in-windows-10/
https://www.top-password.com/blog/6-ways-to-open-registry-editor-in-windows-10/
Related Articles
- SentinelOne agent command line tool
- Capture Client Agent Return Codes - Phase 1
- Configure Email and Notification(Alerts) in Capture Client for Tenants


 YES
YES NO
NO