-
Products
-
SonicPlatform
SonicPlatform is the cybersecurity platform purpose-built for MSPs, making managing complex security environments among multiple tenants easy and streamlined.
Discover More
-
-
Solutions
-
Federal
Protect Federal Agencies and Networks with scalable, purpose-built cybersecurity solutions
Learn MoreFederalProtect Federal Agencies and Networks with scalable, purpose-built cybersecurity solutions
Learn More - Industries
- Use Cases
-
-
Partners
-
Partner Portal
Access to deal registration, MDF, sales and marketing tools, training and more
Learn MorePartner PortalAccess to deal registration, MDF, sales and marketing tools, training and more
Learn More - SonicWall Partners
- Partner Resources
-
-
Support
-
Support Portal
Find answers to your questions by searching across our knowledge base, community, technical documentation and video tutorials
Learn MoreSupport PortalFind answers to your questions by searching across our knowledge base, community, technical documentation and video tutorials
Learn More - Support
- Resources
- Capture Labs
-
- Company
- Contact Us
NSM - How to enable SNMP with Template via API


Description
In NSM Template, Enable/Disable SNMP on SonicWall firewall interface (X0, X1, etc) will cause NSM sends default values of the interface with the change of SNMP. For example, if SSH is enabled on X1, enabling SNMP in Template, and deploy it to the firewall, will make SSH on X1 to be disabled, since the default value is disable.
We can use API to change SNMP only to Template, so that only SNMP value is changed when applying the Template.
These are the steps for using CURL:
1. Login to NSM and switch to Templates screen;
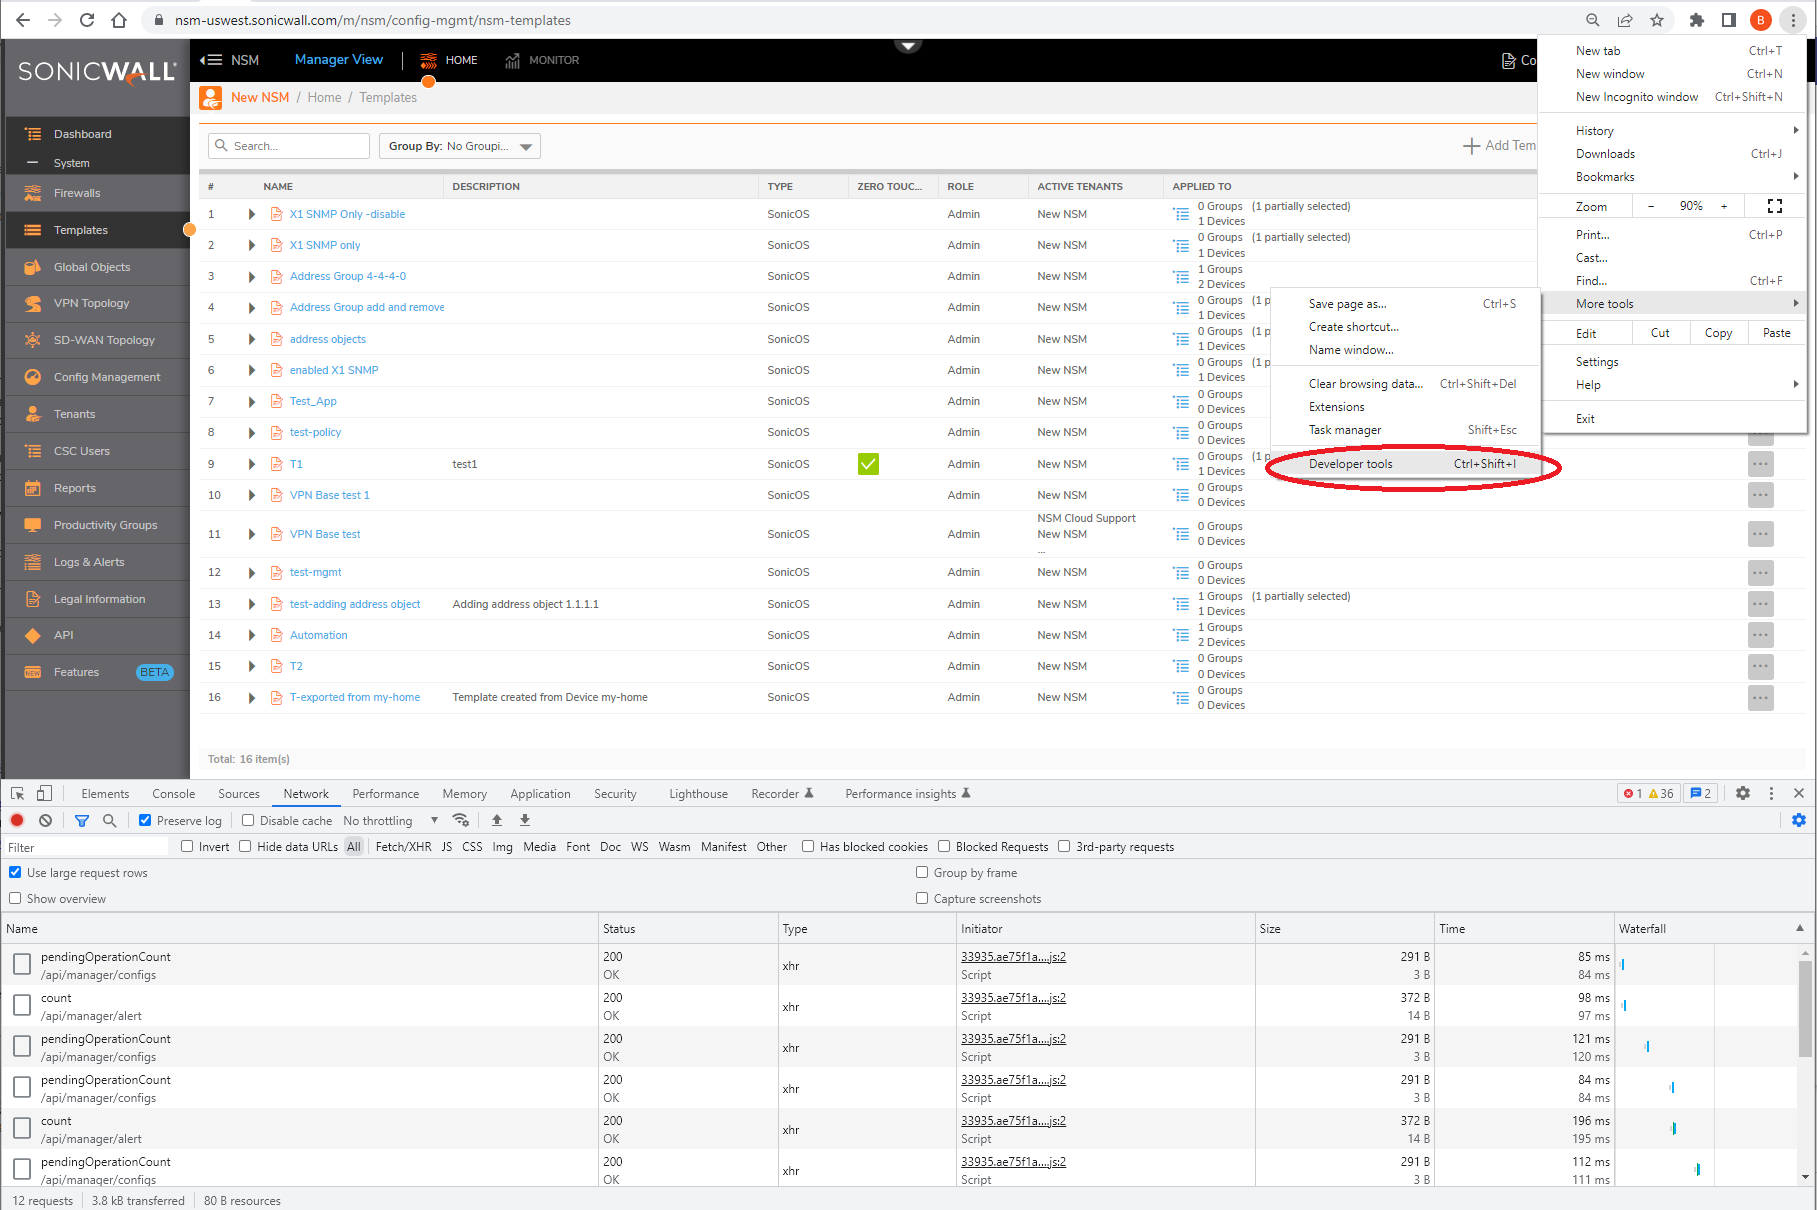
2. Open the browser development tool (F12 for Windows or Opt+Cmd+I for MacOS) and switch to Network tab to capture XHR HTTP requests, or follow screenshot:
3. Add a Template on the UI and do not switch to Template view;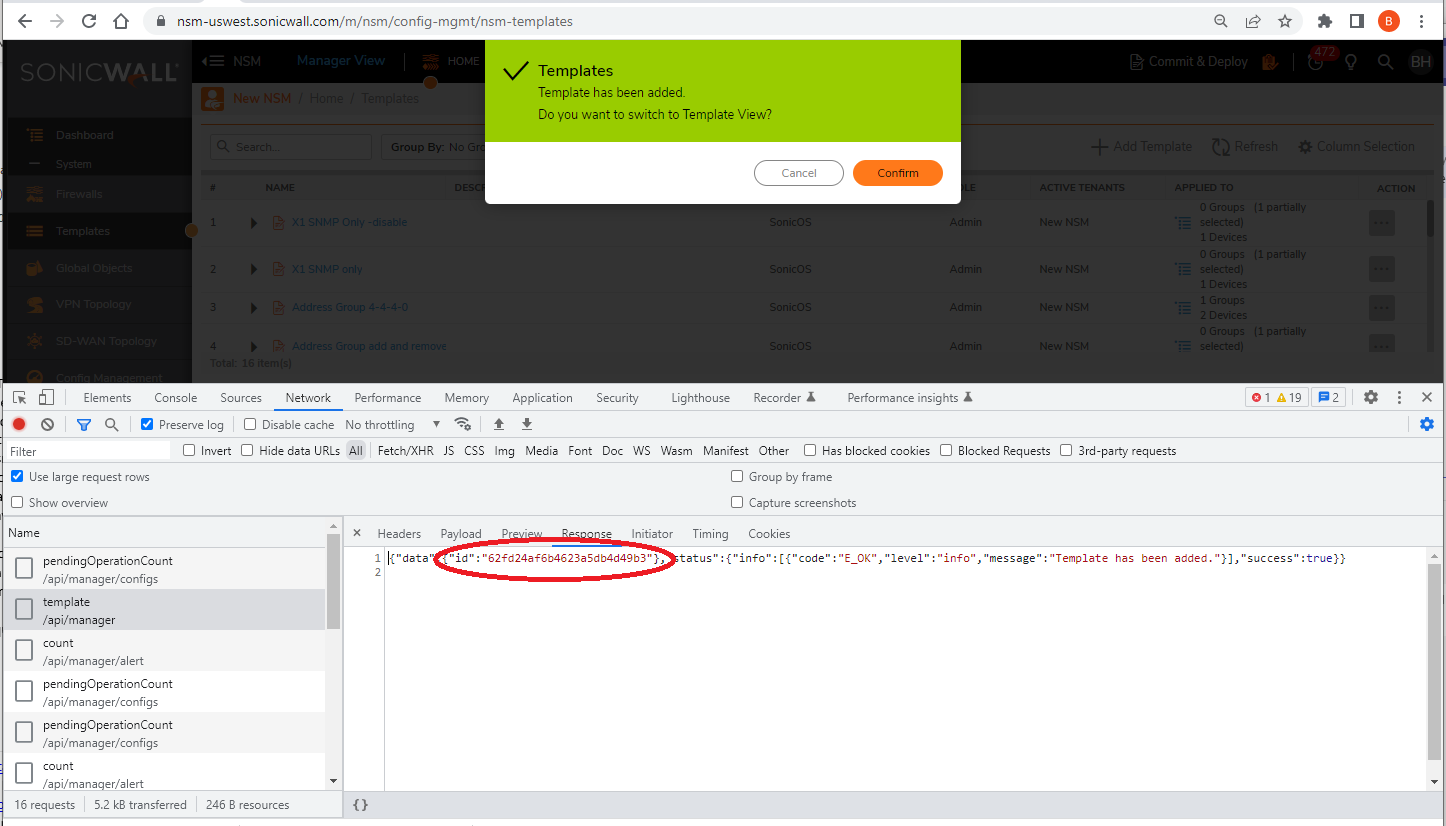
4. Fetch the Template ID from the data.id in the response of the ‘POST /template’ API (See above screenshot);
5. Find Bearer token by searching development tool (control+F):
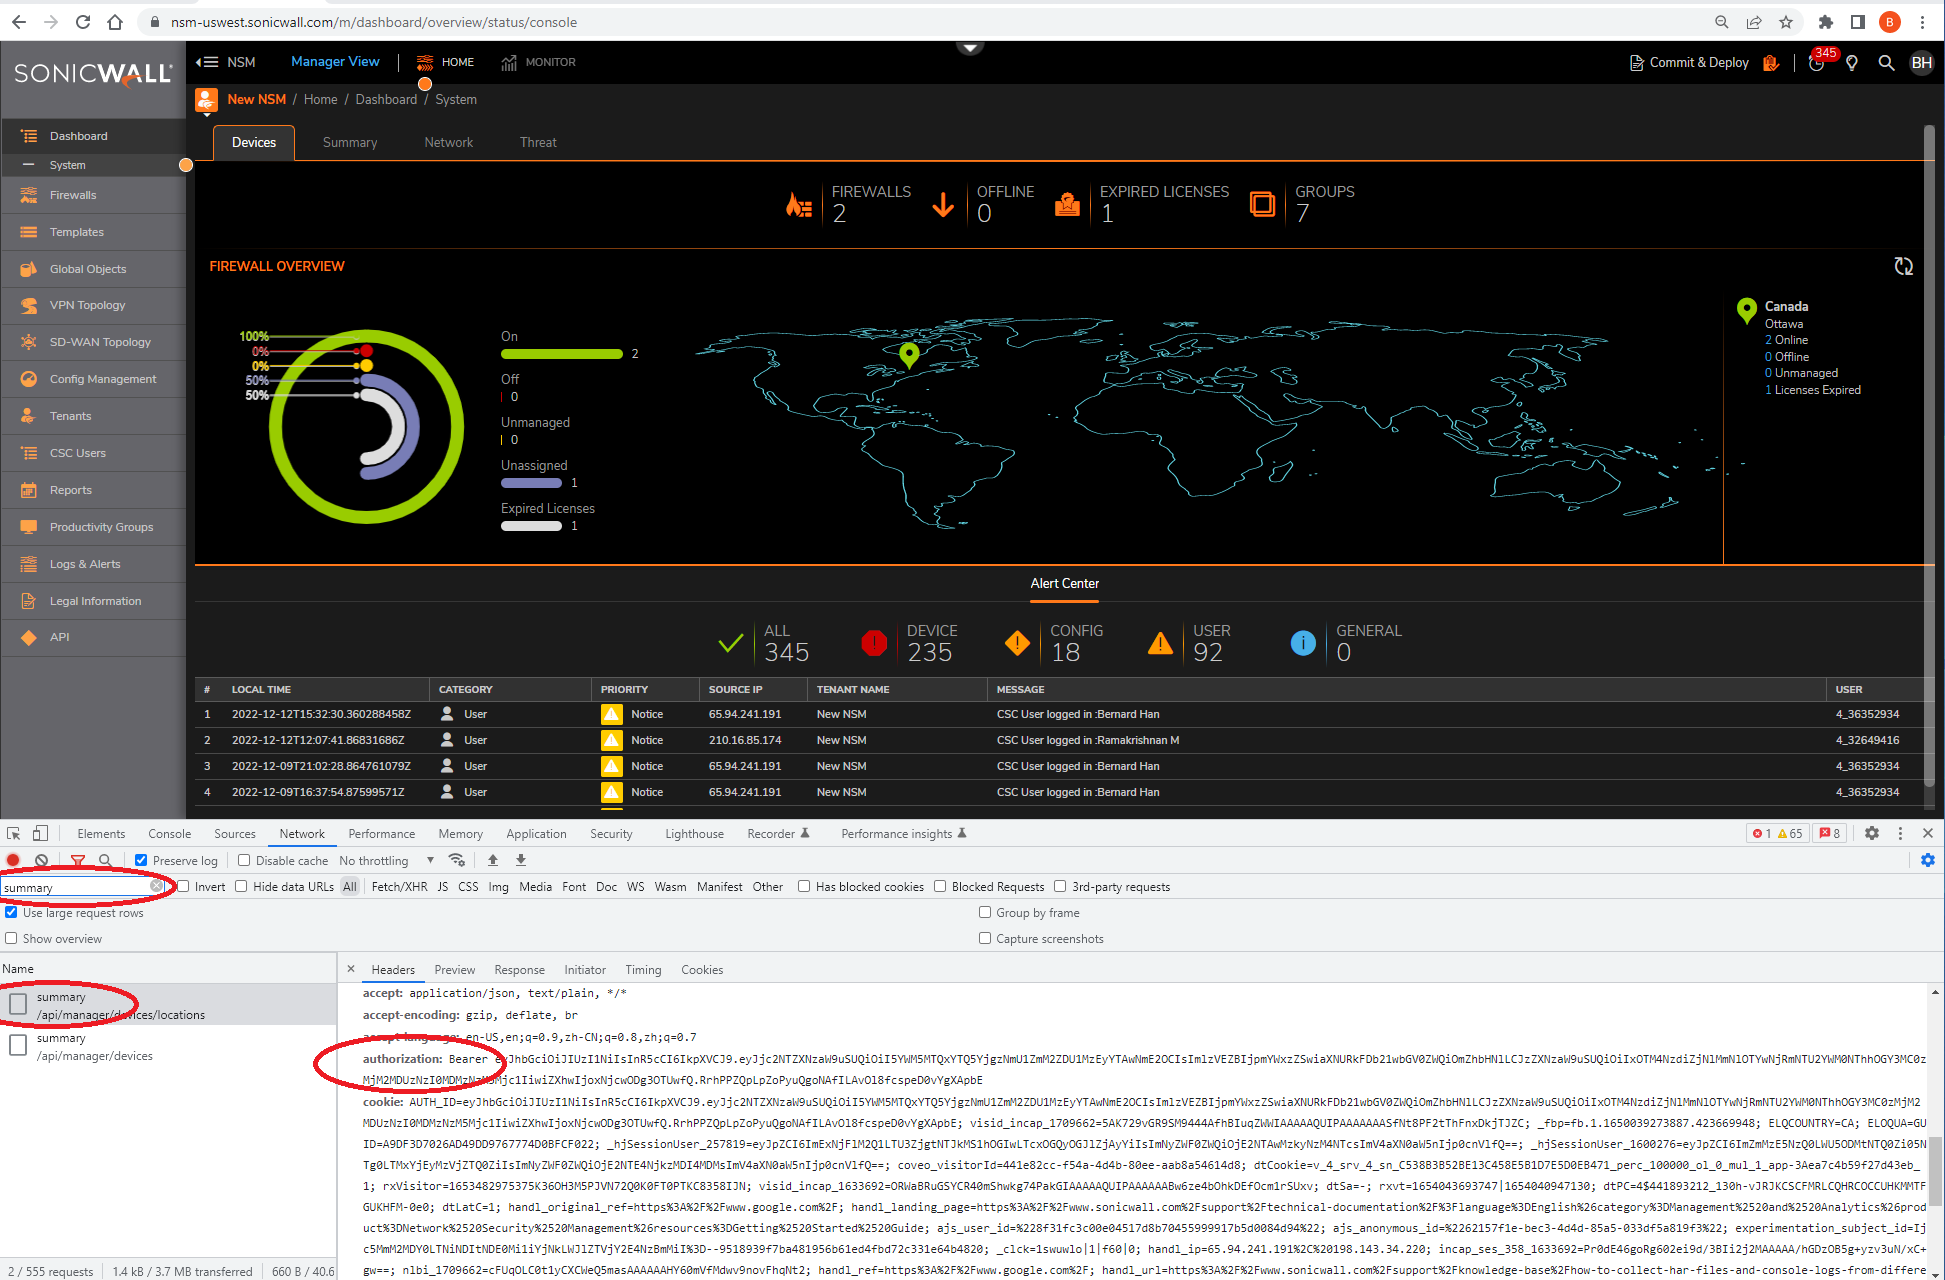
6. Replace the NSM URI (like nsm-uswest.sonicwall.com) if needed and “Authorization: Bearer” token in the header of the cURL command attached (save the following as file name EnableX1SNMP-cURL.json)
curl --location --request PUT 'https://nsm-uswest.sonicwall.com/api/manager/firewall/interfaces/ipv4/name/X1' \
--header 'Content-Type: application/json' \
--header 'X-GMS-MODE: gms' \
--header 'X-TEMPLATE-ID: 62fb9fee3925a38a9f9278f6' \
--header 'Authorization: Bearer eyJhbGciOiJIUzI1NiIsInR5cCI6IkpXVCJ9.eyJpc1RGQSI6ZmFsc2UsImlzVEZBQ29tcGxldGVkIjpmYWxzZSwic2Vzc2lvbklEIjoiNWI0ZGNmOGFhMTk1ZWYwNmY2MmZhZDI3ZTFhNjJiMzItMjA2OTA5NTk4ODc3ODU3NDM3MyIsImV4cCI6MTY2MDY4NTIyN30.6MTXvNqKugROCT6Ks50Qj4EHzeZ56i0QUboZC8TGjnc' \
--data-raw '{
"interfaces": [
{
"ipv4": {
"name": "X1",
"management": {
"snmp": true
}
}
}
]
}'
97. 7. Replace the Template ID follow with the ‘X-TEMPLATE-ID:’ header of the command attached
8. Send the cURL command in a shell which has curl installed
. Now the Template should have been successfully created, and you can continue using NSM UI for the rest of the config management workflow (applying Template, Commit & Deploy, etc)
If using Postman, replacing step 6,7,8 with following:
1. Replace Bearer Token in in Collection level:
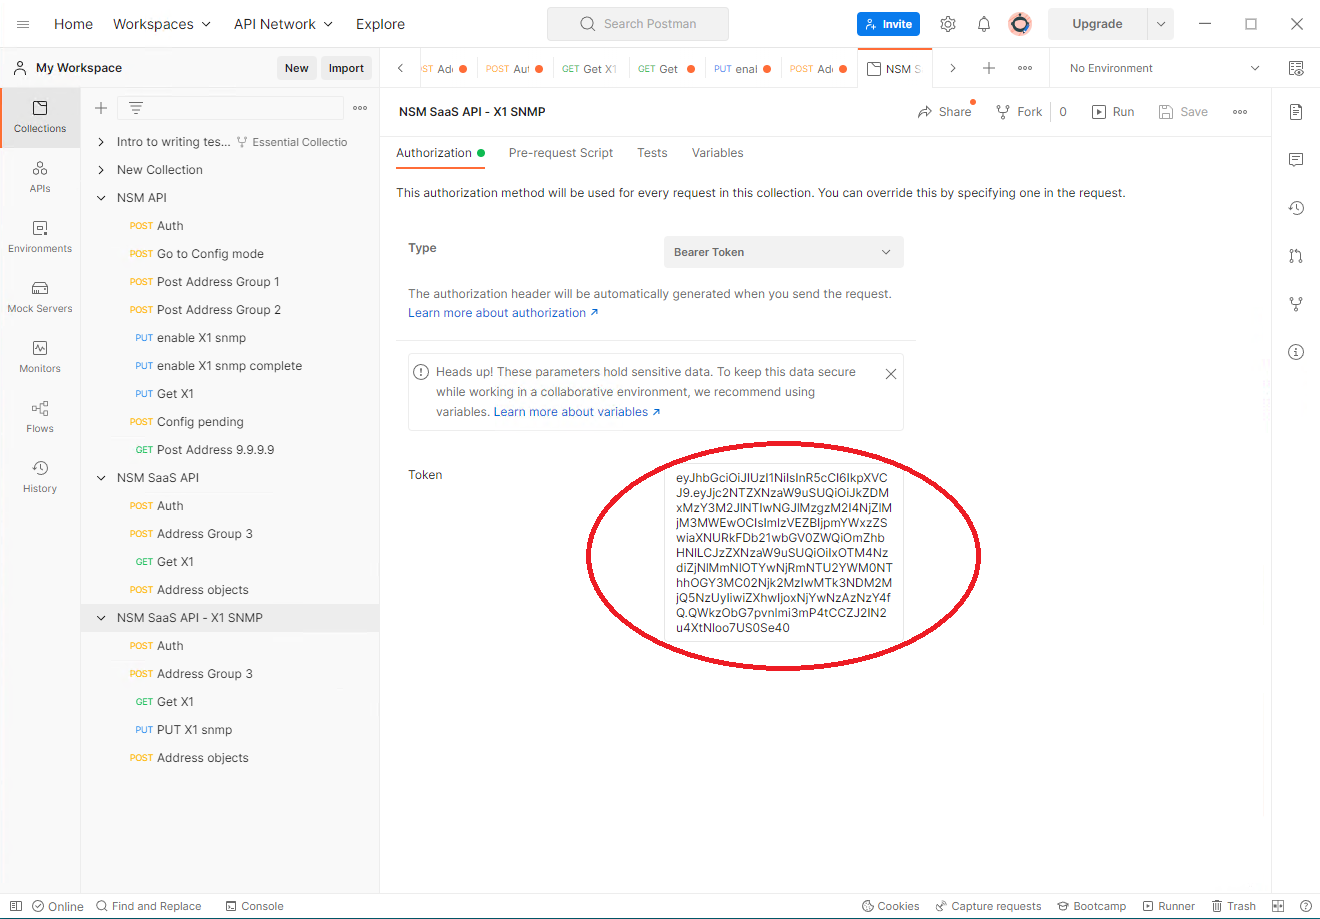
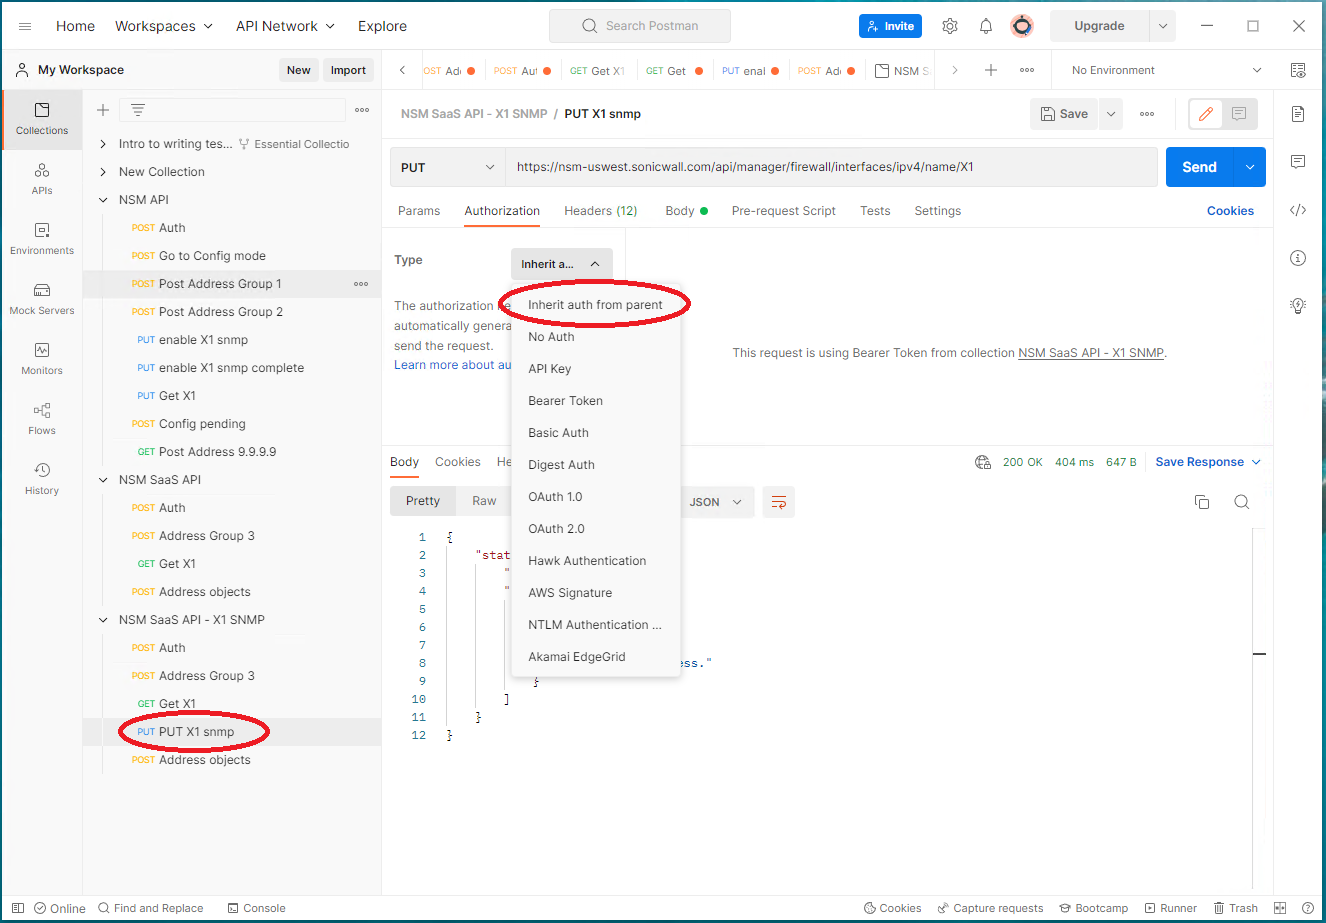
2. Create a new API call name “PUT X1 snmp”, set “Authorization to”Inherit auth from parent”:
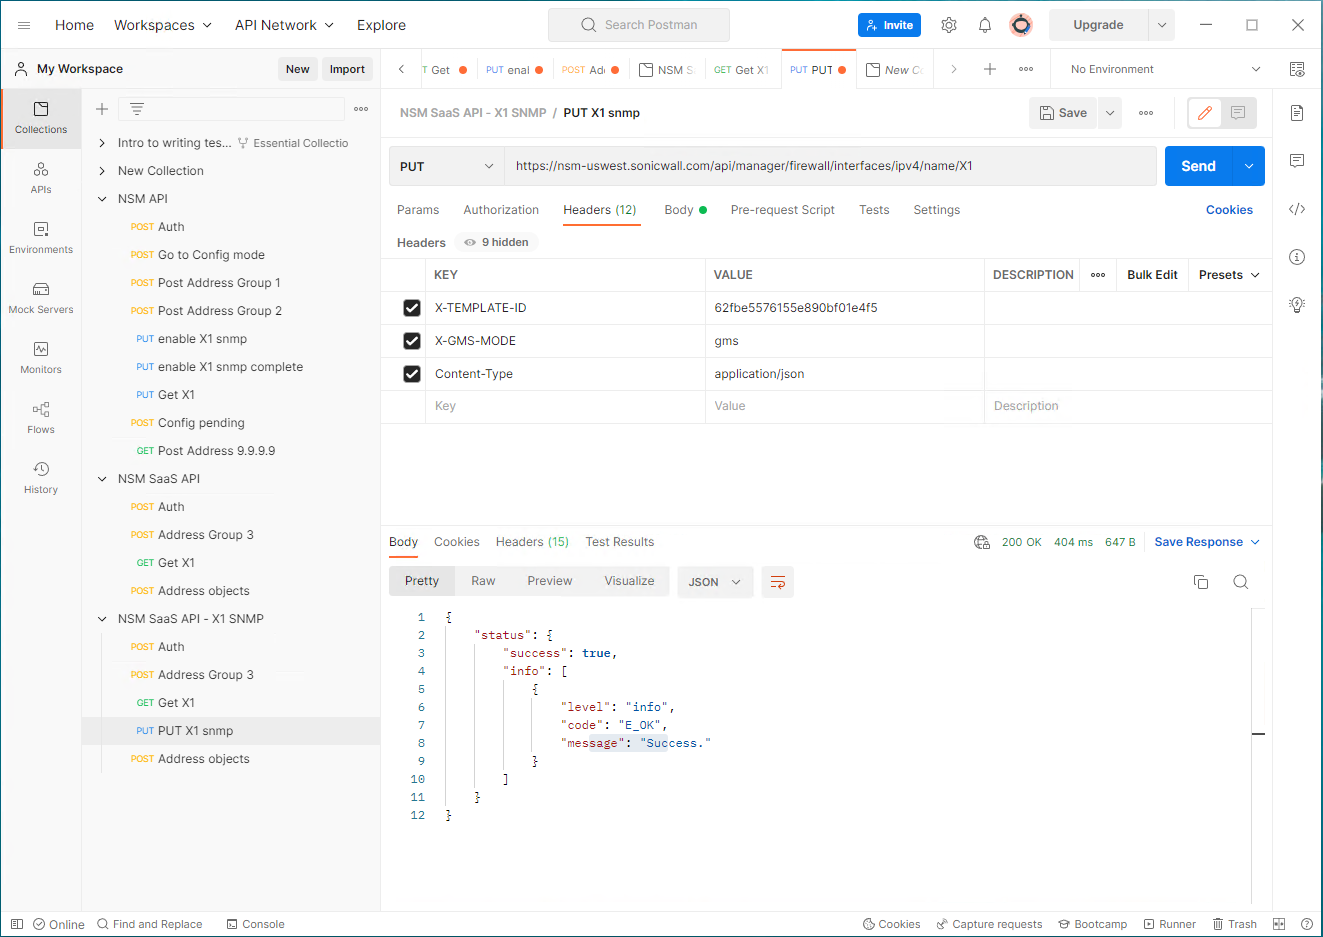
3. Set KEY/Value in Headers, with fetched Template ID:
--header 'Content-Type: application/json'
--header 'X-GMS-MODE: gms' \
--header 'X-TEMPLATE-ID: 62fb9fee3925a38a9f9278f6'
4. Copy/Paste following to Body (raw type):
{
"interfaces": [
{
"ipv4": {
"name": "X1",
"management": {
"snmp": true
}
}
}
]
}
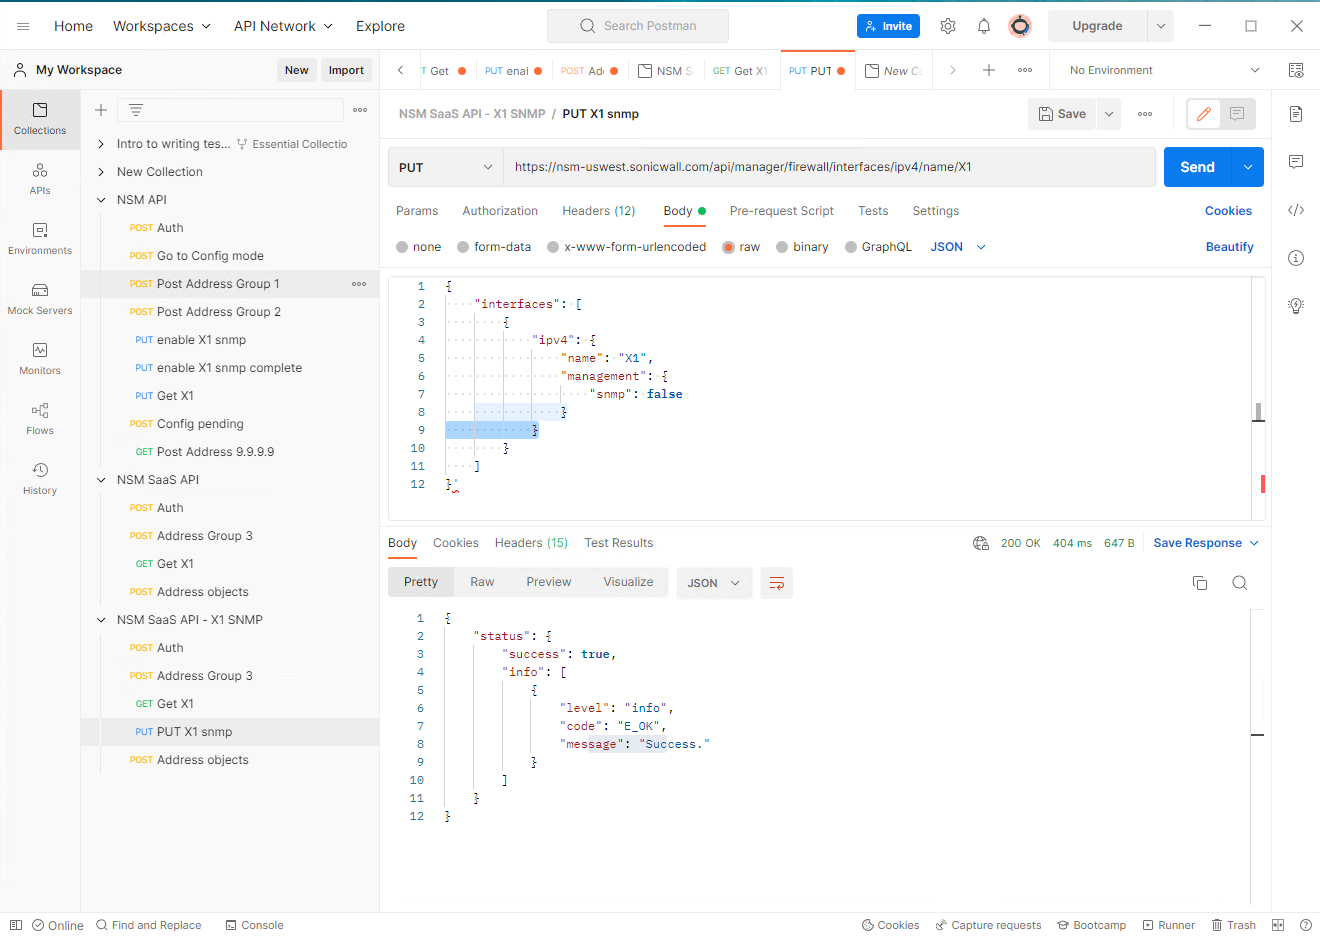
5. Click on “Send” it will return results as “Success”.
Go back to NSM, this Template can be applied to a firewall. Notice that JSON will show the current X1 info, then X1 SNMP change. You can enable or disable SNMP. For disable, change above json to “snmp”: false. Here is a screenshot showing disable SNMP:
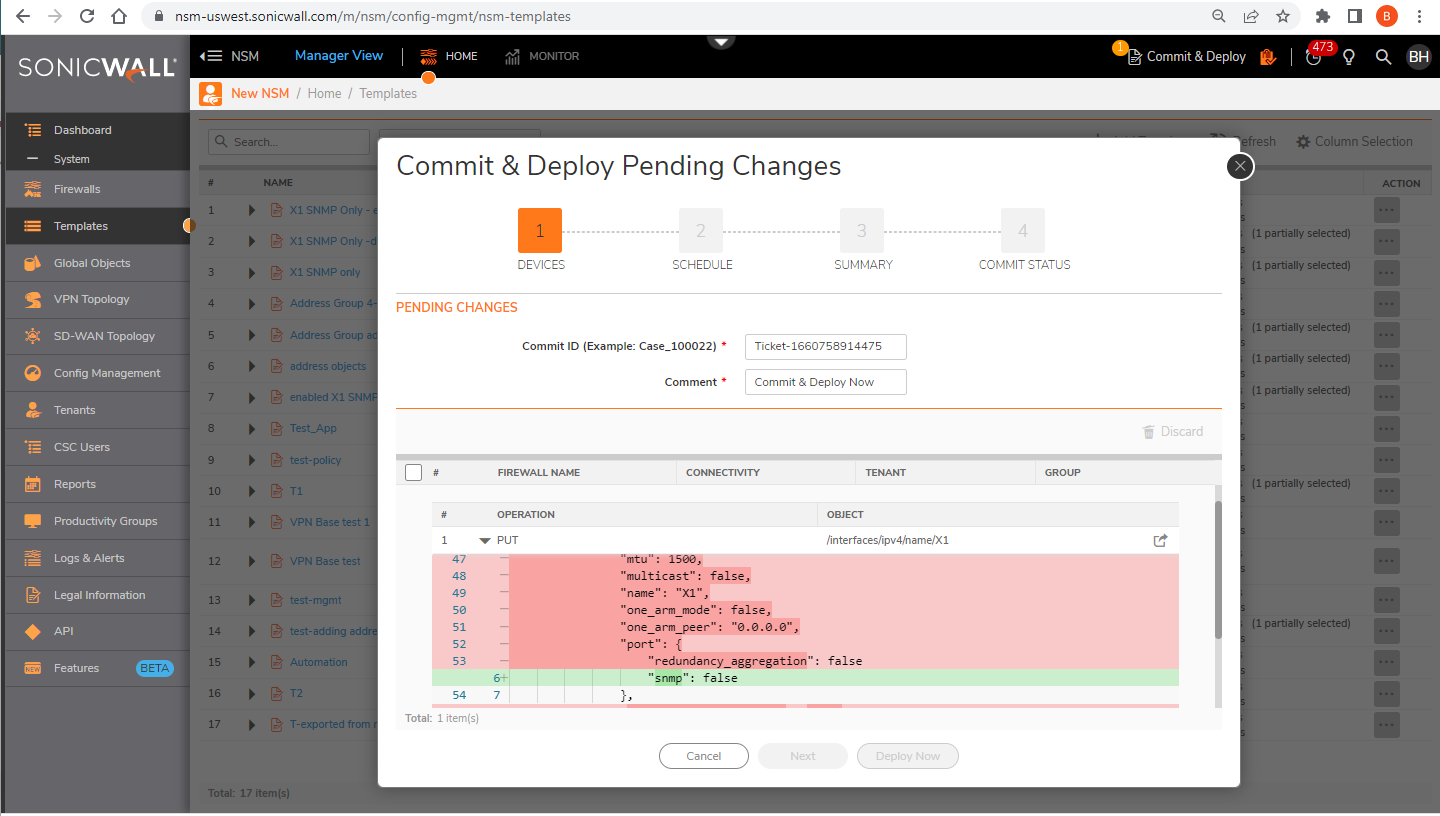
Note: any change in the example X1 interface, like disable HTTPS management, may cause the Template to use default values on the interface, which is undesirable.
Please note that the Bearer token (in step 5#) is no longer working for cscma-ng-dev.eng.sonicwall.com as we have deprecated the Bearer token authentication and use cookie in latest develop pipeline deployment. But in production that is running NSM 2.3.3 releases, we are still using the Bearer token. Thus, to test the workaround in our lab, please use NSM 2.3.3 deployments.
Related Articles
- How to create and export On-Demand report from CSC / CGMS
- SonicWall NSM – AppFlow ports
- NSM - Firewall System Events and Filters


 YES
YES NO
NO