-
Products
-
SonicPlatform
SonicPlatform is the cybersecurity platform purpose-built for MSPs, making managing complex security environments among multiple tenants easy and streamlined.
Discover More
-
-
Solutions
-
Federal
Protect Federal Agencies and Networks with scalable, purpose-built cybersecurity solutions
Learn MoreFederalProtect Federal Agencies and Networks with scalable, purpose-built cybersecurity solutions
Learn More - Industries
- Use Cases
-
-
Partners
-
Partner Portal
Access to deal registration, MDF, sales and marketing tools, training and more
Learn MorePartner PortalAccess to deal registration, MDF, sales and marketing tools, training and more
Learn More - SonicWall Partners
- Partner Resources
-
-
Support
-
Support Portal
Find answers to your questions by searching across our knowledge base, community, technical documentation and video tutorials
Learn MoreSupport PortalFind answers to your questions by searching across our knowledge base, community, technical documentation and video tutorials
Learn More - Support
- Resources
- Capture Labs
-
- Company
- Contact Us
NSM Cloud - Getting token for MSW and NSM APIs


Description
This document outlines how to generate Auth token for NSM APIs to access firewalls.
Requirements
- NSM Essentials License for Firewall
- Firewall Managed via NSM
- MSW API Key Feature Enabled
High Level Process
- Get MSW API Key from MySonicWall.com
- Connect to MSW APIs
- Get Tenant Information
- Get NSM Access Code
- Connect to NSM APIs
- Get Bearer Token
- Use Token for NSM APIs
Resolution
Get MSW API Key from MySonicWall
MSW APIs are NOT enabled by default. To enable the same, call support
- Once have MSW API enabled, Login to MySonicwall Account.
- Navigate to My Workspace | User Groups | User List
- Click on ‘Generate API Key’ on the top right and a pop-up window will come up as below:
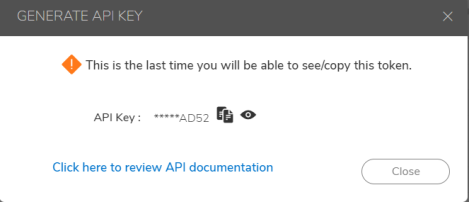
- Click on ‘View / copy’ icon to copy the Key and save it for future use.
Connect to MSW APIs using Postman
a. Get Tenant Information
- Open postman and add a new collection enter URL (https://api.mysonicwall.com/api/hgms/get-cloud-tenants) in the input field using ‘GET’ method

- Click on ‘Headers’ tab and add below keys and then click ‘Send’.
Content-Type: application/json
X-api-key: Enter the key received in step 1 above.
- Below response show up under ‘Body’ section. Click on copy icon to copy the response as that will be used next to generate the NSM token
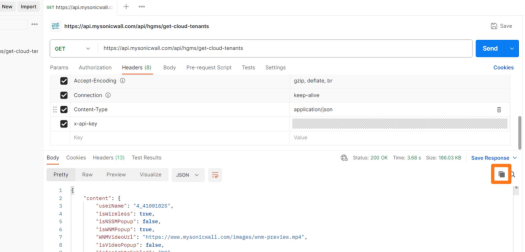
- Click on copy icon to copy the response and save the output to text file.
- Now search for the Tenant name in the output (Text file) and find the "productGroupID" and “tenantSerial” associated with that and keep it aside to be used in next step.
b. Get NSM Access Code
- Add another collection enter URL (https://api.mysonicwall.com/api/generate-cscaccesscode ) in the input field using ‘POST’ method.

- Click below on ‘Body’ and select ‘raw’ and type / enter below text.
tenantID – ‘productGroupID’ from previous step.
Syntax - {"tenantId": “InsertprodcutGroupID”,"tileName": "ISNSMSAFEENABLED"}
- Now click on ‘Send’ and it will return ‘accessCode’ under Body.
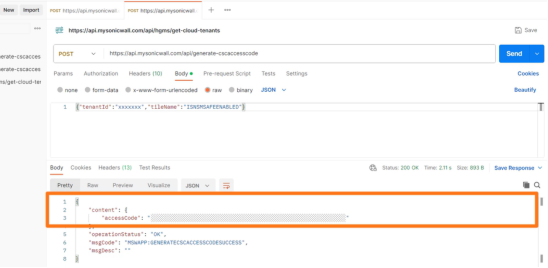
- Copy the ‘accessCode’ as that need to use in next step to Generate NSM Token.
Connect to NSM using Postman
a. Get NSM Bearer Token
- Add another collection enter URL (https://nsm-uswest.sonicwall.com/api/manager/auth/sso ) in the input field using ‘POST’ method.

- Click below on ‘Body’ and select ‘raw’ and type / enter below text as per syntax.
tenantSerial: From step B.a.5
Code: From step B.b.4
Syntax:{"tenantSerial":"InsertSerial", "code":"InsertCode"} - Click ‘Send’ and will below response will show up under ‘Body’.
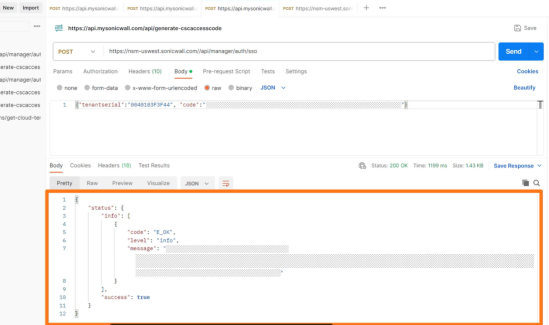
- NSM bearer token info will be shown in ‘message’. Same need to be used for authentication when running NSM APIs
b. Using Token for NSM APIs.
Below example is to get ARP cache using NSM API for a firewall managed by NSM
- Add new collection enter API URL (https://nsm-uswest.sonicwall.com/api/manager/firewall/reporting/arp/caches ) in the input field using either ‘GET’ or ‘POST’ method.
- Go to ‘Authentication’ tab and select ‘Bearer Token’ from the drop down under Type and insert the value (from step C.a.4) in ‘Token’ field.
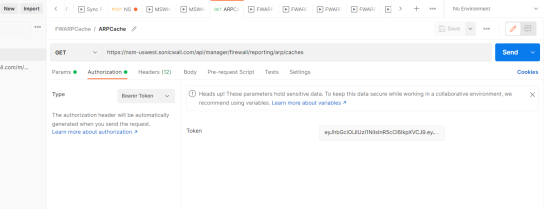
- Go to ‘Headers’ tab and add below Keys
Content-Type: application/json-
X-device-id: Enter the Firewall Serial for which data in being pulled.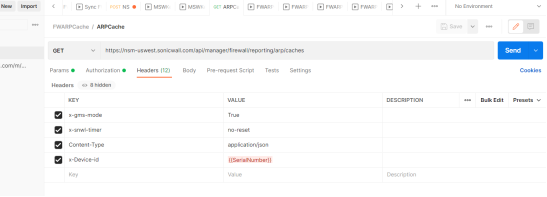
- Click ‘Send’ and response from firewall will show up in ‘Body’ with details requested.
Related Articles
- Creating a license subscription report in GMS 9.3
- How to create SSLVPN login reports with Syslog GMS/Analytics
- Can I review, accept and deny the GMS changes before pushing to firewalls with workflow license?


 YES
YES NO
NO