-
Products
-
SonicPlatform
SonicPlatform is the cybersecurity platform purpose-built for MSPs, making managing complex security environments among multiple tenants easy and streamlined.
Discover More
-
-
Solutions
-
Federal
Protect Federal Agencies and Networks with scalable, purpose-built cybersecurity solutions
Learn MoreFederalProtect Federal Agencies and Networks with scalable, purpose-built cybersecurity solutions
Learn More - Industries
- Use Cases
-
-
Partners
-
Partner Portal
Access to deal registration, MDF, sales and marketing tools, training and more
Learn MorePartner PortalAccess to deal registration, MDF, sales and marketing tools, training and more
Learn More - SonicWall Partners
- Partner Resources
-
-
Support
-
Support Portal
Find answers to your questions by searching across our knowledge base, community, technical documentation and video tutorials
Learn MoreSupport PortalFind answers to your questions by searching across our knowledge base, community, technical documentation and video tutorials
Learn More - Support
- Resources
- Capture Labs
-
- Company
- Contact Us
MySonicWall External IDP Integration


Description
This document outlines the settings needed to integrate your MySonicWall account with an external (IDP) Identity Provider.
There are currently two supported integrations as listed below:
- Microsoft Azure Active Directory
- OKTA
This integration allows you to integrate into the above external IDPs. This gives your users the ability to use the same credentials/MFA that is configured in these platforms.
To setup this integration
- Only one Admin is required to configure these settings in MySonicWall.
- Once the account is setup to use the external IDP, the Admin can turn on the integration for all Employees of an organization.
To configure an external identity provider for MySonicWall:
- Log in to your MySonicWall account.
- Navigate to Settings |My Account |My personal profile.
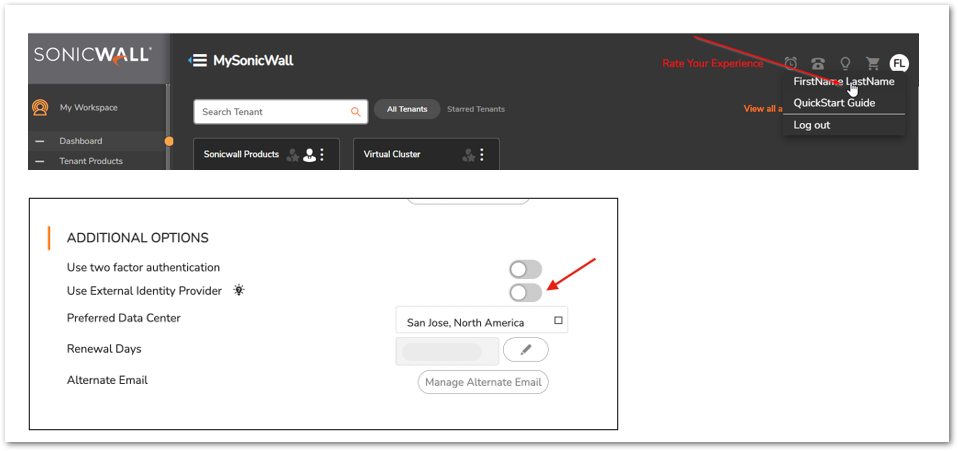
- Enable Use External Identity Provider under ADDITIONAL OPTIONS group.
 CAUTION: Do not enable for all employees of the organization at this point.
 - Select the Identity Provider Organization and follow the respective instructions in the document below.
a) Okta Configuration
b) Azure Active Directory Configuration - Once the setup is complete, leave the current browser as-is and test the configuration in another browser.
 TIP: If the username or password is saved on the screen, delete the information, or clear your browser. Manually type the username and hit next to activate the identity provider settings.
  NOTE: User should be able to successfully login using their identity provider at this step.
 - Once it is confirmed that the setup is successful, the user can now go back to the External Identity Provider option on MySonicWall and enable external identity provider t
 o all employees of the organization.
Resolution
Microsoft Azure Setup
- From the Azure Admin Console, create a new Enterprise Application (Non-Gallery Application).
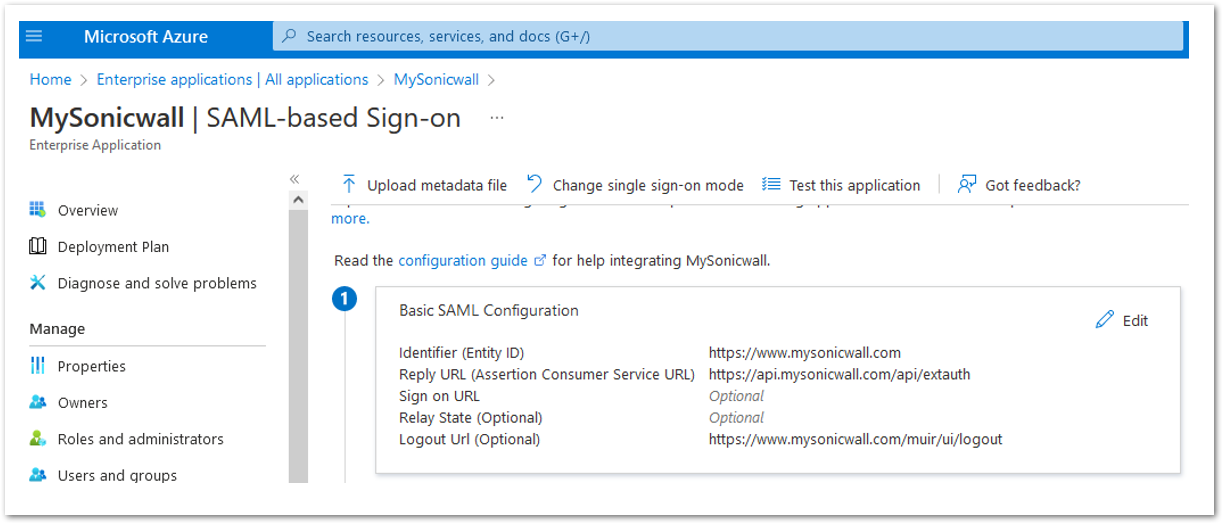
Azure settings:Basic SAML Configuration:
Identifier (Entity ID): https://www.mysonicwall.com
Reply URL (Assertion Consumer Service URL): https://api.mysonicwall.com/api/extauth
Sign on URL: Optional
Relay State (Optional): Optional
Logout Url (Optional): https://www.mysonicwall.com/muir/ui/logout - Assign Users/Groups to your newly created application.
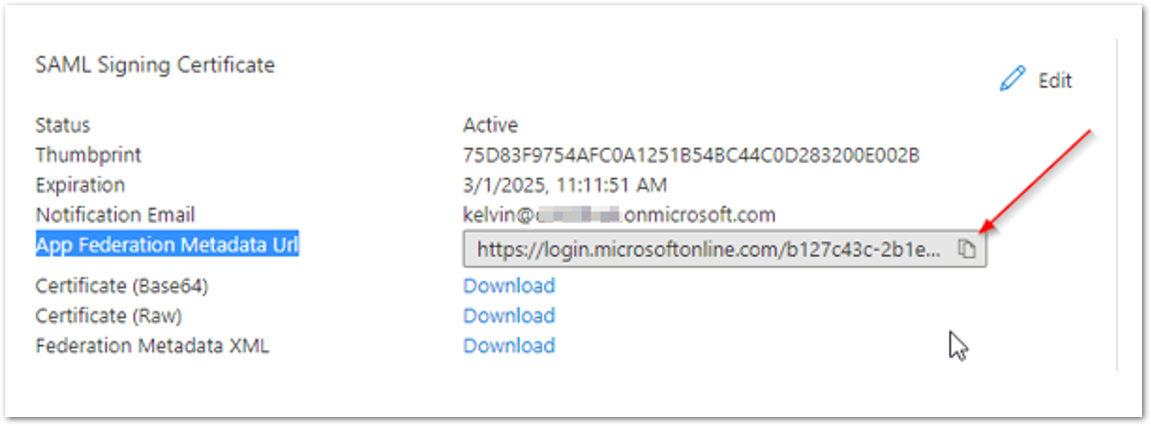
- Copy the App Federation Metadata URL from the Azure app setup. You will use this in the following steps.
MySonicWall Settings
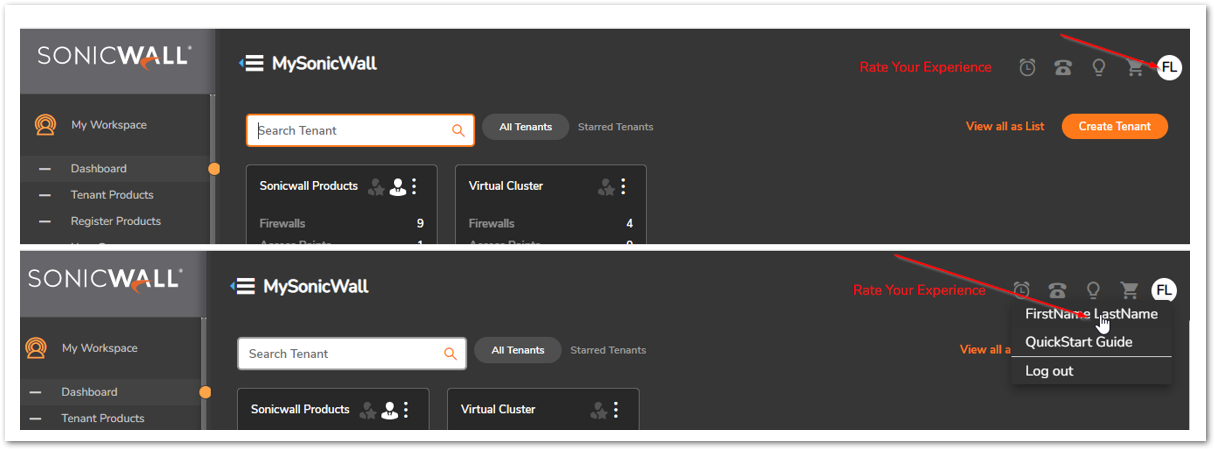
- From within MySonicWall while logged in with the user you want to enable the external IDP on. Click on the username icon in the top left corner in MySonicWall, then click on your name. Click on ‘Use External Identity Provider’ option.
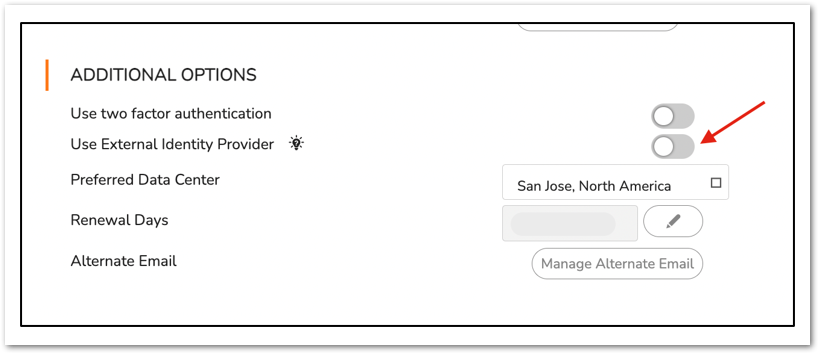
- Check ‘I have access to AZURE Metadata URL’. Paste the URL copied from the Azure setup. Click on save.
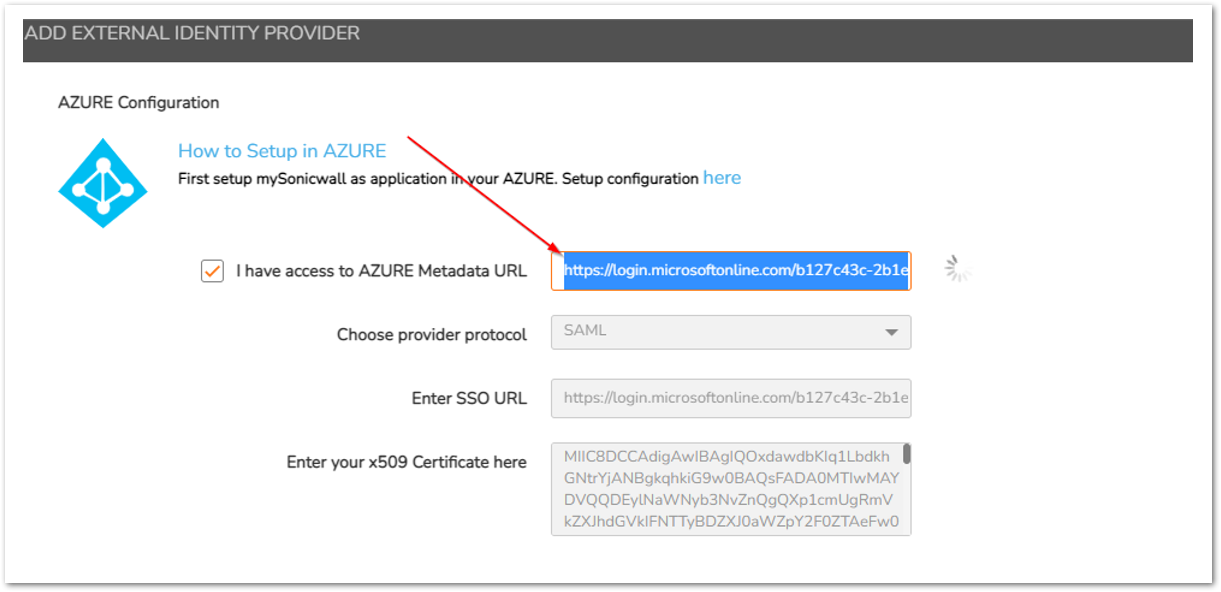
You will now be able to log in using the IDP credentials/MFA. NOTE: You may need to clear your browser and retype the username into the MySonicWall login page, the first time you login.
OKTA Setup
- From within the OKTA Admin Console, create a new app integration (SAML 2.0)
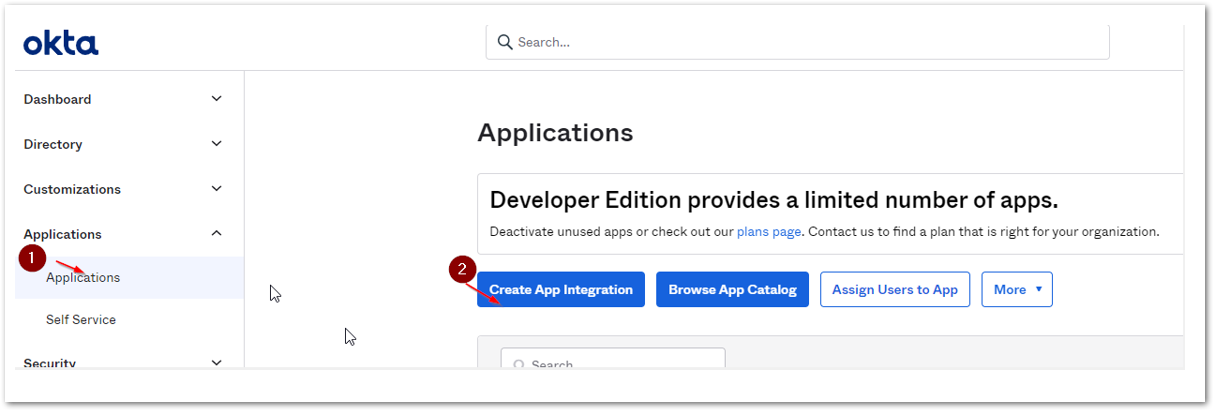
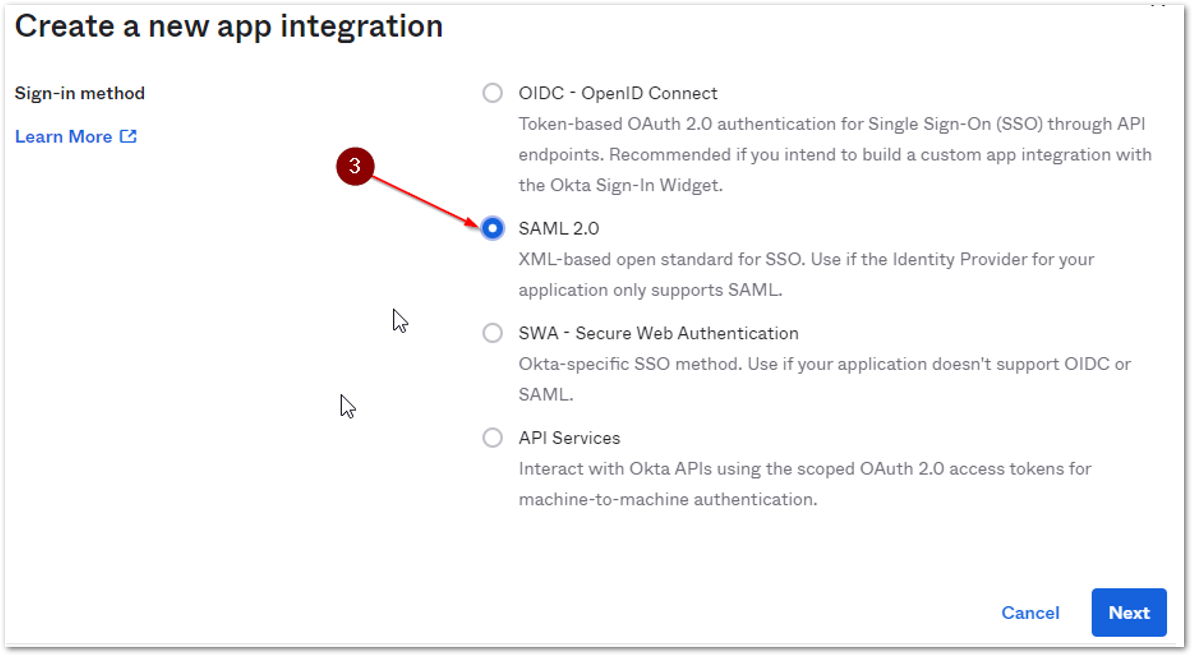
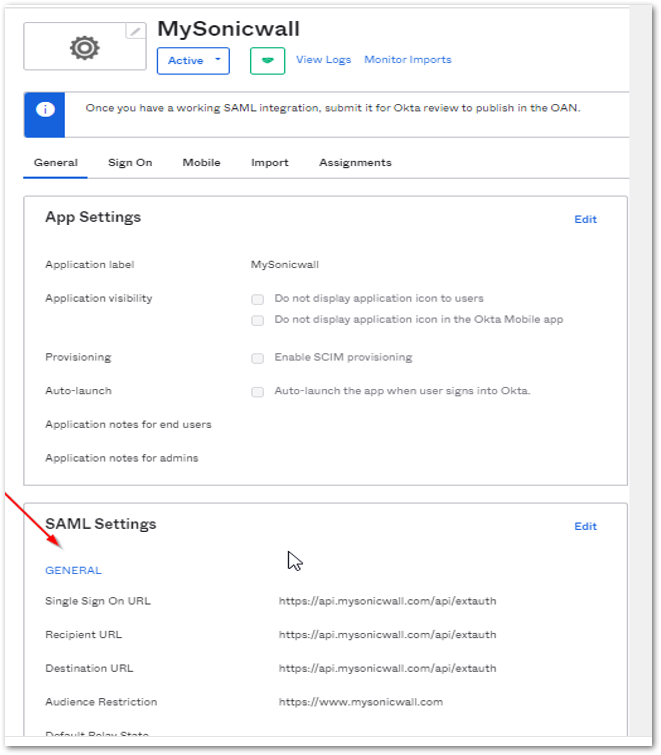
OKTA settings:
SAML General Settings
Single Sign On URL: https://api.mysonicwall.com/api/extauth
Recipient URL: https://api.mysonicwall.com/api/extauth
Destination URL: https://api.mysonicwall.com/api/extauth
Audience Restriction: https://www.mysonicwall.com - Assign Users/Groups to your newly created application. This can be done under the Assignments tab.
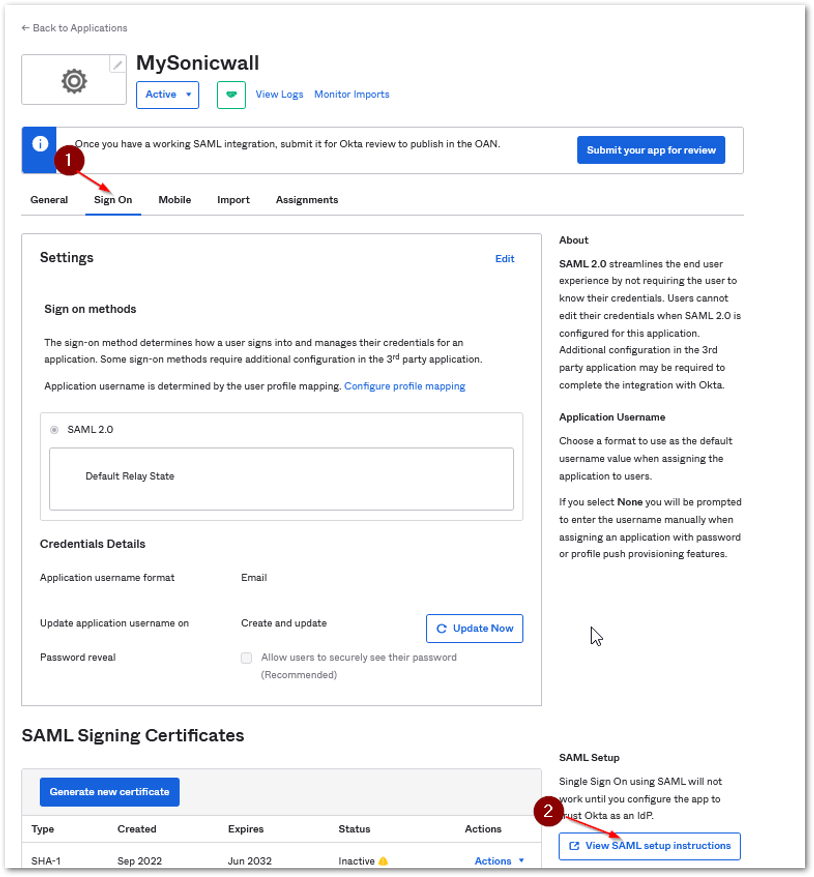
- Get the settings from OKTA to be used in the MySonicWall configuration. Click on View SAML setup instructions as shown below.
- Copy the Identity Provider Single Sign-On URL and the X.509 Certificate. These settings will be used in the next steps.
a. When you copy the certificate – make sure you only enter the certificate value and not the or text.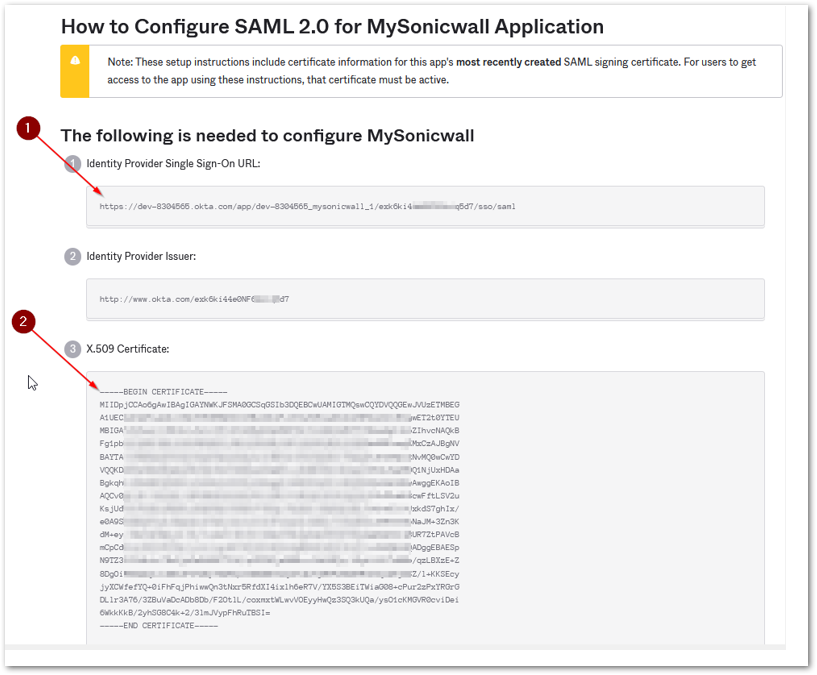
- From within MySonicWall while logged in with the user you want to enable the external IDP on. Click on the username icon in the top left corner in MySonicWall, then click on your name. Click on ‘Use External Identity Provider’ option.

- Paste the SSO URL (the Identity Provider Single Sign-On URL) and the X.509 certificate in the fields as shown below. Click connect and save. You should now be able to log in using the credentials/MFA set on the IDP provider.
a.When entering the certificate – make sure you only enter the certificate value and not the or text.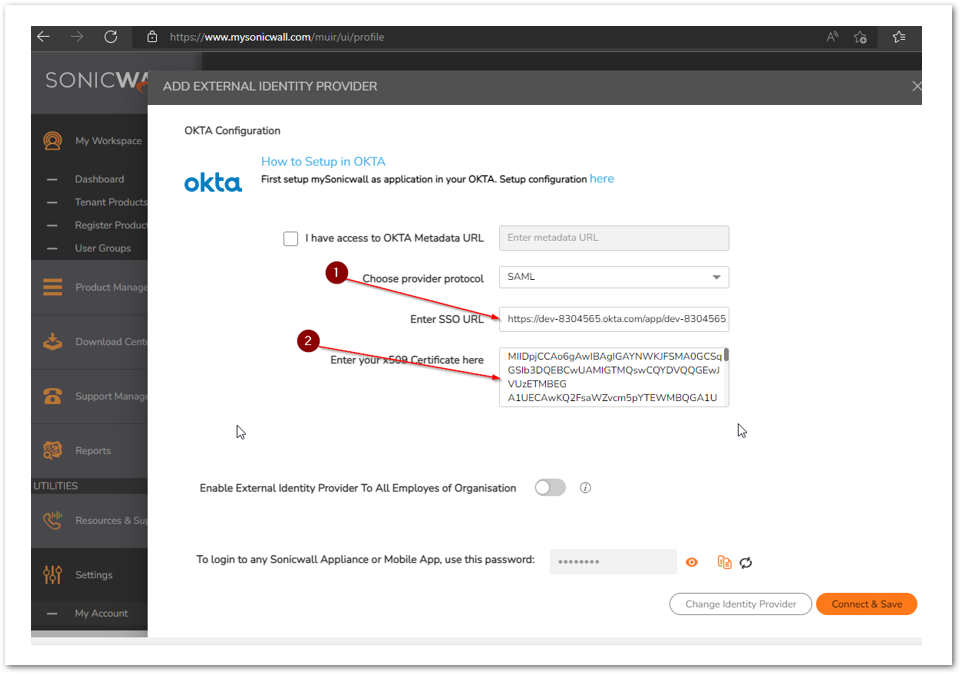
 NOTE: You may need to clear your broswer and retype the username into the Mysonicwall login page, the first time you login.
 NOTE: The steps you can follow to obtain the IDP password within your MysonicWall account:
- Log in to your MySonicWall account and Navigate to Settings |My Account |My personal profile.
- You can view the password by clicking on the info icon next to the External Identity Provider under ADDITIONAL OPTIONS group.

- You will now be able to obtain the password as highlighted below, click the view icon to view the password.

You can now obtain the password and enter it on the device interface to complete the device registration on the GUI.
 NOTE: You can change the password by clicking on the Refresh button.
Related Articles
- PSA Integrations Hub by SonicWall
- Check alerts and notifications on MySonicWall
- SonicProtect Subscription FAQ


 YES
YES NO
NO