-
Products
-
SonicPlatform
SonicPlatform is the cybersecurity platform purpose-built for MSPs, making managing complex security environments among multiple tenants easy and streamlined.
Discover More
-
-
Solutions
-
Federal
Protect Federal Agencies and Networks with scalable, purpose-built cybersecurity solutions
Learn MoreFederalProtect Federal Agencies and Networks with scalable, purpose-built cybersecurity solutions
Learn More - Industries
- Use Cases
-
-
Partners
-
Partner Portal
Access to deal registration, MDF, sales and marketing tools, training and more
Learn MorePartner PortalAccess to deal registration, MDF, sales and marketing tools, training and more
Learn More - SonicWall Partners
- Partner Resources
-
-
Support
-
Support Portal
Find answers to your questions by searching across our knowledge base, community, technical documentation and video tutorials
Learn MoreSupport PortalFind answers to your questions by searching across our knowledge base, community, technical documentation and video tutorials
Learn More - Support
- Resources
- Capture Labs
-
- Company
- Contact Us
How to use DHCP option 120 in SonicWall


Description
DHCP option 120 is described in RFC 3361 - Dynamic Host Configuration Protocol (DHCP-for-IPv4) Option for Session Initiation Protocol (SIP) Servers.
The SIP server DHCP option carries a 32-bit (binary) IPv4 address used by the SIP client to locate a SIP server.
Resolution
Resolution for SonicOS 7.X
This release includes significant user interface changes and many new features that are different from the SonicOS 6.5 and earlier firmware. The below resolution is for customers using SonicOS 7.X firmware.
How to configure option 120 on SonicWall DHCP server?
For DHCP option 120:
Available option types are:
- IP Address
- Domain name
- Four byte data
- two byte data
- one byte
- data
- String
- Boolean
- Hex string
 NOTE: For DHCP Option 120 use option type One Byte Data.
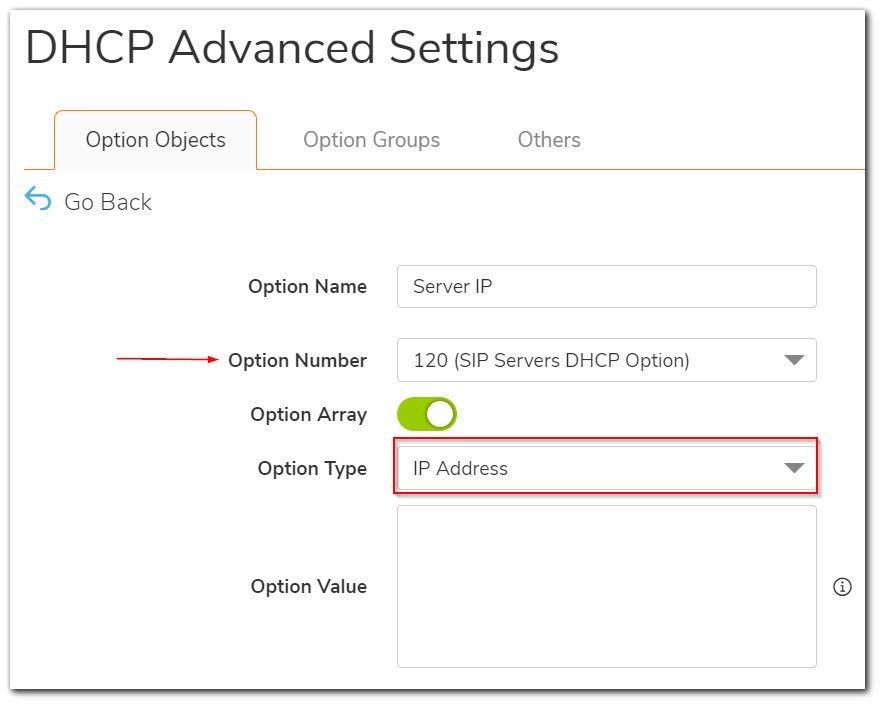
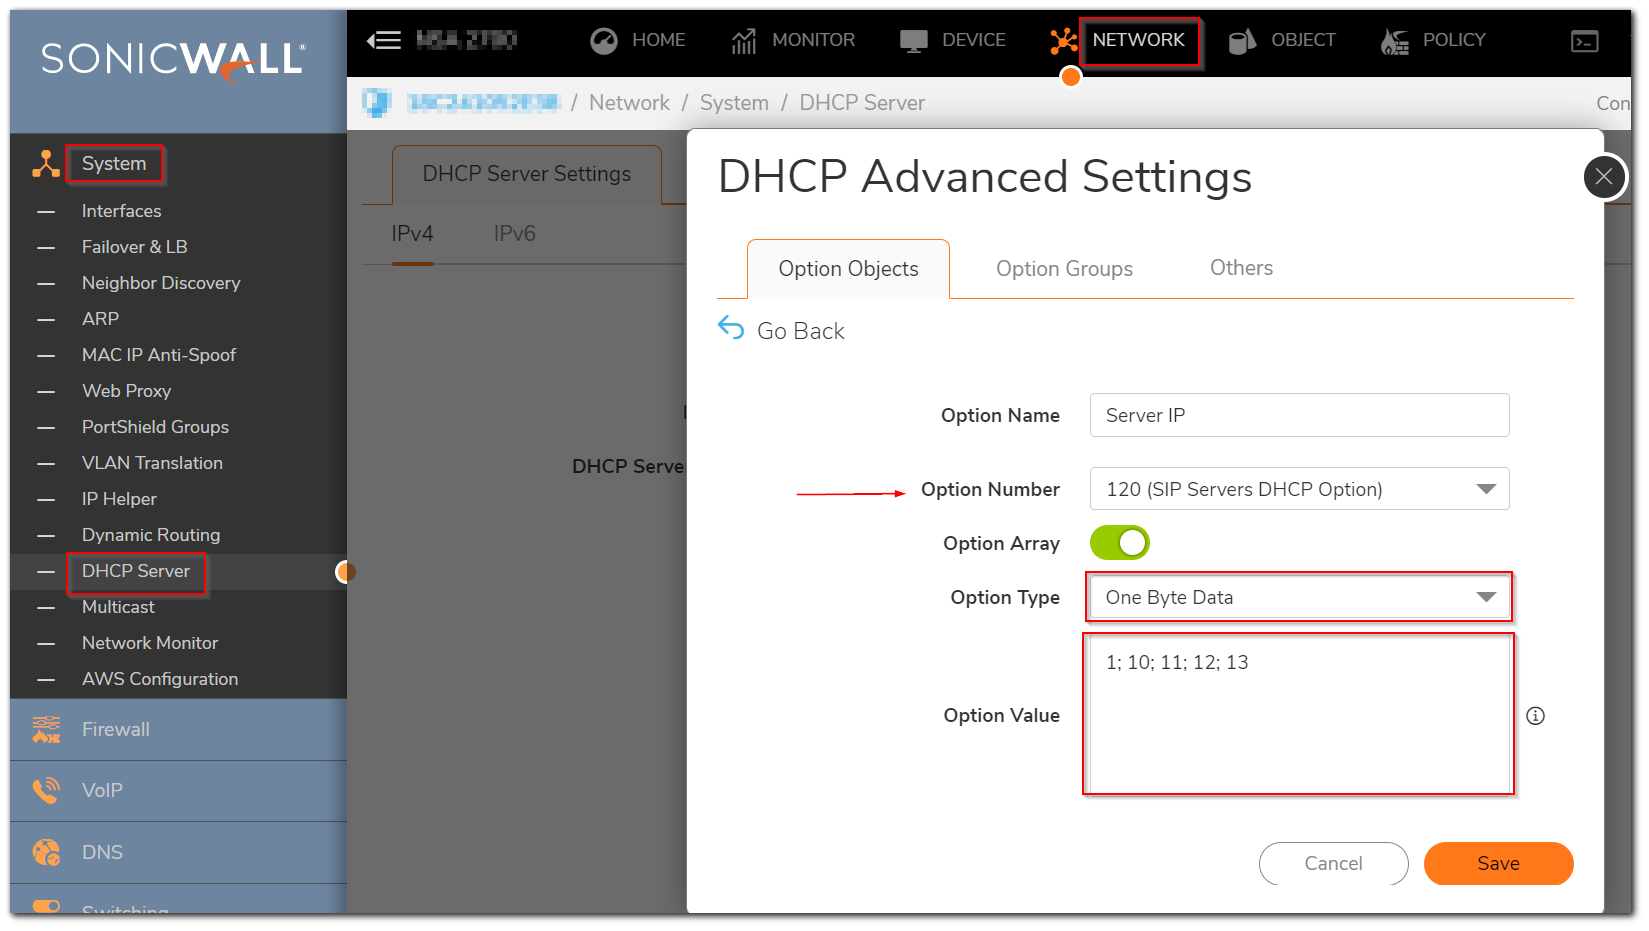
- Navigate to Network | System | DHCP Server, on the right side click Advanced button to get DHCP Advanced Settings window.
- Under Option Objects tab, click Add Option to get Add DHCP Option Object window.
 EXAMPLE: We need to add SIP server IP 10.11.12.13 under DHCP option 120
- Go to Network DHCP Server and click on Advanced
- Click on Add Option and
- Type an "Option Name"
- Select "120 (SIP Servers DHCP Option)" for "Option Number"
- Select "option array"
- Select "One Byte Data" for "Option Type"
- Enter the following string 1;10; 11; 12; 13 as option value
 EXAMPLE: We need to multiple SIP server IPs (10.11.12.13 172.21.0.1 192.168.1.100) under DHCP option 120
- Go to Network DHCP Server and click on Advanced
- Click on Add Option and
- Type an "Option Name"
- Select "120 (SIP Servers DHCP Option)" for "Option Number"
- Select "option array"
- Select "One Byte Data" for "Option Type"
- Enter the following string 1; 10; 11; 12; 13; 172; 21; 0; 2; 192; 168; 1; 100 as option value (decimal value for the 3 IP addresses).
Resolution for SonicOS 6.5
This release includes significant user interface changes and many new features that are different from the SonicOS 6.2 and earlier firmware. The below resolution is for customers using SonicOS 6.5 firmware.
How to configure option 120 on SonicWall DHCP server?
For DHCP option 120:
Available option types are:
- IP Address
- Domain name
- Four byte data
- two byte data
- one byte
- data
- String
- Boolean
- Hex string
 NOTE: For DHCP Option 120 use option type One Byte Data.
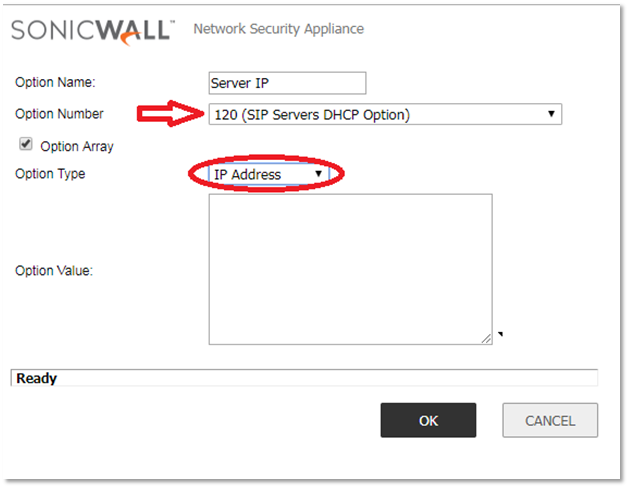
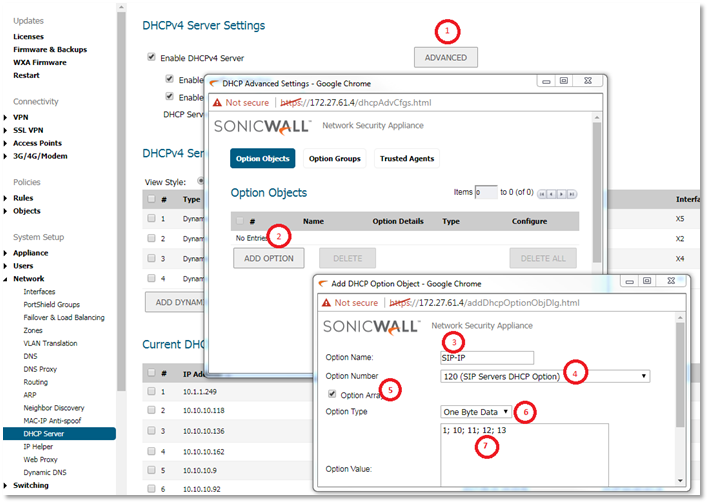
- Navigate to Manage | Network | DHCP Server, on the right side click Advanced button to get DHCP Advanced Settings window.
- Under Option Objects tab, click Add Option to get Add DHCP Option Object window.
 EXAMPLE: We need to add SIP server IP 10.11.12.13 under DHCP option 120
- Go to Network DHCP Server and click on Advanced
- Click on Add Option and
- Type an "Option Name"
- Select "120 (SIP Servers DHCP Option)" for "Option Number"
- Select "option array"
- Select "One Byte Data" for "Option Type"
- Enter the following string 1;10; 11; 12; 13 as option value
 EXAMPLE: We need to multiple SIP server IPs (10.11.12.13 172.21.0.1 192.168.1.100) under DHCP option 120
- Go to Network DHCP Server and click on Advanced
- Click on Add Option and
- Type an "Option Name"
- Select "120 (SIP Servers DHCP Option)" for "Option Number"
- Select "option array"
- Select "One Byte Data" for "Option Type"
- Enter the following string 1; 10; 11; 12; 13; 172; 21; 0; 2; 192; 168; 1; 100 as option value (decimal value for the 3 IP addresses).
Resolution for SonicOS 6.2 and Below
The below resolution is for customers using SonicOS 6.2 and earlier firmware. For firewalls that are generation 6 and newer we suggest to upgrade to the latest general release of SonicOS 6.5 firmware.
How to configure option 120 on SonicWall DHCP server?
For DHCP option 120:
Available option types are:
- IP Address
- Domain name
- Four byte data
- two byte data
- one byte
- data
- String
- Boolean
- Hex string
 NOTE: For DHCP Option 120 use option type One Byte Data.
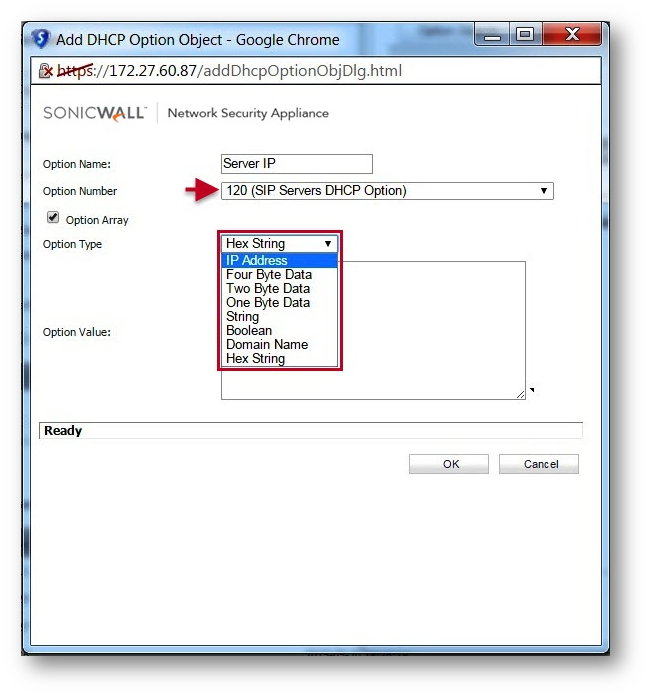
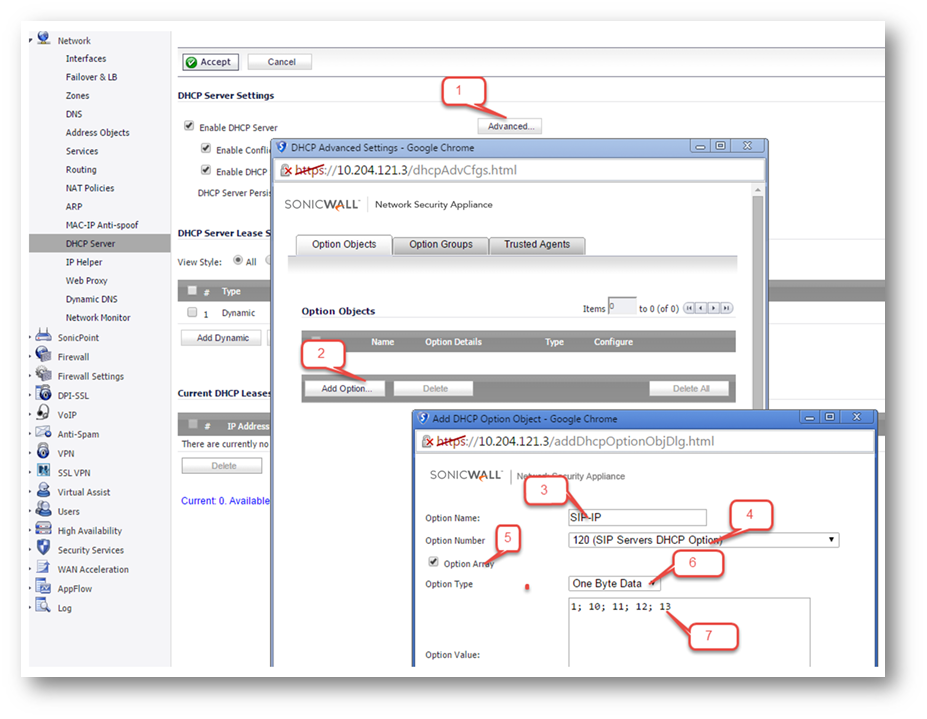
- Navigate to Network | DHCP Server, on the right side click Advanced button to get DHCP Advanced Settings window.
- Under Option Objects tab, click Add Option to get Add DHCP Option Object window.
 EXAMPLE: We need to add SIP server IP 10.11.12.13 under DHCP option 120
- Go to Network DHCP Server and click on Advanced
- Click on Add Option and
- Type an "Option Name"
- Select "120 (SIP Servers DHCP Option)" for "Option Number"
- Select "option array"
- Select "One Byte Data" for "Option Type"
- Enter the following string 1;10; 11; 12; 13 as option value
 EXAMPLE: We need to multiple SIP server IPs (10.11.12.13 172.21.0.1 192.168.1.100) under DHCP option 120
- Go to Network DHCP Server and click on Advanced
- Click on Add Option and
- Type an "Option Name"
- Select "120 (SIP Servers DHCP Option)" for "Option Number"
- Select "option array"
- Select "One Byte Data" for "Option Type"
- Enter the following string 1; 10; 11; 12; 13; 172; 21; 0; 2; 192; 168; 1; 100 as option value (decimal value for the 3 IP addresses).
Related Articles
- Error:"Invalid API Argument" when modifying the access rules
- Cysurance Partner FAQ
- Configure probe monitoring for WAN Failover and Loadbalancing - SonicWall UTM
Categories
- Firewalls > SonicWall NSA Series > DHCP Server
- Firewalls > SonicWall SuperMassive 9000 Series > DHCP Server
- Firewalls > SonicWall SuperMassive E10000 Series > DHCP Server
- Firewalls > TZ Series > DHCP Server


 YES
YES NO
NO