-
Products
-
SonicPlatform
SonicPlatform is the cybersecurity platform purpose-built for MSPs, making managing complex security environments among multiple tenants easy and streamlined.
Discover More
-
-
Solutions
-
Federal
Protect Federal Agencies and Networks with scalable, purpose-built cybersecurity solutions
Learn MoreFederalProtect Federal Agencies and Networks with scalable, purpose-built cybersecurity solutions
Learn More - Industries
- Use Cases
-
-
Partners
-
Partner Portal
Access to deal registration, MDF, sales and marketing tools, training and more
Learn MorePartner PortalAccess to deal registration, MDF, sales and marketing tools, training and more
Learn More - SonicWall Partners
- Partner Resources
-
-
Support
-
Support Portal
Find answers to your questions by searching across our knowledge base, community, technical documentation and video tutorials
Learn MoreSupport PortalFind answers to your questions by searching across our knowledge base, community, technical documentation and video tutorials
Learn More - Support
- Resources
- Capture Labs
-
- Company
- Contact Us
How to uninstall SonicWall CF (Content Filtering) Client?


Description
This article explains how to uninstall SonicWall CF (Content Filtering) Client?
Resolution
Resolution for SonicOS 6.5
This release includes significant user interface changes and many new features that are different from the SonicOS 6.2 and earlier firmware. The below resolution is for customers using SonicOS 6.5 firmware.
1. In Windows 8 Machine (Both 32 & 64 bits Operating System):
Step 1: In Windows 8 32 bit, Client CF can be uninstalled from the C:\Program Files (x86)\SonicWall \SonicWall Enforced Client 2.0\ SecInstaller.exe file (In Windows 8 64 bit, Client CFS can be uninstalled from the C:\Program Files\SonicWall\ SonicWall Enforced Client 2.0 \ SecInstaller.exe file).

Step 2: Double click on the SECInstaller application. You will get a window stating "Starting Uninstall" followed by "Uninstall Password Window" as shown in the below screen shots.

In order to get the Uninstall password of the client, follow the below steps:
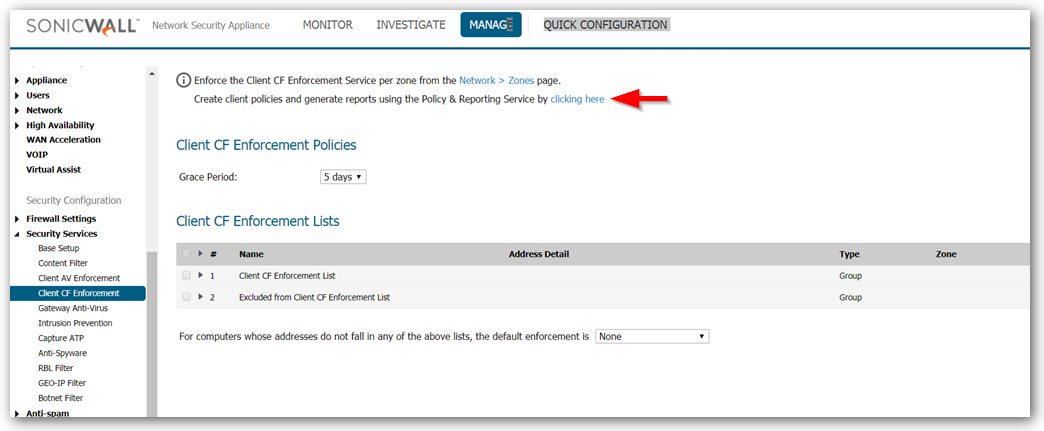
Step 3:Login to SonicWall Management Interface and Click Manage in the top navigation menu
Navigate to Security Services | Client CF Enforcement page
Step 4: Click on link which says "Click here"

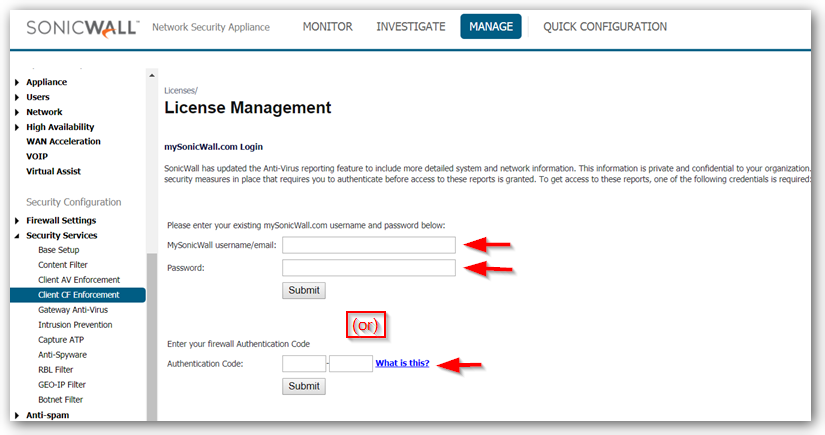
Step 5: There will be an authentication page asking for mySonicWall credentials or authentication code on the SonicWall device. (at least one authentication is required)

Note: The authentication code can be obtained by clicking Monitor in the top navigation menu and then SystemStatus page in the SonicWall GUI or it should be available in the labeled information on the physical unit
- Upon submitting the authentication, you will be taken to the EPRS portal page.

Step 6: Navigate to Enforcement | Clients page & click on the configure option of the existing host present there.

Step 7: In the Client Settings window, you can get the Uninstall password which is called as "Uninstall Hash".

Step 8: Copy the Uninstall Hash, paste it in the "Uninstall password" window and click OK.

- The below screen shows the Enforced Content Filtering Client is being removed from the host machine.

2. In Windows 7 and MAC Machines:
- In Windows 7 go to Start | All Programs to uninstall the content filtering client.
- In MAC open a terminal. Type the following: /Library/SonicWall/EnforcedClient/Uninstall
3. Uninstall CFS Client with Command Line (when trial license expired).
Open DOS by right clicking and choosing to run as admin.
- On 32 bit systems.
- On 64 bit systems
How To Check:
- Just to ensure if the enforced content filtering client is completely removed from the host machine, go to the Notification Area in the PC and check for S symbol icon which will not be there indicating that the client has been removed.
Resolution for SonicOS 6.2 and Below
The below resolution is for customers using SonicOS 6.2 and earlier firmware. For firewalls that are generation 6 and newer we suggest to upgrade to the latest general release of SonicOS 6.5 firmware.
- In Windows 8 Machine (Both 32 & 64 bits Operating System):
Step 1:In Windows 8 32 bit, Client CF can be uninstalled from theC:\Program Files (x86)\SonicWalll \SonicWall Enforced Client 2.0 \ SecInstaller.exe file (In Windows 8 64 bit, Client CFS can be uninstalled from the C:\Program Files\SonicWall \SonicWall Enforced Client 2.0 \ SecInstaller.exe file).

Step 2: Double click on the SECInstaller application. You will get a window stating "Starting Uninstall" followed by "Uninstall Password Window" as shown in the below screen shots.

In order to get the Uninstall password of the client, follow the below steps:
Step 3: Navigate to Security Services | Client CFS Enforcement page in the GUI.
Step 4: Click on Enforced Client Policy and Reporting Server.

Step 5: There will be an authentication page asking for mySonicWall credential and authentication code on the SonicWall device. (at least one authentication is required)

Note: The authentication code can be obtained from System | Status page in the SonicWall GUI or it should be available in the labeled information on the physical unit
- Upon submitting the authentication, you will be taken to the EPRS portal page.

Step 6: Navigate to Enforcement | Clients page & click on the configure option of the existing host present there.

Step 7: In the Client Settings window, you can get the Uninstall password which is called as "Uninstall Hash".

Step 8: Copy the Uninstall Hash, paste it in the "Uninstall password" window and click OK.

- The below screen shows the Enforced Content Filtering Client is being removed from the host machine.

In Windows 7 and MAC Machines:
- In Windows 7 go to Start | All Programs to uninstall the content filtering client.
- In MAC open a terminal. Type the following: /Library/SonicWall/EnforcedClient/Uninstall
Uninstall CFS Client with Command Line (when trial license expired).
Open DOS by right clicking and choosing to run as admin.
- On 32 bit systems.
- On 64 bit systems
How To Check:
- Just to ensure if the enforced content filtering client is completely removed from the host machine, go to the Notification Area in the PC and check for S symbol icon which will not be there indicating that the client has been removed.
Related Articles
- Error:"Invalid API Argument" when modifying the access rules
- Cysurance Partner FAQ
- Configure probe monitoring for WAN Failover and Loadbalancing - SonicWall UTM
Categories
- Firewalls > TZ Series
- Firewalls > SonicWall NSA Series
- Firewalls > SonicWall SuperMassive 9000 Series
- Firewalls > SonicWall SuperMassive E10000 Series
- Endpoint Security > Content Filtering Client


 YES
YES NO
NO