-
Products
-
SonicPlatform
SonicPlatform is the cybersecurity platform purpose-built for MSPs, making managing complex security environments among multiple tenants easy and streamlined.
Discover More
-
-
Solutions
-
Federal
Protect Federal Agencies and Networks with scalable, purpose-built cybersecurity solutions
Learn MoreFederalProtect Federal Agencies and Networks with scalable, purpose-built cybersecurity solutions
Learn More - Industries
- Use Cases
-
-
Partners
-
Partner Portal
Access to deal registration, MDF, sales and marketing tools, training and more
Learn MorePartner PortalAccess to deal registration, MDF, sales and marketing tools, training and more
Learn More - SonicWall Partners
- Partner Resources
-
-
Support
-
Support Portal
Find answers to your questions by searching across our knowledge base, community, technical documentation and video tutorials
Learn MoreSupport PortalFind answers to your questions by searching across our knowledge base, community, technical documentation and video tutorials
Learn More - Support
- Resources
- Capture Labs
-
- Company
- Contact Us
How to setup Port Redundancy on SonicWall?


Description
Port Redundancy provides a simple method for configuring a redundant port for a physical Ethernet port. This is a valuable feature, particularly in high-end deployments, to protect against switch failures being a single point of failure.
When the primary interface is active, it processes all traffic to and from the interface. If the primary interface goes down, the secondary interface takes over all outgoing and incoming traffic. The secondary interface assumes the MAC address of the primary interface and sends the appropriate gratuitous ARP on a Failover event. When the primary interface comes up again, it resumes responsibility for all traffic handling from the secondary interface.
In a typical Port Redundancy configuration, the primary and secondary interfaces are connected to different switches. This provides for a Failover path in case the primary switch goes down. Both switches must be on the same Ethernet domain. Port Redundancy can also be configured with both interfaces connected to the same switch.
Port Redundancy Failover:
SonicWall provides multiple methods for protecting against loss of connectivity in the case of a link failure, including High Availability (HA), Load Balancing Groups (LB Groups), and now Port Redundancy. If all three of these features are configured on a Security Appliance, the following order of precedence is followed in the case of a link failure:
- Port Redundancy
- HA
- LB Group
When Port Redundancy is used with HA, Port Redundancy takes precedence. Typically an interface Failover causes an HA Failover to occur, but if a redundant port is available for that interface, then an interface Failover occurs, but not an HA Failover.
If both the primary and secondary redundant ports go down, then an HA Failover occurs (assuming the secondary Security Appliance has the corresponding port active).
When Port Redundancy is used with an LB Group, Port Redundancy again takes precedence. Any single port (primary or secondary) failures are handled by Port Redundancy just like with HA. When both the ports are down then LB kicks in and tries to find an alternate interface.
Port redundancy limitations and Prerequisites:
- The feature is not supported on platforms that do not support Advanced Switching features, including SOHO/W, SOHO250/W, TZ300/W, TZ350/W, TZ400/W, TZ500/W, TZ600, and NSA 2600.
- Port Redundancy is based on interface link speed like Link Aggregation, For example, a 10 Gbps port cannot have a Redundant Port that does not support the same speed as 10 Gbps. Ports that have to be configured in redundancy should support the same link speed.
Resolution
Resolution for SonicOS 7.X
This release includes significant user interface changes and many new features that are different from the SonicOS 6.5 and earlier firmware. The below resolution is for customers using SonicOS 7.X firmware.
Port Redundancy Configuration:
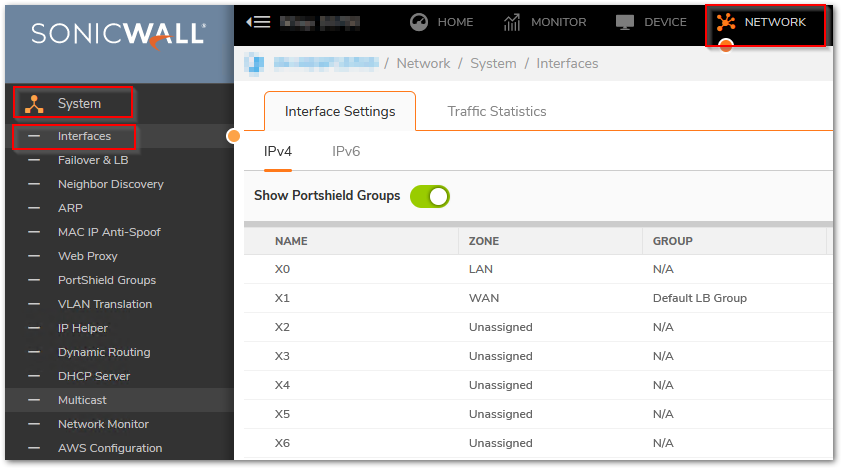
- Navigate to NETWORK | System > Interfaces.
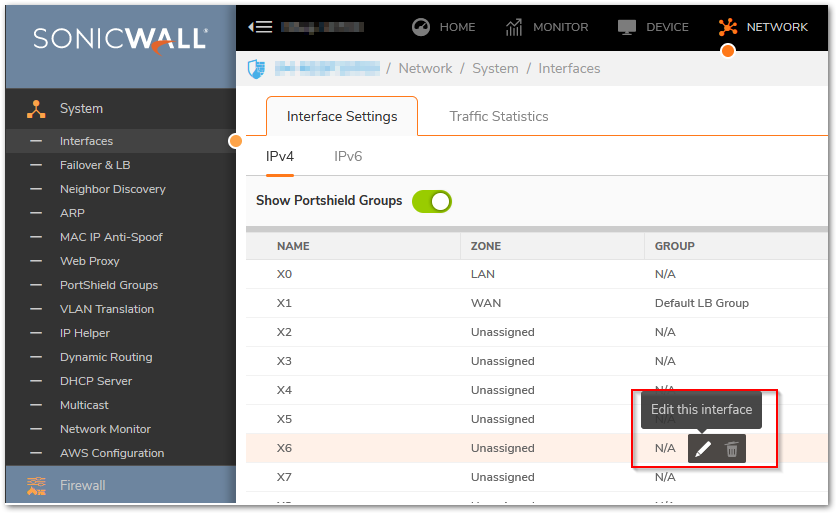
- Click the Edit this interface icon for the interface that is to be designated as the master of the Port Redundancy Group.
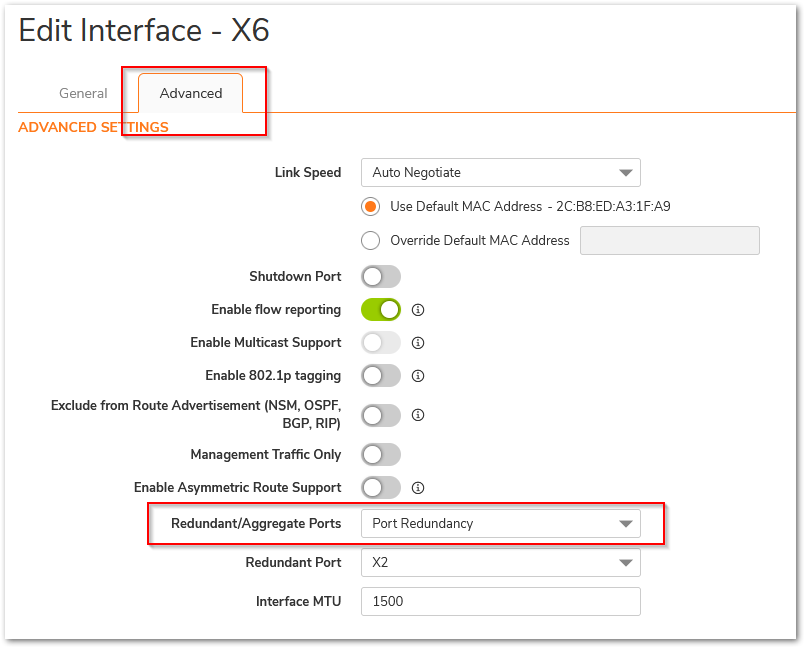
- The Edit Interface dialog displays. Click Advanced and under the Dropdown Redundant/Aggregate Ports Select Port Redundancy.
- The Redundant Port Dropdown is displayed. The dropdown displays all of the currently unassigned interfaces available. Select one of the interfaces that supports the same speed as the master port; the default is None. Click OK to accept the configuration change.
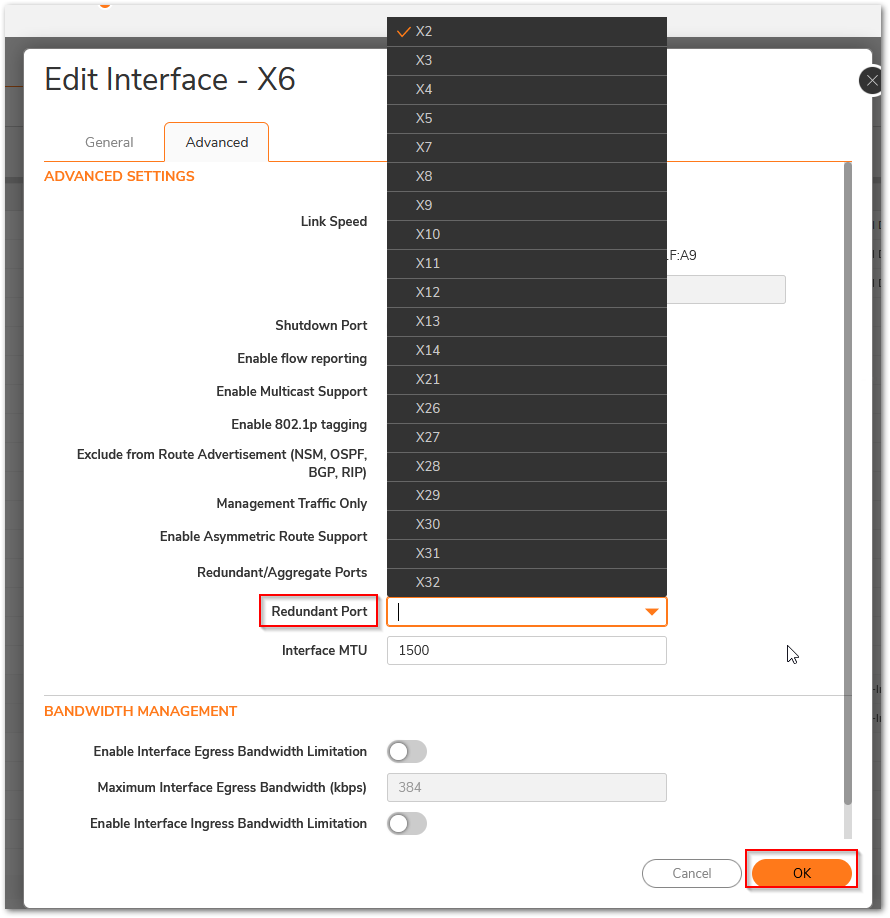
 NOTE: After an Interface is selected as a Redundant Port, its configuration is governed by the primary interface and it cannot be configured independently. In the Interface Settings table, the Interface's Zone is displayed as Redundant Port, and the configuration icon is removed.
Resolution for SonicOS 6.5
This release includes significant user interface changes and many new features that are different from the SonicOS 6.2 and earlier firmware. The below resolution is for customers using SonicOS 6.5 firmware.
Port Redundancy Configuration:
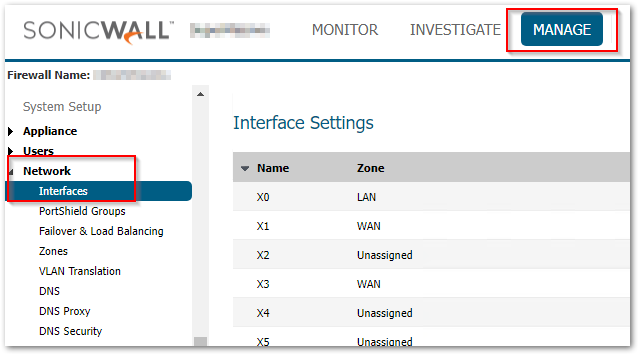
- Navigate to MANAGE | Network > Interfaces.
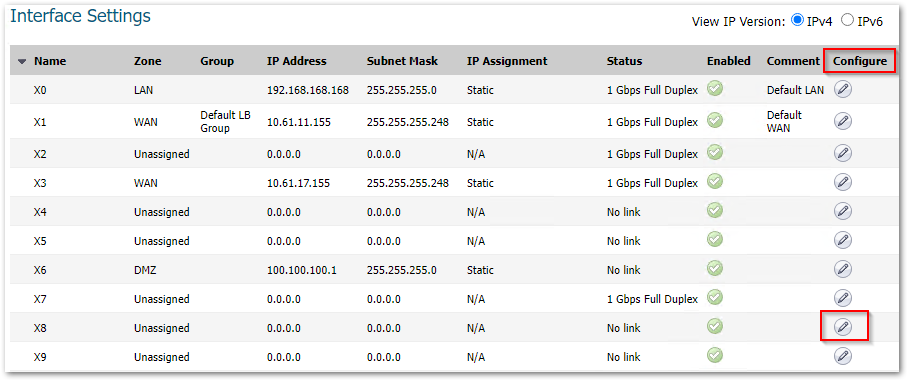
- Click the Configure icon for the interface that is to be designated the master of the Port Redundancy Group.
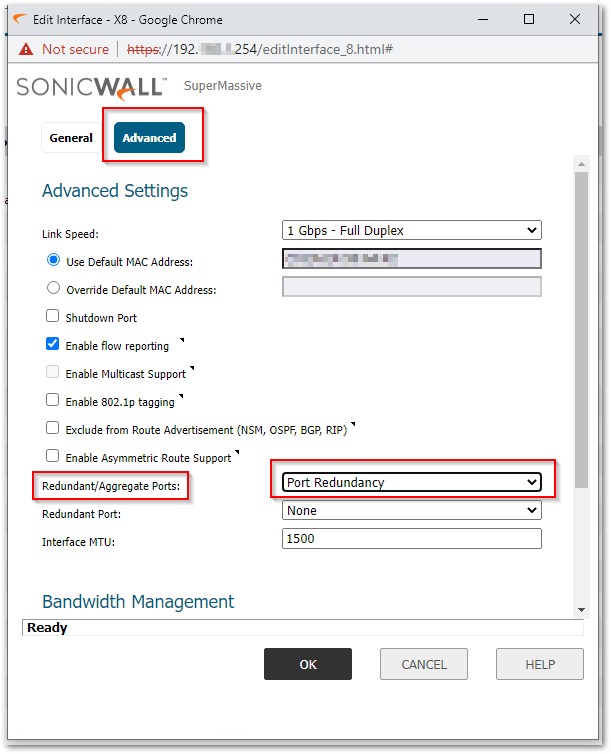
- The Edit Interface dialog displays. Click Advanced and under the Dropdown Redundant/Aggregate Ports Select Port Redundancy.
- The Redundant Port Dropdown is displayed. The dropdown displays all of the currently unassigned interfaces available. Select one of the interfaces that supports the same speed as the master port; the default is None. Click OK to accept the configuration change.
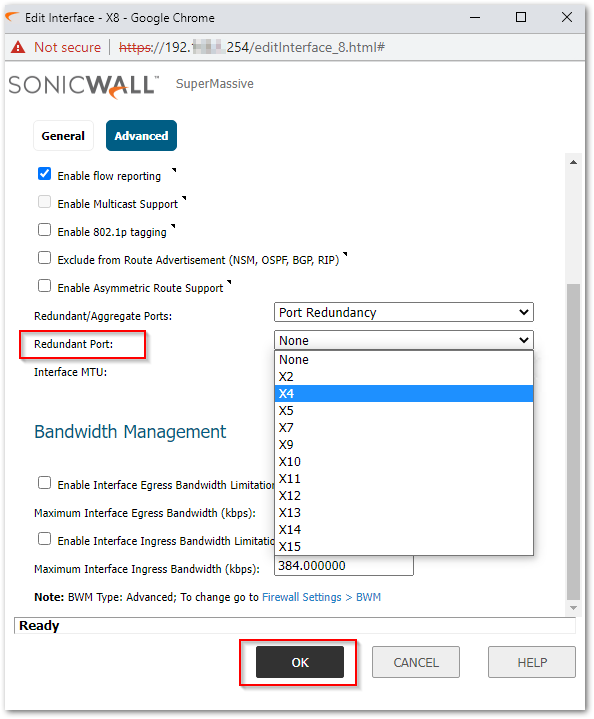
 NOTE: After an Interface is selected as a Redundant Port, its configuration is governed by the primary interface and it cannot be configured independently. In the Interface Settings table, the Interface's Zone is displayed as Redundant Port, and the configuration icon is removed.
Related Articles
- Error:"Invalid API Argument" when modifying the access rules
- Cysurance Partner FAQ
- Configure probe monitoring for WAN Failover and Loadbalancing - SonicWall UTM
Categories
- Firewalls > NSa Series > Networking
- Firewalls > SonicWall SuperMassive 9000 Series > Networking
- Firewalls > NSsp Series > Networking


 YES
YES NO
NO