-
Products
-
SonicPlatform
SonicPlatform is the cybersecurity platform purpose-built for MSPs, making managing complex security environments among multiple tenants easy and streamlined.
Discover More
-
-
Solutions
-
Federal
Protect Federal Agencies and Networks with scalable, purpose-built cybersecurity solutions
Learn MoreFederalProtect Federal Agencies and Networks with scalable, purpose-built cybersecurity solutions
Learn More - Industries
- Use Cases
-
-
Partners
-
Partner Portal
Access to deal registration, MDF, sales and marketing tools, training and more
Learn MorePartner PortalAccess to deal registration, MDF, sales and marketing tools, training and more
Learn More - SonicWall Partners
- Partner Resources
-
-
Support
-
Support Portal
Find answers to your questions by searching across our knowledge base, community, technical documentation and video tutorials
Learn MoreSupport PortalFind answers to your questions by searching across our knowledge base, community, technical documentation and video tutorials
Learn More - Support
- Resources
- Capture Labs
-
- Company
- Contact Us
How to setup Active/Standby High Availability on NSSP 13700 appliances?


Description
This article explains setting up an Active/Standby High Availability between two SonicWall NSSP 13700 appliances.
HA Setup:
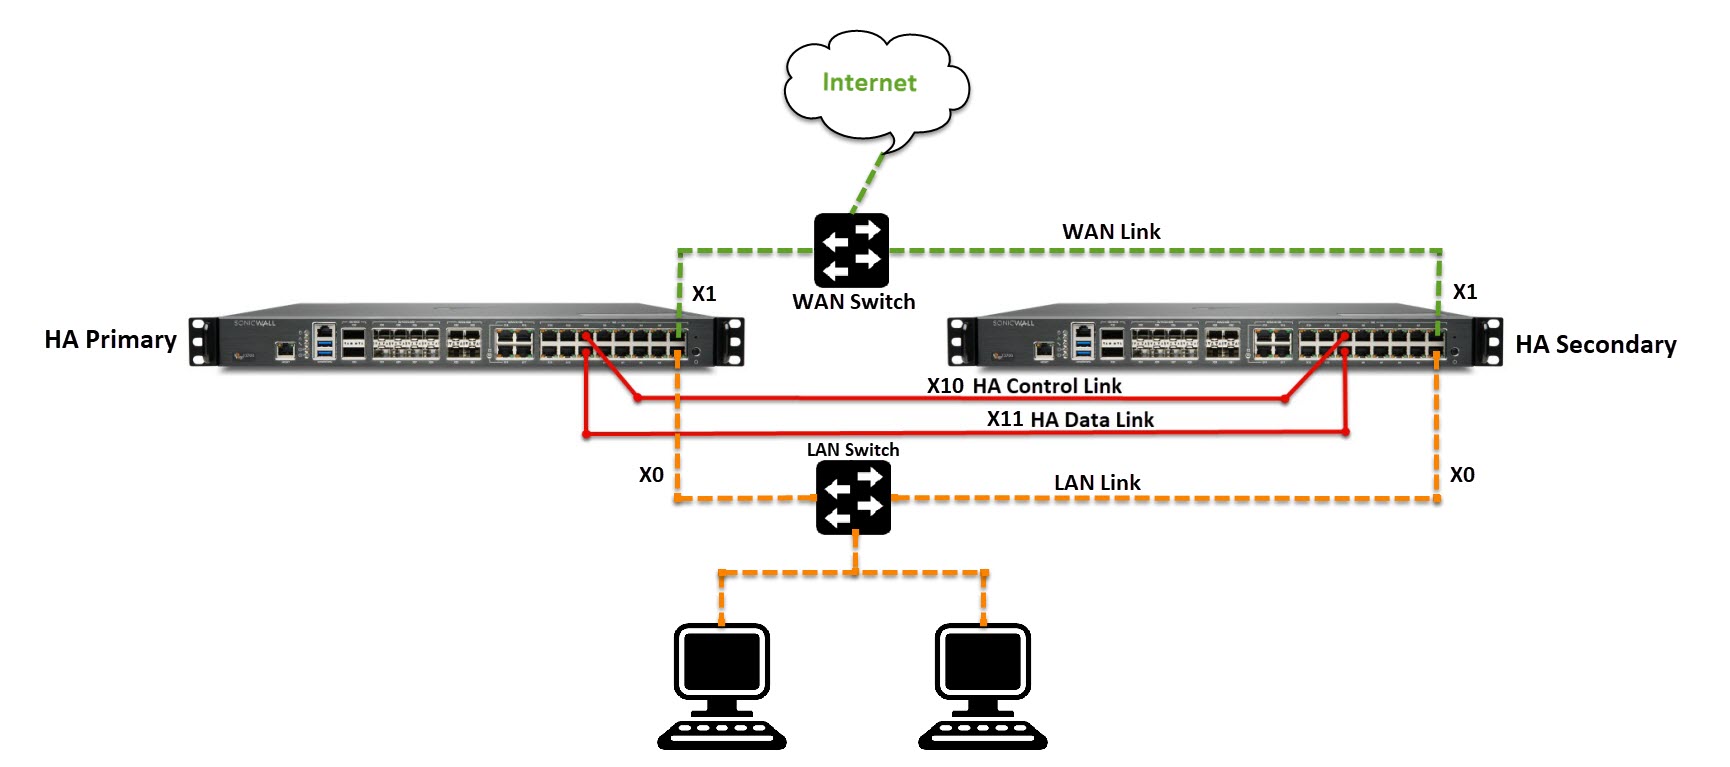
- The LAN (X0) interfaces of the NSSP 13700 appliances are connected to a switch on the LAN network. The WAN (X1) interfaces are connected to another switch termed WAN switch, which connects to the Internet.
- The dedicated HA interfaces (Control/Data) are connected directly to each other using at least a Cat 5e cable or SFP module. Crossover cables are no longer required.
- The HA control and HA data links are configured to use same or separate interfaces in Active/Standby setup.
- X0 interface should always have monitoring IPs configured. If the X0 interface is not in use in the HA environment be sure to connect them directly to each other because the X0 interface with monitoring IPs serves as an additional HA link and improves HA sync and overall stability.
 NOTE: When connecting the Primary and Secondary NSSP 13700 appliances to an Ethernet switch that uses the spanning tree protocol, please be aware that it may be necessary to adjust the link activation time on the switch port that the SonicWall interfaces connect to. For example, on a Cisco Catalyst-series switch, it is necessary to activate spanning tree port fast for each port connecting to the NSSP 13700 HA appliance interfaces.
Resolution
Setting up Active/Standby HA on NSSP 13700 SonicWall’s involves the following steps:
- Performing HA Association on MySonicWall account
- Enabling Active/Standby HA
- Configuring Monitoring IP addresses
- HA Advanced Settings
Performing HA Association on MySonicWall account:
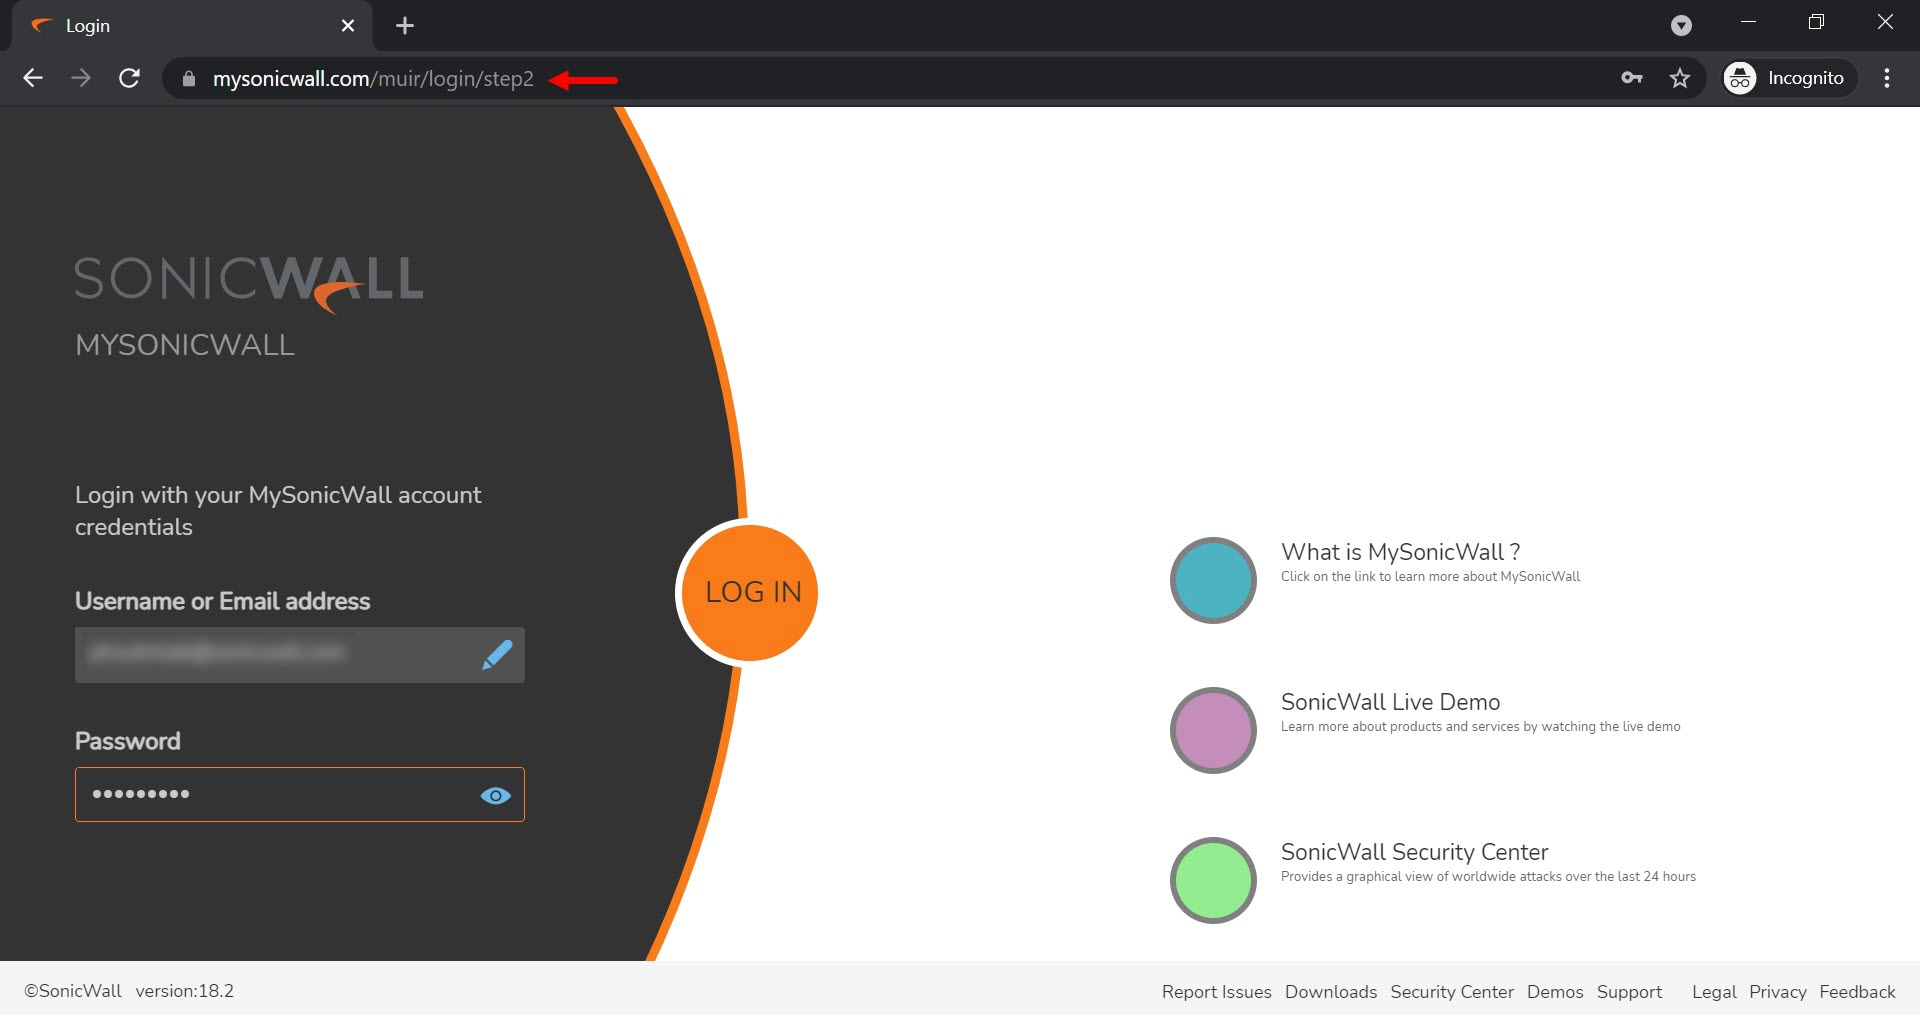
1. Visit MySonicWall account, enter the Username & Password and click LOG IN.
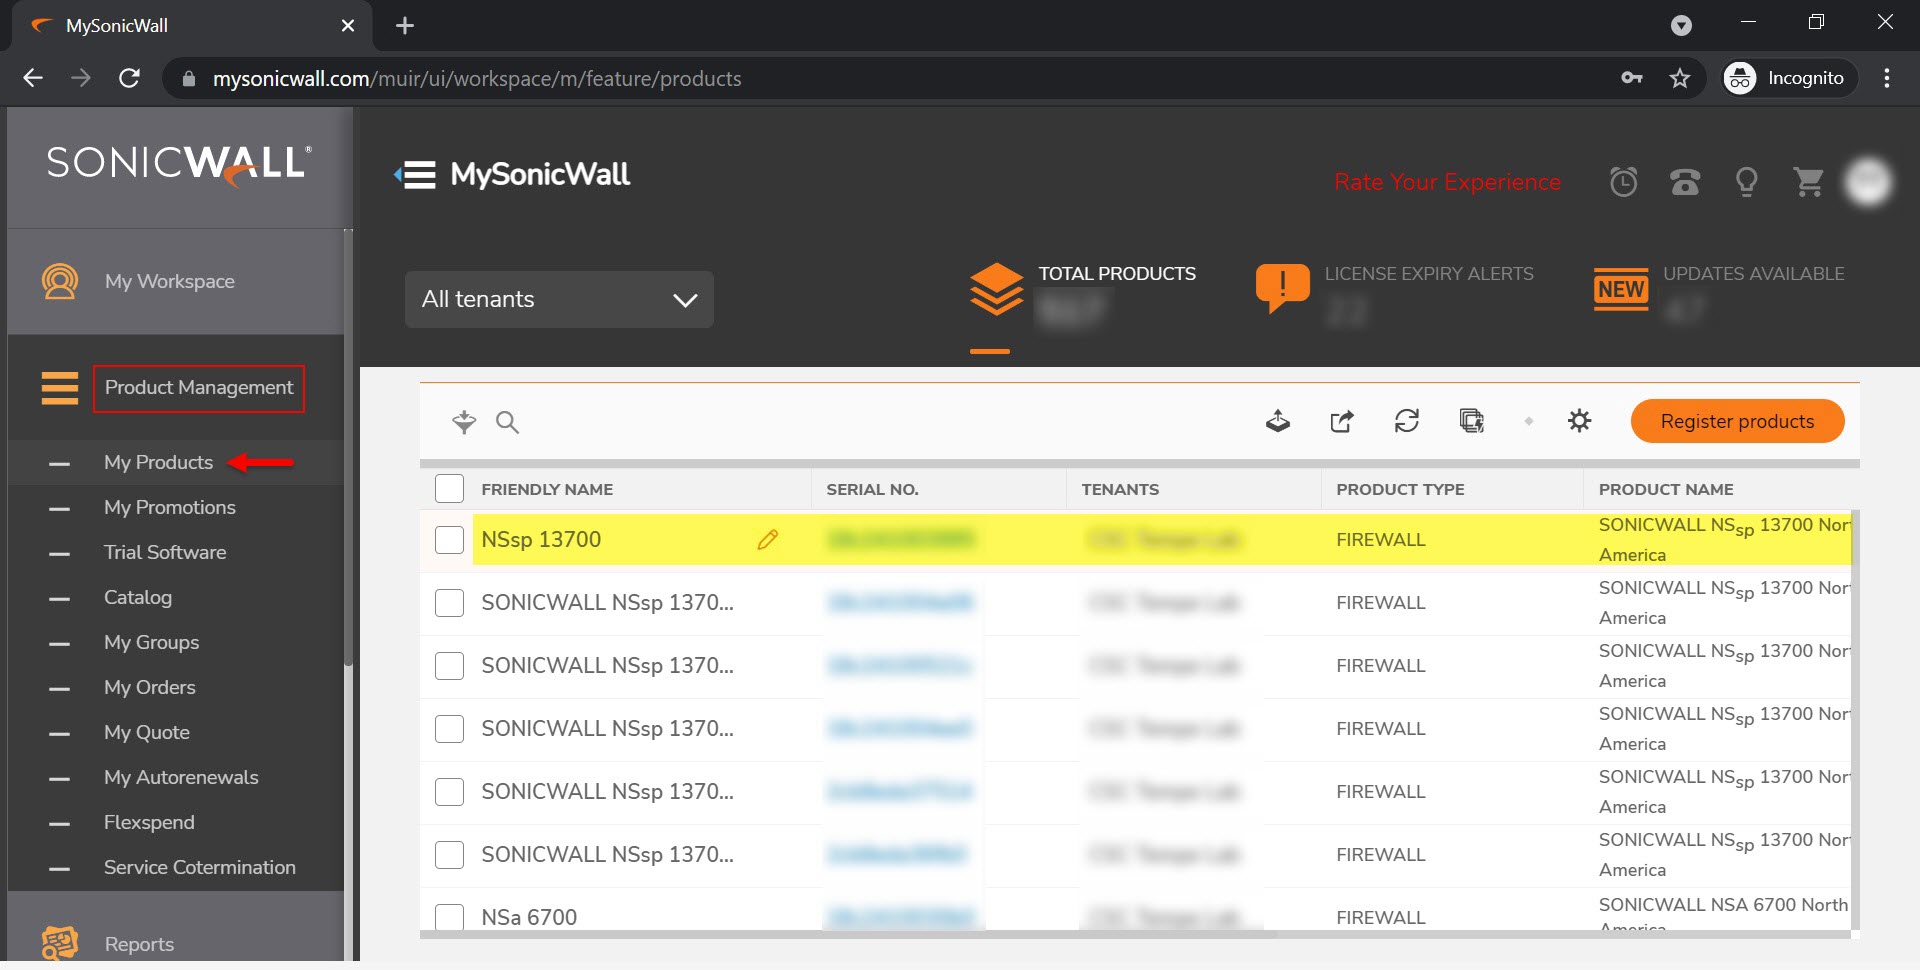
2. Navigate to Product Management | My Products page.
3. Click on the Serial Number of the primary NSSP 13700.
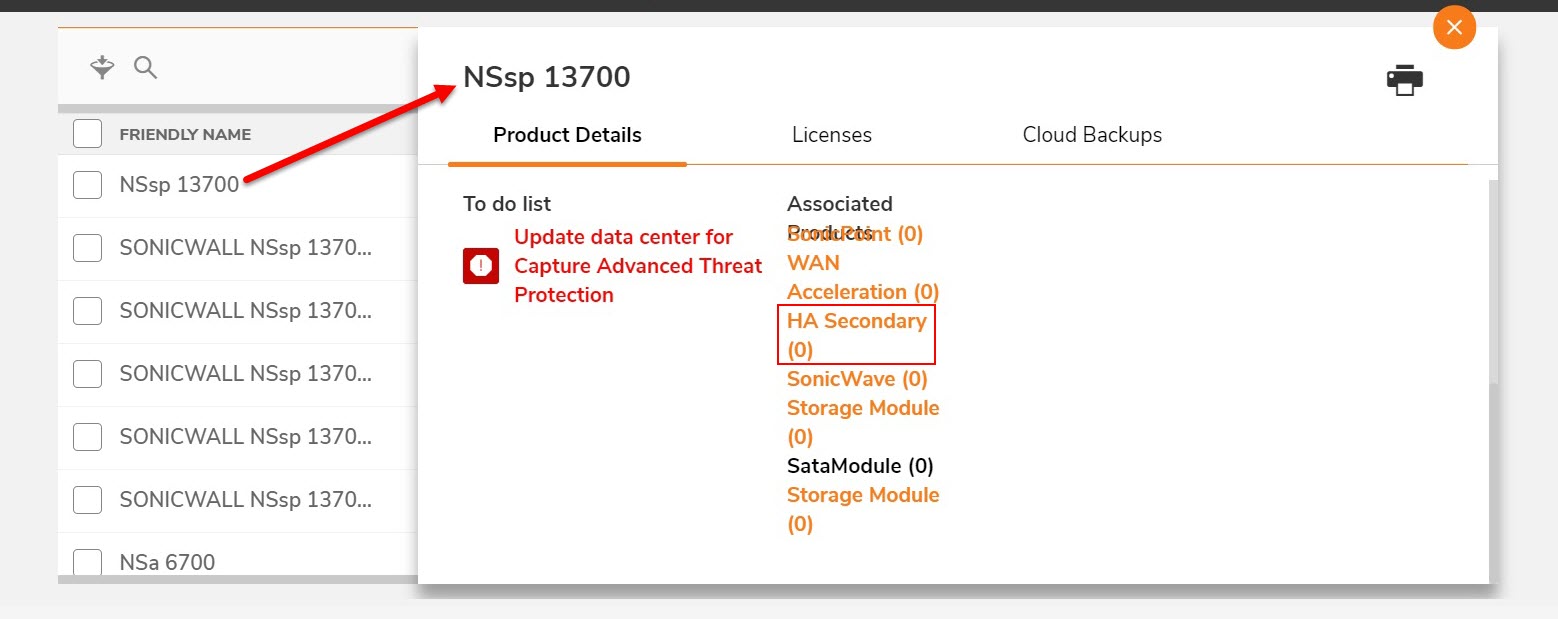
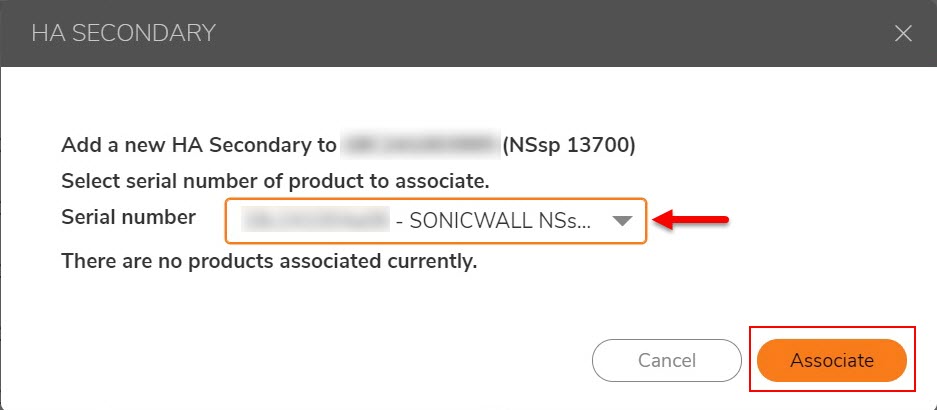
4. In the Product Details page, click on HA Secondary (0).
5. In the Add a new HA Secondary pop-up, select the NSSP 13700 HA Secondary firewall’s serial number from the Serial number dropdown list.
6. Click Associate.
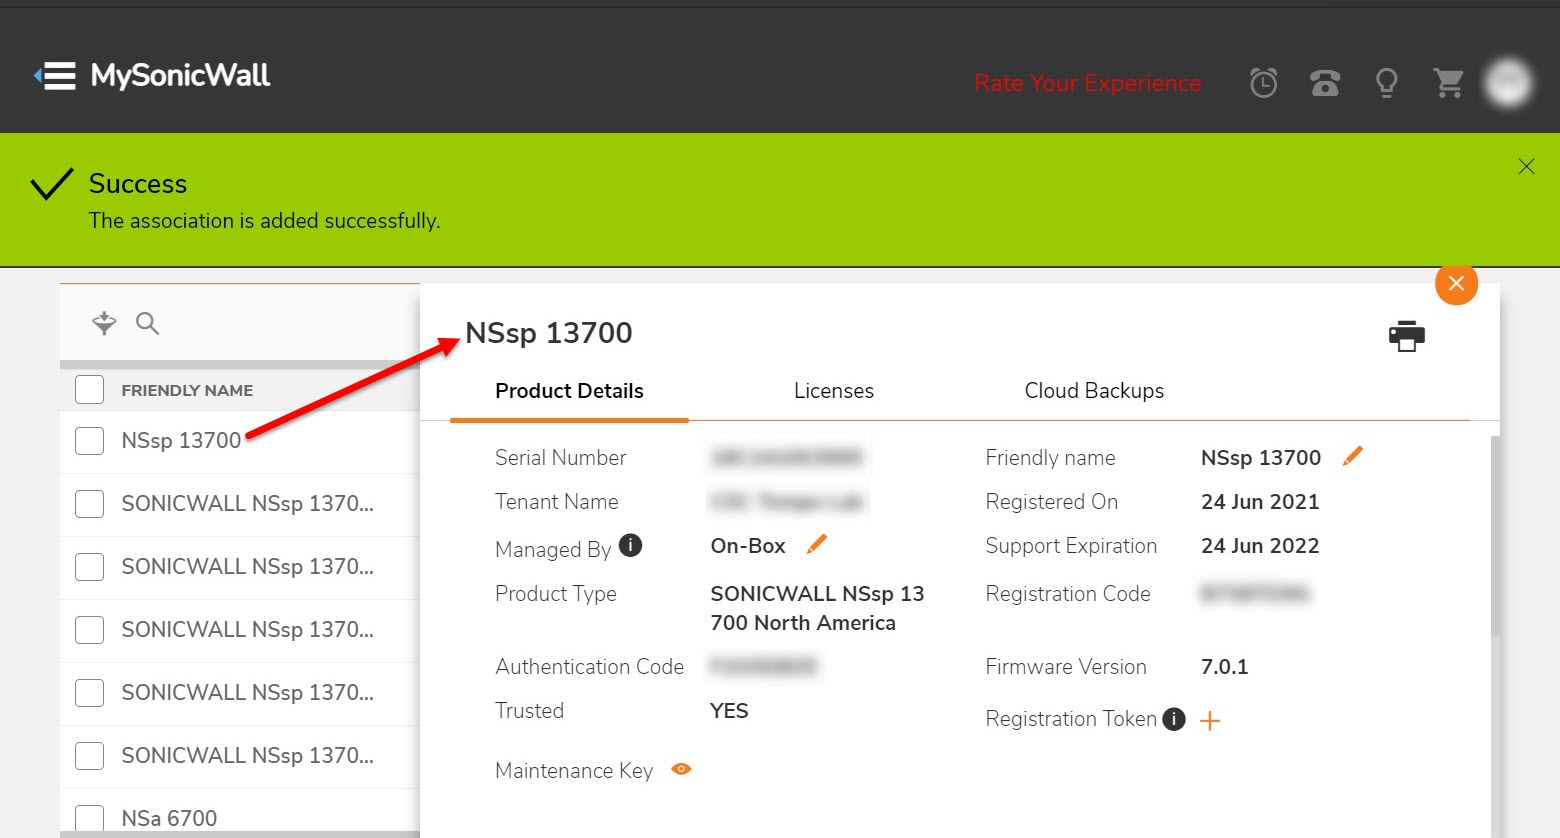
7. The HA association will be successful, and it is notified as shown in the below screenshot.
Enabling Active/Standby HA:
 TIP:
TIP:
- Secondary NSSP 13700 appliance needs to be registered initially on its GUI before enabling HA on Primary NSSP 13700.
- Disable the PortShield and Native Bridge mode on both primary and secondary NSSP 13700 appliances.
- If the Secondary NSSP 13700 firewall contains any configuration, perform a factory default reset to it. When it is accessible after the reset, disable the PortShield on it if any.
1. Login to the Primary NSSP 13700 appliance.
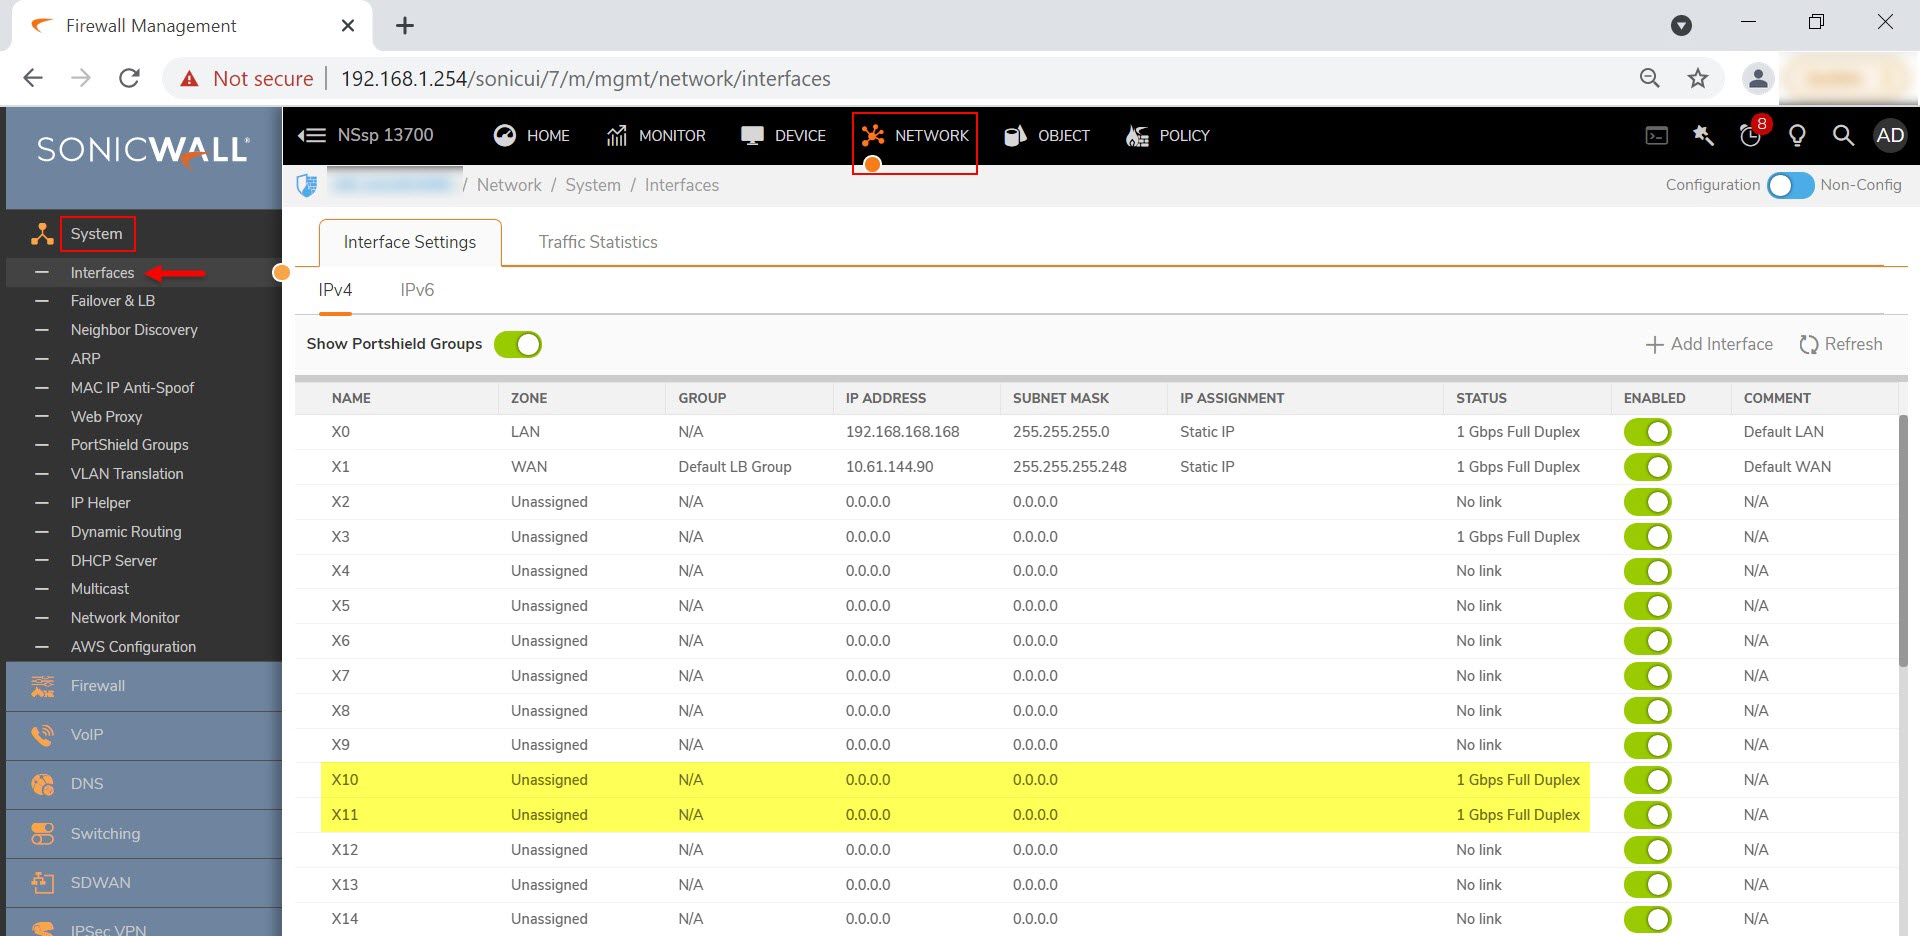
2. Navigate to NETWORK | System | Interfaces | Interface Settings | IPv4 on the GUI.
3. The HA Control and Data link interfaces are determined with the physical link status showing UP whereas the Zone still shows Unassigned.
 NOTE: For this KB’s perspective, X10 and X11 interfaces correspond to the HA links namely HA Control and HA Data. Other interfaces can also be used as HA links.
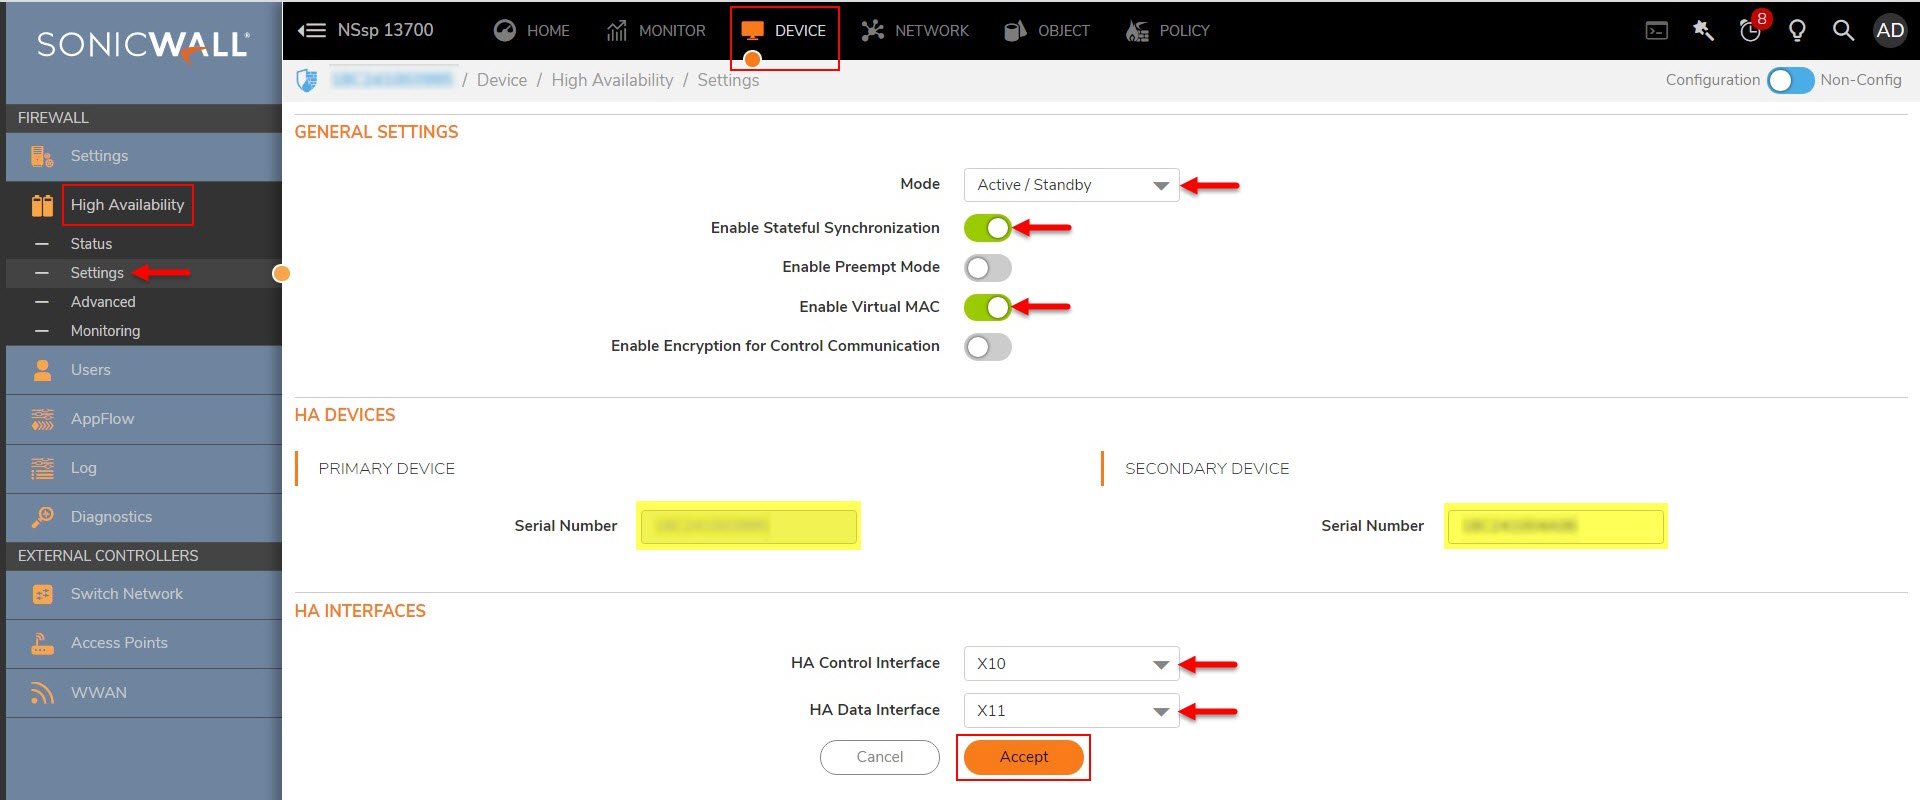
4. Navigate to DEVICE | High Availability | Settings on the GUI.
5. Perform below HA configuration,
GENERAL SETTINGS
- Mode: Active/Standby
- Enable the Sliders for Enable Stateful Synchronization and Virtual MAC.
HA DEVICES
- Enter the Serial Number of PRIMARY DEVICE and SECONDARY DEVICE.
HA INTERFACES
- Select the HA Control Interface and HA Data Interface fields with appropriate NSSP 13700 interfaces.
6. Click Accept.
7. Once the HA configuration is saved, the Primary NSSP 13700’s initial HA status is ELECTION and changes to SYNC.

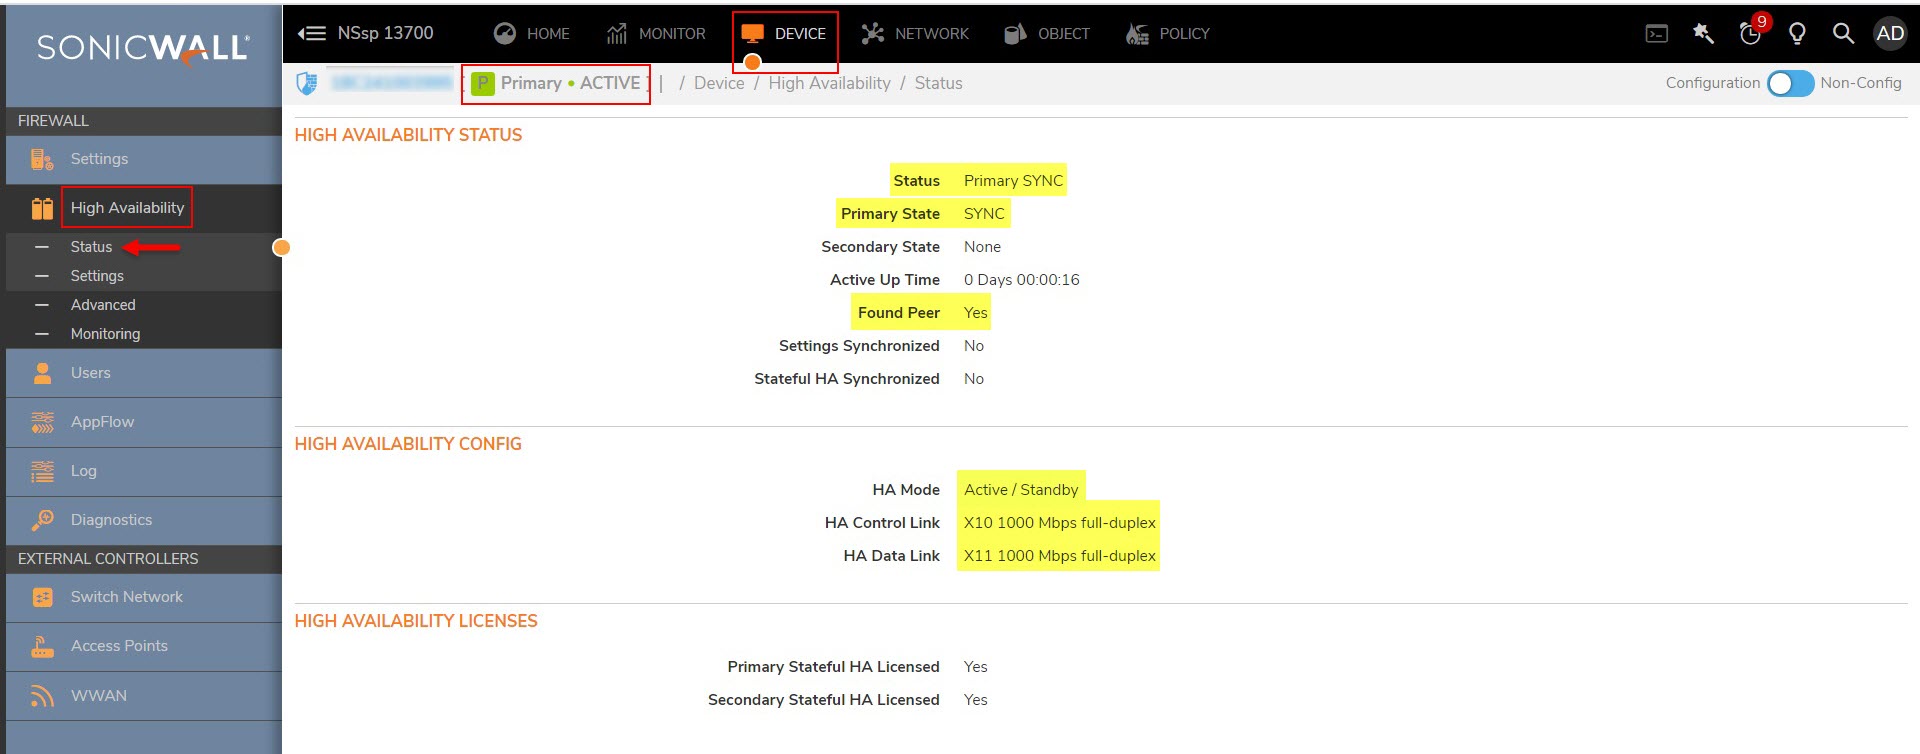
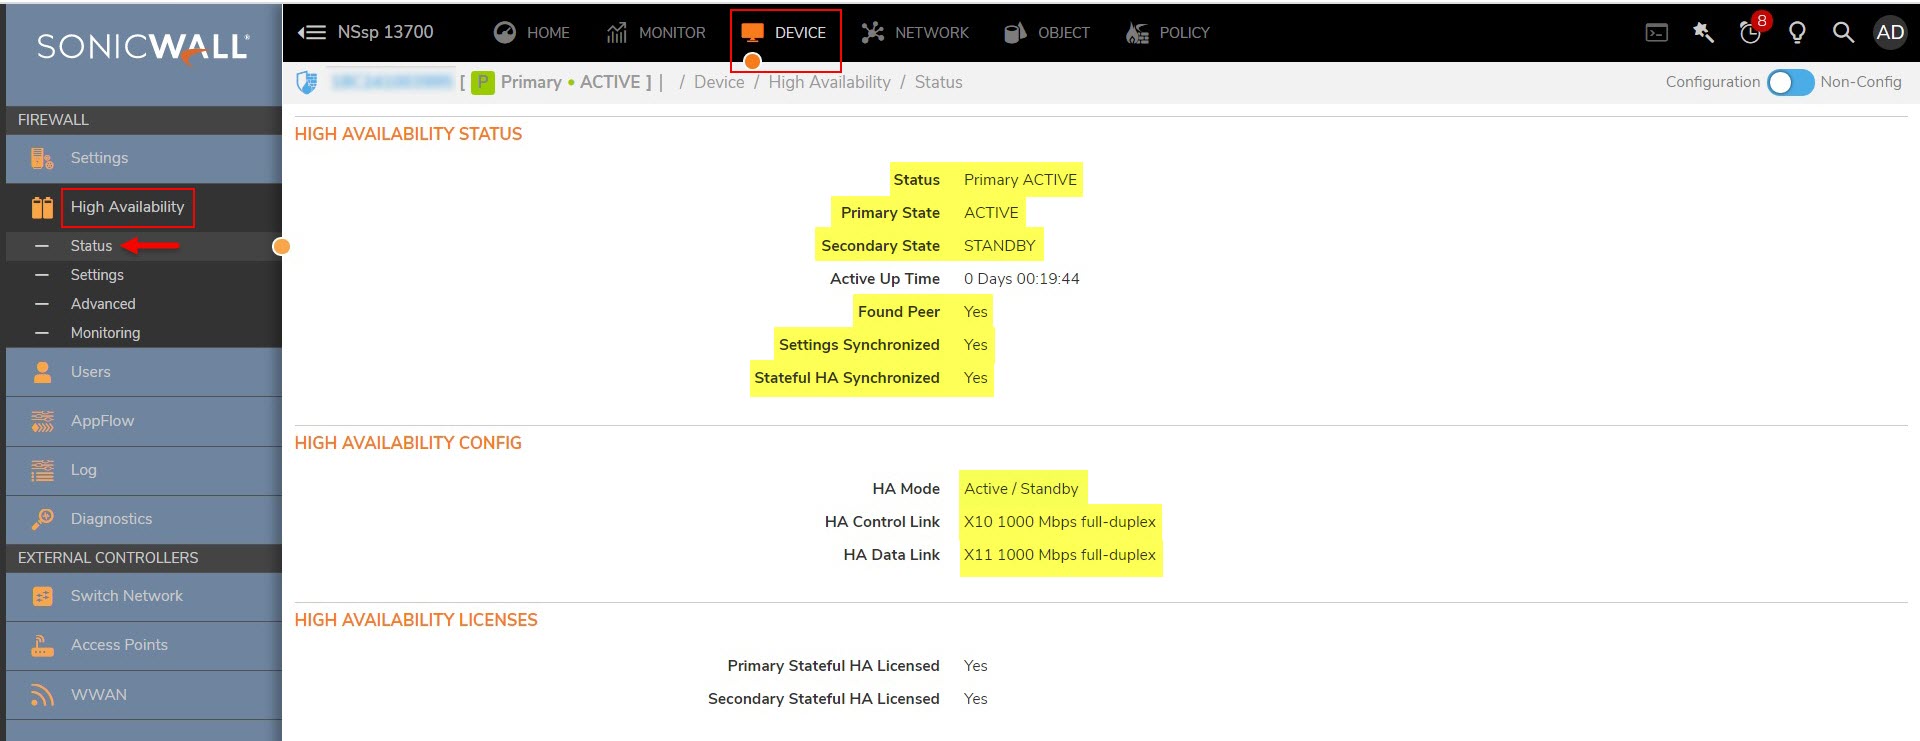
8. After few minutes (up to 12 – 15 minutes), the HA gets established between the Primary NSSP 13700 and Secondary NSSP 13700 appliances respectively as shown in the below screenshot.
Configuring Monitoring IP addresses:
1. Navigate to DEVICE | High Availability | Monitoring | Monitoring IPv4 Settings on the GUI.
2. Click on the Edit this entry icon corresponding the X0 interface.
 NOTE: Monitoring IP address can be configured for any physical interface on the NSSP 13700. In this KB, X0 interface is only considered.

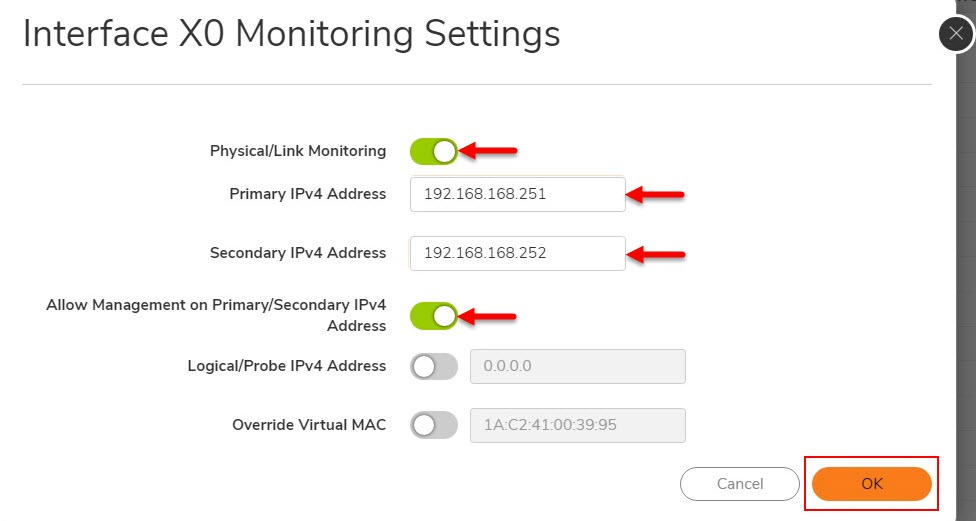
3. In the Interface X0 Monitoring Settings pop-up, fill in the fields as shown below.
- Physical/Link Monitoring: Enable the Slider
- Primary IPv4 Address: 192.168.168.251 (can be of any IP address on X0 subnet)
- Secondary IPv4 Address: 192.168.168.252 (can be of any IP address on X0 subnet)
- Allow Management on Primary/Secondary IPv4 Address: Enable the Slider
 NOTE:
NOTE:
- The IP addresses specified in the Primary IPv4 and Secondary IPv4 fields should be dedicated for management access of primary and secondary NSSP 13700 appliances.
These IP addresses should not be used anywhere on the network and if used, it may lead to IP conflicts and management of primary and secondary NSSP 13700’s would fail.
4. Click OK.
5. The Monitoring/Management IP addresses are configured for the X0 with Management enabled as shown in the below screenshot.

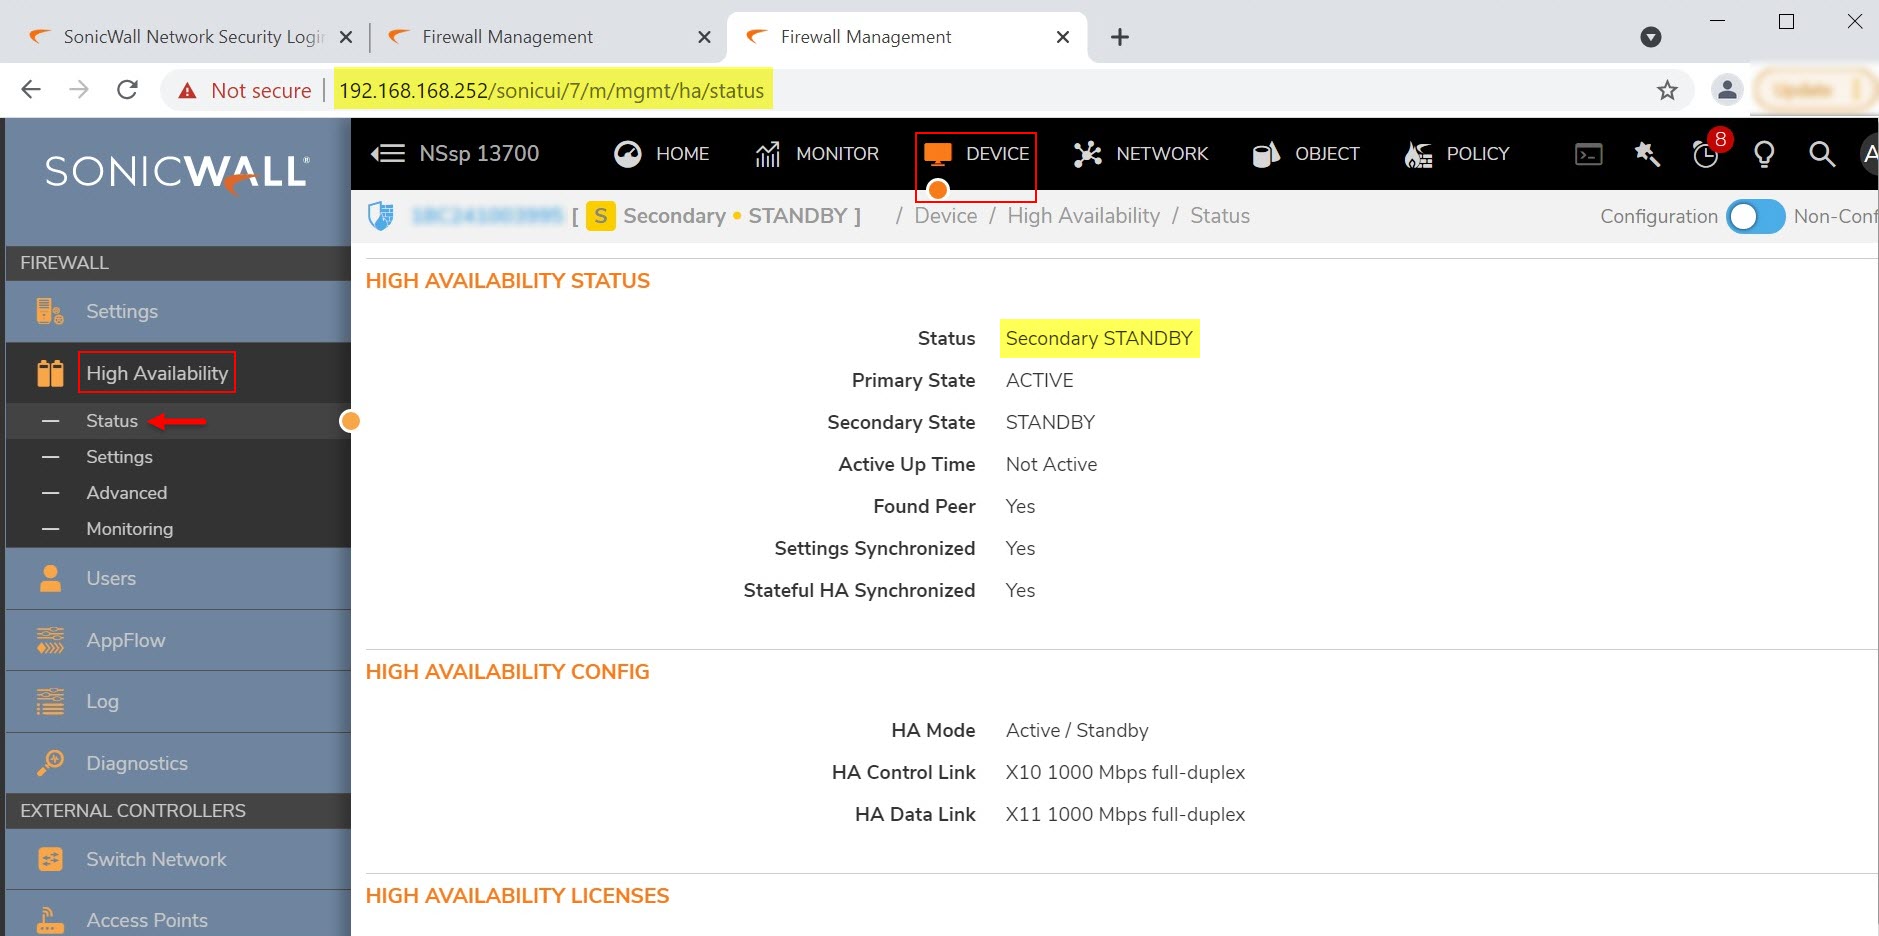
6. Gain access to the Primary NSSP 13700 by browsing to the IP address https://192.168.168.251 and verify the HA status in DEVICE | High Availability | Status.
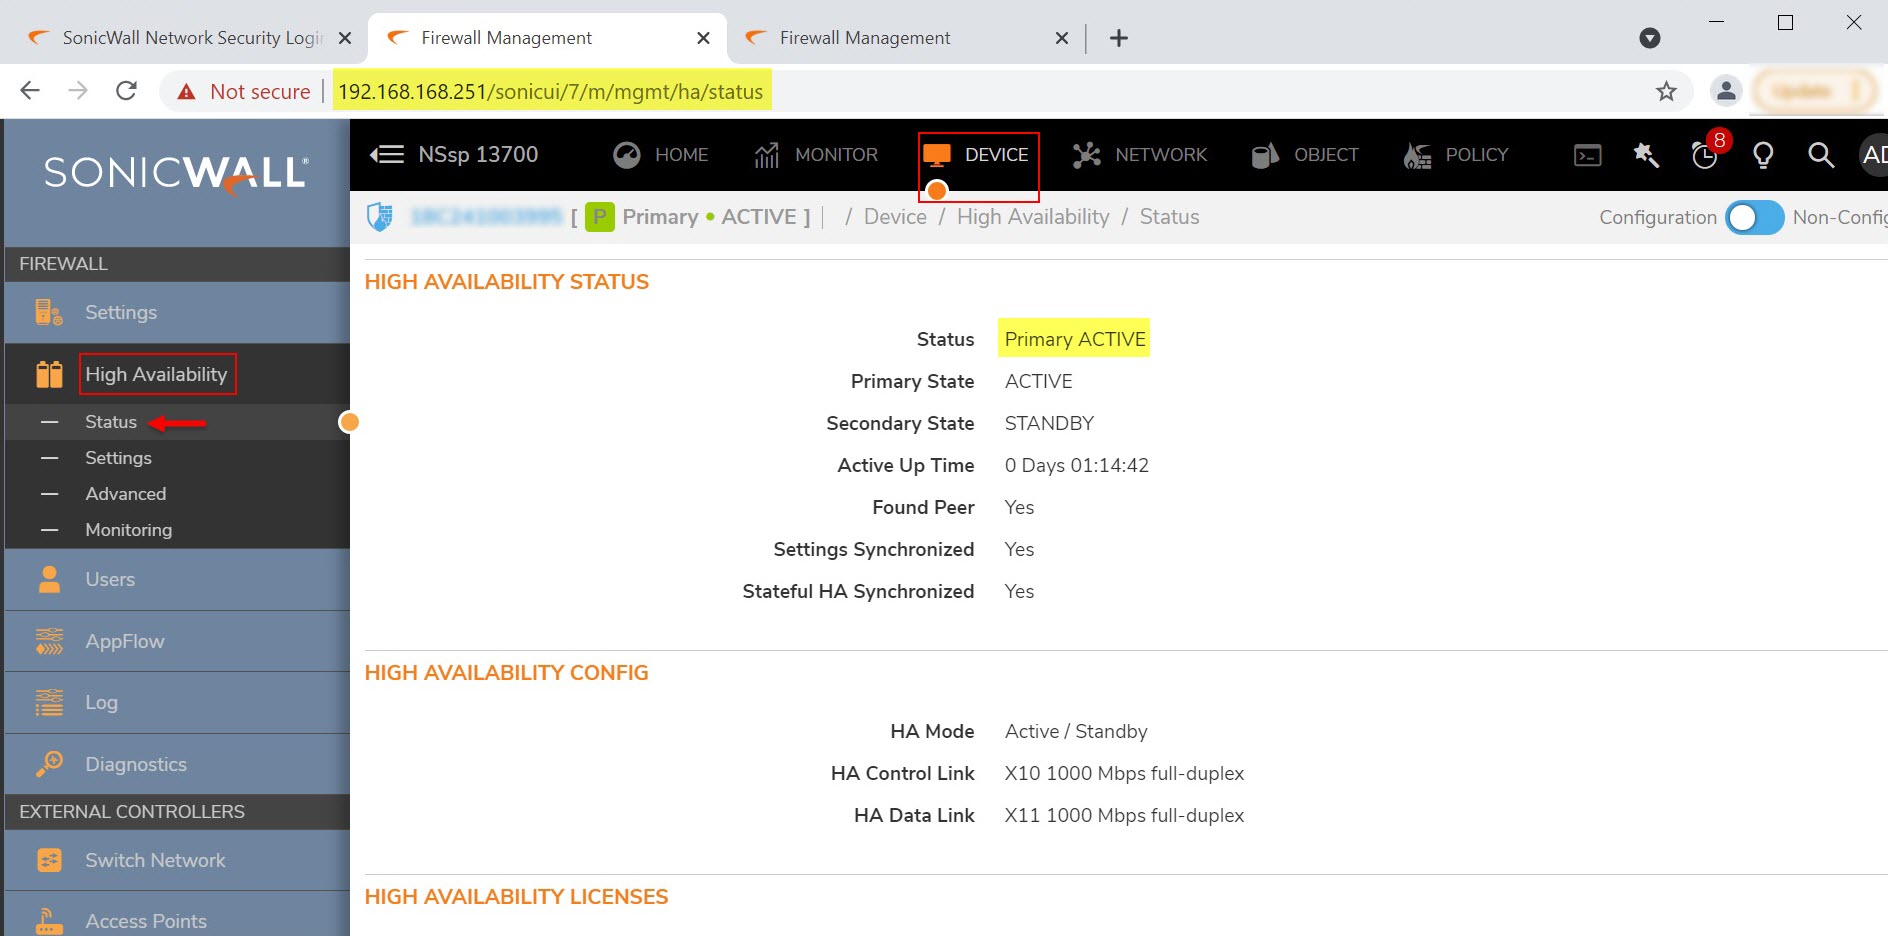
7. Gain access to the Secondary NSSP 13700 by browsing to the IP address https://192.168.168.252 and verify the HA status in DEVICE | High Availability | Status.
HA Advanced Settings:
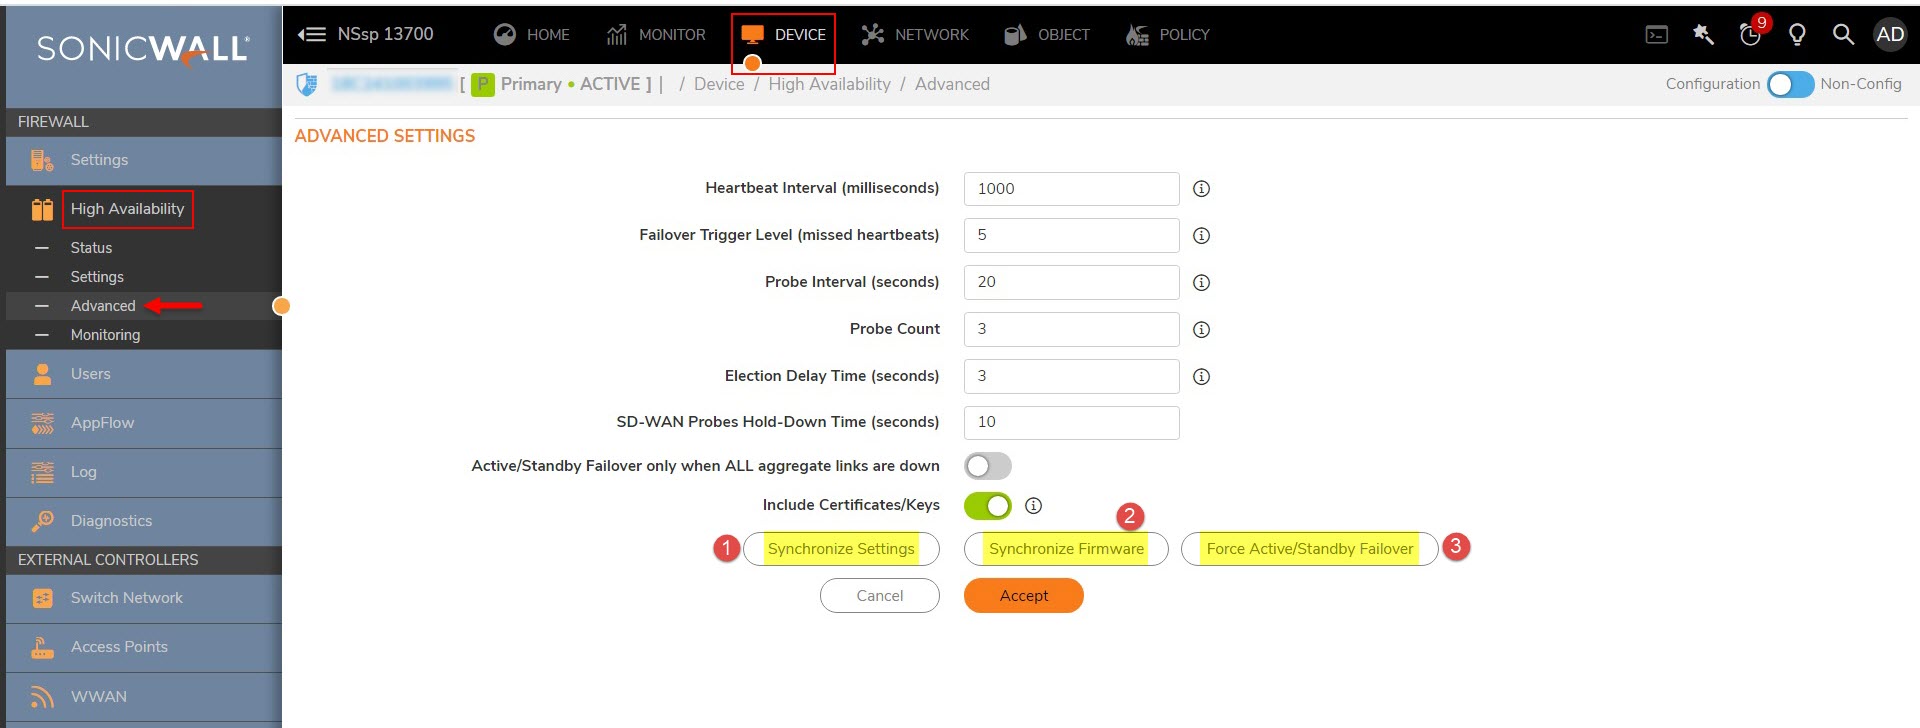
1. Navigate to DEVICE | High Availability | Advanced | Advanced Settings on the GUI.
2. Set the below fields to default values unless there is a change as mentioned in the Note below.
- Heartbeat Interval (milliseconds)
- Failover Trigger Level (missed heartbeats)
- Probe Interval (seconds)
- Probe Count
- Election Delay Time (seconds)
- SD-WAN Probes Hold-Down Time (seconds)
- Active/Standby Failover only when ALL aggregate links are down
- Include Certificate/Keys
 NOTE: The Advanced Settings page shows the minimum recommended values. Lower values may cause unnecessary Failover, especially when the NSSP 13700 is under heavy load. Usage of higher values are recommended if NSSP 13700 handles lot of network traffics.
Synchronize Settings: Click Synchronize Settings to manually synchronize the settings between the Primary and Secondary NSSP 13700 appliances. The Secondary NSSP 13700 restarts upon a manual settings sync.
Synchronize Firmware: Click Synchronize Firmware to manually push the firmware from primary NSSP 13700 to the secondary NSSP 13700.
Force Active/Standby Failover: Click on Force Active/Standby Failover to swap the roles of the Primary and Secondary NSSP 13700 respectively. i.e., Active unit becomes Standby and Standby unit would become Active as a cause of clicking Force Active/Standby Failover.
Related Articles
- How to Block Google QUIC Protocol on SonicOSX 7.0?
- How to block certain Keywords on SonicOSX 7.0?
- How internal Interfaces can obtain Global IPv6 Addresses using DHCPv6 Prefix Delegation


 YES
YES NO
NO