-
Products
-
SonicPlatform
SonicPlatform is the cybersecurity platform purpose-built for MSPs, making managing complex security environments among multiple tenants easy and streamlined.
Discover More
-
-
Solutions
-
Federal
Protect Federal Agencies and Networks with scalable, purpose-built cybersecurity solutions
Learn MoreFederalProtect Federal Agencies and Networks with scalable, purpose-built cybersecurity solutions
Learn More - Industries
- Use Cases
-
-
Partners
-
Partner Portal
Access to deal registration, MDF, sales and marketing tools, training and more
Learn MorePartner PortalAccess to deal registration, MDF, sales and marketing tools, training and more
Learn More - SonicWall Partners
- Partner Resources
-
-
Support
-
Support Portal
Find answers to your questions by searching across our knowledge base, community, technical documentation and video tutorials
Learn MoreSupport PortalFind answers to your questions by searching across our knowledge base, community, technical documentation and video tutorials
Learn More - Support
- Resources
- Capture Labs
-
- Company
- Contact Us
How to replace the Primary Firewall in High Availability


Description
HA Configuration:
- Screenshot below shows a healthy HA environment with Primary FW status showing as Active and secondary FWstatus as Standby.
Primary and secondary Stateful HA is licensed and settings are synchronized.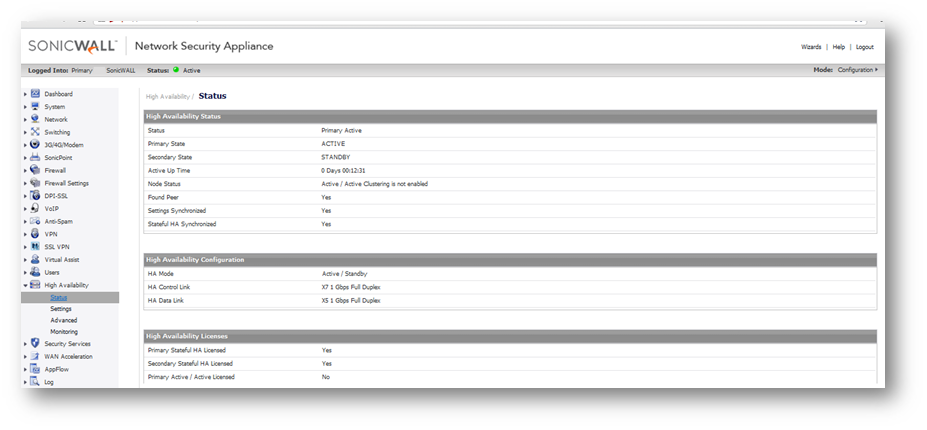
- Export the current firewall settings by navigating to System | Settings and then click on the export settings button, which will be needed in the event of replacing a Primary SonicWall NGFW later in this article.
 CAUTION: Before starting the replacement procedure, plan a maintenance window and notify the affected parties about the service disruption and expected duration. Replacement of primary shouldn't take more than few minutes while new appliance take over the control and both firewalls may reboots after new appliance has been introduced into HA.
Resolution
Replacement of Primary SonicWall NGFW:
- Disable HA on Secondary Active NGFW: In order to replace the Primary Firewall, disable the HA on the currently active (Secondary) firewall.
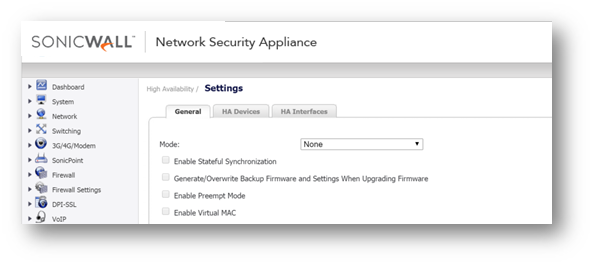
- Remove the existing Primary SonicWall NGFW and HA control and data link cables.
- Export the settings backup from the Secondary Firewall through System | Settings.
- Factory Default the Secondary Firewall and disconnect all the cables.
- HA has now been disabled on the Secondary SonicWall NGFW, and all HA related links showing none status, see screenshot below:
Prepare New Primary NGFW: unpack, power up, and prepare the new Primary SonicWall NGFW by uploading the same firmware and then registering it with the License manager via an active Internet connection.
 NOTE: Connect the new primary with an Internet connection by configuring one of its WAN interfaces and accessing it via MGMT interface by connecting a PC/Laptop directly to its MGMT (management) interface using an Ethernet Patch cable or if MGMT Interface is unavailable you can use the X0 Interface and connect to 192.168.168.168
- Log in to the new MGMT interface by typing 192.168.1.254 (or 192.168.168.168 if connected to X0) in the web browser on the PC being used and upload same Firmware on the new Primary FW.
- To upload Firmware: Download it from MySonicWall web portal and click here to read about how to upload a Firmware.
- To upload Firmware: Download it from MySonicWall web portal and click here to read about how to upload a Firmware.
- Register New Primary NGFW: Register the new Primary NGFW by clicking the register link from the right hand side of System | Status page and enter MySonicWall username password details.
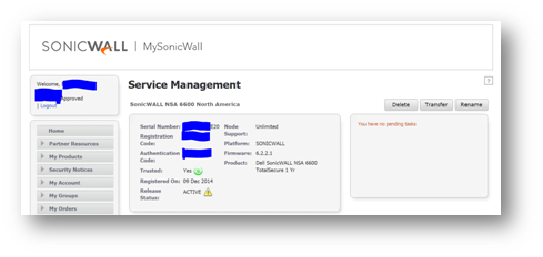
- Login to MySonicWall: Log in to the MySonicWall web portal and check the new Primary SonicWall HA associations after successfully registering the firewall in the previous step.
 NOTE: Please allow some time for the device status to show green as this could take some time to display the active Green icon next to Trusted, as shown below:
- Check HA association on MSW:
- Old Primary firewall with its Serial number shouldn't return any results under products on the MySonicWall web portal, because its services have been transferred to the new Primary and the old firewall has been de-registered.
- Search for the New serial number on MySonicWall web portal and check its HA associations.
 NOTE: If the HA association is not showing correctly then remove the existing association and create new association, click here for more information about creating HA associations. In the above case association was also updated as result of RMA service transfer. Once the association has been checked on MySonicWall web portal and showing correct NGFW serial numbers proceed to the next step. If HA association is not updating please contact Support on for further assistance.
- Old Primary firewall with its Serial number shouldn't return any results under products on the MySonicWall web portal, because its services have been transferred to the new Primary and the old firewall has been de-registered.
- Import Settings on New Primary NGFW and verify serial numbers and HA configuration:
- Log back into new Primary NGFW via its MGMT or X0 interface and Import the preferences which were exported in the previous steps.
- After the new Primary firewall has been rebooted successfully with HA preferences, navigate to High Availability as shown below:
 NOTE: This Firewall is currently active and secondary status is none because this firewall is not yet placed in the HA.
- Navigate to High Availability | Settings | and click on General Tab to confirm the HA Mode settings.

- Navigate to High Availability | Settings | and click on HA Devices tab to confirm the serial numbers of HA Devices.
- Navigate to High Availability | Settings | and click on HA Interfaces tab to confirm the HA interfaces.
 CAUTION: The HA configuration after importing the settings, shouldn't require any manual change unless the changes were made after exporting the settings. It is recommended to connect the HA primary and secondary NGFWs with Serial cables and save their console outputs in separate files for further analysis in the event of unforeseen incident.
- Log back into new Primary NGFW via its MGMT or X0 interface and Import the preferences which were exported in the previous steps.
- Connect all network cables to the Primary and verify the correct functionality of the traffic.
- Once confirmed that the network is up and running with the primary, reconnect all HA Cables only to the secondary firewall.
 NOTE: Make sure the secondary unit was factory defaulted as per previous steps.
 - Wait until the secondary synchronizes the settings. restarts and the HA Status shows the Secondary in "Standby".
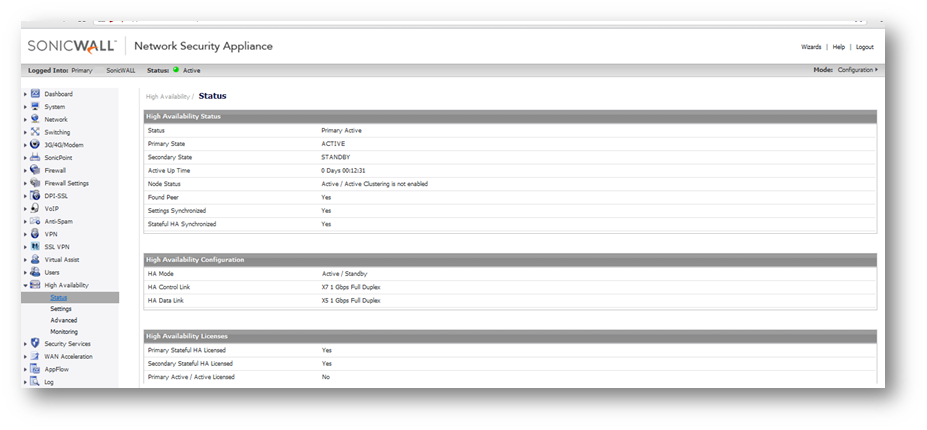
- Now reconnect all network cable to the secondary unit.
 TIP: If you have configured Monitoring IPs, you can now login to the Standby secondary firewall to verify and confirm its status:
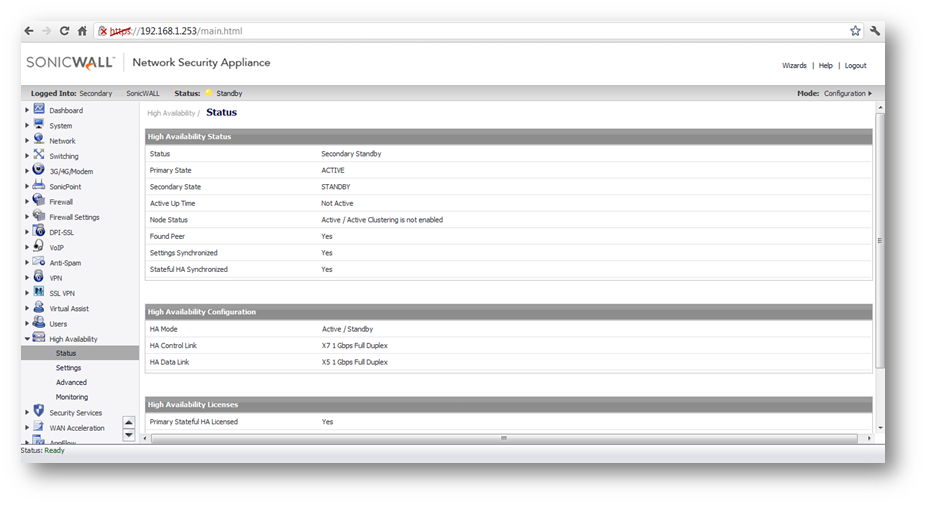
This concludes the replacement of a New Primary SonicWall NGFW into a HA.
Related Articles
- Error:"Invalid API Argument" when modifying the access rules
- Cysurance Partner FAQ
- Configure probe monitoring for WAN Failover and Loadbalancing - SonicWall UTM
Categories
- Firewalls > TZ Series
- Firewalls > SonicWall SuperMassive E10000 Series
- Firewalls > SonicWall SuperMassive 9000 Series
- Firewalls > SonicWall NSA Series
- Firewalls > NSa Series > High Availability


 YES
YES NO
NO