-
Products
-
SonicPlatform
SonicPlatform is the cybersecurity platform purpose-built for MSPs, making managing complex security environments among multiple tenants easy and streamlined.
Discover More
-
-
Solutions
-
Federal
Protect Federal Agencies and Networks with scalable, purpose-built cybersecurity solutions
Learn MoreFederalProtect Federal Agencies and Networks with scalable, purpose-built cybersecurity solutions
Learn More - Industries
- Use Cases
-
-
Partners
-
Partner Portal
Access to deal registration, MDF, sales and marketing tools, training and more
Learn MorePartner PortalAccess to deal registration, MDF, sales and marketing tools, training and more
Learn More - SonicWall Partners
- Partner Resources
-
-
Support
-
Support Portal
Find answers to your questions by searching across our knowledge base, community, technical documentation and video tutorials
Learn MoreSupport PortalFind answers to your questions by searching across our knowledge base, community, technical documentation and video tutorials
Learn More - Support
- Resources
- Capture Labs
-
- Company
- Contact Us
How to obtain the DHCP Lease information from the Tech Support Report file?


Description
This KB article illustrates how to see the DHCP lease information in the Tech Support Report obtained from SonicWall.
Resolution
Resolution for SonicOS 6.5
This release includes significant user interface changes and many new features that are different from the SonicOS 6.2 and earlier firmware. The below resolution is for customers using SonicOS 6.5 firmware.
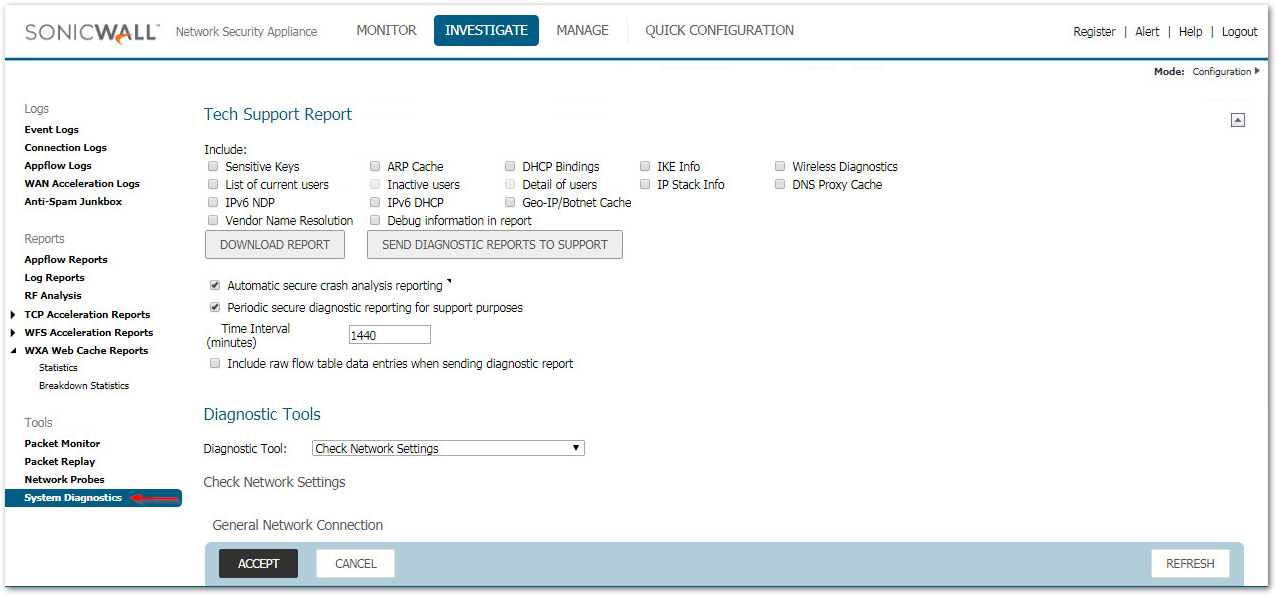
Step 1: Log in to the SonicWall Security Appliance management GUI. Click Investigate in the top navigation menu.
Step 2: Go to System Diagnostics.
Step 3: Enable the check box "DHCP Bindings" and click on "Download Report".
Step 4: A small pop-up window appears and click OK to save the TSR file to the local machine.


Step 5: Open the TSR file and press CTRL+F to bring the search box.
Step 6: In the search box, enter DHCP Bindings and hit enter to move to DHCP section on the TSR.
- Below screen shot depicts the DHCP Lease information present on the TSR along with IP conflict detection.

Resolution for SonicOS 6.2 and Below
The below resolution is for customers using SonicOS 6.2 and earlier firmware. For firewalls that are generation 6 and newer we suggest to upgrade to the latest general release of SonicOS 6.5 firmware.
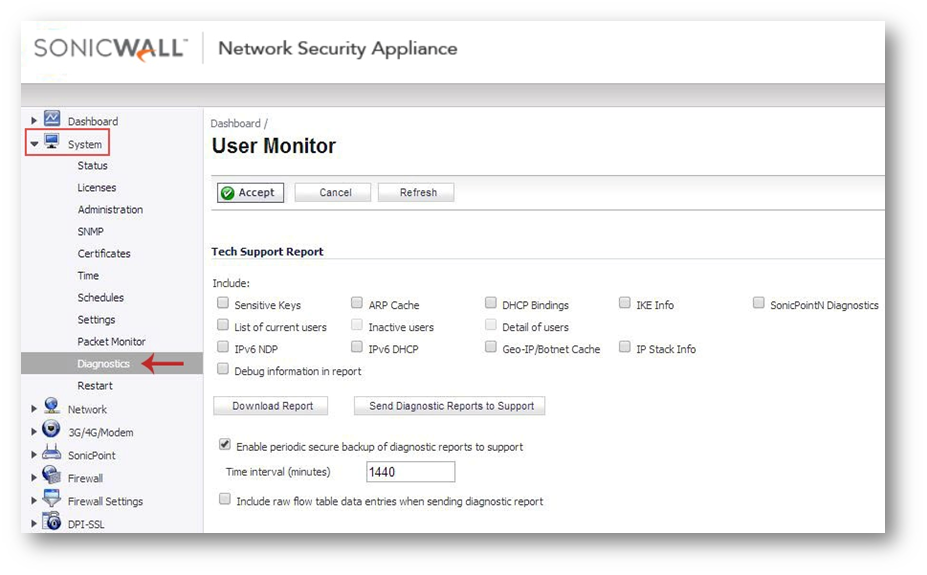
Step 1: Log in to the SonicWall Security Appliance management GUI.
Step 2: Navigate to System | Diagnostics page.
Step 3: Enable the check box "DHCP Bindings" & click on "Download Report".
Step 4: A small pop-up window appears and click OK to save the TSR file to the local machine.
Step 5: Open the TSR file and press CTRL+F to bring the search box.
Step 6: In the search box, enter DHCP Bindings and hit enter to move to DHCP section on the TSR.
- Below screen shot depicts the DHCP Lease information present on the TSR along with IP conflict detection.

Related Articles
- How to block like/comment/post/share features of Facebook using App Rules
- How to block various YouTube features using App Rules
- How can I enable or disable SonicWall firewall management access?
Categories
- Firewalls > TZ Series
- Firewalls > SonicWall NSA Series
- Firewalls > SonicWall SuperMassive 9000 Series
- Firewalls > SonicWall SuperMassive E10000 Series


 YES
YES NO
NO