-
Products
-
SonicPlatform
SonicPlatform is the cybersecurity platform purpose-built for MSPs, making managing complex security environments among multiple tenants easy and streamlined.
Discover More
-
-
Solutions
-
Federal
Protect Federal Agencies and Networks with scalable, purpose-built cybersecurity solutions
Learn MoreFederalProtect Federal Agencies and Networks with scalable, purpose-built cybersecurity solutions
Learn More - Industries
- Use Cases
-
-
Partners
-
Partner Portal
Access to deal registration, MDF, sales and marketing tools, training and more
Learn MorePartner PortalAccess to deal registration, MDF, sales and marketing tools, training and more
Learn More - SonicWall Partners
- Partner Resources
-
-
Support
-
Support Portal
Find answers to your questions by searching across our knowledge base, community, technical documentation and video tutorials
Learn MoreSupport PortalFind answers to your questions by searching across our knowledge base, community, technical documentation and video tutorials
Learn More - Support
- Resources
- Capture Labs
-
- Company
- Contact Us
How to Manually set time and date on the SonicWall


Description
How to Manually set time and date on the SonicWall
Resolution
Resolution for SonicOS 7.X
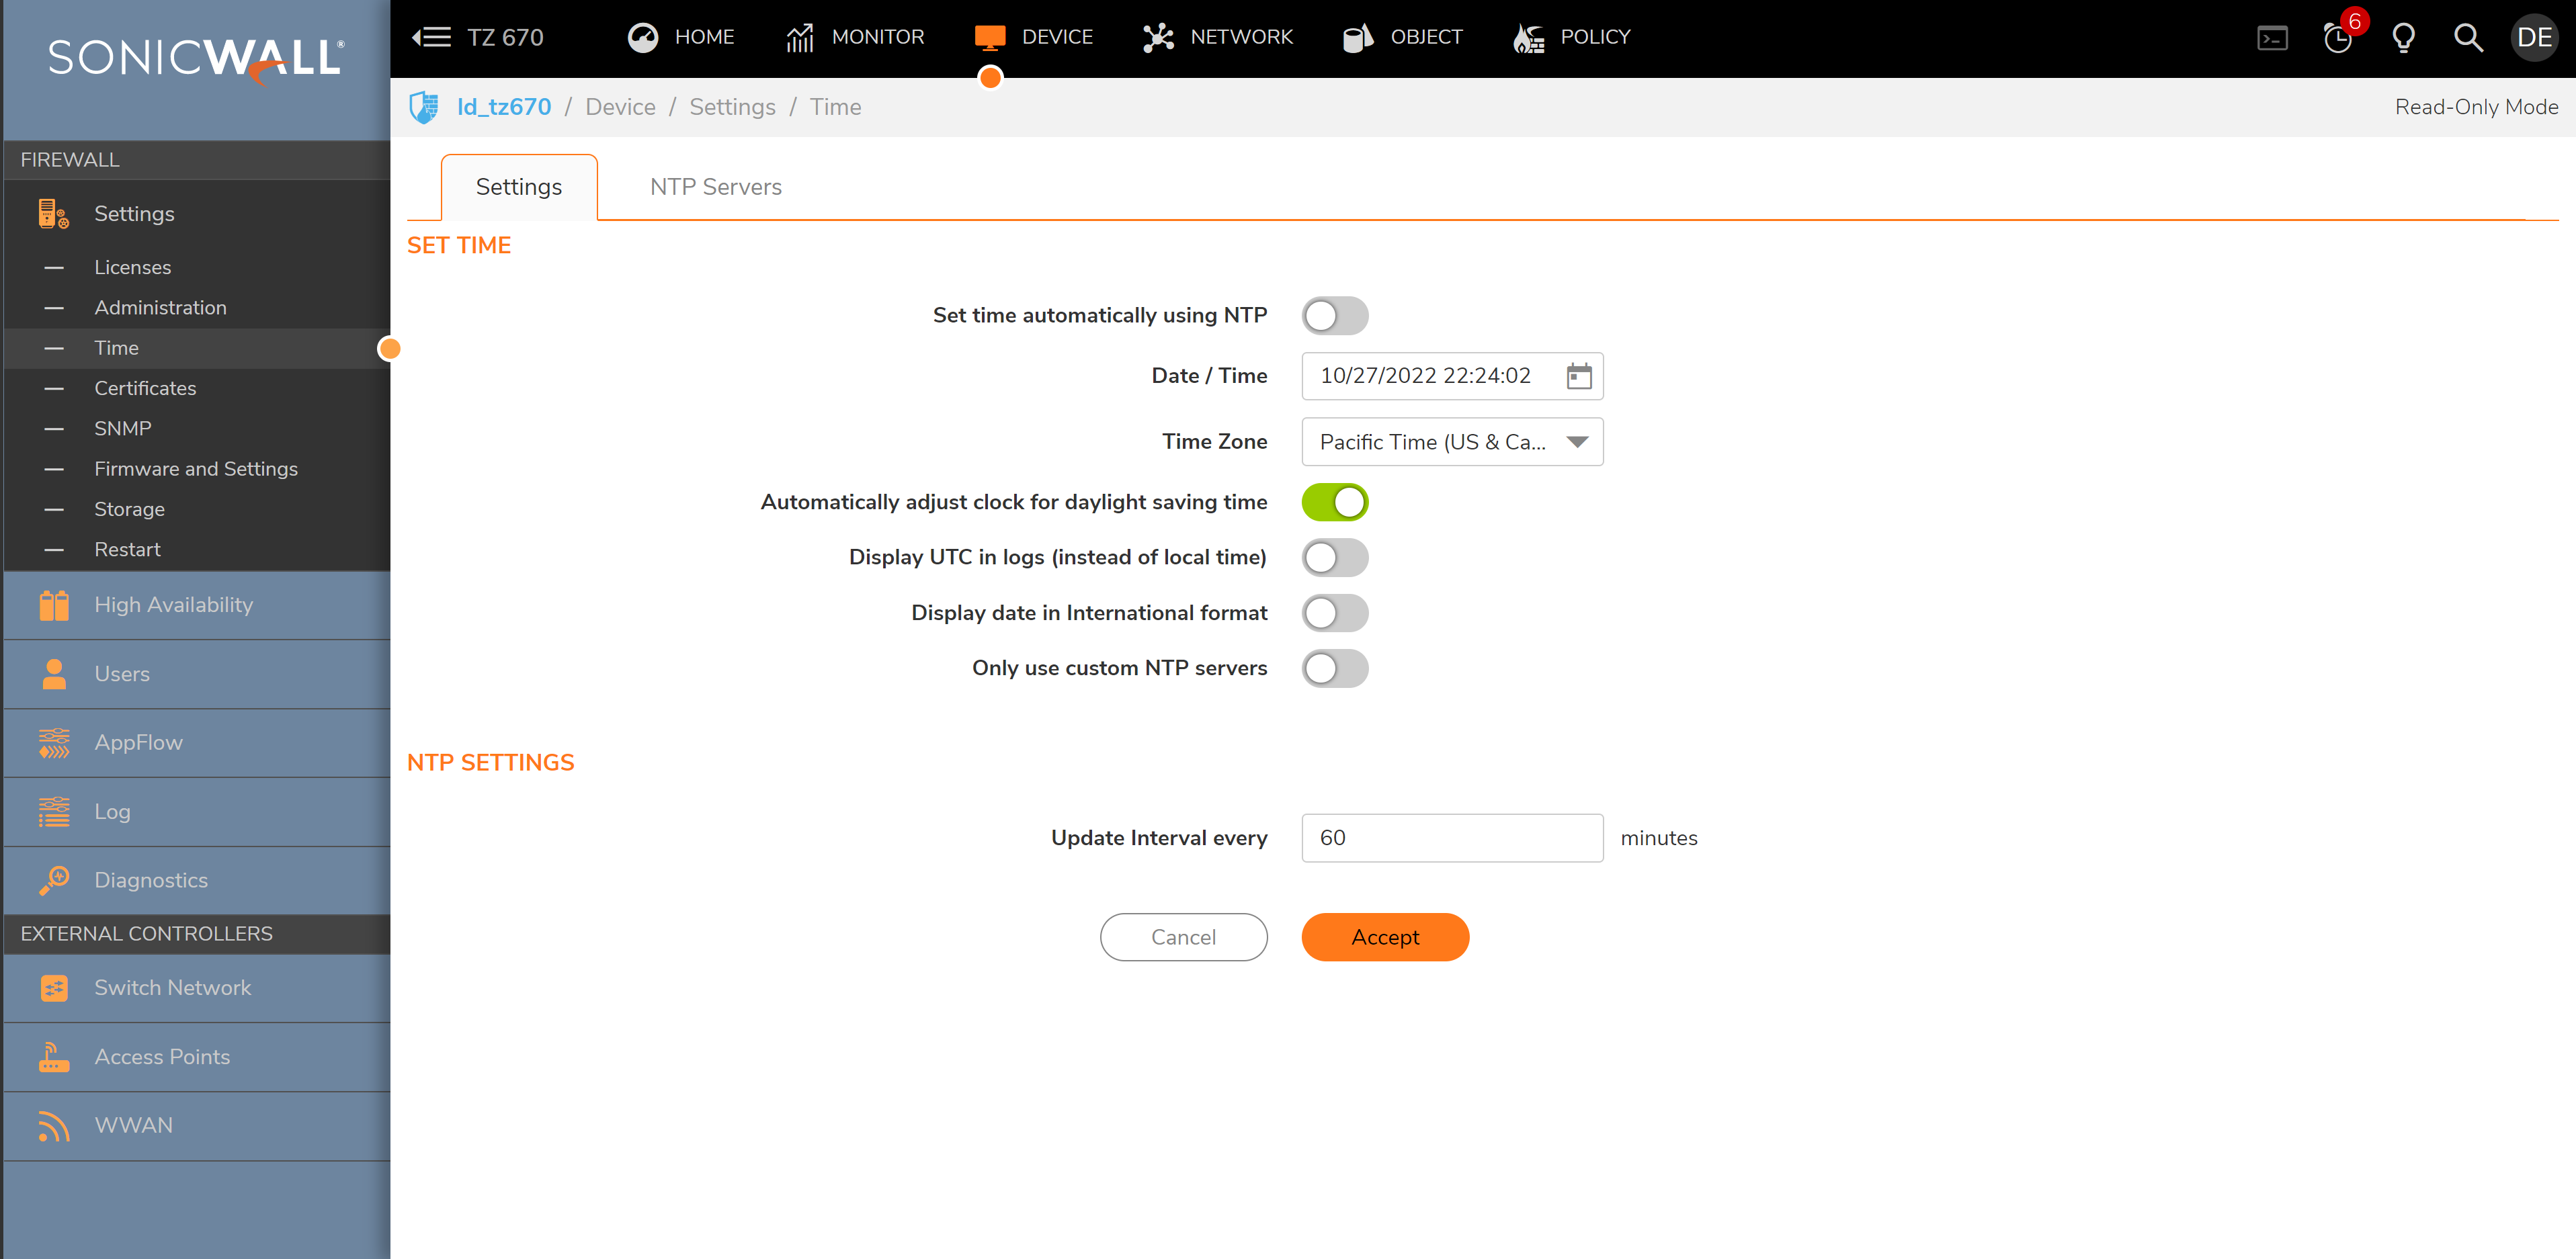
This release includes significant user interface changes and many new features that are different from the SonicOS 6.5 and earlier firmware. The below resolution is for customers using SonicOS 7.X firmware.
When the time and date on your SonicWall are not set correctly, it can cause synchronization and other issues to arise. These can be easily resolved by manually setting the time and date to the correct time. To set the time and date manually on the SonicWall, follow these steps:
Procedure to set time manually for SonicOS Standard/Enhanced firmware.
To set the time and date manually, clear the check boxes and enter the time (in 24- hour format) and the date.
- Log into the SonicWall security appliance
- Click Device in the top navigation menu
- Navigate to Settings | Time
- Uncheck Set time automatically using NTP | Click Accept to add the information to the SonicWall.
- To select your time zone and automatically update the time, choose the time zone from the Time Zone menu.
- Select the time in the 24-hour format using the Time (hh:mm:ss) menus and the date from the Date menus.
- Select Automatically adjust clock for daylight saving time to enable automatic adjustments for daylight savings time.
- Selecting Display UTC in logs (instead of local time) specifies the use universal time (UTC) rather than local time for log events.
- Selecting Display time in International format displays the date in International format, with the day preceding the month.
- Click Accept & Restart SonicWall.

Resolution for SonicOS 6.5
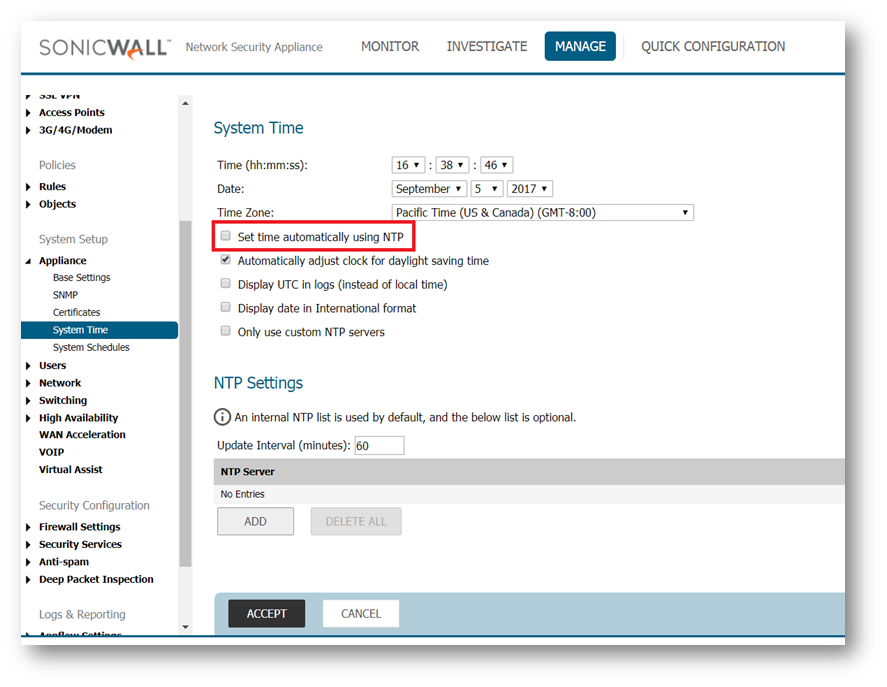
This release includes significant user interface changes and many new features that are different from the SonicOS 6.2 and earlier firmware. The below resolution is for customers using SonicOS 6.5 firmware.
When the time and date on your SonicWall are not set correctly, it can cause synchronization and other issues to arise. These can be easily resolved by manually setting the time and date to the correct time. To set the time and date manually on the SonicWall, follow these steps:
Procedure to set time manually for SonicOS Standard/Enhanced firmware.
To set the time and date manually, clear the check boxes and enter the time (in 24- hour format) and the date.
- Log into the SonicWall security appliance
- Click Manage in the top navigation menu
- Navigate to Appliance | System Time
- Uncheck Set time automatically using NTP | Click Accept to add the information to the SonicWall.
- To select your time zone and automatically update the time, choose the time zone from the Time Zone menu.
- Select the time in the 24-hour format using the Time (hh:mm:ss) menus and the date from the Date menus.
- Select Automatically adjust clock for daylight saving time to enable automatic adjustments for daylight savings time.
- Selecting Display UTC in logs (instead of local time) specifies the use universal time (UTC) rather than local time for log events.
- Selecting Display time in International format displays the date in International format, with the day preceding the month.
- Click Accept & Restart SonicWall.

Resolution for SonicOS 6.2 and Below
The below resolution is for customers using SonicOS 6.2 and earlier firmware. For firewalls that are generation 6 and newer we suggest to upgrade to the latest general release of SonicOS 6.5 firmware.
When the time and date on your SonicWall are not set correctly, it can cause synchronization and other issues to arise. These can be easily resolved by manually setting the time and date to the correct time. To set the time and date manually on the SonicWall, follow these steps:
Procedure to set time manually for SonicOS Standard/Enhanced firmware.
To set the time and date manually, clear the check boxes and enter the time (in 24- hour format) and the date.
- Log into the SonicWall security appliance, and click System | Time.
- Uncheck Set time automatically using NTP Click Apply to add the information to the SonicWall.
- To select your time zone and automatically update the time, choose the time zone from the Time Zone menu.
- Select the time in the 24-hour format using the Time (hh:mm:ss) menus and the date from the Date menus.
- Select Automatically adjust clock for daylight saving time to enable automatic adjustments for daylight savings time.
- Selecting Display UTC in logs (instead of local time) specifies the use universal time (UTC) rather than local time for log events.
- Selecting Display time in International format displays the date in International format, with the day preceding the month.
- Click Apply & Restart SonicWall.
Related Articles
- Error:"Invalid API Argument" when modifying the access rules
- Cysurance Partner FAQ
- Configure probe monitoring for WAN Failover and Loadbalancing - SonicWall UTM
Categories
- Firewalls > TZ Series
- Firewalls > SonicWall NSA Series
- Firewalls > SonicWall SuperMassive 9000 Series
- Firewalls > SonicWall SuperMassive E10000 Series


 YES
YES NO
NO