


-
Products
-
SonicPlatform
SonicPlatform is the cybersecurity platform purpose-built for MSPs, making managing complex security environments among multiple tenants easy and streamlined.
Discover More
-
-
Solutions
-
Federal
Protect Federal Agencies and Networks with scalable, purpose-built cybersecurity solutions
Learn MoreFederalProtect Federal Agencies and Networks with scalable, purpose-built cybersecurity solutions
Learn More - Industries
- Use Cases
-
-
Partners
-
Partner Portal
Access to deal registration, MDF, sales and marketing tools, training and more
Learn MorePartner PortalAccess to deal registration, MDF, sales and marketing tools, training and more
Learn More - SonicWall Partners
- Partner Resources
-
-
Support
-
Support Portal
Find answers to your questions by searching across our knowledge base, community, technical documentation and video tutorials
Learn MoreSupport PortalFind answers to your questions by searching across our knowledge base, community, technical documentation and video tutorials
Learn More - Support
- Resources
- Capture Labs
-
- Company
- Contact Us
How to manage X-Series switch's admin credentials and management IP through the UI and in CLI
 03/26/2020
  9 People found this article helpful
 510,534 Views

Description
SonicWall X-Series Solution:
How to manage X-Series switch's admin credentials and management IP address using X-Switch's UI and in CLI?
The SonicWall X-Series Solution allows unified management of both the firewall and the switch using the SonicWall firewall UI. While a SonicWall can mange a factory default X-Series switch using the switch's default management IP and default administrator credentials, these factory default parameters are not secure. If you wish to secure these parameters then you must log into the X-Switch's UI or the CLI console to make changes, these changes cannot be made through SonicOS UI.
The purpose of this KB article is to provide basic instructions for managing X-Switch's credentials and management IP address using the X-Switch's UI and from the CLI console.
Resolution
For information on other SonicWall X-Series Solution related topics:
KB185057 - How to provision X-Series Switches on a SonicWall TZ series firewall
KB186085 - How to provision X-Series Switches on a SonicWall TZ High Availability (HA) system
KB189771 - SonicWall X-Series Solution - Support for SonicWall Virtual Interfaces (VLANs)
KB185430 - SonicWall integration with X-Series Switches FAQ
KB185439 - SonicWall X-Series Solution Overview
KB185479 - How to manage X-Series switch's admin credentials and management IP through the X-Switch's UI
KB186709 - SonicWall X-Series Solution: Which models of X-Switches has support for POE+
KB189204 - SonicWall X- Series Solution How to backup and restore X-Series switches
-------------------------------------------------------------------------------------------------------------------------------------------------------------------------------------------------------
I do not know the X-Switch's login credentials, how can I put the X-Switch into factory default mode?
Locate the Reset button and press the reset button for at least 7 seconds and release.
The reset button on the X1008 and X1008P is located at the rear of device next to the network ports.

The reset button for the models X1026/X1026P, X1052/X1052P, and X4012 is located at the rear of devices but the interface ports are on the front.

While the X-Series switch is resetting, the Power indicator light will be blinking. The X-Series switch will be operational when the Power indicator light stops blinking.
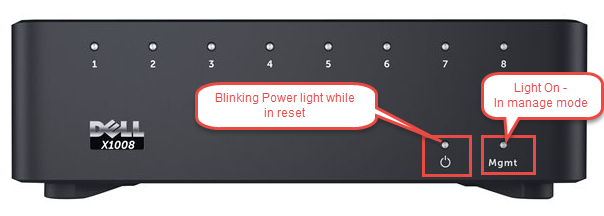
I cannot access the X-switch management UI, how can I put the X-Switch into manage mode?
Locate the Mode button and press the Mode button for at least 7 seconds and release.
The Mgmt (manage mode) light is located on the front of device and is on when the X-Switch is in manage mode.
Note: If the X-Switch is not in manage mode, you will not be able to reach its Web UI or CLI interface.

What is the IP address of an X-Switch in factory default mode?
The factory default management IP address of a X-Switch is 192.168.2.1
When in factory default, all ports are in the default vlan of "vlan1"
What management options are available to manage a X-Switch?
- Access the Web user interface (WEBUI) with a web browser to the management IP address
- Access the Command Line Interface (CLI) with telnet to the management IP address
- Access the Command Line Interface (CLI) with SSH to the management IP address
- Access the Command Line Interface (CLI) with the Console port
How to access the Console port on the X-Switch?
The X-Series switch is supplied with a Micro USB cable.
Go to X-Series switch Network Drivers & download to get the Micro USB driver
Under the Network section, download the Networking X1000 Series zip package (this zip package has multiple folders)
Download the x10xx.30070.zip or later file.

Extract the the zip package, and then extract the MicroUSB folder
Go to the MicroUSB folder, install the driver with the CDM application
Connect the supplied MicroUSB cable to your workstation and to the X-Series Switch Console port

Make sure the switch is powered on
On your workstation, go to Control Panel | Device Manager | Ports (COM & LPT)
Find out which COM port is being used by the MicroUSB driver, it is usually COM3 or higher
In this example, the MicroUSB driver uses COM8 (the COM port used by another workstation will vary)

Now that you know which COM port is being used, open a program such as Putty
In Putty under Session, select Serial and put in the COM port that is used by the MicroUSB driver
For Speed, the default is 9600 baud (do not change)
Click Open to access the Command Line Console on the switch

What are the X-Switch default credentials?
- The default user is admin
- The default user password is admin
What CLI commands are needed to modify the switch's admin password and the Management IP?
In order to make changes to the switch with CLI commands, you must be in the configure mode

To change or add a user and its password:
Use the username command
The factory default user is admin and factory default password is admin
You cannot delete the user admin but you can change its password (It is always good to secure the admin password)
In this example, we will change the admin's password to "newpassword123"

To change the switch's Management IP:
Use the interface command and its ip command
The switch's Management IP belongs to the interface vlan1
In interface vlan1, use its ip command to change the IP address
In this example, the factory default Management IP of 192.168.2.1 is changed to 192.168.4.1

Note: (config-if) #ip address 192.168.4.1 255.255.255.0 can also be written as (config-if) #ip address 192.168.4.1 /24
Note: after changing the management IP and management credentials, you must close your web browser and reconnect to the new IP address with your new credentials.
To save Running-config to Startup-config
use the command write memory
To leave the configuring level
use the command exit or end
The steps to modify the admin user's password and modify the switch's management IP:
- Put switch in management mode
- Connect to switch's console (9600baud),
- Power on,
- Login (admin / admin)
- Go into config mode,
- Change admin password,
- Configure interface vlan 1
- If needed, change the static IP address,
- Write changes to memory.
CLI Example: (modify the admin's password and change the management IP to 192.168.4.1)
console#configure
console(config)#username admin password
console(config)#interface vlan 1
console(config-if)#ip address 192.168.4.1 255.255.255.0
console(config-if)#end
console#write memory
Is there a DHCP server function on the X-Series Switch?
Yes but it is disabled in factory default mode.
You can mange it from the X-Series switch's web UI in Network Administration | DHCP Server
Is there a Wizard to help change the default management IP address and default Admin user/password?
Yes, you can use the Initial Setup Wizard from X-Switch Dashboard
The Initial Setup Wizard will help manage:
- Network Settings (allows changing the management IP address)
- Credentials (allows changing the Admin user name/password)
- Switch Information (optional)
- SNMP Settings (allows changing SNMP community String and SMNP Management System IP)

Initial Setup Wizard walk through
Web to the management IP (192.168.2.1) of a factory default X-Switch.
Login with default admin credentials: admin/admin
On the X-Switch's Dashboard, click the Initial Setup button to run the Initial Setup Wizard
The Initial Setup Wizard allows for the management of:
- Network Settings
- Credentials
- Switch Information
- SNMP Settings
- Summary
Network Setting Page
In the Network Setting Page, enter the request info and click Next
- IP Address (New management IP)
- Subnet Mask (New subnet mask)
- Gateway (New gateway)

Credentials Page
In the Credentials Page, enter the request info and click Next
- User name (New admin user name)
- Password (New admin password)

Switch Information Page (optional)
In the Switch Information Page, enter the request info and click Next
- System Name
- System Contact
- System Location

SNMP Setting Page
In the SNMP Setting Page, enter the request info and click Next
- SNMP mode (Enabled / Disable)
- SNMP Community String
- SNMP Management System IP

Summary Page
Review your selections on the Summary Page, Click Apply to accept the new settings
Note: after changing the management IP and management credentials, you must close your web browser and reconnect to the new IP address with your new credentials.
Where can I find the X-Switches user guide, getting started guide and latest firmware?
Go to the X-Series Manuals and documentation Website
Note: the X-Series user guide contains instructions for both the Web UI and CLI.
Related Articles
- Error:"Invalid API Argument" when modifying the access rules
- Cysurance Partner FAQ
- Configure probe monitoring for WAN Failover and Loadbalancing - SonicWall UTM
Categories
- Firewalls > TZ Series
- Firewalls > SonicWall SuperMassive E10000 Series
- Firewalls > SonicWall SuperMassive 9000 Series
- Firewalls > SonicWall NSA Series
 YES
YES NO
NO