-
Products
-
SonicPlatform
SonicPlatform is the cybersecurity platform purpose-built for MSPs, making managing complex security environments among multiple tenants easy and streamlined.
Discover More
-
-
Solutions
-
Federal
Protect Federal Agencies and Networks with scalable, purpose-built cybersecurity solutions
Learn MoreFederalProtect Federal Agencies and Networks with scalable, purpose-built cybersecurity solutions
Learn More - Industries
- Use Cases
-
-
Partners
-
Partner Portal
Access to deal registration, MDF, sales and marketing tools, training and more
Learn MorePartner PortalAccess to deal registration, MDF, sales and marketing tools, training and more
Learn More - SonicWall Partners
- Partner Resources
-
-
Support
-
Support Portal
Find answers to your questions by searching across our knowledge base, community, technical documentation and video tutorials
Learn MoreSupport PortalFind answers to your questions by searching across our knowledge base, community, technical documentation and video tutorials
Learn More - Support
- Resources
- Capture Labs
-
- Company
- Contact Us
How To Log Packet Monitor Results to an FTP Server


Description
For some Packet Captures it's useful to log the results to an external FTP Server. SonicWalls can only capture as much traffic as the models internal buffer memory allows, when this is full the Packet Monitor will stop capturing traffic, or begin to delete the oldest captured traffic. Logging to an FTP Server allows an Administrator to perform longer term captures which can be useful for troubleshooting intermittent issues or providing captures to SonicWall Technical Support for examination.
 TIP: If you're sending Packet Captures via FTP to a particular Software solution, such as Filezilla, please reference their documentation to ensure the Server is ready to receive data.
If you're unfamiliar with the SonicWall Packet Monitor Feature please reference How to Setup and Utilize the Packet Monitor Feature for Troubleshooting.
Resolution
Resolution for SonicOS 7.X
This release includes significant user interface changes and many new features that are different from the SonicOS 6.5 and earlier firmware. The below resolution is for customers using SonicOS 7.X firmware.
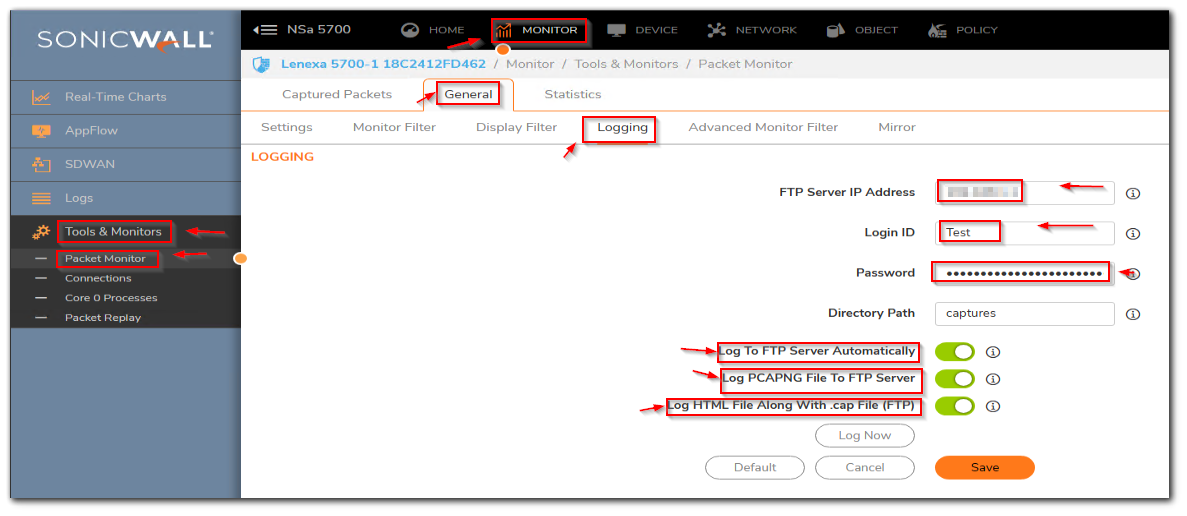
1. Login to the SonicWall Management GUI
2. Navigate to the MONITOR Tab in the top navigation menu.
3. Under Tools & Monitors settings, click Packet Monitor.
4. Under Packet Monitor, navigate to the General Tab and click on Logging.

 CAUTION: IP Addresses that are reachable only via a VPN Tunnel are not supported.
 NOTE: Files are transferred in both HTML and Libpcap Formats. If you don't select automatic logging, you can still log Libpcap and HTML with the Log HTML File Along With .cap File option.
Resolution for SonicOS 6.5
This release includes significant user interface changes and many new features that are different from the SonicOS 6.2 and earlier firmware. The below resolution is for customers using SonicOS 6.5 firmware.
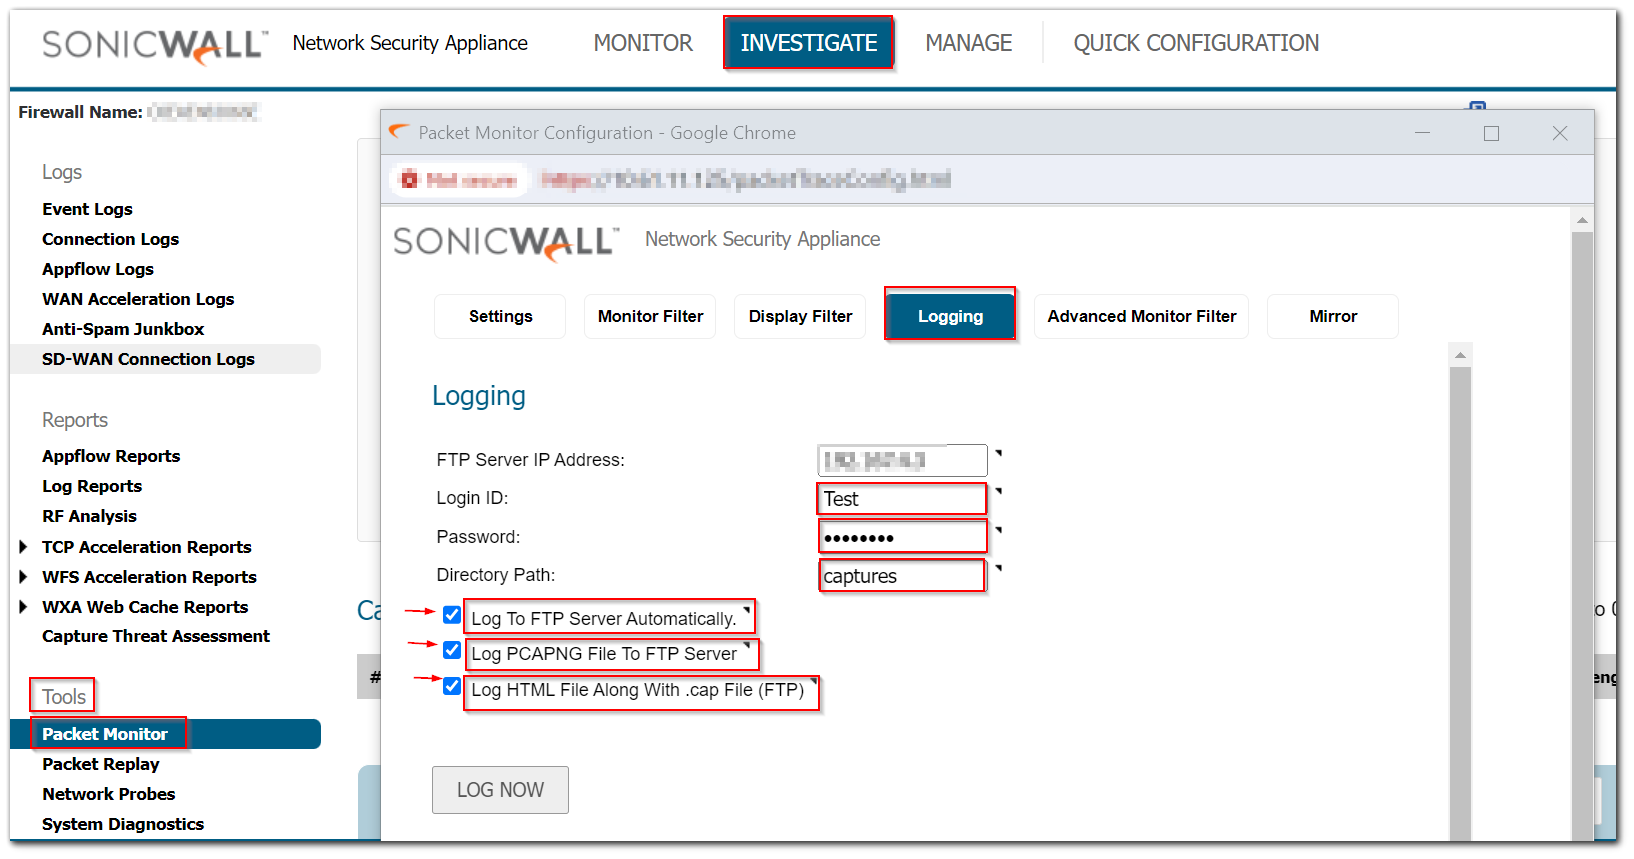
- Login to the SonicWall Management GUI
- Click Investigate in the top navigation menu
- Click Packet Monitor in the left panel
- Under Packet Monitor, click Configure
- In the Packet Monitor Configuration window, click the Logging tab.

- In the FTP Server IP Address field type the IP address of the FTP server. Ensure sure that the FTP server IP address is reachable by the SonicWall.
 CAUTION: IP Addresses that are reachable only via a VPN Tunnel are not supported.
- In the Login ID field, type the login name that the SonicWall should use to connect to the FTP server.
- In the Password field, type the login name that the SonicWall should use to connect to the FTP server.
- In the Directory Path field, type the directory location for the transferred files. The files are written to this location relative to the default FTP Root Directory. For example: If the Root Directory of the FTP server is "FTP" and a sub-folder named "Capture Files" is created, enter "Capture Files" in the Directory Path.
- To enable automatic transfer of the capture file to the FTP server when the buffer is full, select the Log To FTP Server Automatically checkbox.
 NOTE: Files are transferred in both HTML and Libpcap Formats. If you don't select automatic logging, you can still log Libpcap and HTML with the Log HTML File Along With .cap File option.
How to Test
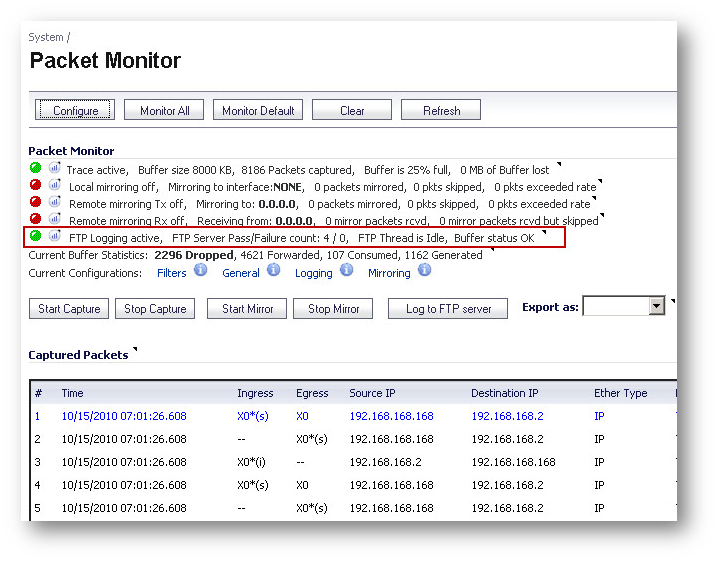
When the settings are saved, start the Packet Monitor by clicking on the Start Capture button. If the FTP settings are correct you will see a green light under the FTP Logging option.
Resolution for SonicOS 6.2 and Below
The below resolution is for customers using SonicOS 6.2 and earlier firmware. For firewalls that are generation 6 and newer we suggest to upgrade to the latest general release of SonicOS 6.5 firmware.
1. Login to the SonicWall Management GUI and Navigate to the System | Packet Monitor page.
2. Under Packet Monitor, click Configure.
3. In the Packet Monitor Configuration window, click the Logging tab.
4. In the FTP Server IP Address field type the IP address of the FTP server. Ensure sure that the FTP server IP address is reachable by the SonicWall.
 CAUTION: IP Addresses that are reachable only via a VPN Tunnel are not supported.
5. In the Login ID field, type the login name that the SonicWall should use to connect to the FTP server.
6. In the Password field, type the login name that the SonicWall should use to connect to the FTP server.
7. In the Directory Path field, type the directory location for the transferred files. The files are written to this location relative to the default FTP Root Directory. For example: If the Root Directory of the FTP server is "FTP" and a sub-folder named "Capture Files" is created, enter "Capture Files" in the Directory Path.
8. To enable automatic transfer of the capture file to the FTP server when the buffer is full, select the Log To FTP Server Automatically checkbox.
 NOTE: Files are transferred in both HTML and Libpcap Formats. If you don't select automatic logging, you can still log Libpcap and HTML with the Log HTML File Along With .cap File option.

How to Test
When the settings are saved, start the Packet Monitor by clicking on the Start Capture button. If the FTP settings are correct you will see a green light under FTP Logging option.

Related Articles
- Error:"Invalid API Argument" when modifying the access rules
- Cysurance Partner FAQ
- Configure probe monitoring for WAN Failover and Loadbalancing - SonicWall UTM
Categories
- Firewalls > TZ Series
- Firewalls > SonicWall NSA Series
- Firewalls > SonicWall SuperMassive 9000 Series
- Firewalls > SonicWall SuperMassive E10000 Series


 YES
YES NO
NO