-
Products
-
SonicPlatform
SonicPlatform is the cybersecurity platform purpose-built for MSPs, making managing complex security environments among multiple tenants easy and streamlined.
Discover More
-
-
Solutions
-
Federal
Protect Federal Agencies and Networks with scalable, purpose-built cybersecurity solutions
Learn MoreFederalProtect Federal Agencies and Networks with scalable, purpose-built cybersecurity solutions
Learn More - Industries
- Use Cases
-
-
Partners
-
Partner Portal
Access to deal registration, MDF, sales and marketing tools, training and more
Learn MorePartner PortalAccess to deal registration, MDF, sales and marketing tools, training and more
Learn More - SonicWall Partners
- Partner Resources
-
-
Support
-
Support Portal
Find answers to your questions by searching across our knowledge base, community, technical documentation and video tutorials
Learn MoreSupport PortalFind answers to your questions by searching across our knowledge base, community, technical documentation and video tutorials
Learn More - Support
- Resources
- Capture Labs
-
- Company
- Contact Us
How to install Capture Client on VDI


Description
This article explains the steps need to be followed to install Capture Client on VDI
Resolution
For VDI master image with Capture Client and without VDI configuration
- Uninstall Capture Client. This should Uninstall both Capture Client and the SentinelOne agent. Verify that the machine is not reported in unmanaged devices
- Confirm both CC & S1 are uninstalled
- Reboot – this is needed to fully Uninstall the CC & S1 kernel-level drivers.
- Follow instructions as given in the above section based on your chosen SentinelOne Version
For VDI master image without Capture Client
For SentinelOne versions up to and including 3.0.*
- Install Capture Client on the VDI master Image using the command line with VDI_MASTER=1 flag:
C:\> msiexec /i "SonicWall Capture Client.<version>.msi" VDI_MASTER=1 - Let Capture Client completely install and install SentinelOne.
- Once everything is all green and fully installed, SentinelOne recommends that you make sure the full disk scan is completed.
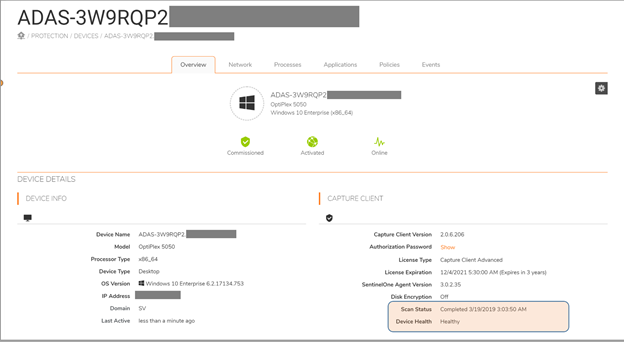
NOTE: If you make the clones while the master runs the scan, there will be unexpected results on the new VMs. - You can verify the scan status by checking the Capture Client device details page in the management console. highlighted in Orange
- Once the scan is completed, shut down the master VM image.
Once the master VM image is shutdown you can clone it.
For SentinelOne versions 3.1 to 3.3.2:
- Install Capture Client on the VDI master image
- Let Capture Client completely install, and install SentinelOne.
- Once everything is all green and fully installed, SentinelOne recommends that you make sure the full disk scan is completed.
NOTE: If you make the clones while the master runs the scan, there will be unexpected results on the new VMs. - You can verify the scan status by checking the Capture Client device details page in the management console. (highlighted below in Orange)

- Once the scan is completed, follow the below
- Open the Command Prompt with Run as administrator.
- Navigate to the folder of exe:
"C:\Program Files\SentinelOne\Sentinel Agent version\" - Run: sentinelctl.exe agent_id -r -b -k "<passphrase>"
- Run: sentinelctl.exe agent_id -v
- To get the SentinelOne passphrase
- Export device lists from capture client

- In the exported CSV find the master image device and use the value in the ‘S1 Passphrase’ column.

- Make sure the output shows: Randomize UUID on next boot: true
- If the output is not true, repeat the steps of this procedure.
NOTE: If you do not do this, your Agents will not generate unique IDs and will result in duplicate entries and license consumption. Every Agent must have a unique ID to function.
- shut down the master VM image.
- Once the master VM image is shutdown you can clone it.
For SentinelOne versions 3.3.3 and above:
- The /VDI installation switch is now supported again. It is recommended for VM environments that use Cold cloning.
- C:\> msiexec /i "SonicWall Capture Client.<version>.msi" VDI_MASTER=1
- If the sentinelctl.exe agent_id -r -b command works well in your environment, continue to use that method.
Related Articles
- SentinelOne agent command line tool
- Capture Client Agent Return Codes - Phase 1
- Configure Email and Notification(Alerts) in Capture Client for Tenants


 YES
YES NO
NO