-
Products
-
SonicPlatform
SonicPlatform is the cybersecurity platform purpose-built for MSPs, making managing complex security environments among multiple tenants easy and streamlined.
Discover More
-
-
Solutions
-
Federal
Protect Federal Agencies and Networks with scalable, purpose-built cybersecurity solutions
Learn MoreFederalProtect Federal Agencies and Networks with scalable, purpose-built cybersecurity solutions
Learn More - Industries
- Use Cases
-
-
Partners
-
Partner Portal
Access to deal registration, MDF, sales and marketing tools, training and more
Learn MorePartner PortalAccess to deal registration, MDF, sales and marketing tools, training and more
Learn More - SonicWall Partners
- Partner Resources
-
-
Support
-
Support Portal
Find answers to your questions by searching across our knowledge base, community, technical documentation and video tutorials
Learn MoreSupport PortalFind answers to your questions by searching across our knowledge base, community, technical documentation and video tutorials
Learn More - Support
- Resources
- Capture Labs
-
- Company
- Contact Us
How to inject a custom HTTP/HTTPS header into traffic


Description
This article guides through the process of enabling HTTP/HTTPS header injection using Content Filtering Service (CFS) 4.0.
Common use headers are pre-configured in the appliance. As of Gen7(7.0.0 and above) and Gen6 (6.5.1.0 and above) the following common use headers are included:
- Google G Suite Restrict- Creates restriction of Google domains a user can access. i.e. users can only access company Google accounts
- YouTube Strict Mode- Restricts users to access YouTube strict mode
- YouTube Moderate Mode- Restricts users to access YouTube moderate mode
These header injections are applied through the CFS 4.0 engine and can be applied on a per-policy basis. I.e. students can be applied YouTube strict mode, while teachers can be applied YouTube moderate mode.
3 items are needed to configure:
- Domain for the header to be applied on
- Header Key
- Value for the header
 NOTE: For HTTPS sessions, DPI-SSL is required to be able to inject information into the header.
Resolution
RESOLUTION FOR SONICOS 7.X
This release includes significant user interface changes and many new features that are different from the SonicOS 6.5 and earlier firmware. The below resolution is for customers using SonicOS 7.X firmware.
- Navigate to the Object tab.
- Access the Profile Objects | Content Filter page .

3.Click on the CFS Profile Objects button.
4.Click the configure icon next to the profile you wish to add a custom header on.

5.Check Enable Custom Header Insertion.
6.Click Add. The Add Custom Header Entry pop-up displays

7.Fill-in the Domain field or select one of the pre-filled options.
8.If applicable, fill-in the Key and Value fields based on your needs.
9.Click Save to save your changes. The policy is now in effect for the modified CFS profile object.
 NOTE : If you are trying to add multiple domains in the custom header value field, please make sure to use a comma(,) separator. This header value uses comma-separated list for the allowed domain names.
RESOLUTION FOR SONICOS 6.5
This release includes significant user interface changes and many new features that are different from the SonicOS 6.2 and earlier firmware. The below resolution is for customers using SonicOS 6.5 firmware.
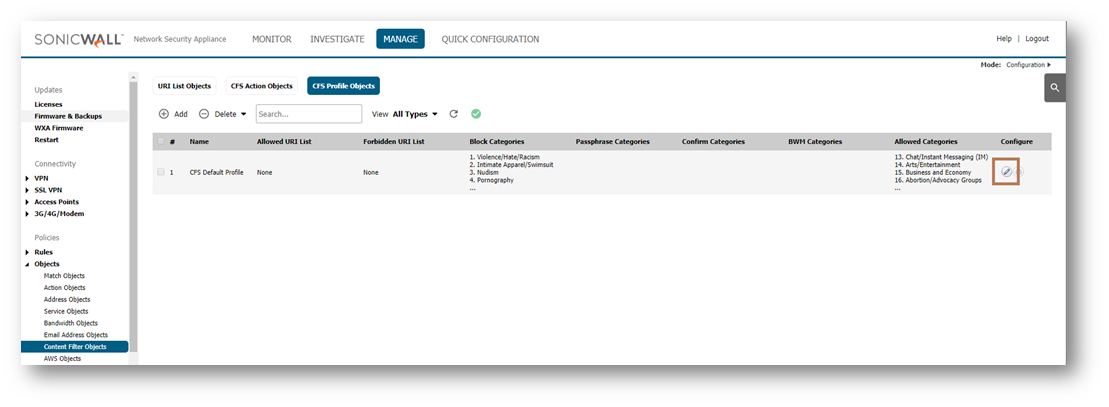
- Navigate to the Manage tab.
- Access the Objects | Content Filter Objects page.

- Click on the CFS Profile Objects button.
- Click the configure icon next to the profile you wish to add a custom header on.

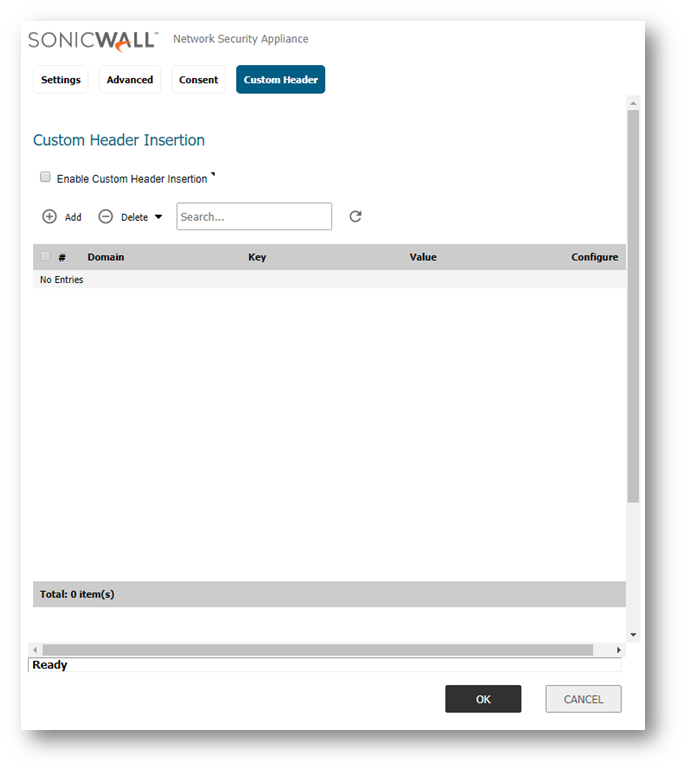
- Check Enable Custom Header Insertion.
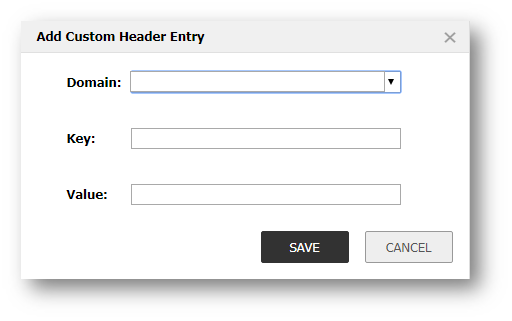
- Click Add. The Add Custom Header Entry pop-up displays

- Fill-in the Domain field or select one of the pre-filled options.
- If applicable, fill-in the Key and Value fields based on your needs.
- Click Save to save your changes. The policy is now in effect for the modified CFS profile object.
 NOTE :If you are trying to add multiple domains in the custom header value field, please make sure to use a comma(,) separator. This header value uses comma-separated list for the allowed domain names.
Related Articles
- Error:"Invalid API Argument" when modifying the access rules
- Cysurance Partner FAQ
- Configure probe monitoring for WAN Failover and Loadbalancing - SonicWall UTM
Categories
- Firewalls > NSa Series
- Firewalls > SonicWall NSA Series
- Firewalls > TZ Series
- Firewalls > SonicWall SuperMassive 9000 Series


 YES
YES NO
NO