-
Products
-
SonicPlatform
SonicPlatform is the cybersecurity platform purpose-built for MSPs, making managing complex security environments among multiple tenants easy and streamlined.
Discover More
-
-
Solutions
-
Federal
Protect Federal Agencies and Networks with scalable, purpose-built cybersecurity solutions
Learn MoreFederalProtect Federal Agencies and Networks with scalable, purpose-built cybersecurity solutions
Learn More - Industries
- Use Cases
-
-
Partners
-
Partner Portal
Access to deal registration, MDF, sales and marketing tools, training and more
Learn MorePartner PortalAccess to deal registration, MDF, sales and marketing tools, training and more
Learn More - SonicWall Partners
- Partner Resources
-
-
Support
-
Support Portal
Find answers to your questions by searching across our knowledge base, community, technical documentation and video tutorials
Learn MoreSupport PortalFind answers to your questions by searching across our knowledge base, community, technical documentation and video tutorials
Learn More - Support
- Resources
- Capture Labs
-
- Company
- Contact Us
How to Export the RCF/configuration file from SonicWall Security Appliance and Import it


Description
How to Export the RCF/configuration file from SonicWall Security Appliance and Import it to Global VPN Client (GVC) to connect with Secondary WAN Interface as Remote Gateway.
Resolution
Resolution for SonicOS 6.5
This release includes significant user interface changes and many new features that are different from the SonicOS 6.2 and earlier firmware. The below resolution is for customers using SonicOS 6.5 firmware.
The SonicWall GVC client creates a Virtual Private Network (VPN) connection between your computer and the corporate network to maintain the confidentiality of important data. This article focuses on exporting and importing the configuration file for the SonicWalll GVC client and using it's secondary WAN interface as the remote gateway .
To download the RCF file see How to export the RCF/configuration file from SonicWall and import it into Global VPN Client
By default, after downloading the RCF file, remote users will connect to the X1 (Primary WAN interface of SonicWall Security Appliance).
Scenario:
If dual WAN connection is configured on SonicWall Security Appliance and GVC users are required to connect to the secondary WAN interface using RCF file, then follow the steps below:
Step 1: Download the RCF file.
Dual WAN connections on SonicWall Security Appliance configured as X1 (primary) and X2 (secondary), as shown below:
By default downloading the RCF file, will have the primary WAN interface as the remote gateway in it which depends on the Failover settings.
Step 2: Failover settings for X1 configured as primary, as shown below: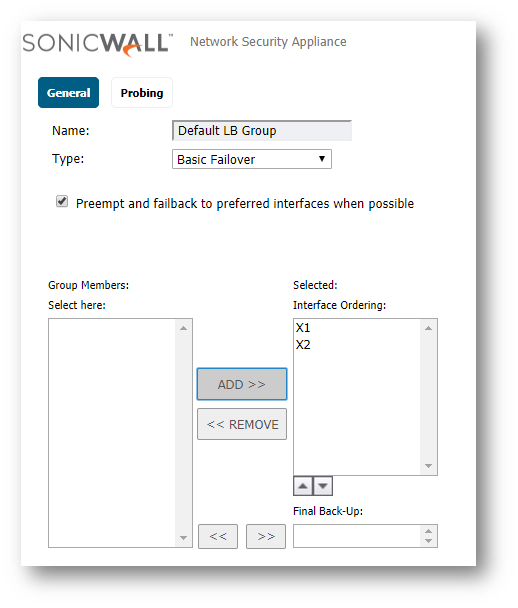
Step 3: Import RCF file on SonicWall GVC client software. 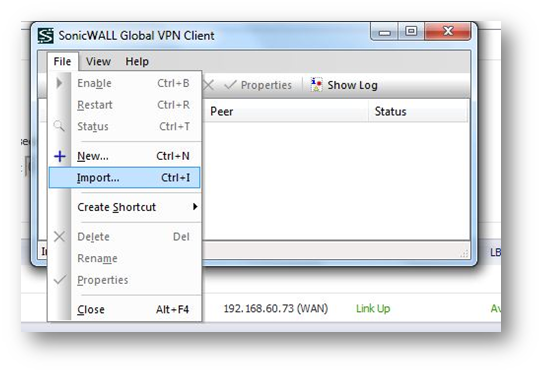


Step 4. Enter the same password if used during export.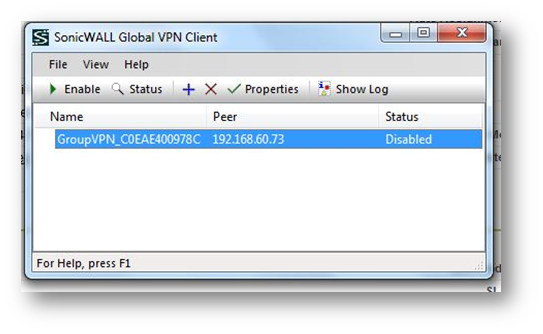
Step 5. Click on Enable and enter user credentials once prompted. Here the RCF file showing the X1 Interface IP as remote gateway of SonicWall Security Appliance, now if you want to terminate connection on the X2 interface of SonicWall Security Appliance the follow the steps below:
Step 6: Move X2 Interface as primary interface under Interface Ordering and click okay, as shown below: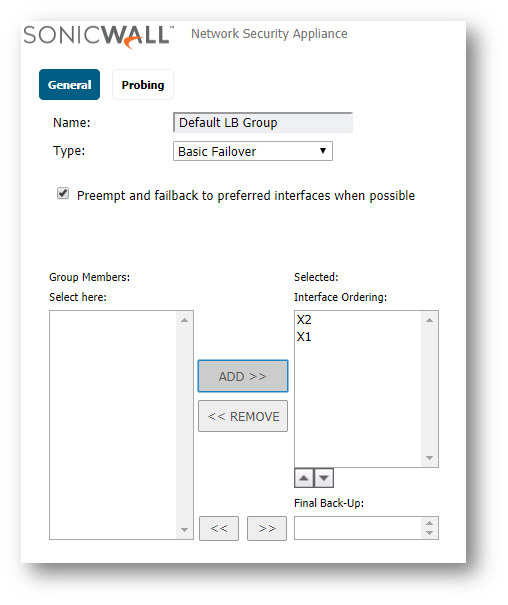
Step 7 Navigate to VPN | Base Settings, Download RCF file again and import in the SonicWall GVC software.
Step 8: Imported new RCF file on SonicWall GVC client will show X2 Interface IP address under "Peer", as shown below: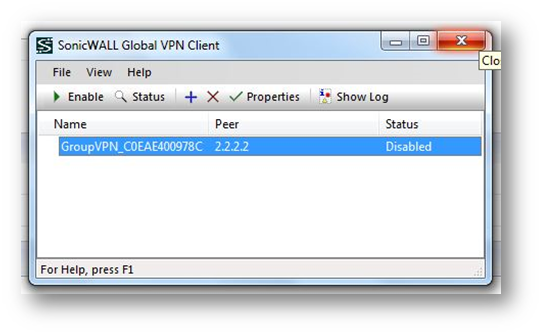
 NOTE: X2 Interface IP of SonicWall Security Appliance is the remote gateway IP
You can revert the settings back on Failover to X1, however, users still connects to the X2 WAN from GVC.
Resolution for SonicOS 6.2 and Below
The below resolution is for customers using SonicOS 6.2 and earlier firmware. For firewalls that are generation 6 and newer we suggest to upgrade to the latest general release of SonicOS 6.5 firmware.
The SonicWall GVC client creates a Virtual Private Network (VPN) connection between your computer and the corporate network to maintain the confidentiality of important data. This article focuses on exporting and importing the configuration file for the SonicWalll GVC client and using it's secondary WAN interface as the remote gateway .
To download the RCF file see How to export the RCF/configuration file from SonicWall and import it into Global VPN Client
By default, after downloading the RCF file, remote users will connect to the X1 (Primary WAN interface of SonicWall Security Appliance).
Scenario:
If dual WAN connection is configured on SonicWall Security Appliance and GVC users are required to connect to the secondary WAN interface using RCF file, then follow the steps below:
Step 1: Download the RCF file.
Dual WAN connections on SonicWall Security Appliance configured as X1 (primary) and X2 (secondary), as shown below:
By default downloading the RCF file, will have the primary WAN interface as the remote gateway in it which depends on the Failover settings.
Step 2: Failover settings for X1 configured as primary, as shown below: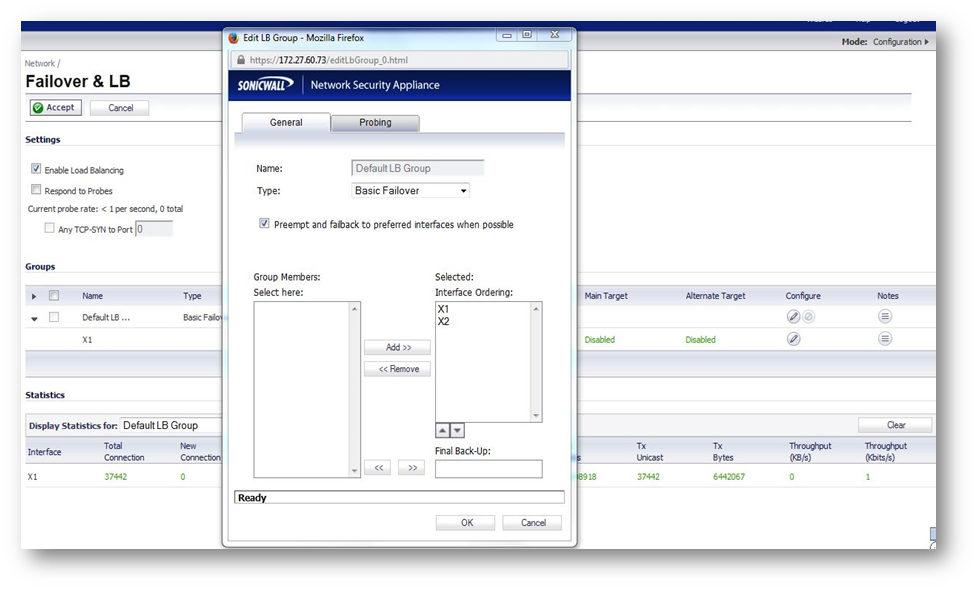
Step 3: Import RCF file on SonicWall GVC client software. 


Step 4. Enter the same password if used during export.
Step 5. Click on Enable and enter user credentials once prompted. Here the RCF file showing the X1 Interface IP as remote gateway of SonicWall Security Appliance, now if you want to terminate connection on the X2 interface of SonicWall Security Appliance the follow the steps below:
Step 6: Move X2 Interface as primary interface under Interface Ordering and click okay, as shown below: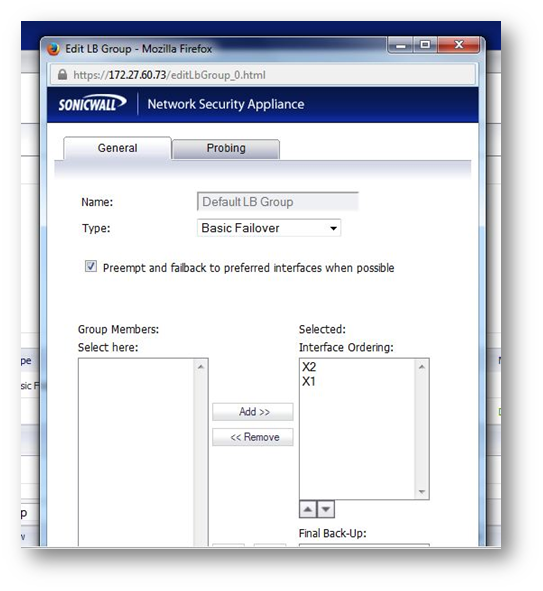
Step 7 Navigate to VPN | Settings, Download RCF file again and import in the SonicWall GVC software.
Step 8: Imported new RCF file on SonicWall GVC client will show X2 Interface IP address under "Peer", as shown below:
 NOTE: X2 Interface IP of SonicWall Security Appliance is the remote gateway IP
You can revert the settings back on Failover to X1, however, users still connects to the X2 WAN from GVC.
Related Articles
- Error:"Invalid API Argument" when modifying the access rules
- Cysurance Partner FAQ
- Configure probe monitoring for WAN Failover and Loadbalancing - SonicWall UTM
Categories
- Firewalls > SonicWall NSA Series
- Firewalls > SonicWall SuperMassive E10000 Series
- Firewalls > SonicWall SuperMassive 9000 Series
- Firewalls > TZ Series


 YES
YES NO
NO