-
Products
-
Gen 7 Firewalls
SonicWall's Gen 7 platform-ready firewalls offer performance with stability and superior threat protection — all at an industry-leading TCO.
Read More
-
-
Solutions
-
Federal
Protect Federal Agencies and Networks with scalable, purpose-built cybersecurity solutions
Learn MoreFederalProtect Federal Agencies and Networks with scalable, purpose-built cybersecurity solutions
Learn More - Industries
- Use Cases
-
-
Partners
-
Partner Portal
Access to deal registration, MDF, sales and marketing tools, training and more
Learn MorePartner PortalAccess to deal registration, MDF, sales and marketing tools, training and more
Learn More - SonicWall Partners
- Partner Resources
-
-
Support
-
Support Portal
Find answers to your questions by searching across our knowledge base, community, technical documentation and video tutorials
Learn MoreSupport PortalFind answers to your questions by searching across our knowledge base, community, technical documentation and video tutorials
Learn More - Support
- Resources
- Capture Labs
-
- Company
- Contact Us
How to enable Gateway Anti-Virus, Anti-Spyware and Intrusion Prevention mechanisms on the firewall?


Description
Enabling the security services on the firewall is an essential part of the firewall configuration.
The main Security Services are:
- Gateway Anti-Virus: integrates a high performance Real-Time Virus Scanning Engine and dynamically updated signature database to deliver continuous protection from malicious virus threats at the gateway.
- Intrusion Prevention: integrates a high-performance Deep Packet Inspection architecture and dynamically updated signature database to deliver complete network protection from application exploits, worms and malicious traffic.
- Anti-Spyware
SonicWall firewalls provide an innovative multi-layered anti-malware strategy consisting of a patented Reassembly-Free Deep Packet Inspection anti-malware solution: Tech Brief: Advantages of Reassembly-Free Deep Packet Inspection (RFDPI) - SonicWall
Resolution
Resolution for SonicOS 7.X
This release includes significant user interface changes and many new features that are different from the SonicOS 6.5 and earlier firmware. The below resolution is for customers using SonicOS 7.X firmware.
Once you have purchased the License for the Security Services and activated it in your mySonicWall.com, you will see the licenses showing up on the SonicWall under System | Status/Licenses page.
Even though the Security Services show licensed on the device you would still have to enable the Security Services and apply it on the required zones.
Enabling the Security Services in the Security Services tab
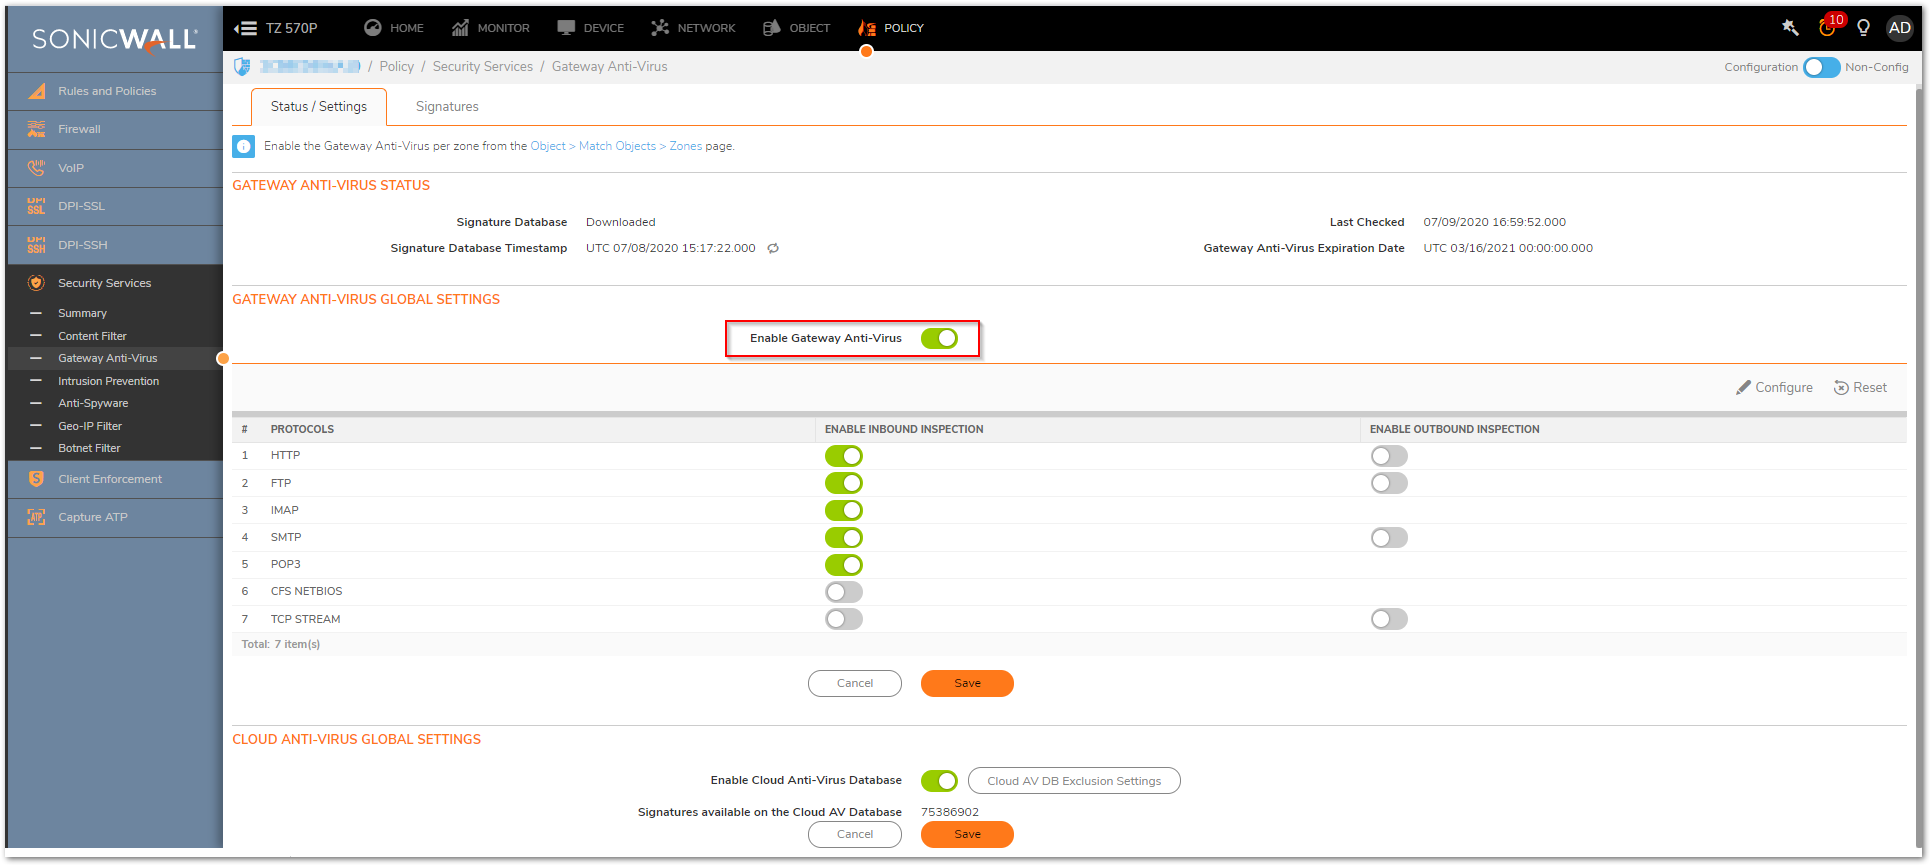
- Navigate to Policy| Security Services | Gateway Anti-Virus .
- Under GATEWAY ANTI-VIRUS GLOBAL SETTINGS: enable the option Enable Gateway Anti-Virus.
- By default, the inbound Inspection for HTTP, FTP, IMAP, SMTP, POP3 is enabled. You can enable the outbound inspection as well if required.
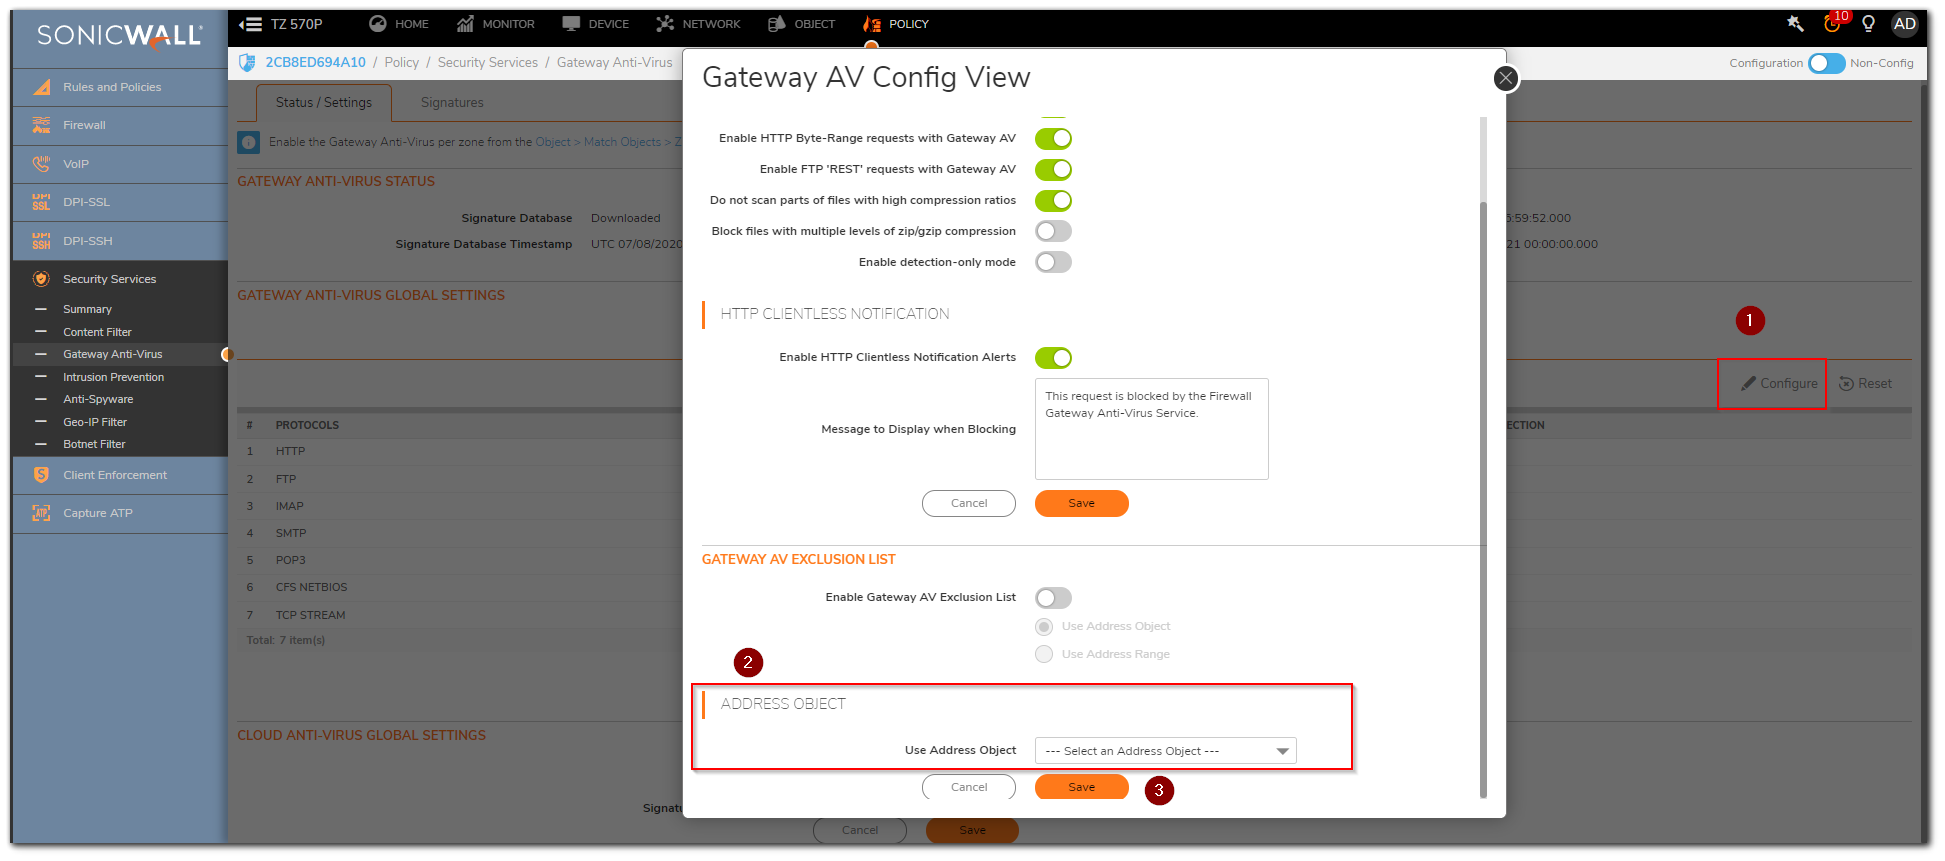
- If you want to exclude some IP addresses from being inspected by the Gateway Anti-Virus, you can do the same by clicking on Configure button. You have the option to Exclude based on the Address object/group.
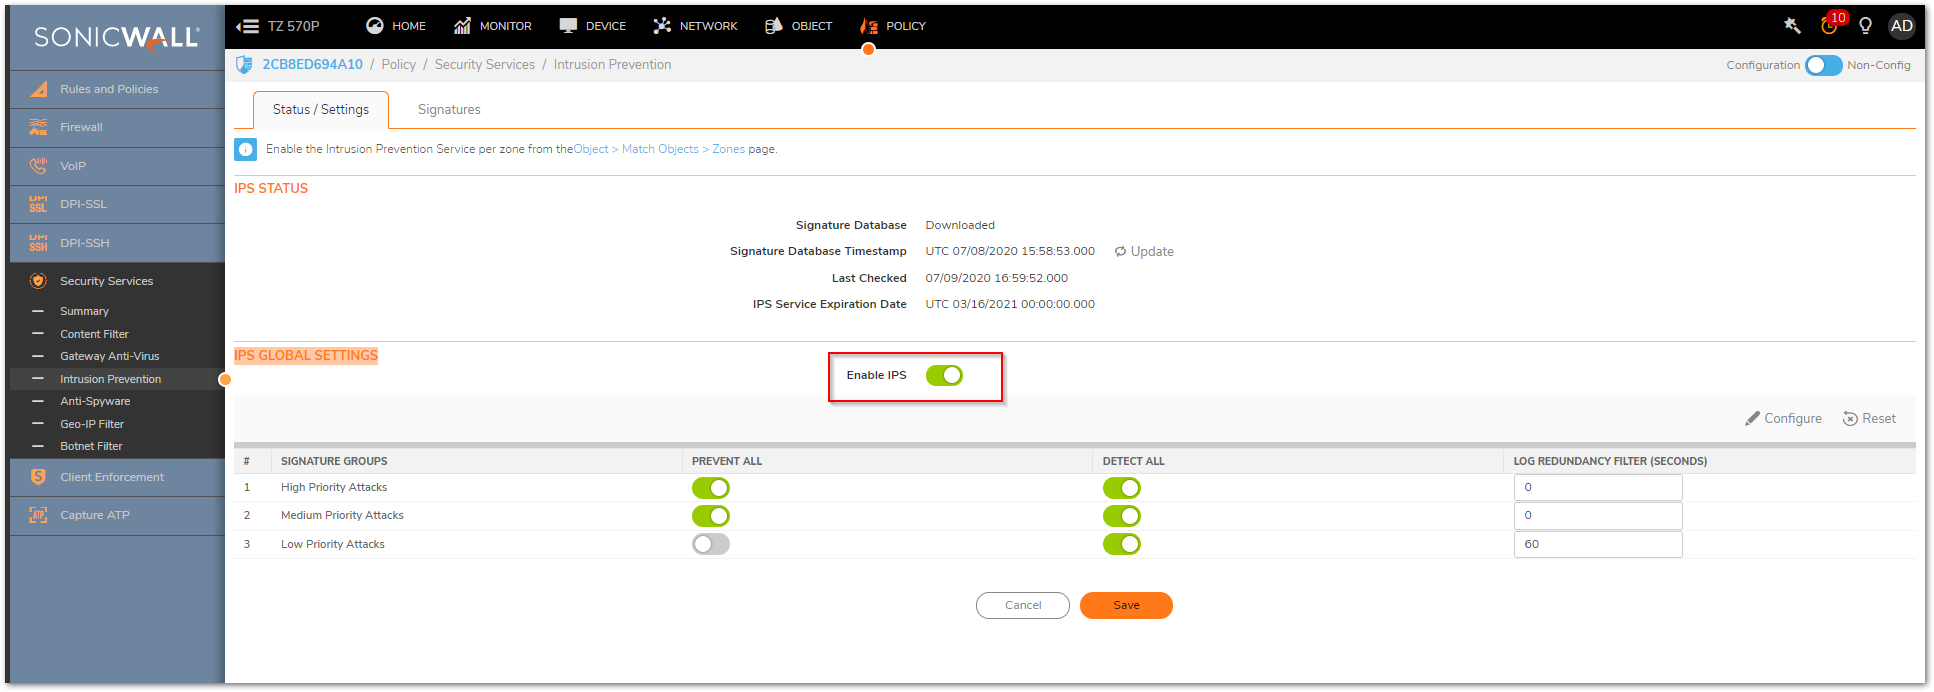
- Navigate to Policy| Security Services | Intrusion Prevention.
- Under IPS GLOBAL SETTINGS, Enable the option 'Enable IPS'.
- You will have three Signature Groups " High Priority Attacks, Medium Priority Attacks and Low Priority Attacks. You can enable the Detection and Prevention as per your requirement but the recommended settings are to leave the prevention disabled and just enable the detection for low priority attacks.
 NOTE: Enabling the Prevention of Low-priority attacks will block ICMP as well.
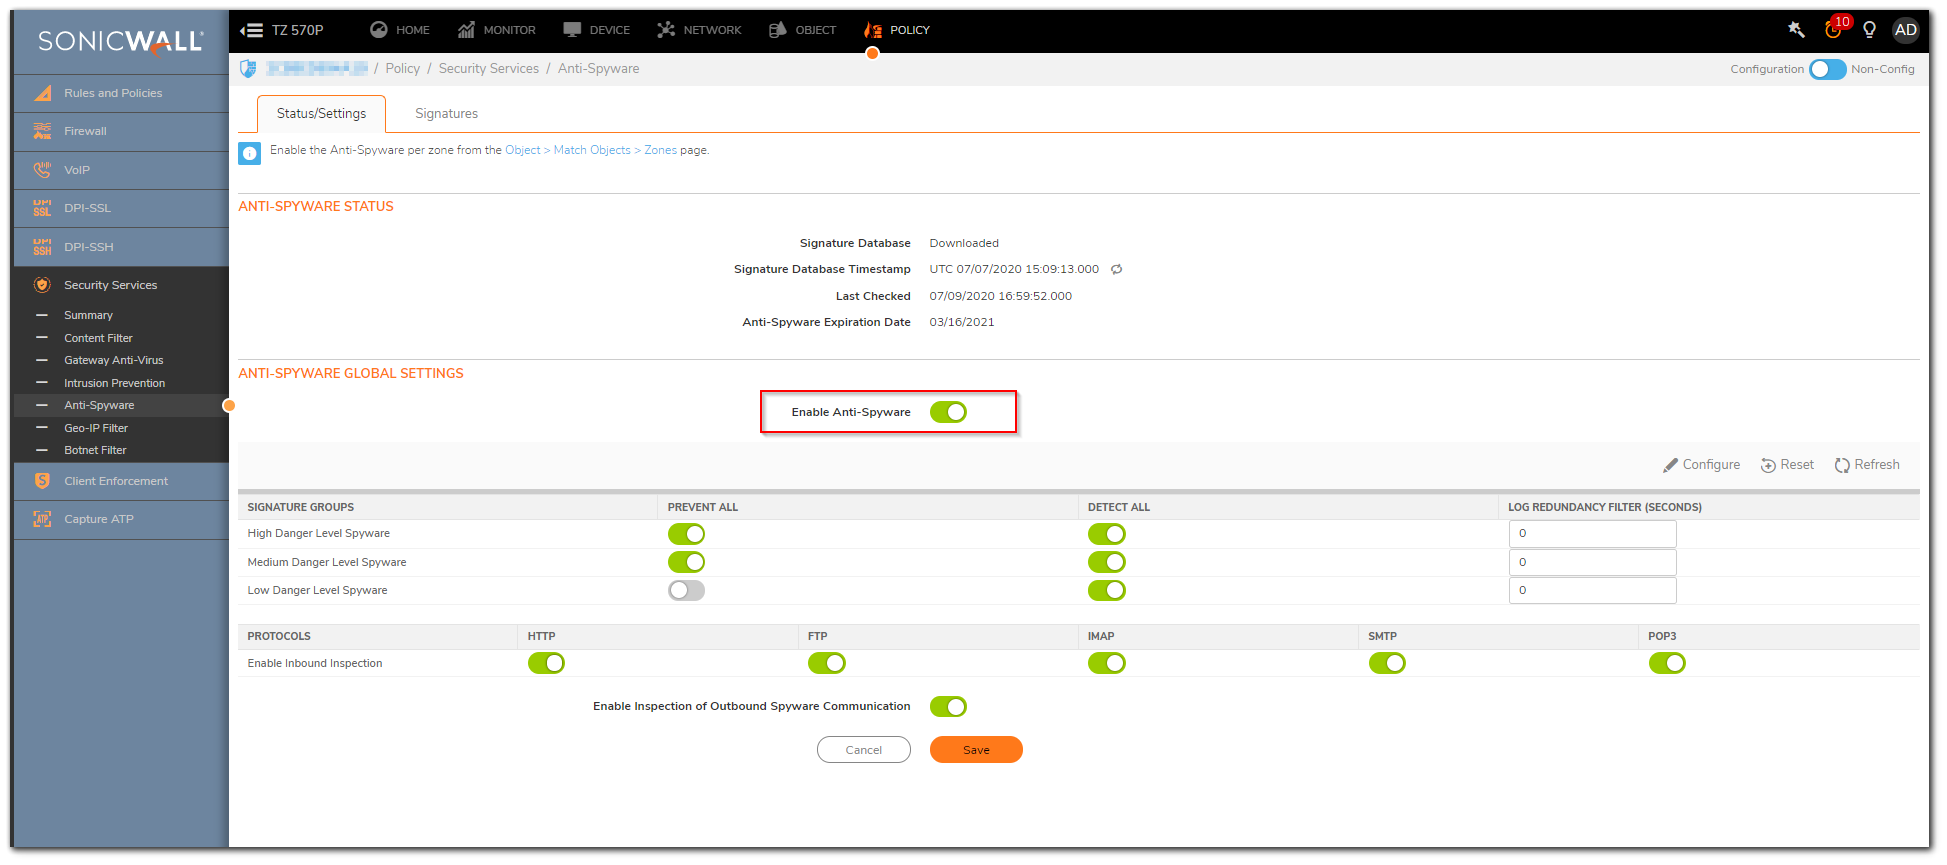
- Navigate to Policy| Security Services | Anti-Spyware.
- Under ANTI-SPYWARE GLOBAL SETTINGS, enable the option Enable Anti-Spyware.
- This completes enabling the Security Services and you will have to apply these in the appropriate zones for the Security Services to take effect.
Applying the Security Services on the required Zones:
- Navigate to Object|Match Objects|Zones. Edit the appropriate zone required by clicking on configure icon and apply the security services by enabling the checkboxes for "Enable Gateway Anti-Virus Service" "Enable IPS" and "Enable Anti-Spyware Service". The below screenshot shows the Security Services being applied on the LAN zone.
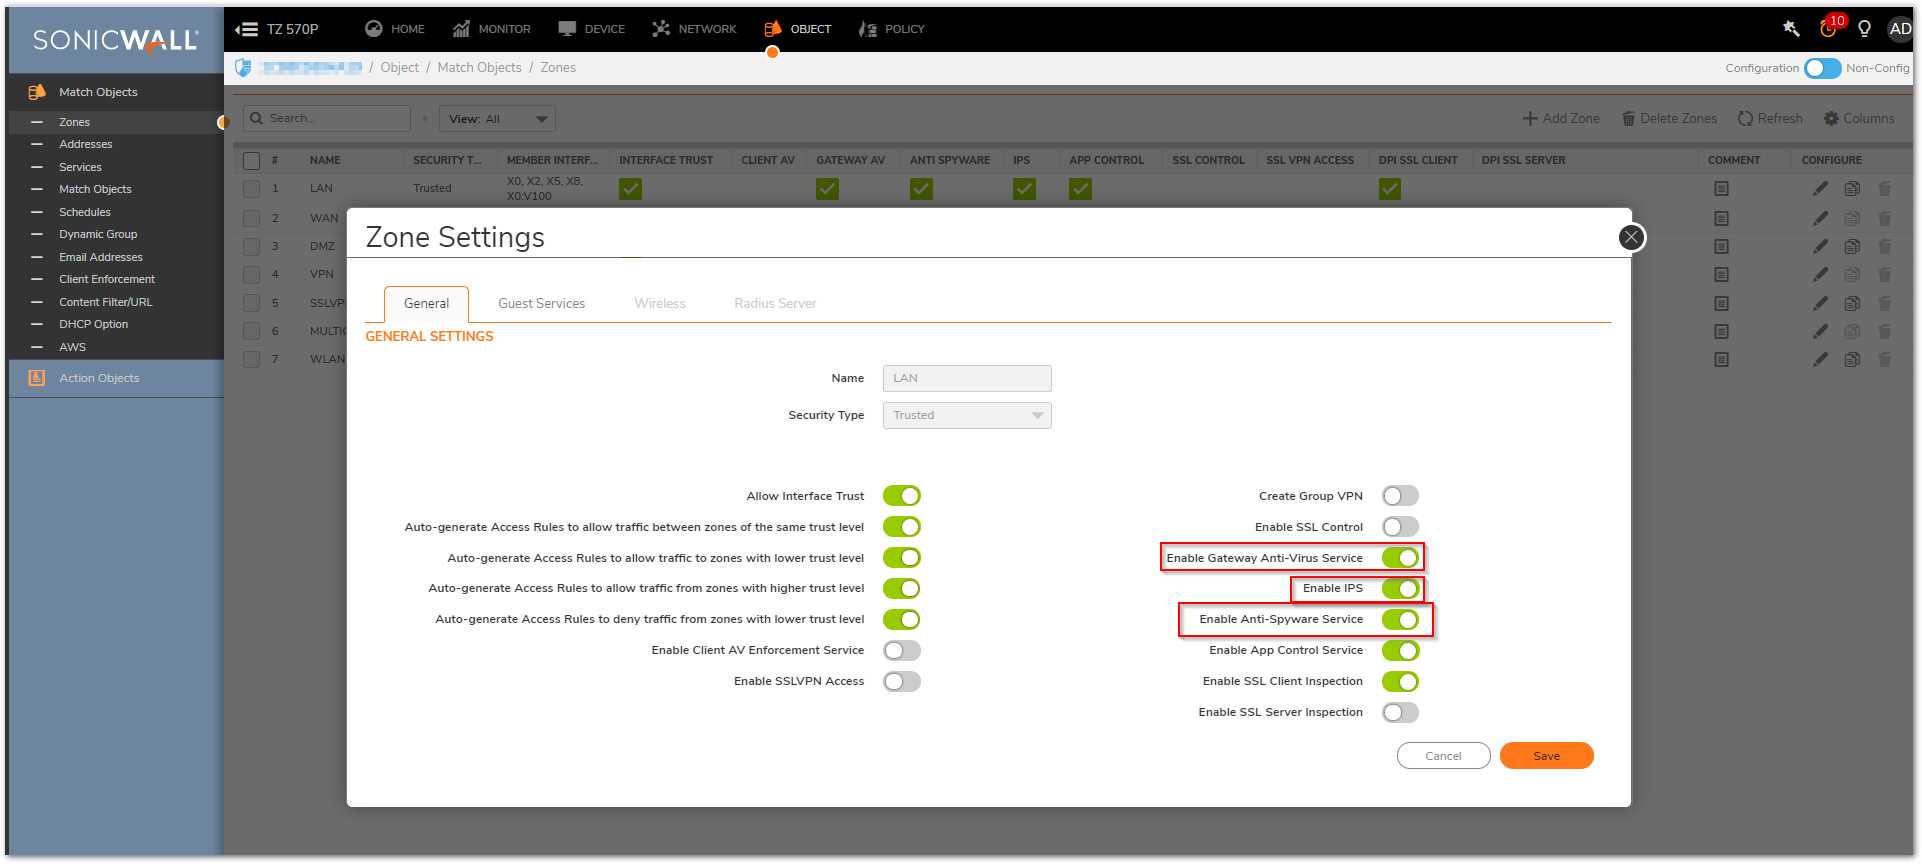
- Click on Save.
 CAUTION: Similarly you need to apply the same on the WANzone and additional zones if required.
Resolution for SonicOS 6.5
This release includes significant user interface changes and many new features that are different from the SonicOS 6.2 and earlier firmware. The below resolution is for customers using SonicOS 6.5 firmware.
Once you have purchased the License for the Security Services and activated it in your mySonicWall.com, you will see the licenses showing up on the SonicWall under System | Status/Licenses page. Even though the Security Services show licensed on the device you would still have to enable the Security Services and apply it on the required zones.
Enabling the Security Services in the Security Services tab:
- Navigate to Manage | Security Services | Gateway Anti-Virus tab.
- Check the Box 'Enable Gateway Anti-Virus'. By default, the inbound Inspection for HTTP, FTP, IMAP, SMTP, POP3 is enabled. You can enable the outbound inspection as well if required.
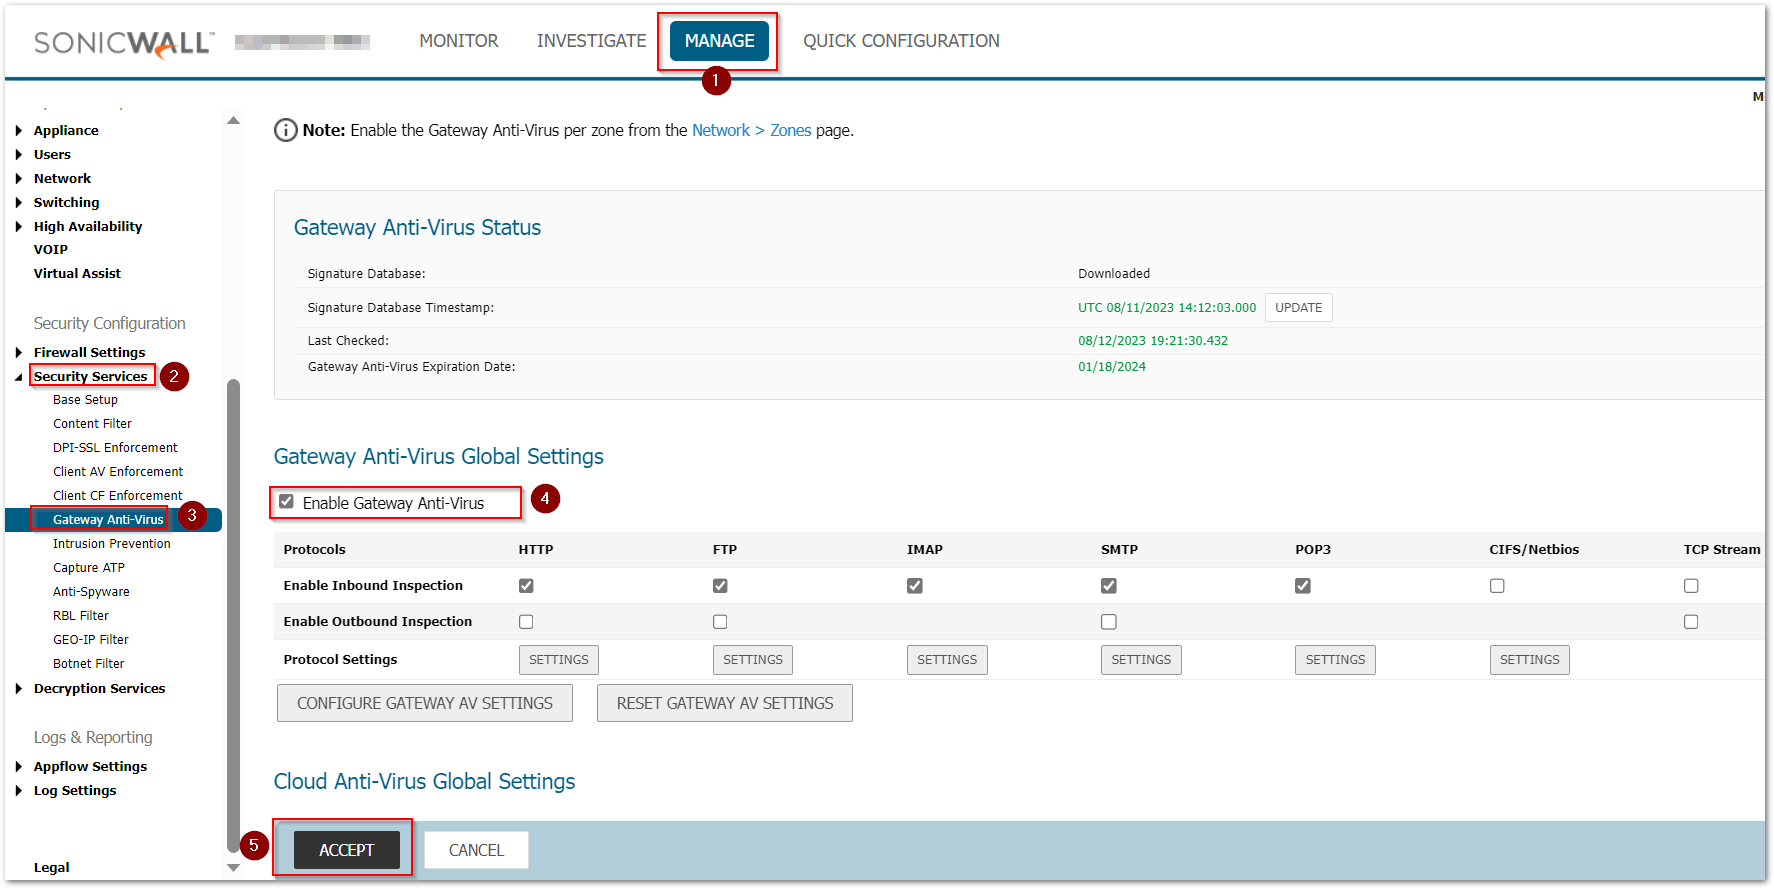
- If you want to exclude some IP addresses from being inspected by the gateway Anti-Virus, you can do the same by clicking on Configure Gateway AV Settings button. You have the option to Exclude based on address objects or a Range.
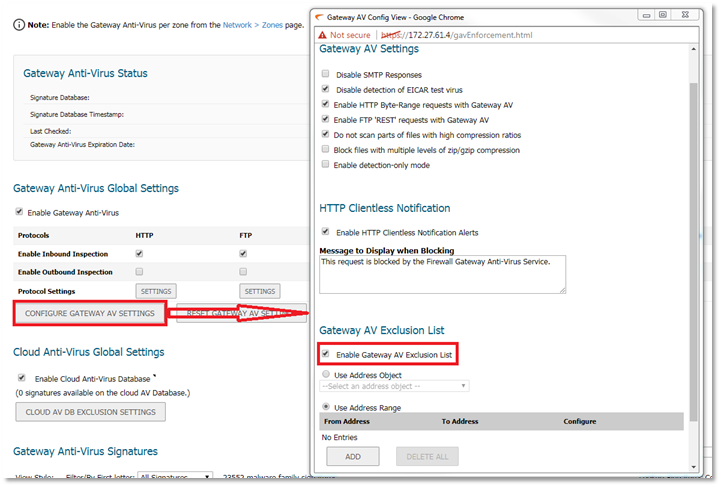
- Once the GAV is enabled, navigate to Manage | Security Services | Intrusion Prevention. Check the box 'Enable IPS'. You will have three Signature Groups " High Priority Attacks, Medium Priority Attacks and Low Priority Attacks. You can enable the Detection and Prevention as per your requirement but the recommended settings are to leave the prevention disabled and just enable the detection for low priority attacks.
 NOTE: Enabling the Prevention for Low priority attacks will drop ICMP as well.
- Similarly, Navigate to Manage | Security Services | Anti-Spyware and enable the Anti-Spyware checkbox and you can leave the Low Danger Level Spyware disabled for prevention and enabled for detection.

This completes enabling the Security Services and you will have to apply these in to appropriate zones for the Security Services to take effect.
Applying the Security Services on the required Zones:
- Navigate to Manage | Network | Zones.
- Edit the appropriate zone required by clicking on
 icon and apply the security services by enabling the checkboxes for "Enable Gateway Anti-Virus Service" "Enable IPS" and "Enable Anti-Spyware Service". The below screenshot shows the Security Services being applied on the LAN zone.
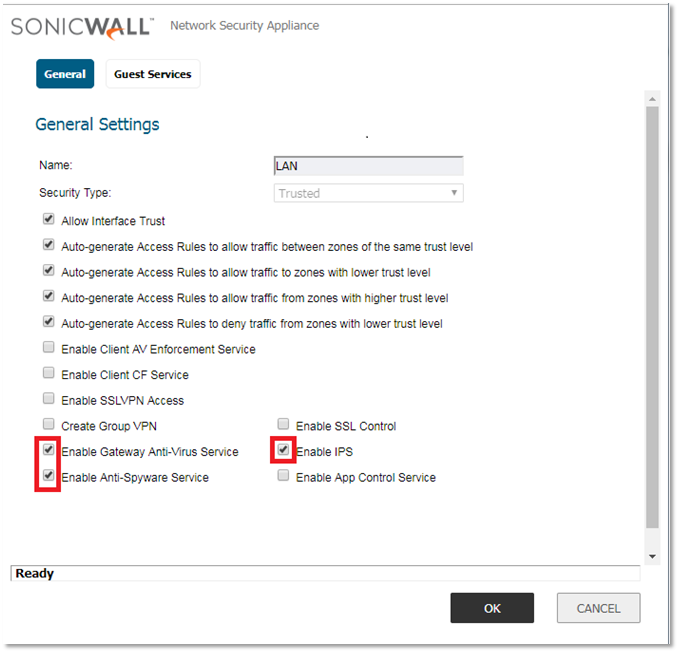
- Click on OK to save the setting. Similarly, you need to apply the same on the WAN zone and additional zones if required.
Related Articles
- How to enable DNS Doctoring?
- Understanding TCP Handshake violation
- How can I Install SonicWall NSv on AWS ?
Categories
- Firewalls > SonicWall NSA Series > IPS/GAV/Spyware
- Firewalls > SonicWall SuperMassive 9000 Series > IPS/GAV/Spyware
- Firewalls > SonicWall SuperMassive E10000 Series > IPS/GAV/Spyware
- Firewalls > TZ Series > IPS/GAV/Spyware


 YES
YES NO
NO