-
Products
-
SonicPlatform
SonicPlatform is the cybersecurity platform purpose-built for MSPs, making managing complex security environments among multiple tenants easy and streamlined.
Discover More
-
-
Solutions
-
Federal
Protect Federal Agencies and Networks with scalable, purpose-built cybersecurity solutions
Learn MoreFederalProtect Federal Agencies and Networks with scalable, purpose-built cybersecurity solutions
Learn More - Industries
- Use Cases
-
-
Partners
-
Partner Portal
Access to deal registration, MDF, sales and marketing tools, training and more
Learn MorePartner PortalAccess to deal registration, MDF, sales and marketing tools, training and more
Learn More - SonicWall Partners
- Partner Resources
-
-
Support
-
Support Portal
Find answers to your questions by searching across our knowledge base, community, technical documentation and video tutorials
Learn MoreSupport PortalFind answers to your questions by searching across our knowledge base, community, technical documentation and video tutorials
Learn More - Support
- Resources
- Capture Labs
-
- Company
- Contact Us
Deploying SonicWall Gen 7 NSv in High Availability Mode on Azure


Description
Prerequisites:
- Azure Requirements:
- Active Azure Subscription.
- Role Assignments:
- Owner
- Contributor
- SonicWall NSv Prerequisites:
- Valid NSv appliance licenses - BYOL.
- Active MySonicWall account.
- Firewall Instances:
- Two SonicWall NSv instances for HA deployment.
Product Matrix

For Azure sizing and pricing information, see:
- https://azure.microsoft.com/en-us/pricing/details/virtual-machines/Linux/
- https://docs.microsoft.com/en-us/azure/virtual-machines/windows/sizes-general
Topology:
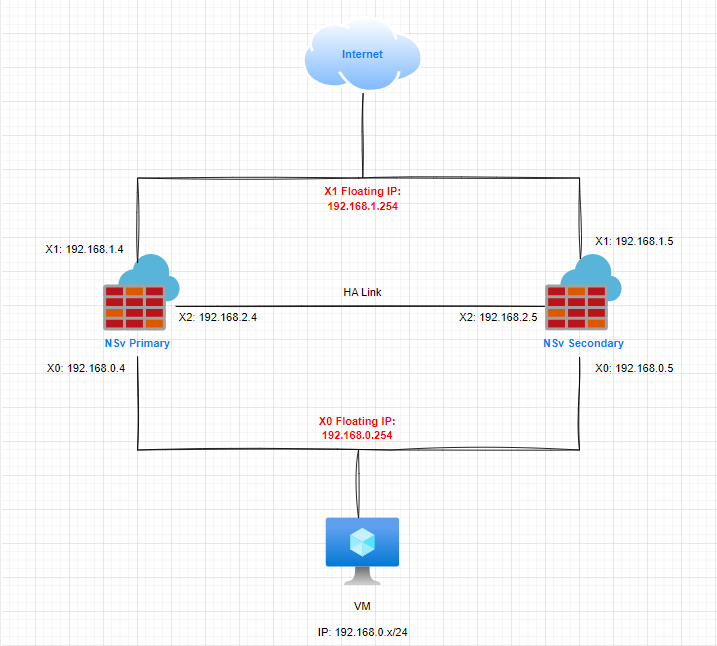
 NOTE: For HA interface use only /24 subnet. There is no such limitation for other interfaces like X0 or X1.
Resolution
Steps to Deploy NSv in Active/Standby HA Mode
Use the SonicWall custom template from the GitHub repository for a pre-configured setup with best practices, ensuring error-free configuration. Access the repository via the link below and follow the steps provided.
Deploy SonicWall NSv Instances Using GitHub Template
- Open a browser, navigate to https://github.com/sonicwall-NSv/azure-template/tree/feature/HA, scroll down to ARM template deployment session and click on Deploy to Azure.

- Log in to the Azure Portal using valid credentials, if necessary.
- You will be redirected to the Custom Deployment page. Proceed with deployment:
- Resource Group: Use an existing or create a new resource group.
- Region: Select the desired Azure region.
- Image Sku: snwl-NSv-scx.
- Image Version: latest.
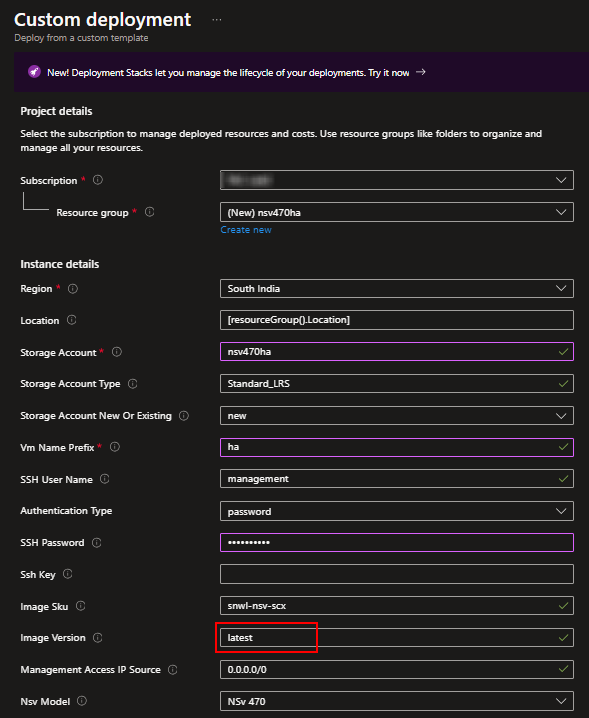
 NOTE: Please store "SSH Password" and "Key pair" in a safe place as these will be required in the future when Console or SSH access to the firewall is needed.
 NOTE: Please leave the Image Version tab as the default value “latest” to install the Gen 7 NSv Firewall.
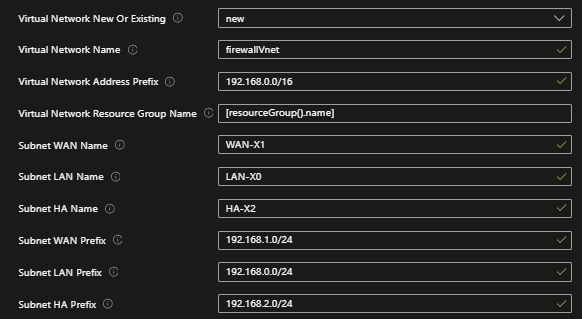
4. Click Review + Create, then confirm by clicking Create.
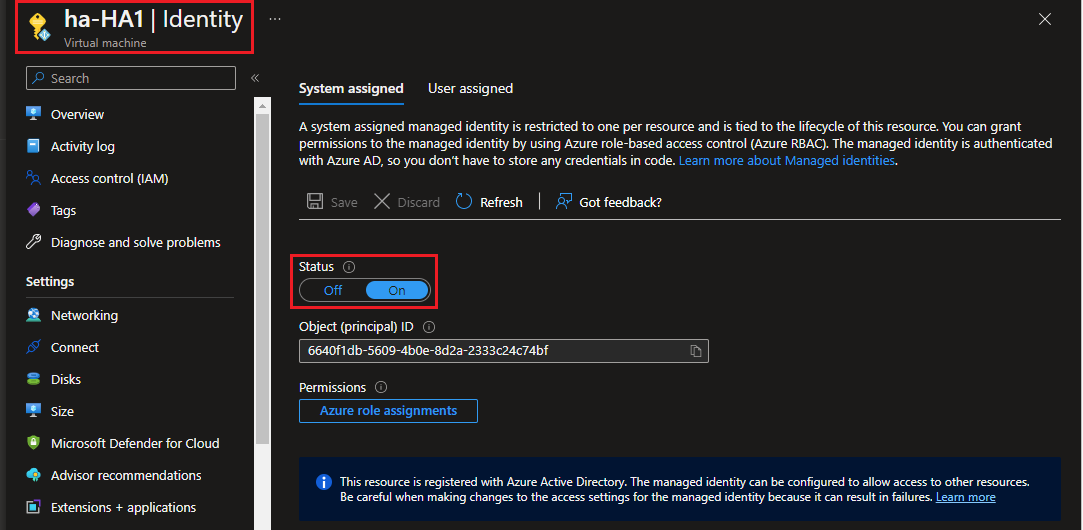
ENABLE IDENTITY OF BOTH VIRTUAL MACHINES (HA1 and HA2)
To enable Identity:
- On the left Panel access the All Services | Virtual machine page.
- Search for the Primary VM that you have created during deployment, on the left panel, select Identity and change the status to On (If it is already configured through Template, please leave it as default).
- Repeat the steps 1 and 2 to the Secondary VM.
ROLE ASSIGNMENT
As of the next step, you will add Role Assignment to the Resource Group.
The role assignment “Contributor” should be set to the Resource Group, since it will give the ability to the firewalls exchange High Availability information. To do that, follow the steps below:
- Navigate to Dashboard, on the search bar, search for the Resource Group that you have created during deployment, and on the left panel, select Access Control (IAM).
- Click Add | Add role assignment.
- Click Contributor.
- In Contributor, select Managed Identity | check if you are in the right Subscription and drop-down Managed Identity. Select Virtual Machine and select both HA1 and H2 VMs to provide permissions (If it is already configured through Template, please leave it as default).

 NOTE: Keep the VNet and NSv VMs in the same Resource Group. If they are in separate Resource Groups, assign the NSv VMs as Contributors to the VNet Resource Group.
Log in to Primary NSv through X1 associated public IP
- Register appliance
- Navigate to NETWORK | System | Interfaces:
- Edit X0 interface:
- Mode/IP assignment: Static IP mode
- IP Address: [friendlyname]-HA1-interface-X0-ipconfig-float
- keep the rest default
- Edit X1 interface:
- Mode/IP assignment: Static IP mode
- IP Address: [friendlyname]-HA1-interface-X1-ipconfig-float
- Default Gateway: MS Azure Default Gateway
- DNS Server 1: MS Azure Default DNS Server
NOTE: Before changing the X1 Interface IP, take a screenshot of the current settings to ensure the Default Gateway and DNS Server 1 remain unchanged, preventing loss of access to the primary firewall.
HA1 - floating IPs X0 and X1

Enable HA on Primary NSv
On the primary firewall, Login using the Floating Public IP address. To get the IP go to:
- Resource Groups
- Select the VM ha-HA1
- On the left panel press Networking
- Network Interface: ha-HA1-Interface-X1
- On the left panel press IP configurations
- Copy the Floating Public IP address and paste it into the browser
Configure High Availability to Active/Standby with L3 HA Link
- General Settings:
- Navigate to Manage | High Availability.
- Enable the Stateful Synchronization option.
- HA Devices:
- Input Secondary Device Serial Number
- HA Interfaces:
- Enable HA Control Link to L3 mode.
- Input Primary Unit IP
- Input Secondary Unit IP
HA1 - Configure HA Settings:
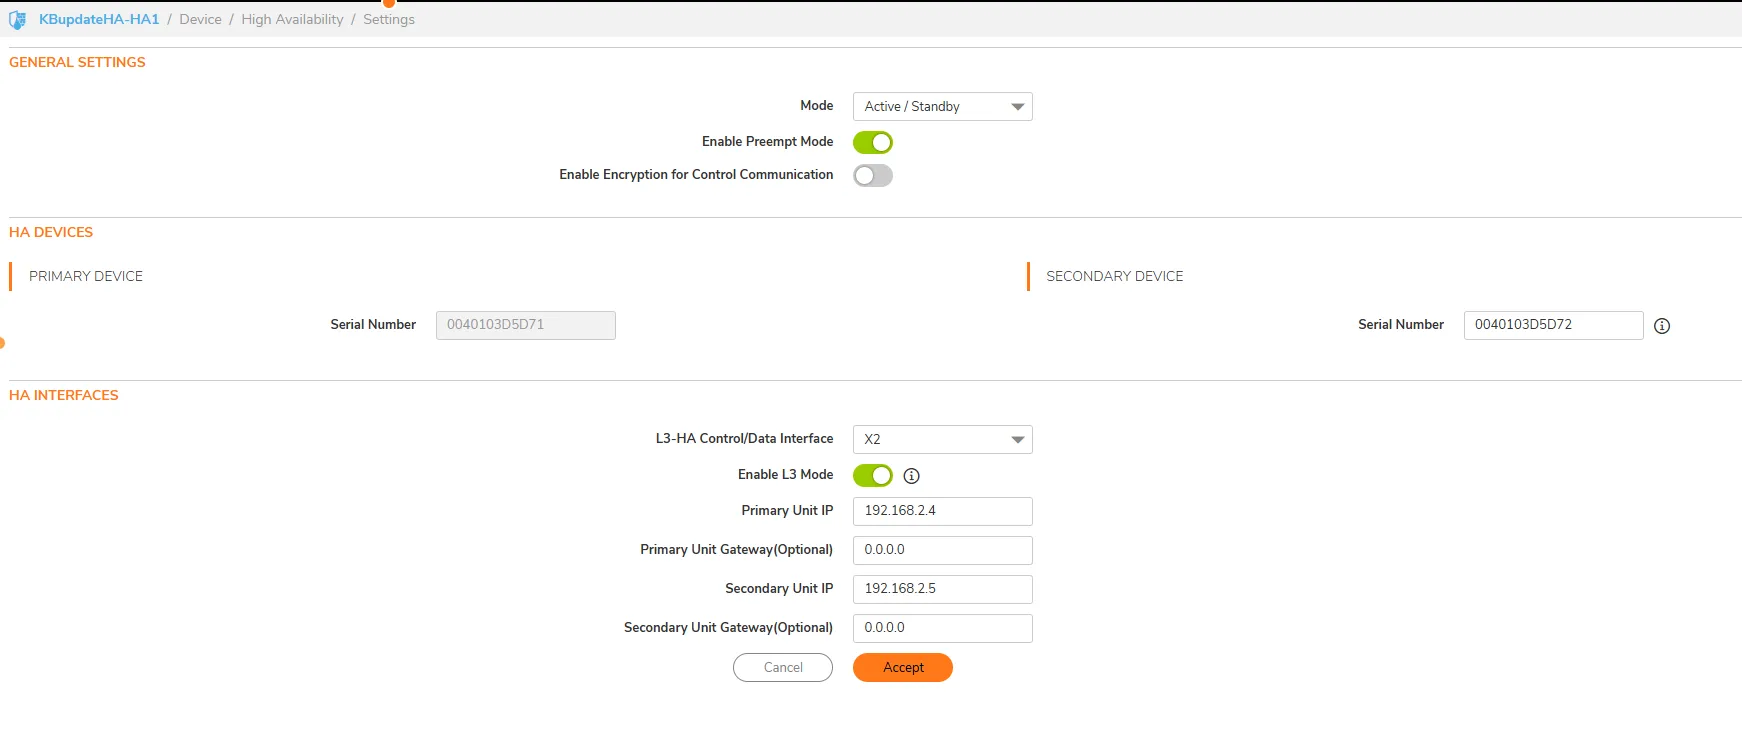
After, hit ACCEPT:
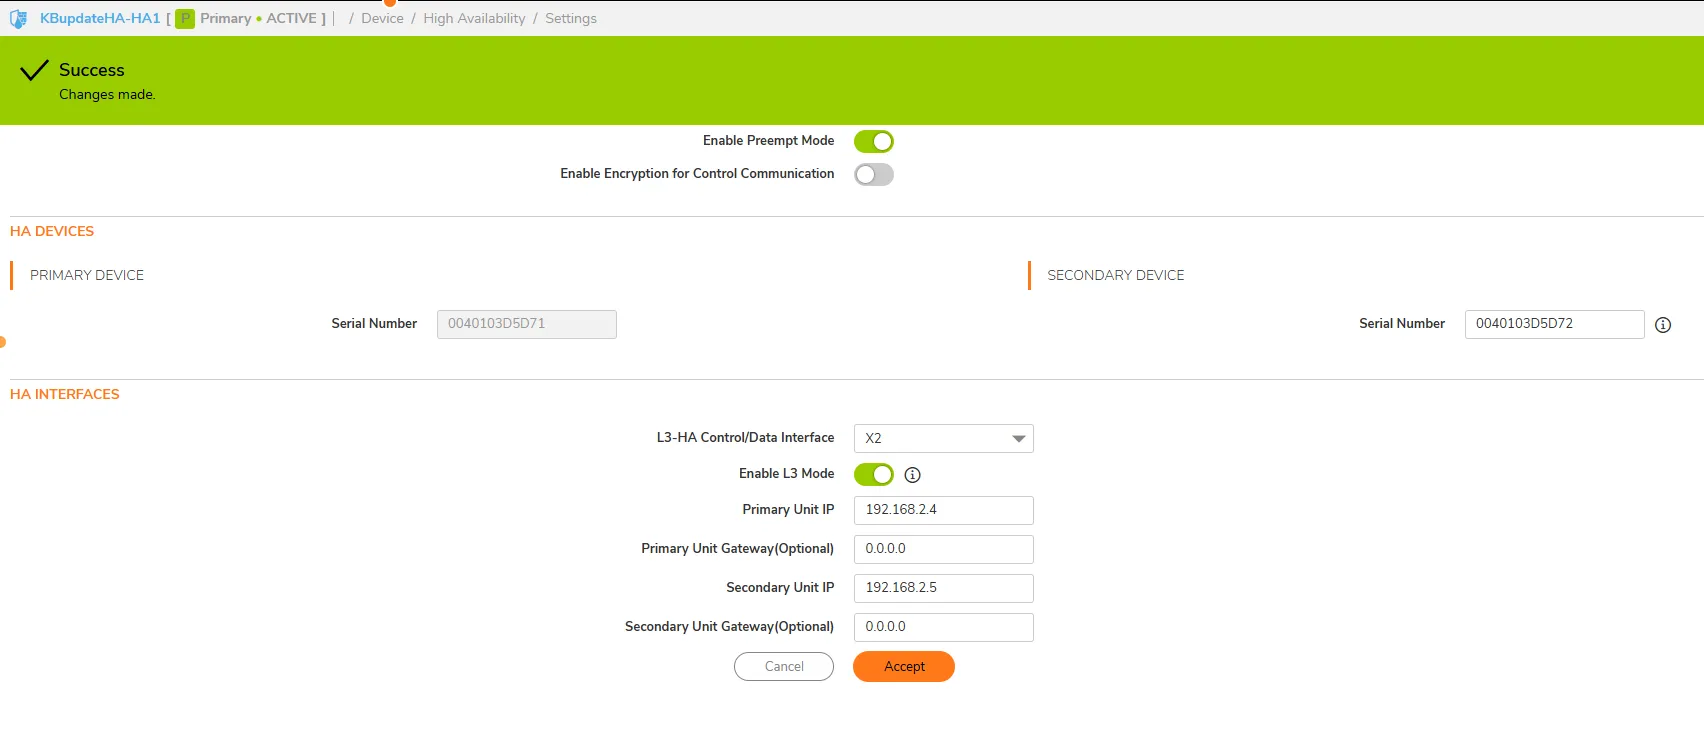
- Add monitoring IP to Primary NSv as Physical IP X0 and X1 Azure Interface to manage the secondary firewall.

Configure HA on Secondary NSv:
Log in to the Secondary NSv firewall using the Associated public IP
- Navigate to Network | System | Interfaces, and create the HA interface with custom zone "HA" using the IP address of ha-HA2-Interface-X2.
- Security Type: Trusted
- Enable “Allow Interface Trust”
- No need to enable Security Services.
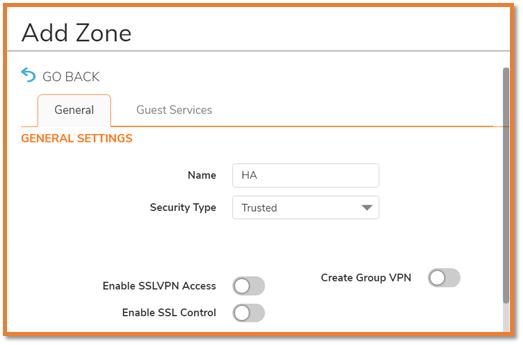
- The IP Address is the ha-HA2-Interface-X2 found on the Networking tab.
- Here we set the HA interface (X2) LAN zone. Actually, it doesn't matter which zone it is. After the HA is established, the zone attribute will be overwritten by its HA interface attribute. So, the unique purpose here is just let the interface of secondary unit can receive the packet from primary (reply the arp resolve). Once the HA is established, the interface is just a HA interface. It will not be a LAN interface anymore.
HA2 - Configure HA interface x2

NOTE: Do NOT change X0 and X1 interfaces of Secondary Firewall.
Navigate to DEVICE | High Availability | Settings | HA Interfaces on the secondary appliance.
- Enable the L3 Mode option, hit Accept.
 NOTE: Primary secondary device IP/gateway configuration should be avoided assigning directly to that zone

- Navigate to Device | High Availability | Status page to check whether the cluster is coming together. The secondary will reboot, and it may take a while to see the cluster up.
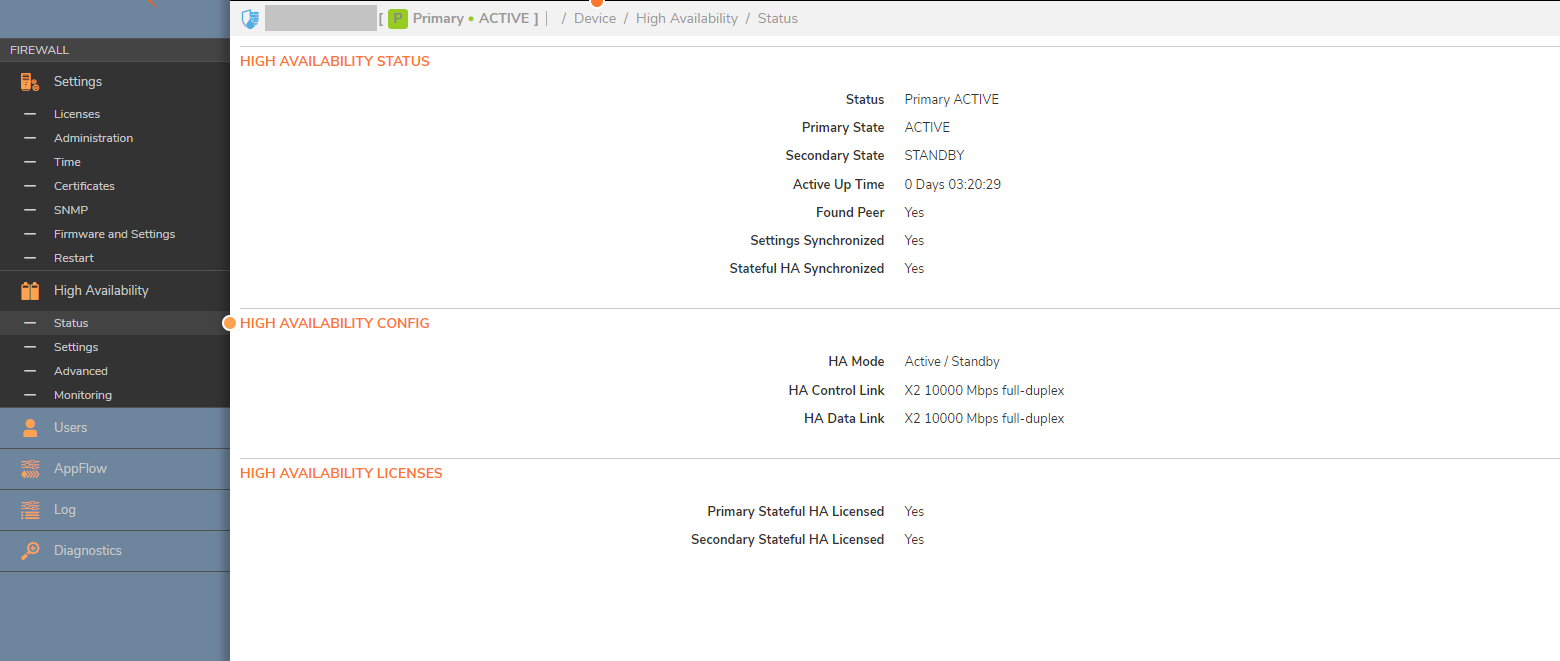
ASSIGNING MULTIPLE FLOATING IP ADDRESSES
 NOTE: It is recommended to be on the latest 7.1.1-7051 or a newer firmware version for using Multiple Floating IP addresses in Azure
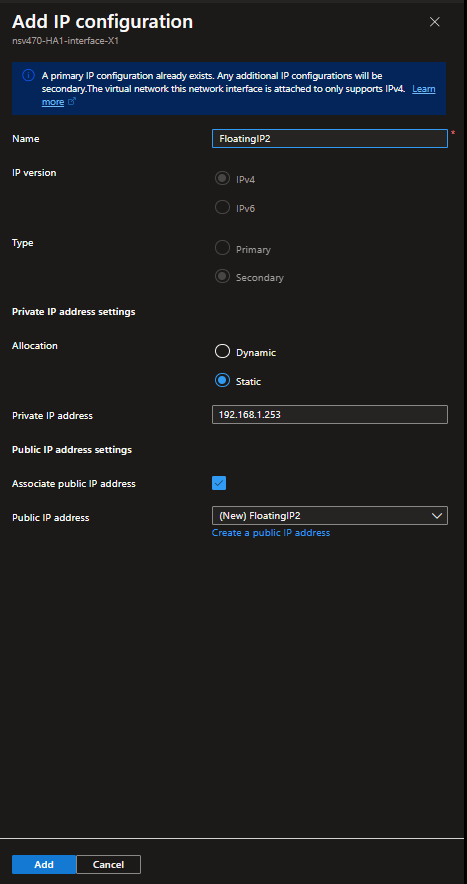
Steps to add Additional Floating public IP
- Resource Groups
- Select the VM ha-HA1
- On the left panel press Networking
- Network Interface: ha-HA1-Interface-X1
- On the left panel press IP configurations
- Click Add to Add IP configuration, and specify the name and IP allocation method.

7. Associate the public IP by using an existing public IP or create a new public IP address.
Related Articles
- Error:"Invalid API Argument" when modifying the access rules
- Cysurance Partner FAQ
- Configure probe monitoring for WAN Failover and Loadbalancing - SonicWall UTM
Categories
- Firewalls > NSv Series > Azure


 YES
YES NO
NO