How to default a High Availability (HA) SonicWall pair
 09/28/2022
  66 People found this article helpful
 507,914 Views
Description
How to default a High Availability (HA) SonicWall pair
Resolution
Resolution for SonicOS 7.X
This release includes significant user interface changes and many new features that are different from the SonicOS 6.5 and earlier firmware. The below resolution is for customers using SonicOS 7.X firmware.
Step 1: Updating the Primary Unit
- Power down the Primary unit causing a Failover to the Backup unit. Once down disconnect the Primary from the network and the HA heartbeat cable.
- Connect a PC directly to the Primary unit to perform an upgrade.
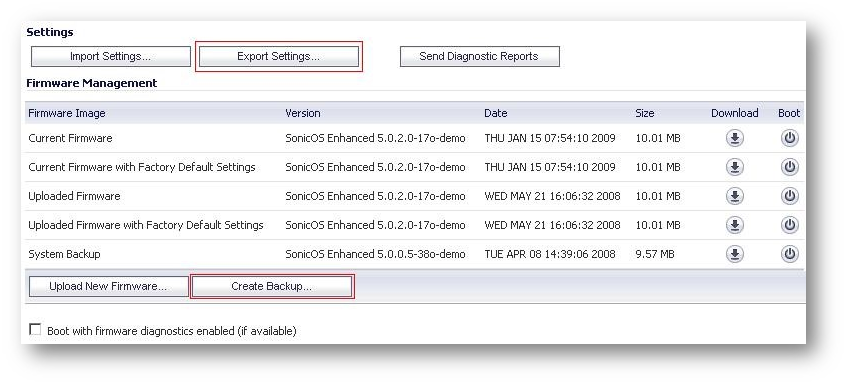
- Save a copy of your settings file from the Primary unit. Detailed instructions can be found in our article entitled How do I save a backup settings file from a SonicWall firewall?

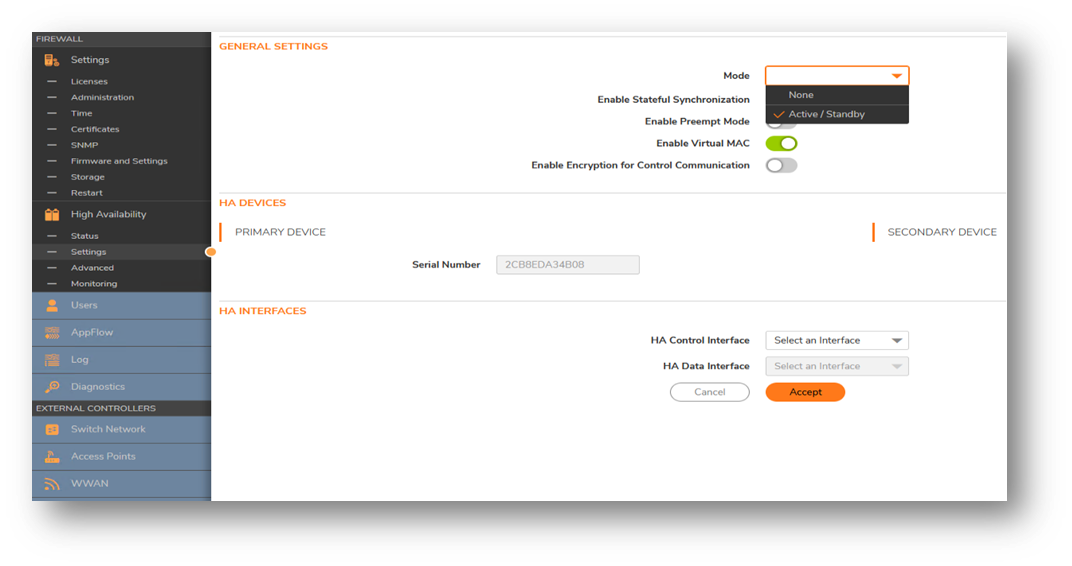
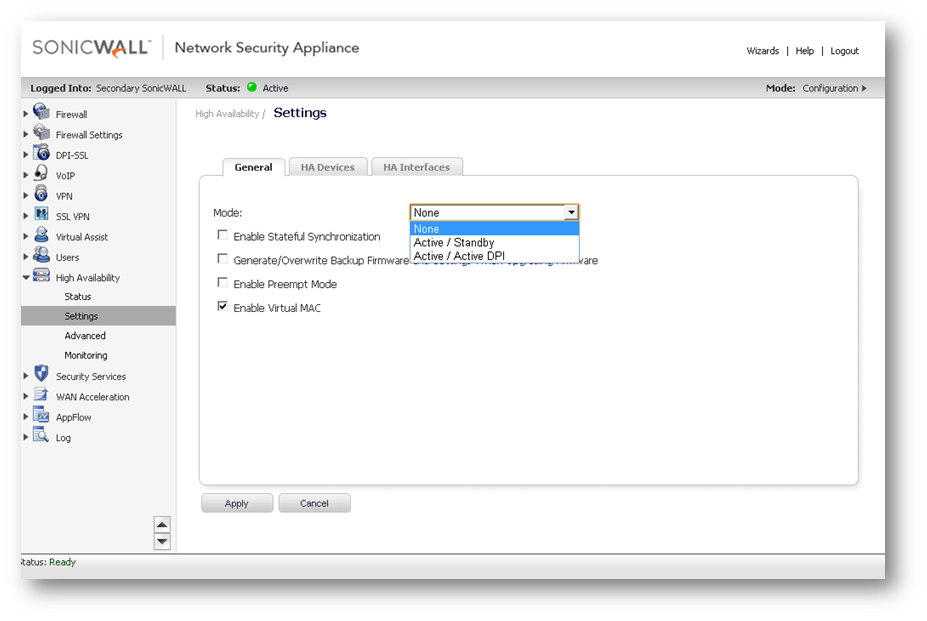
- Disable the HA settings. Go to: HA > Settings and uncheck the “enabled” box for this feature (or select "None" for HA Mode), the saved settings file you have created will turn this back on in a later step.

- Now navigate to Device | Settings | Firmware and settings page and select the “Uploaded Firmware with Factory Default Settings” boot option.

- Once the unit reboots you will need to log back in using the default IP and login information. The SonicWall can be accessed at the default IP of 192.168.168.168 with a subnet of 255.255.255.0, please set your computer to a hardcoded IP in that subnet to login in. The username and password will be “admin” and “password” (MGMT subnet 192.168.1.0, interface IP 192.168.1.254).
- Once logged back in follow the instructions in this article for details on how to import your settings file back into the unit. This should also turn the HA feature back on.
- (Optional Step) The admin/password settings will still be on default settings (admin/password), this is a good time to reconfigure those to your choice before moving on, those settings are found under System | Administration page
Step 2: Swapping out the two units:
- Begin by powering down the backup unit; this will begin a brief network outage.
- After the Backup unit is powered down fully, reconnect the Primary firewall with all network connections, except the HA Heartbeat cable. The Primary should already be powered on and will begin to assume control of the network.
- Once the Primary unit is in control of the network again, you will need to register the unit to acquire all license information. Go to the Home | Dashboard | System page on the security services section of the page will be a link prompting for registration, follow the link and enter the mySonicWall.com user information to reacquire the licenses for this unit.
At this point the Primary unit should now be fully in control of the network and the outage time will be completed, if all runs smoothly this should be 3-5 minutes on average.
Step 3: Upgrading the Backup unit.
- Now that the Backup unit is off the network, we reset the back up as well. As we cannot make change on the back up normally, first we will need to boot the unit into safe mode. Follow steps listed in this article to gain access to the safe mode screens.
- Then use the same Boot option as on the Primary, the “Uploaded Firmware with Factory Default Settings” to load the firmware at its default state. Boot into this new firmware.
- Once the reboot completes, reconnect the backup unit to the network and reconnect the HA Heartbeat cable between the two units. The Primary should push its settings file to the backup unit automatically once discovered, or you can force the settings file using the synchronize settings option, on the Primary unit, found on the HA settings page.
With this the HA pair should be restored and the upgrade is complete.
Resolution for SonicOS 6.5
This release includes significant user interface changes and many new features that are different from the SonicOS 6.2 and earlier firmware. The below resolution is for customers using SonicOS 6.5 firmware.
Step 1: Updating the Primary Unit
- Power down the Primary unit causing a Failover to the Backup unit. Once down disconnect the Primary from the network and the HA heartbeat cable.
- Connect a PC directly to the Primary unit to perform an upgrade.
- Save a copy of your settings file from the Primary unit. Detailed instructions can be found in our article entitled How do I save a backup settings file from a SonicWall firewall?

- Disable the HA settings. Go to: HA > Settings and uncheck the “enabled” box for this feature (or select "None" for HA Mode), the saved settings file you have created will turn this back on in a later step.

- Now navigate to System > Settings page and select the “Uploaded Firmware with Factory Default Settings” boot option.

- Once the unit reboots you will need to log back in using the default IP and login information. The SonicWall can be accessed at the default IP of 192.168.168.168 with a subnet of 255.255.255.0, please set your computer to a hardcoded IP in that subnet to login in. The username and password will be “admin” and “password” (MGMT subnet 192.168.1.0, interface IP 192.168.1.254).
- Once logged back in follow the instructions in this article for details on how to import your settings file back into the unit. This should also turn the HA feature back on.
- (Optional Step) The admin/password settings will still be on default settings (admin/password), this is a good time to reconfigure those to your choice before moving on, those settings are found under System | Administration page
Step 2: Swapping out the two units:
- Begin by powering down the backup unit; this will begin a brief network outage.
- After the Backup unit is powered down fully, reconnect the Primary firewall with all network connections, except the HA Heartbeat cable. The Primary should already be powered on and will begin to assume control of the network.
- Once the Primary unit is in control of the network again, you will need to register the unit to acquire all license information. Go to the System | Status page on the security services section of the page will be a link prompting for registration, follow the link and enter the mySonicWall.com user information to reacquire the licenses for this unit.
At this point the Primary unit should now be fully in control of the network and the outage time will be completed, if all runs smoothly this should be 3-5 minutes on average.
Step 3: Upgrading the Backup unit.
- Now that the Backup unit is off the network, we reset the back up as well. As we cannot make change on the back up normally, first we will need to boot the unit into safe mode. Follow steps listed in this article to gain access to the safe mode screens.
- Then use the same Boot option as on the Primary, the “Uploaded Firmware with Factory Default Settings” to load the firmware at its default state. Boot into this new firmware.
- Once the reboot completes, reconnect the backup unit to the network and reconnect the HA Heartbeat cable between the two units. The Primary should push its settings file to the backup unit automatically once discovered, or you can force the settings file using the synchronize settings option, on the Primary unit, found on the HA settings page.
With this the HA pair should be restored and the upgrade is complete.
Related Articles
Categories
Was This Article Helpful?
 YES
YES NO
NO


 YES
YES NO
NO