


-
Products
-
Gen 7 Firewalls
SonicWall's Gen 7 platform-ready firewalls offer performance with stability and superior threat protection — all at an industry-leading TCO.
Read More
-
-
Solutions
-
Federal
Protect Federal Agencies and Networks with scalable, purpose-built cybersecurity solutions
Learn MoreFederalProtect Federal Agencies and Networks with scalable, purpose-built cybersecurity solutions
Learn More - Industries
- Use Cases
-
-
Partners
-
Partner Portal
Access to deal registration, MDF, sales and marketing tools, training and more
Learn MorePartner PortalAccess to deal registration, MDF, sales and marketing tools, training and more
Learn More - SonicWall Partners
- Partner Resources
-
-
Support
-
Support Portal
Find answers to your questions by searching across our knowledge base, community, technical documentation and video tutorials
Learn MoreSupport PortalFind answers to your questions by searching across our knowledge base, community, technical documentation and video tutorials
Learn More - Support
- Resources
- Capture Labs
-
- Company
- Contact Us
How to create port shield interface on SonicWall?
 03/06/2023
  162 People found this article helpful
 333,478 Views

Description
Port Shield architecture enables you to configure some or all the LAN ports into separate security contexts, providing protection not only from the WAN and DMZ but between devices inside your network as well. In effect, each context has its own wire-speed Port Shield that enjoys the protection of a dedicated, deep packet inspection firewall.
 NOTE: Zones can always be applied to multiple interfaces in the Network |Interfaces page, even without the use of Port Shield groupings. However, these interfaces will not share the same network subnet unless they are grouped using Port Shield.
Resolution
Resolution for SonicOS 7.X
This release includes significant user interface changes and many new features that are different from the SonicOS 6.5 and earlier firmware. The below resolution is for customers using SonicOS 7.X firmware.
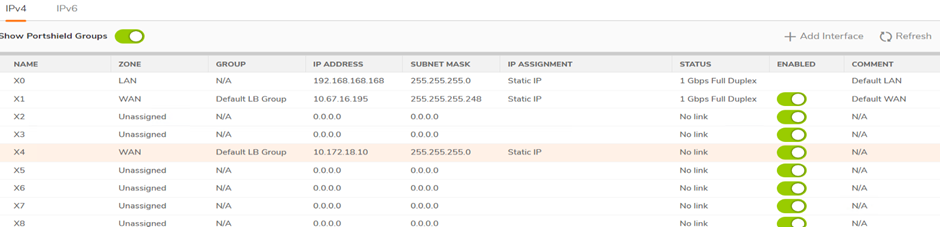
To configure a Port Shield interface, perform the following steps:
1. Click on the Network | Interfaces page.
2. Click the Configure button for the interface you want to configure. The Edit Interface window displays.
3. In the Zone pulldown menu, select a zone type option to which you want to map the interface.
NOTE: You can add Port Shield interfaces only to Trusted, Public, and Wireless zones.
4. In the IP Assignment pulldown menu, select Port Shield Switch Mode.
5. In the Port Shield to pulldown menu, select the interface you want to map this port too. Only ports that match the zone you have selected are displayed.
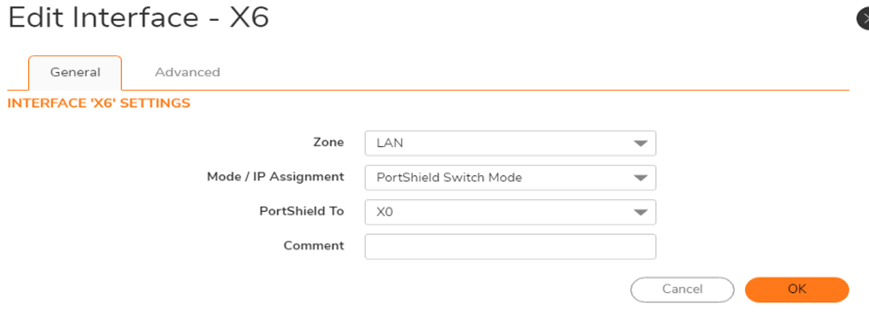
 EXAMPLE: X6 interface being port shielded to X0 LAN in below picture
Resolution for SonicOS 6.5
This release includes significant user interface changes and many new features that are different from the SonicOS 6.2 and earlier firmware. The below resolution is for customers using SonicOS 6.5 firmware.
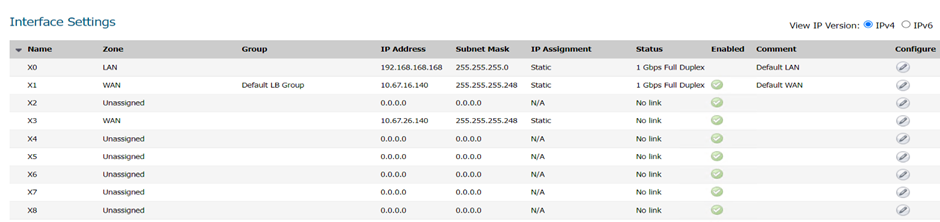
To configure a Port Shield interface, perform the following steps:
1. Navigate to the Network | Interfaces page.
2. Click the Configure button for the interface you want to configure. The Edit Interface window displays.
3. In the Zone pulldown menu, select a zone type option to which you want to map the interface.
NOTE: You can add Port Shield interfaces only to Trusted, Public, and Wireless zones.
4. In the IP Assignment pulldown menu, select Port Shield Switch Mode.
5. In the Port Shield to pulldown menu, select the interface you want to map this port too. Only ports that match the zone you have selected are displayed.
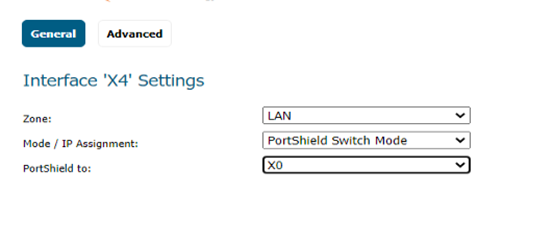
EXAMPLE: X4 interface being port shielded to X0 LAN in below picture
Related Articles
- How to enable DNS Doctoring?
- Understanding TCP Handshake violation
- How can I Install SonicWall NSv on AWS ?
 YES
YES NO
NO