-
Products
-
SonicPlatform
SonicPlatform is the cybersecurity platform purpose-built for MSPs, making managing complex security environments among multiple tenants easy and streamlined.
Discover More
-
-
Solutions
-
Federal
Protect Federal Agencies and Networks with scalable, purpose-built cybersecurity solutions
Learn MoreFederalProtect Federal Agencies and Networks with scalable, purpose-built cybersecurity solutions
Learn More - Industries
- Use Cases
-
-
Partners
-
Partner Portal
Access to deal registration, MDF, sales and marketing tools, training and more
Learn MorePartner PortalAccess to deal registration, MDF, sales and marketing tools, training and more
Learn More - SonicWall Partners
- Partner Resources
-
-
Support
-
Support Portal
Find answers to your questions by searching across our knowledge base, community, technical documentation and video tutorials
Learn MoreSupport PortalFind answers to your questions by searching across our knowledge base, community, technical documentation and video tutorials
Learn More - Support
- Resources
- Capture Labs
-
- Company
- Contact Us
How to connect to SSL VPN from any Internal Zone?


Description
This article explains how to enable the ability to connect to the SSL VPN for secure access to resources from a less secure Internal Zone
Cause
Resolution
Resolution for SonicOS 7.X
This release includes significant user interface changes and many new features that are different from the SonicOS 6.5 and earlier firmware. The below resolution is for customers using SonicOS 7.X firmware.
Enable SSL VPN on Internal Zone
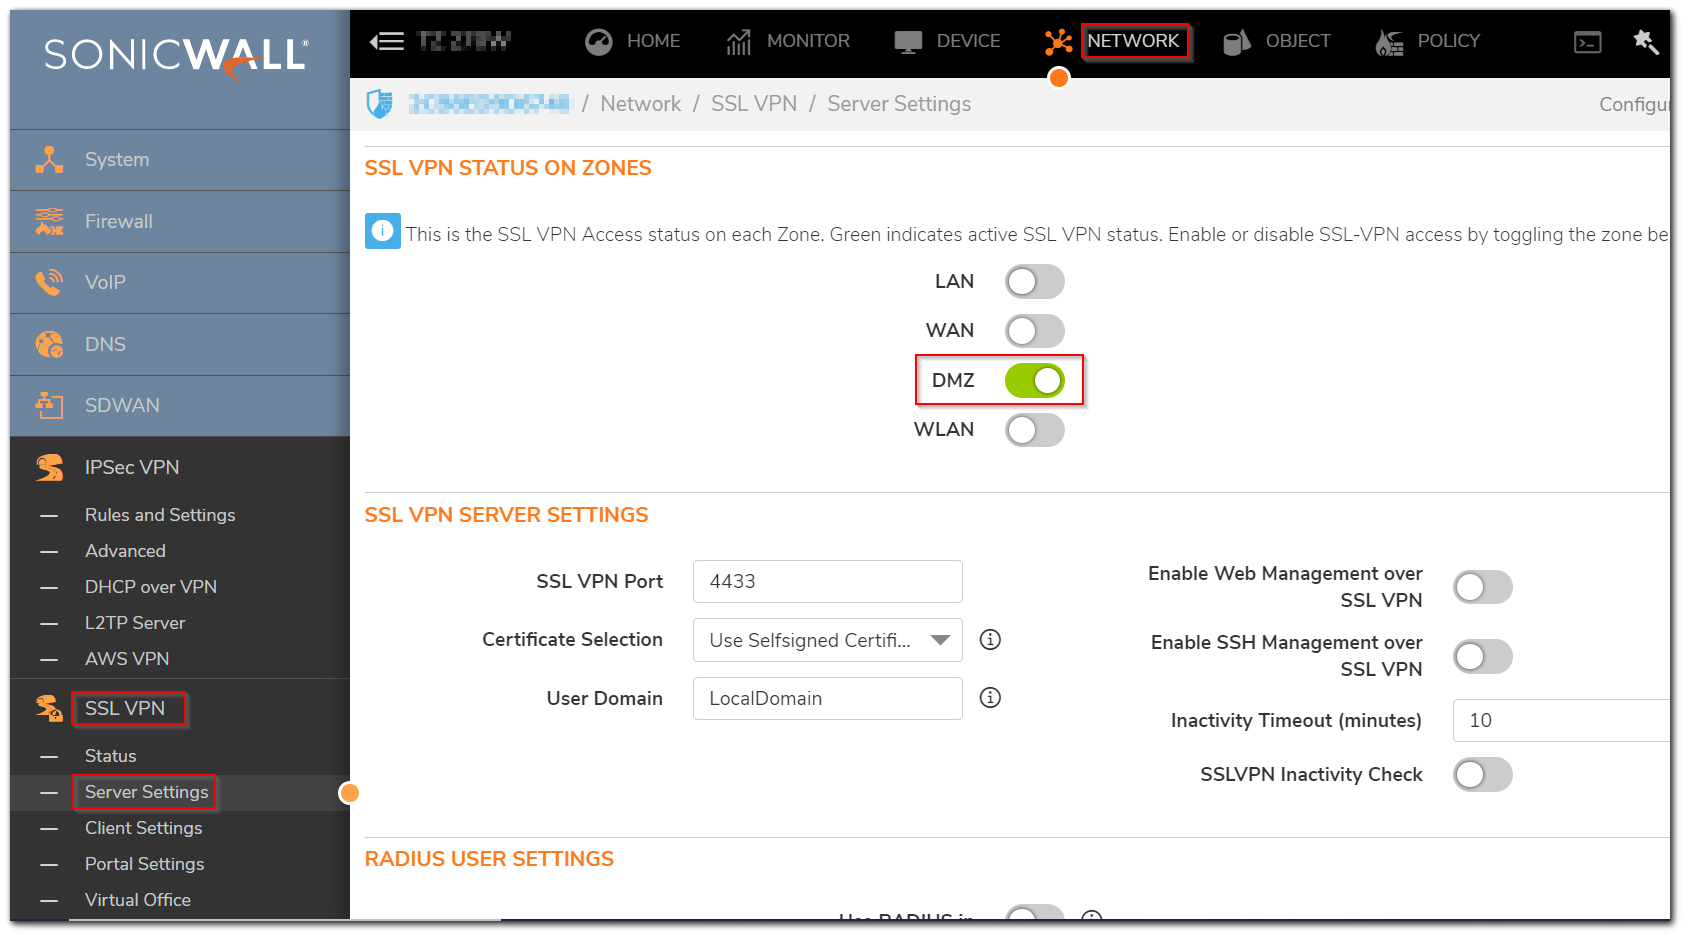
- Navigate to Network | SSL VPN | Server Settings. Enable SSL VPN on the Zone from where you would like to connect. [I have used DMZ in my example].
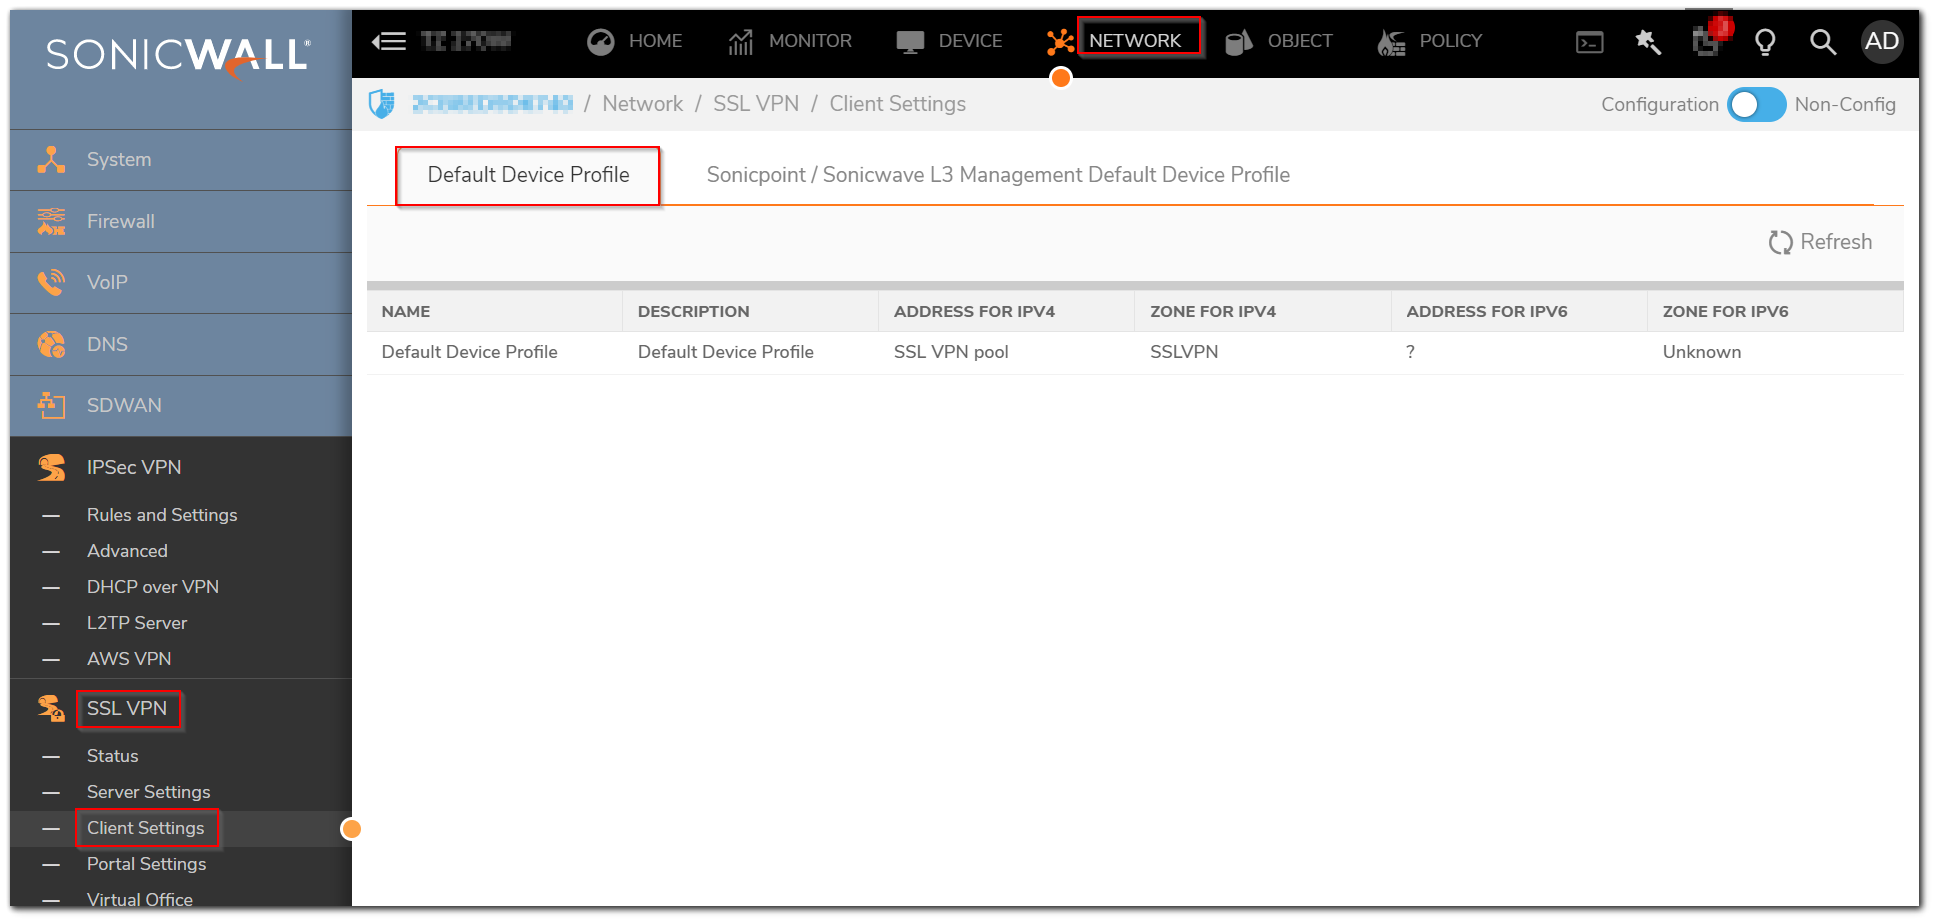
- Navigate to Network | SSL VPN | Client Settings. Configure the Default Device Profile.
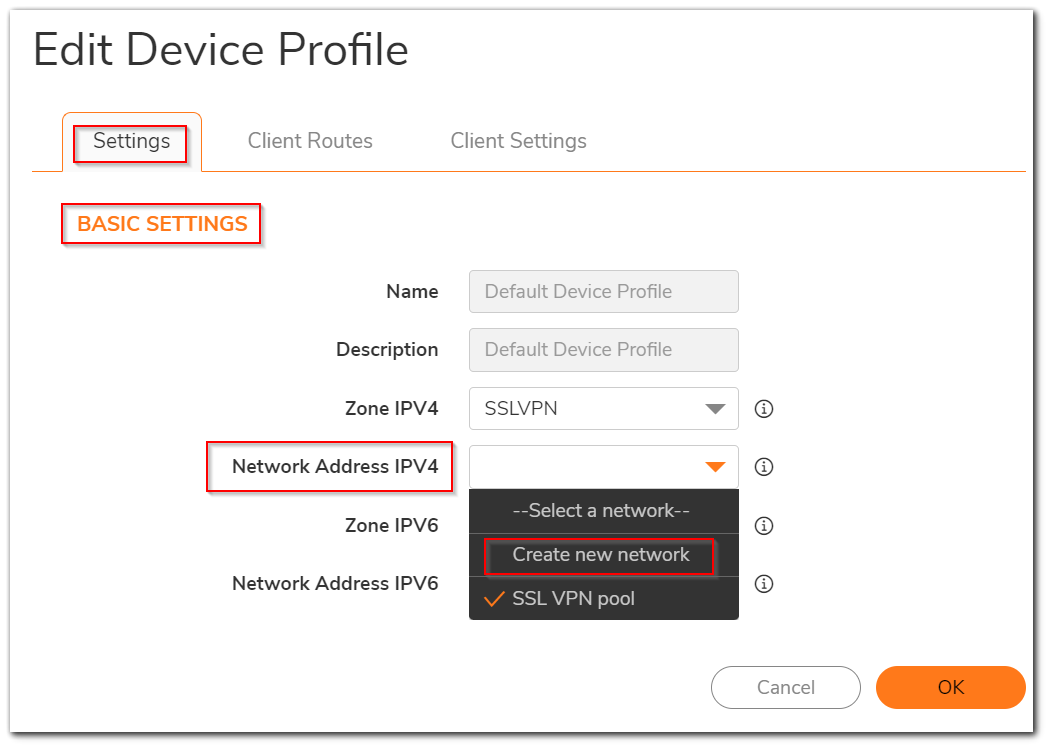
- Edit Device Profile window will appear. Under the Settings tab, for the Network Address IPV4 dropdown, select Create new network.
- Add Address Object window will appear. Add the Name, Type, and IP Address in the respective fields. Leave the Zone as SSLVPN. Click OK. [For my example I am using Name as SSLVPN POOL, Type as Host, and IP Address as 192.168.1.100].
 CAUTION: Make sure that the IP address defined has been excluded from All DHCP servers on the network and is not assigned to any other device.
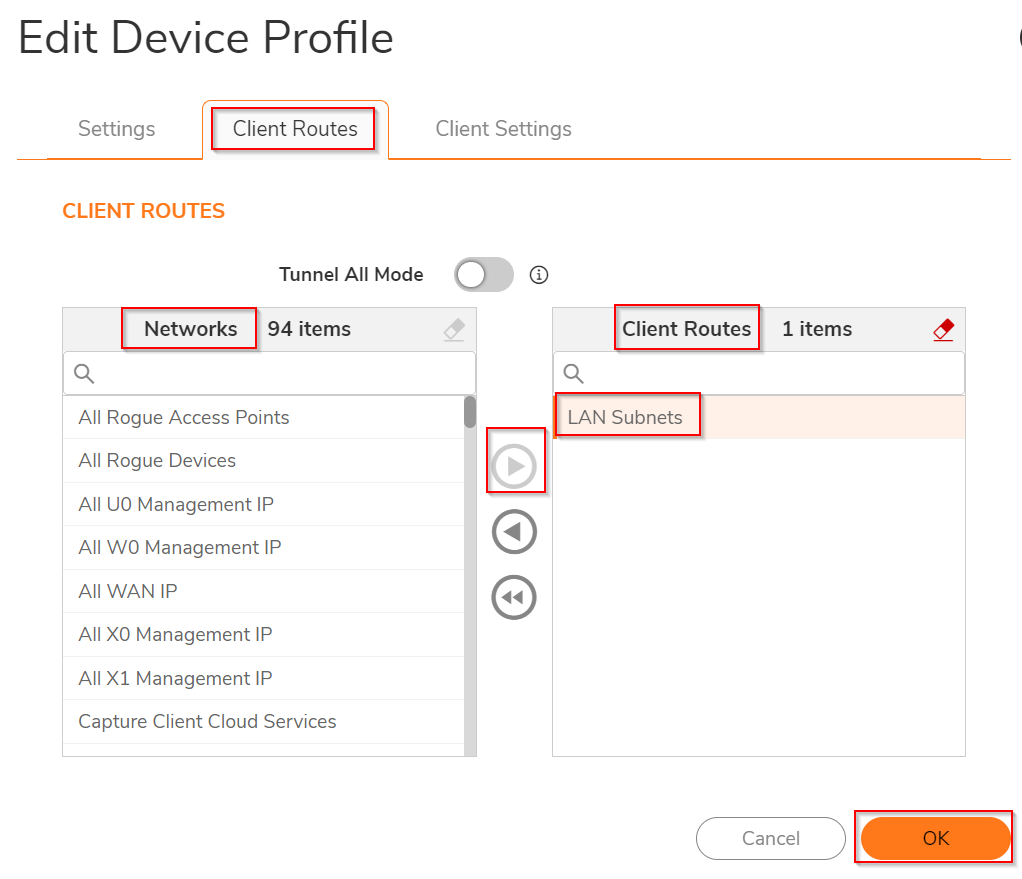
- Edit Device Profile window will appear. Under the Client Routes tab, Select the network you want to access after connecting to SSLVPN from the Networks section on the left-hand side and move it to the Client Routes section on the right-hand side using the arrow icon.
- Additional Settings are available under the Client Settings tab, you can configure those as per your requirement and click OK.
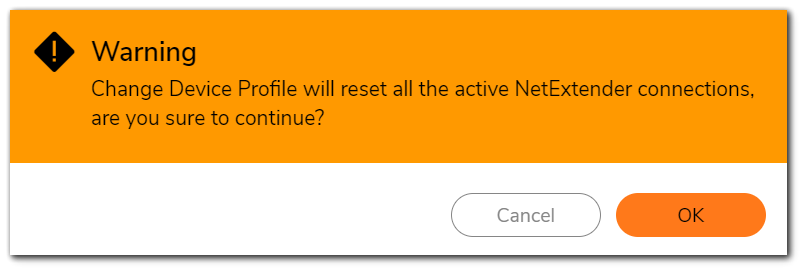
- A warning Popup will appear. Click OK on that as well to save the configurations.
Configure User Accounts
- Navigate to Device | Users | Local Users & Groups | Local Users. Click on Add.
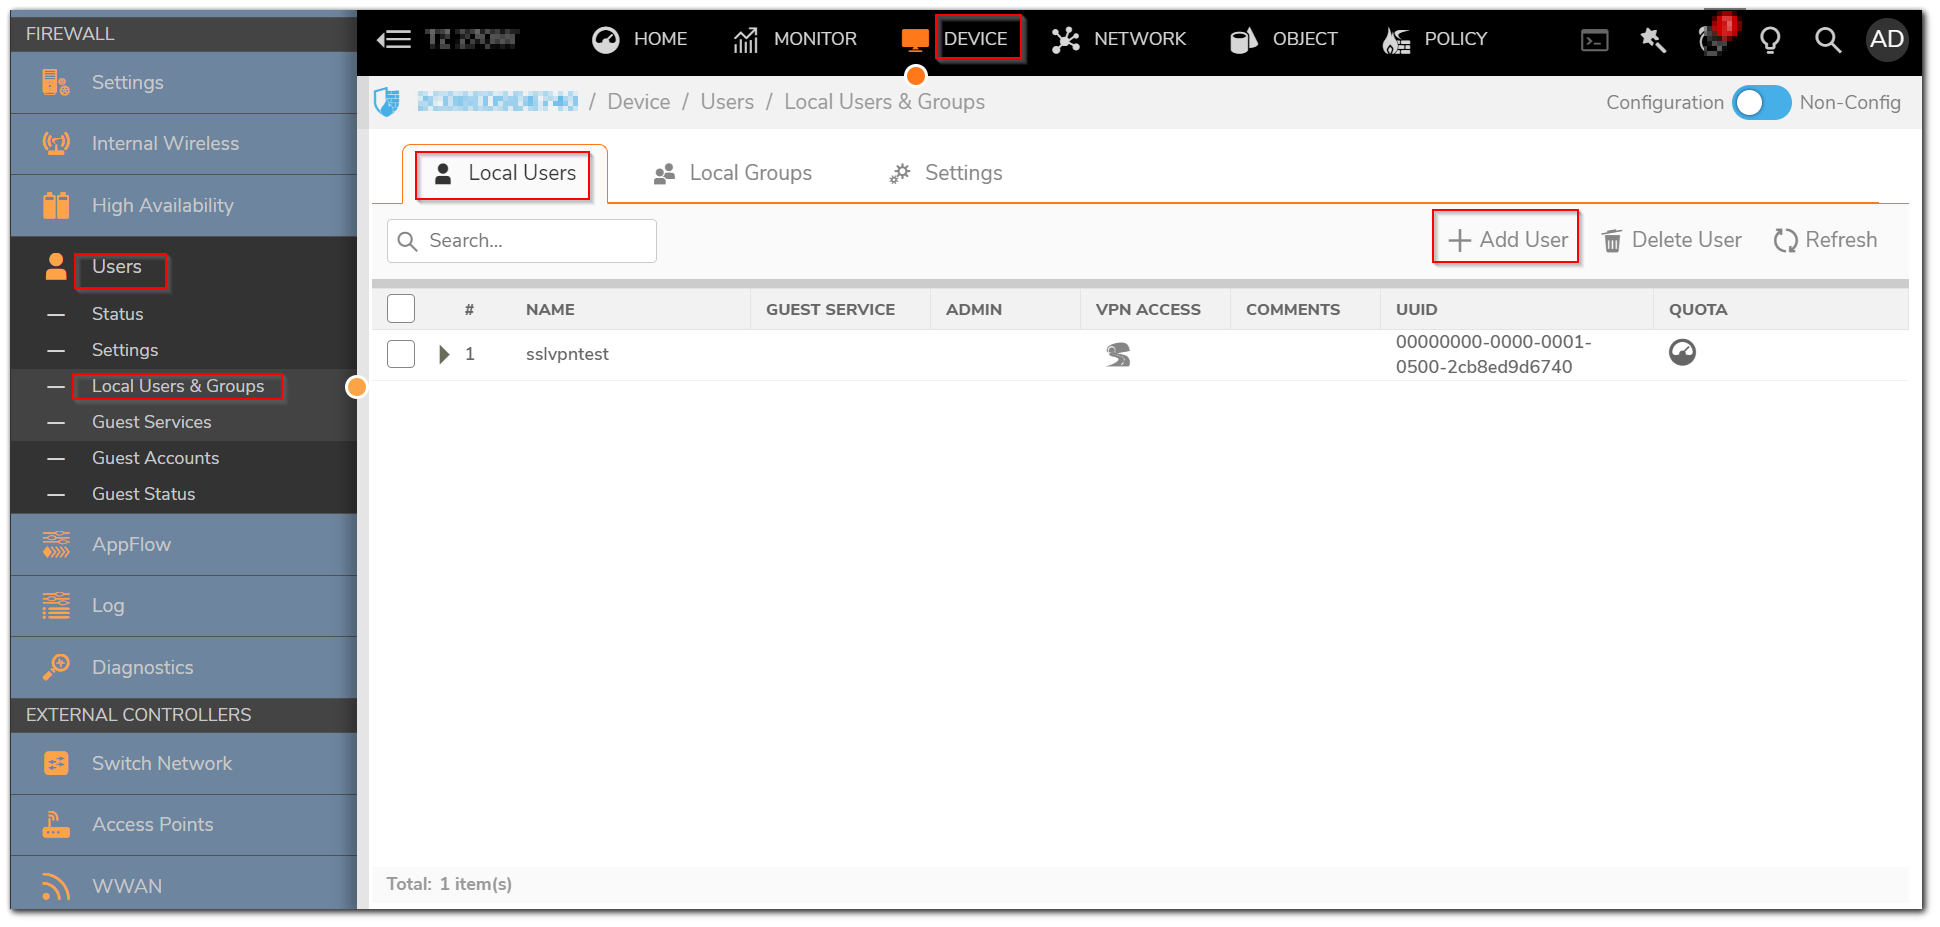
- Add User window will appear. Under the Settings tab, Add the preferred Username and Password.

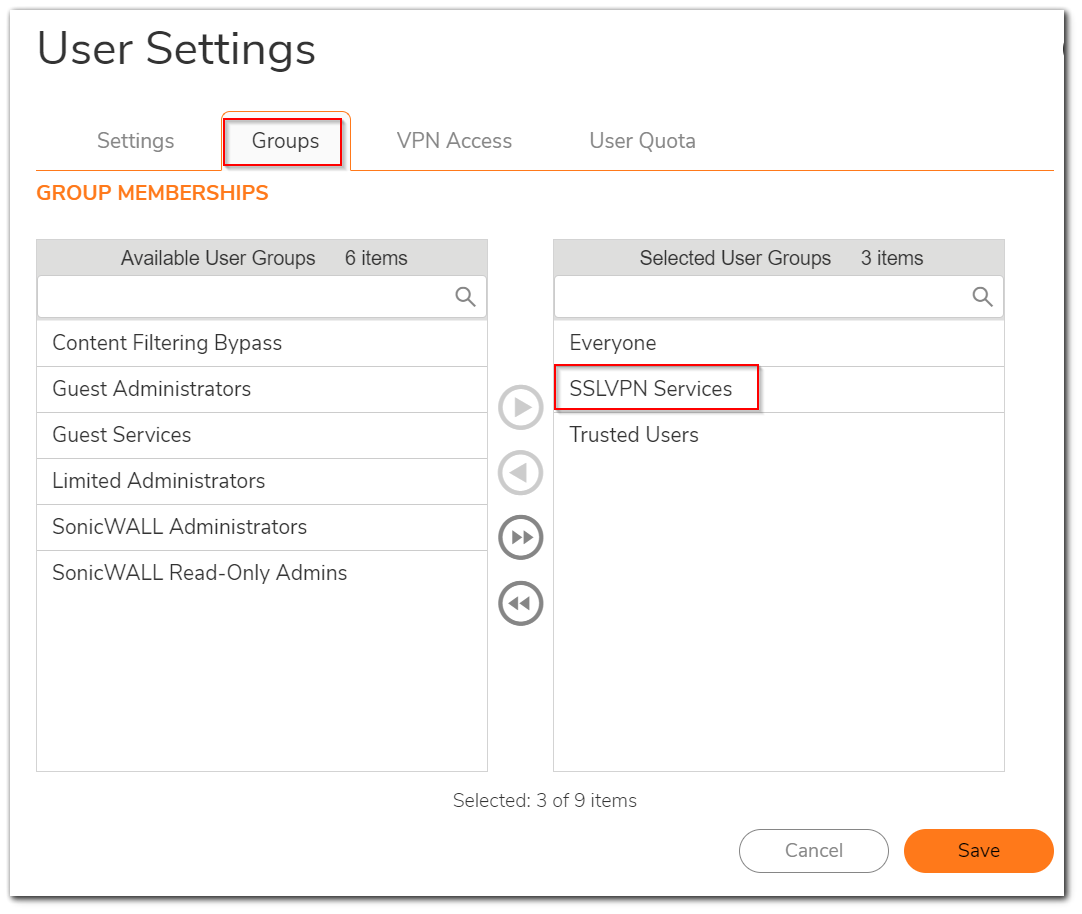
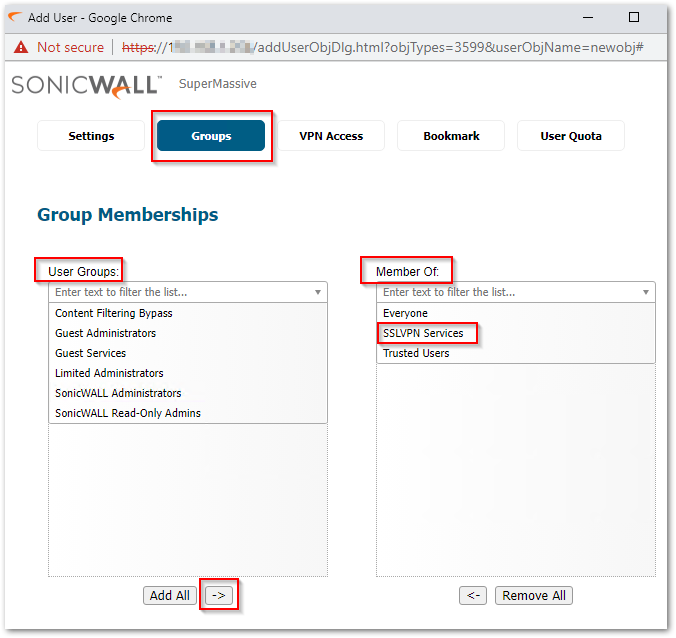
- Under the Groups tab, From the User Groups section on the left-hand side, select the SSLVPN Services an move it to the Member Of section on the right-hand side using the arrow icon.
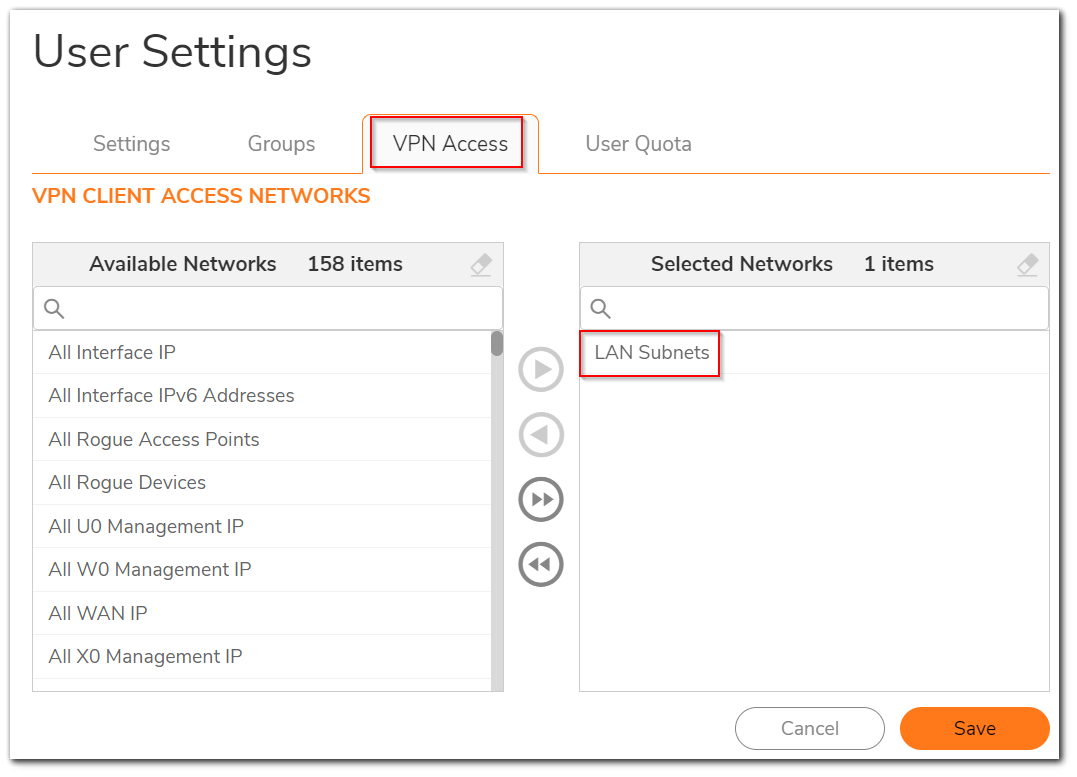
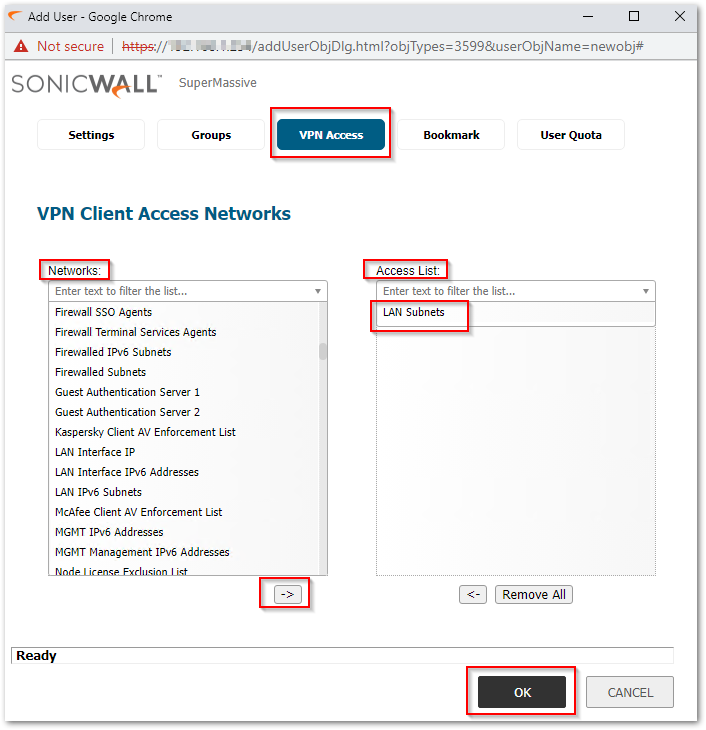
- Under the VPN Access tab, Select the Network you want to access after connecting to SSL VPN from Networks section on the left-hand side and move it to the Access list section on the right-hand side using the arrow icon. Click on OK.
NetExtender Settings
- Under the Server Field, Enter the SonicWall Internal Interface IP Address along with the SSLVPN Port. [In my example I am using 100.100.100.1:4433 My DMZ interface IP]. Enter the other required information and click on Connect.
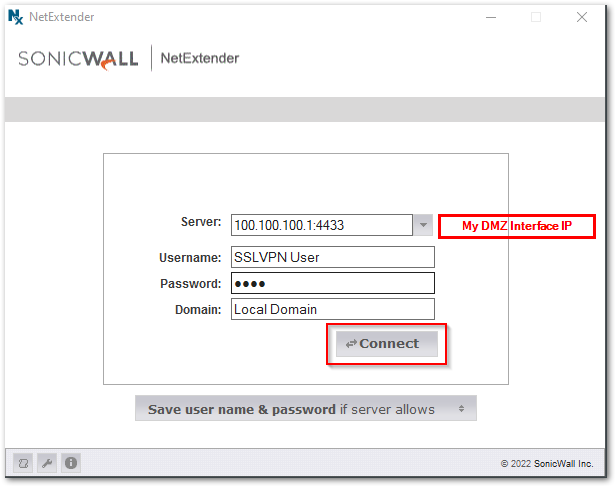
- Similarly to access the Virtual Office page [If configured], the following URL can be used: https://Internal_Zone_IP_Address:Port_Number [ In my example, I use https://100.100.100.1:4433]
- The User will be connected after that and you will be able to access the Internal Network resources from a less secure Internal Zone. [In my example, LAN Subnets can be accessed when I connect to SSLVPN from the DMZ zone].
Resolution for SonicOS 6.5
This release includes significant user interface changes and many new features that are different from the SonicOS 6.2 and earlier firmware. The below resolution is for customers using SonicOS 6.5 firmware.
Enable SSL VPN on Internal Zone
- Navigate to MANAGE | SSL VPN > Server Settings. Enable SSL VPN on the Zone from where you would like to connect. [I have used DMZ in my example].
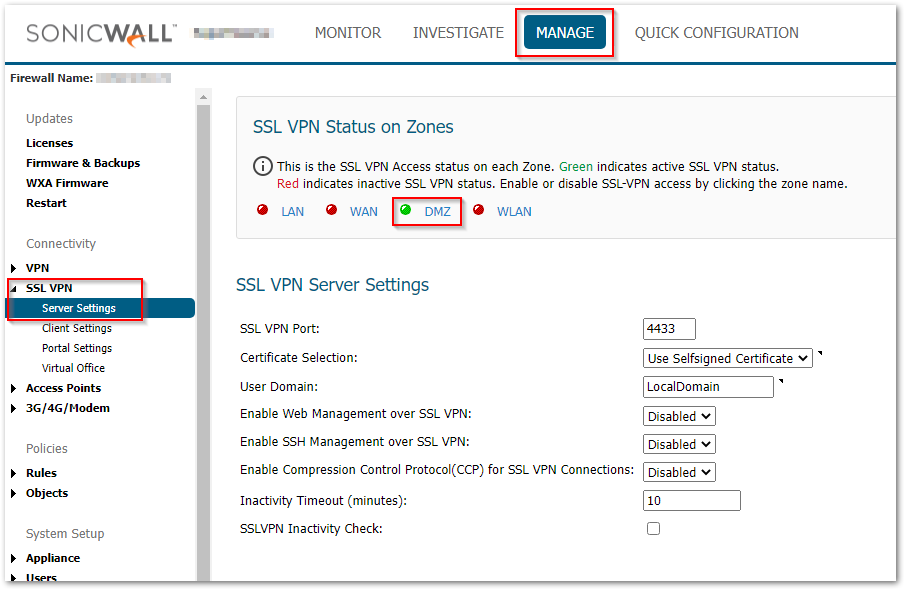
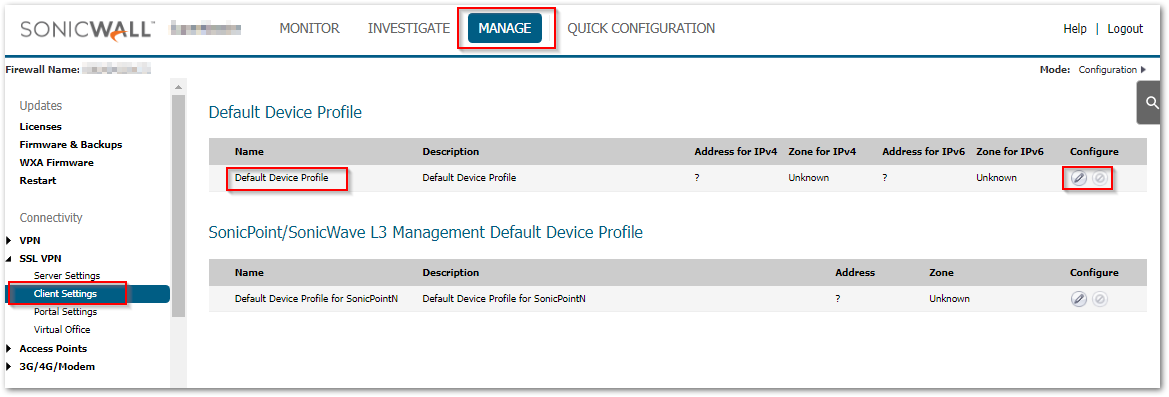
- Navigate to MANAGE | SSL VPN > Client Settings. Configure the Default Device Profile.
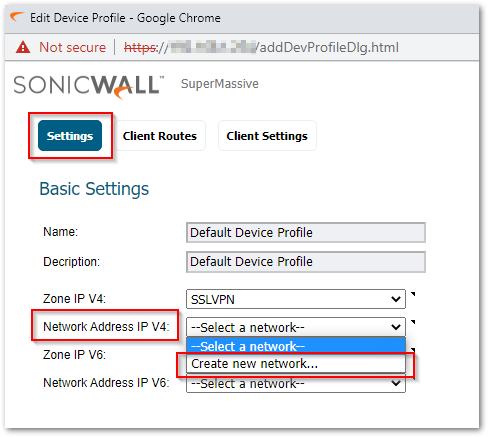
- Edit Device Profile window will appear. Under the Settings tab, for the Network Address IP V4 dropdown, select Create new network.
- Add Address Object window will appear. Add the Name, Type, and IP Address in the respective fields. Leave the Zone as SSLVPN. Click OK. [For my example I am using Name as SSLVPN IP POOL, Type as Host, and IP Address as 192.168.1.100].
 CAUTION: Make sure that the IP address defined has been excluded from All DHCP servers on the network and is not assigned to any other device.
- Edit Device Profile window will appear. Under the Client Routes tab, Select the network you want to access after connecting to SSLVPN from the Networks section on the left-hand side and move it to the Client Routes section on the right-hand side using the arrow icon.
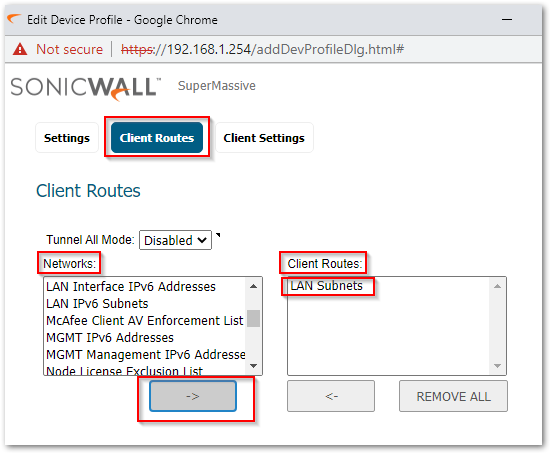
- Additional Settings are available under the Client Settings tab, you can configure those as per your requirement and click OK.
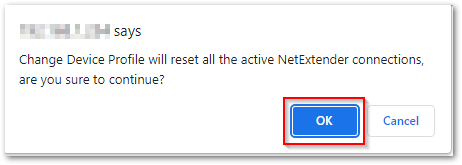
- A warning Popup will appear. Click OK on that as well to save the configurations.
Configure User Accounts
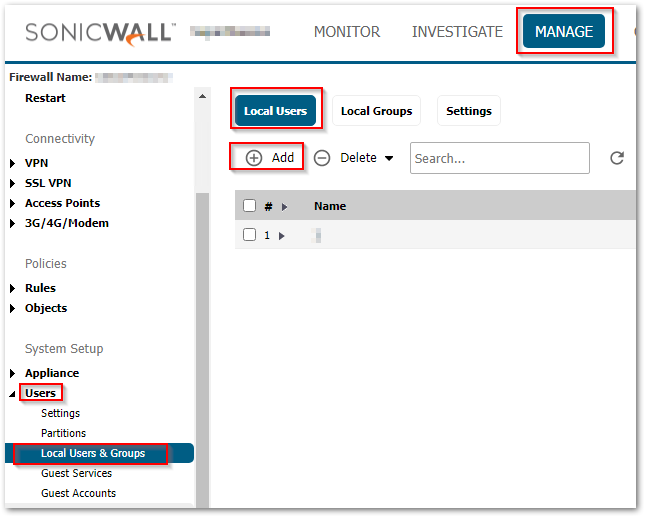
- Navigate to MANAGE | Users > Local Users & Groups. Click on Add.
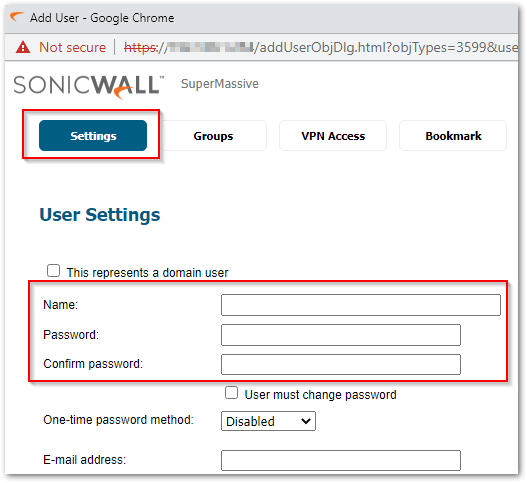
- Add User window will appear. Under the Settings tab, Add the preferred Username and Password.
- Under the Groups tab, From the User Groups section on the left-hand side, select the SSLVPN Services and move it to the Member Of section on the right-hand side using the arrow icon.
- Under the VPN Access tab, Select the Network you want to access after connecting to SSL VPN from the Networks section on the left-hand side and move it to the Access list section on the right-hand side using the arrow icon. Click on OK.
NetExtender Settings
- Under the Server Field, Enter the SonicWall Internal Interface IP Address along with the SSLVPN Port. [In my example I am using 100.100.100.1:4433 My DMZ interface IP]. Enter the other required information and click on Connect.

- Similarly to access the Virtual Office page [If configured], the following URL can be used: https://Internal_Zone_IP_Address:Port_Number [ In my example, I use https://100.100.100.1:4433]
- The User will be connected after that and you will be able to access the Internal Network resources from a less secure Internal Zone. [In my example, LAN Subnets can be accessed when I connect to SSLVPN from the DMZ zone].
Related Articles
- Error:"Invalid API Argument" when modifying the access rules
- Cysurance Partner FAQ
- Configure probe monitoring for WAN Failover and Loadbalancing - SonicWall UTM
Categories
- Firewalls > NSa Series > SSLVPN
- Firewalls > TZ Series > SSLVPN
- Firewalls > NSsp Series > SSLVPN
- Firewalls > NSv Series > SSLVPN
- Firewalls > SonicWall SuperMassive 9000 Series > SSLVPN


 YES
YES NO
NO