-
Products
-
SonicPlatform
SonicPlatform is the cybersecurity platform purpose-built for MSPs, making managing complex security environments among multiple tenants easy and streamlined.
Discover More
-
-
Solutions
-
Federal
Protect Federal Agencies and Networks with scalable, purpose-built cybersecurity solutions
Learn MoreFederalProtect Federal Agencies and Networks with scalable, purpose-built cybersecurity solutions
Learn More - Industries
- Use Cases
-
-
Partners
-
Partner Portal
Access to deal registration, MDF, sales and marketing tools, training and more
Learn MorePartner PortalAccess to deal registration, MDF, sales and marketing tools, training and more
Learn More - SonicWall Partners
- Partner Resources
-
-
Support
-
Support Portal
Find answers to your questions by searching across our knowledge base, community, technical documentation and video tutorials
Learn MoreSupport PortalFind answers to your questions by searching across our knowledge base, community, technical documentation and video tutorials
Learn More - Support
- Resources
- Capture Labs
-
- Company
- Contact Us
How to connect to a source behind SonicWall from a Secondary WAN subnet when the source is nat


Description
If you have multiple ISP routers connected to a SonicWall and have machines with IP addresses in a secondary ISP scheme, when accessing a machine behind SonicWall on its primary WAN IP from this secondary subnet,you may get an "IP Spoof Detected" or "SYN Flood Protection" error message in the log. Consider the scenario shown below:

X1 and X2 are two WAN interfaces. X1 connected to ISP 1 router is Primary WAN interface. X2 is connected via a network switch to ISP 2 router. To this switch there are two PC's connected as well which get public IP from secondary ISP scheme. The configurations are as follows:
X1 IP - 1.1.1.1
X1 Gateway IP - 1.1.1.2
X2 IP - 2.2.2.1
X2 Gateway - 2.2.2.4
PC1 IP - 2.2.2.2
PC1 IP - 2.2.2.3
The gateway of the PC's is the ISP 2 router interface of 2.2.2.4.
Consider a port forwarding done for a LAN machine with the public IP set to X1 IP. When accessing that machine on X1 IP from PC1 or PC2, the traffic would ingress the SonicWall on X1 interface as it would be normal internet traffic. However SonicWall would expect the traffic coming from PC1 or PC2 to ingress on X2 interface as they are part of the X2 addressing scheme. Thus SonicWall would drop the packet as either "IP spoof" or "SYN Flood Protection".
Resolution
Resolution for SonicOS 7.X
This release includes significant user interface changes and many new features that are different from the SonicOS 6.5 and earlier firmware. The below resolution is for customers using SonicOS 7.X firmware.
Step 1: Please Navigate Object|Match Object|Addresses|Click on +Add
Step 2: We need to tell the SonicWall to consider the traffic received from PC1 and PC2 as normal internet traffic received on X1. This is facilitated by means of a static route.
Step 3: Create an address object for the PC IPs as shown below:
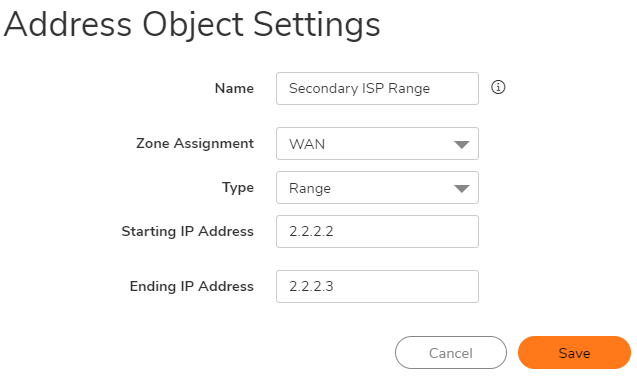
Step 4:Create a static route to tell Sonicwall to reach Secondary ISP range via X1 gateway
Navigate to Policy|Rules and Policy|Routing Rules
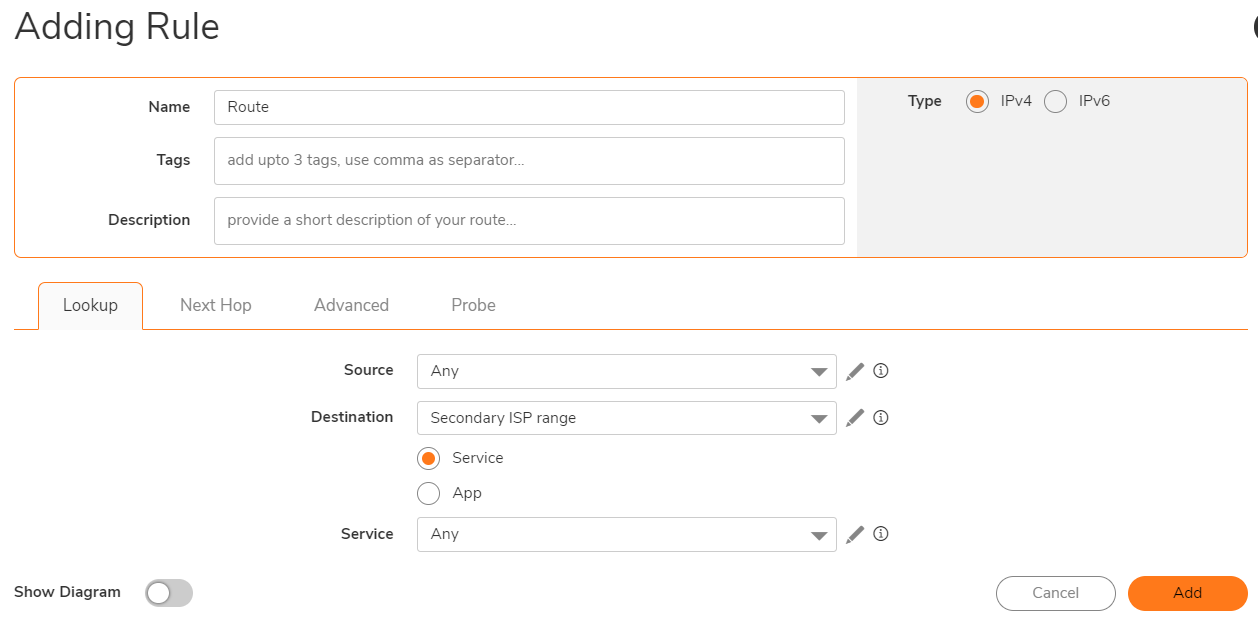
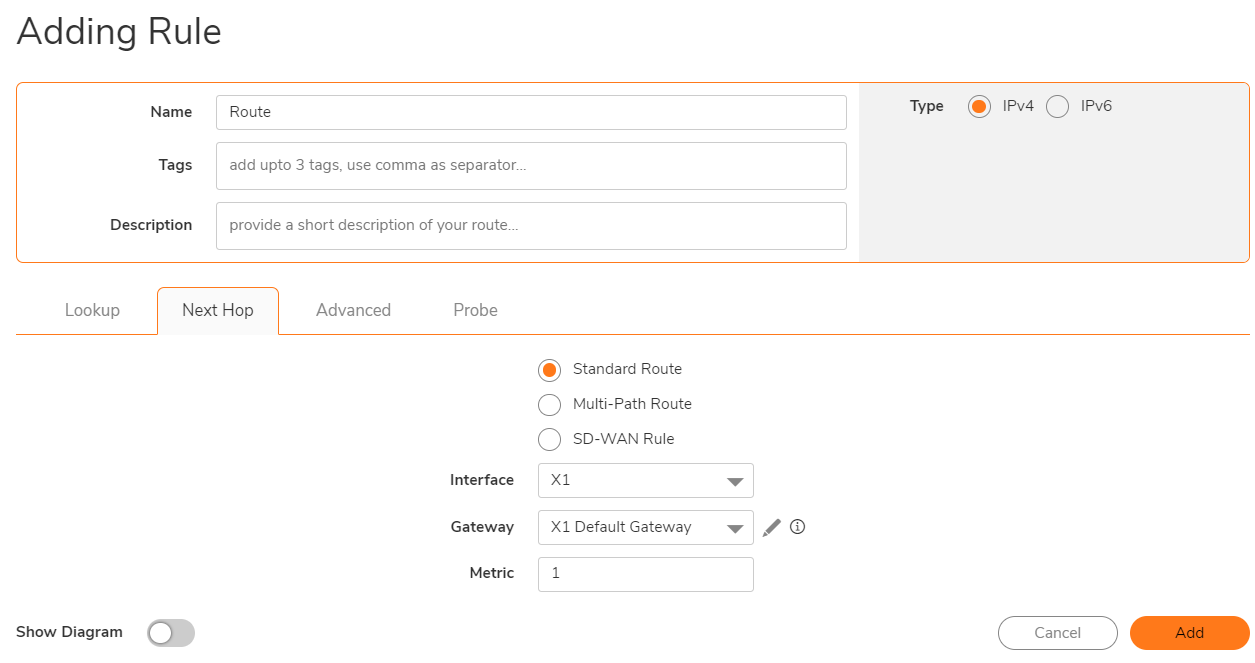
How to Test:
Should be able to access the local machine on X1 IP from either PC1 or PC2 now.
Resolution for SonicOS 6.5
This release includes significant user interface changes and many new features that are different from the SonicOS 6.2 and earlier firmware. The below resolution is for customers using SonicOS 6.5 firmware.
Step 1:Please navigate to Manage|Object|Address object | Click on +Add
Step 2: We need to tell the SonicWall to consider the traffic received from PC1 and PC2 as normal internet traffic received on X1. This is facilitated by means of a static route.
Step 3: Create an address object for the PC IPs as shown below:
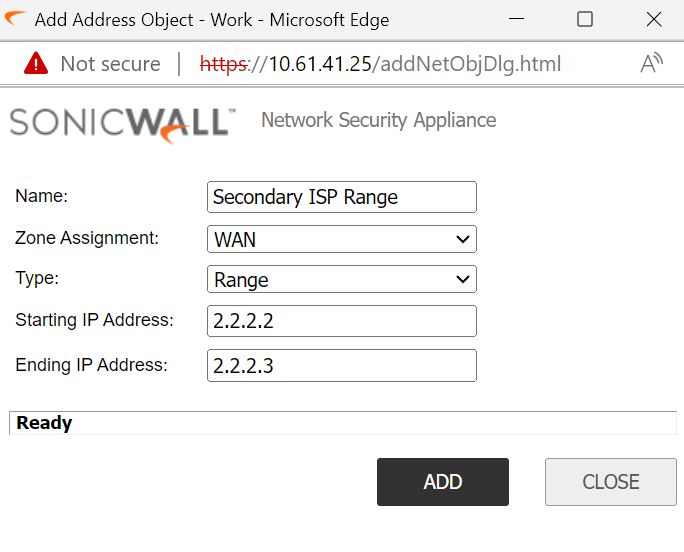
Step 4: Create static route to tell sonicwall to reach secondary ISP range via X1 gateway
Navigate to Manage|Network|Routing|Route Policies
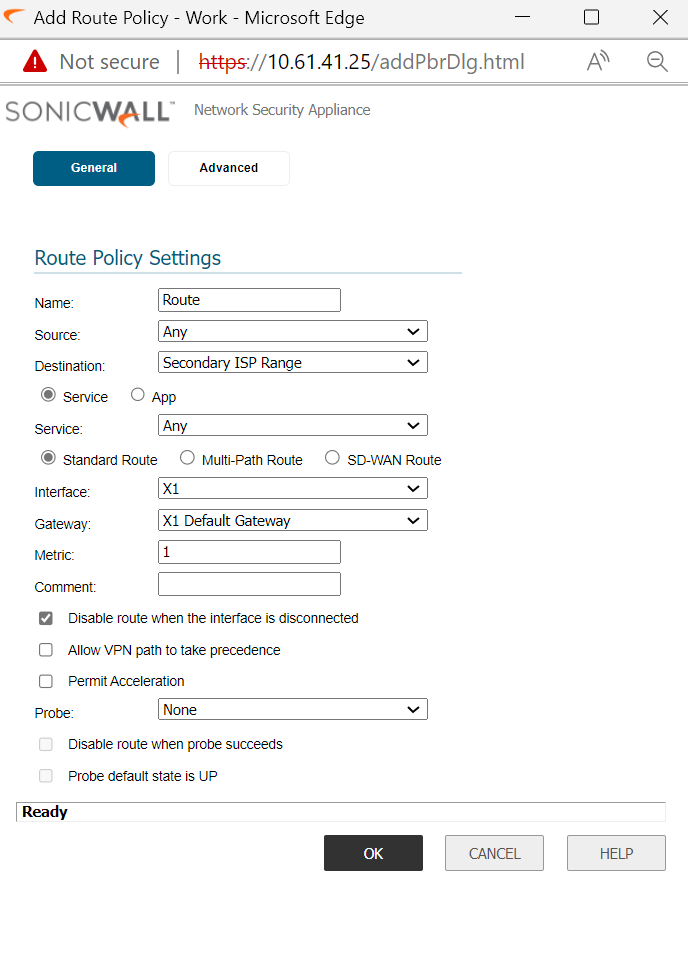
How to Test:
Should be able to access the local machine on X1 IP from either PC1 or PC2 now.
Resolution for SonicOS 6.2 and Below
The below resolution is for customers using SonicOS 6.2 and earlier firmware. For firewalls that are generation 6 and newer we suggest to upgrade to the latest general release of SonicOS 6.5 firmware.
Step 1: We need to tell the SonicWall to consider the traffic received from PC1 and PC2 as normal internet traffic received on X1. This is facilitated by means of a static route.
Step 2: Create an address object for the PC IPs as shown below:
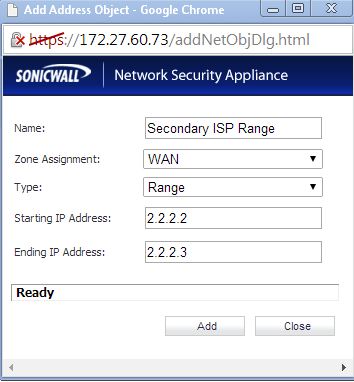
Step 3: Create a Static route to tell SonicWall to reach secondary ISP range via X1 gateway: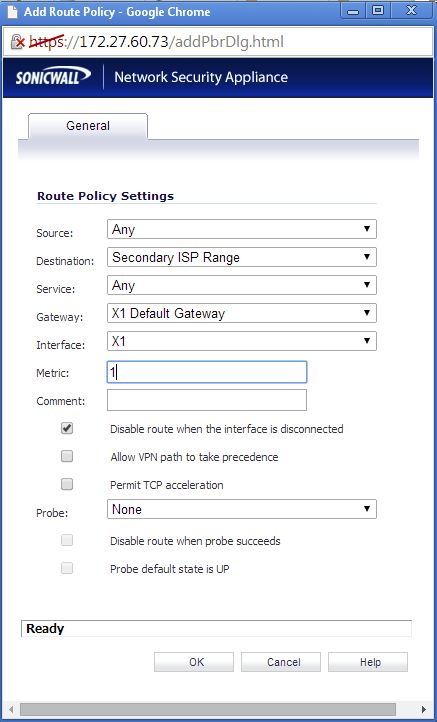
How to Test:
Should be able to access the local machine on X1 IP from either PC1 or PC2 now.
Related Articles
- Error:"Invalid API Argument" when modifying the access rules
- Cysurance Partner FAQ
- Configure probe monitoring for WAN Failover and Loadbalancing - SonicWall UTM
Categories
- Firewalls > TZ Series
- Firewalls > SonicWall SuperMassive E10000 Series
- Firewalls > SonicWall SuperMassive 9000 Series
- Firewalls > SonicWall NSA Series


 YES
YES NO
NO