-
Products
-
SonicPlatform
SonicPlatform is the cybersecurity platform purpose-built for MSPs, making managing complex security environments among multiple tenants easy and streamlined.
Discover More
-
-
Solutions
-
Federal
Protect Federal Agencies and Networks with scalable, purpose-built cybersecurity solutions
Learn MoreFederalProtect Federal Agencies and Networks with scalable, purpose-built cybersecurity solutions
Learn More - Industries
- Use Cases
-
-
Partners
-
Partner Portal
Access to deal registration, MDF, sales and marketing tools, training and more
Learn MorePartner PortalAccess to deal registration, MDF, sales and marketing tools, training and more
Learn More - SonicWall Partners
- Partner Resources
-
-
Support
-
Support Portal
Find answers to your questions by searching across our knowledge base, community, technical documentation and video tutorials
Learn MoreSupport PortalFind answers to your questions by searching across our knowledge base, community, technical documentation and video tutorials
Learn More - Support
- Resources
- Capture Labs
-
- Company
- Contact Us
How to configure wireless interfaces in static IP mode


Description
A wireless interface is assigned to a WLAN zone and is used to support SonicWall Sonicpoint secure access. This article depicts how to configure the wireless interface in a static IP mode.
Resolution
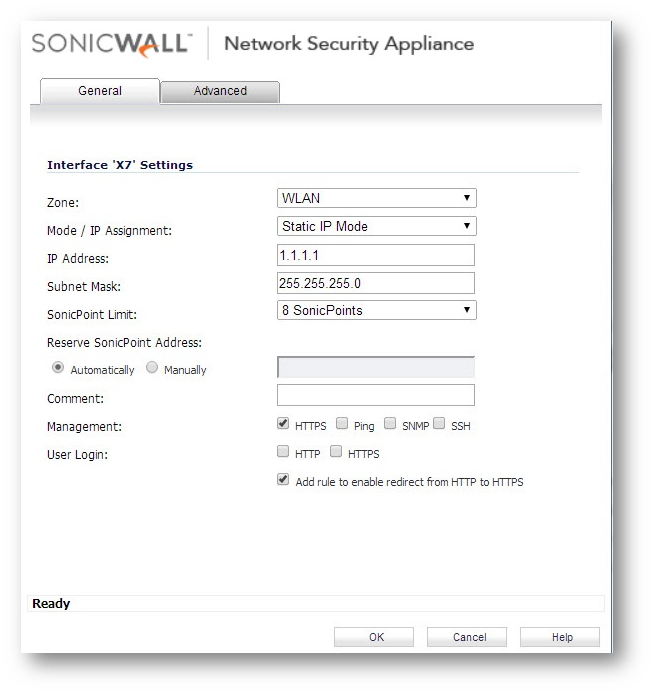
Navigate to Network | Interfaces page and click on the Configure icon in the Configure column for the interface. The Edit Interface dialog box is displayed as following.

Example:
-
NSA3600 - v6.2.0.0
-
Interface - X7
-
IP address - 1.1.1.1
-
Subnet Mask - 255.255.255.0
-
SonicPoint - Limit 8 SonicPoints
-
A SonicPoint has been connected to interface X7.
-
Configuring General Settings for a Wireless Interface.

Step 1 In the Zone list, select WLAN or a custom Wireless zone.
Step 2 In the Mode/IP Assignment list, select Static IP Mode.
You can also select Layer 2 Bridged Mode (IP Route Option) or PortShield Switch Mode, of which the settings can be found in other KB articles.
Step 3 Enter the IP address and subnet mask of the zone in the IP address and Subnet Mask fields.
Step 4 In the SonicPoint Limit field, select the maximum number of SonicPoints allowed on the interface.
Note: If you want to use a smaller(higher subnet notation) subnet to limit the number of potential DHCP leases available on the interface, the maximum subnet mask is determined by the number of SonicPoints you select in this field.
| SonicPoints per Interface |
Maximum Subnet Mask |
Total Usable IP addresses |
Available Client IPs |
| No SonicPoints |
30 bits-255.255.255.252 |
2 |
2 |
| 2 SonicPoints |
29 bits-255.255.255.248 |
6 |
3 |
| 4 SonicPoints |
29 bits-255.255.255.248 |
6 |
1 |
| 8 SonicPoints |
28 bits-255.255.255.240 |
14 |
5 |
| 16 SonicPoints |
27 bits-255.255.255.224 |
30 |
13 |
| 32 SonicPoints |
26 bits-255.255.255.192 |
62 |
29 |
| 48 SonicPoints |
25 bits-255.255.255.128 |
126 |
77 |
| 64 SonicPoints |
25 bits-255.255.255.128 |
126 |
61 |
| 96 SonicPoints |
24 bits-255.255.255.0 |
254 |
157 |
| 128 SonicPoints |
23 bits-255.255.255.0 |
510 |
381 |
The firewall interface and the SonicPoints allowed on the interface, each will consume an IP address from the DHCP pool.
Step 5 Enter any optional comment text in the Comment field
Step 6 If you want to enable remote management of the firewall from this interface, select the supported management protocol(s): HTTPS, Ping, SNMP, and/or SSH from the Management field.
Step 7 If you want to allow selected users with limited management rights to log in to the security appliance, select HTTP and/or HTTPS in User Login field.
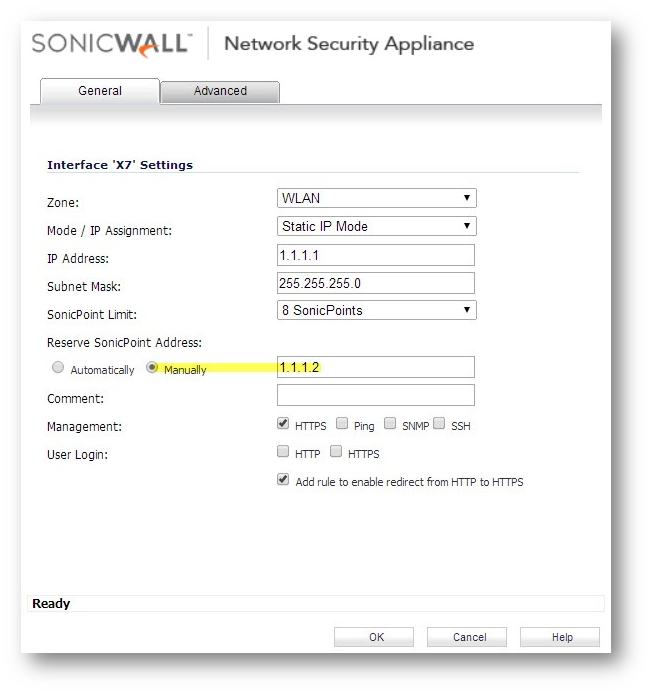
Step 8 Choose Automatically or Manually assign an IP address for the connected SonicPoint(s) in Reserve SonicPoint Address field.
-
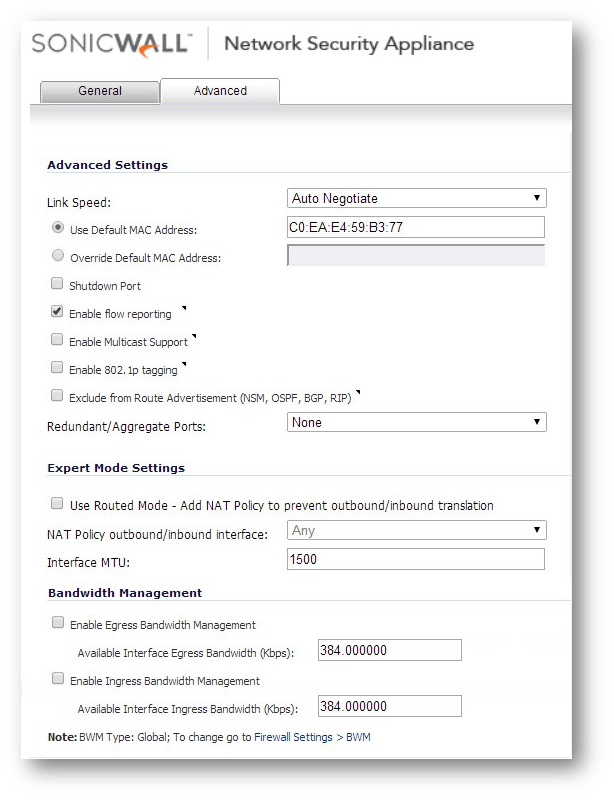
Configuring Advanced Settings for a Wireless Interface.
In the Edit Interface dialog box, click the Advanced tab. The Advance page will be displayed as following. The configuration in this example can keep as default.

Step 9 Click OK button.
How to Check:
Reserve SonicPoint Address: Automatically.
-
Navigate to Network | DHCP Server. The DHCP range for wireless interface X7 has been dynamically added. For 1.1.1.0/24 network, IP address 1.1.1.1 has been configured as IP for firewall interface X7 and IP addresses1.1.1.247 to 1.1.1.254 have been automatically reserved for 8 SonicPoints.

-
Navigate to SonicPoint | SonicPoints. The SonicPoint connected to interface X7 has got the reserved IP address 1.1.1.247.

Reserve SonicPoint Address: Automatically.
-
Navigate to Network | DHCP Server. The DHCP range for wireless interface X7 has been dynamically added. For 1.1.1.0/24 network, IP address 1.1.1.1 has been configured as IP for firewall interface X7 and IP addresses1.1.1.2 to 1.1.1.9 have been automatically reserved for 8 SonicPoints.

-
Navigate to SonicPoin | SonicPoints. The SonicPoint connected to interface X7 has got the reserved IP address 1.1.1.2.

Related Articles
- Error:"Invalid API Argument" when modifying the access rules
- Cysurance Partner FAQ
- Configure probe monitoring for WAN Failover and Loadbalancing - SonicWall UTM
Categories
- Firewalls > TZ Series
- Firewalls > SonicWall SuperMassive E10000 Series
- Firewalls > SonicWall SuperMassive 9000 Series
- Firewalls > SonicWall NSA Series


 YES
YES NO
NO